

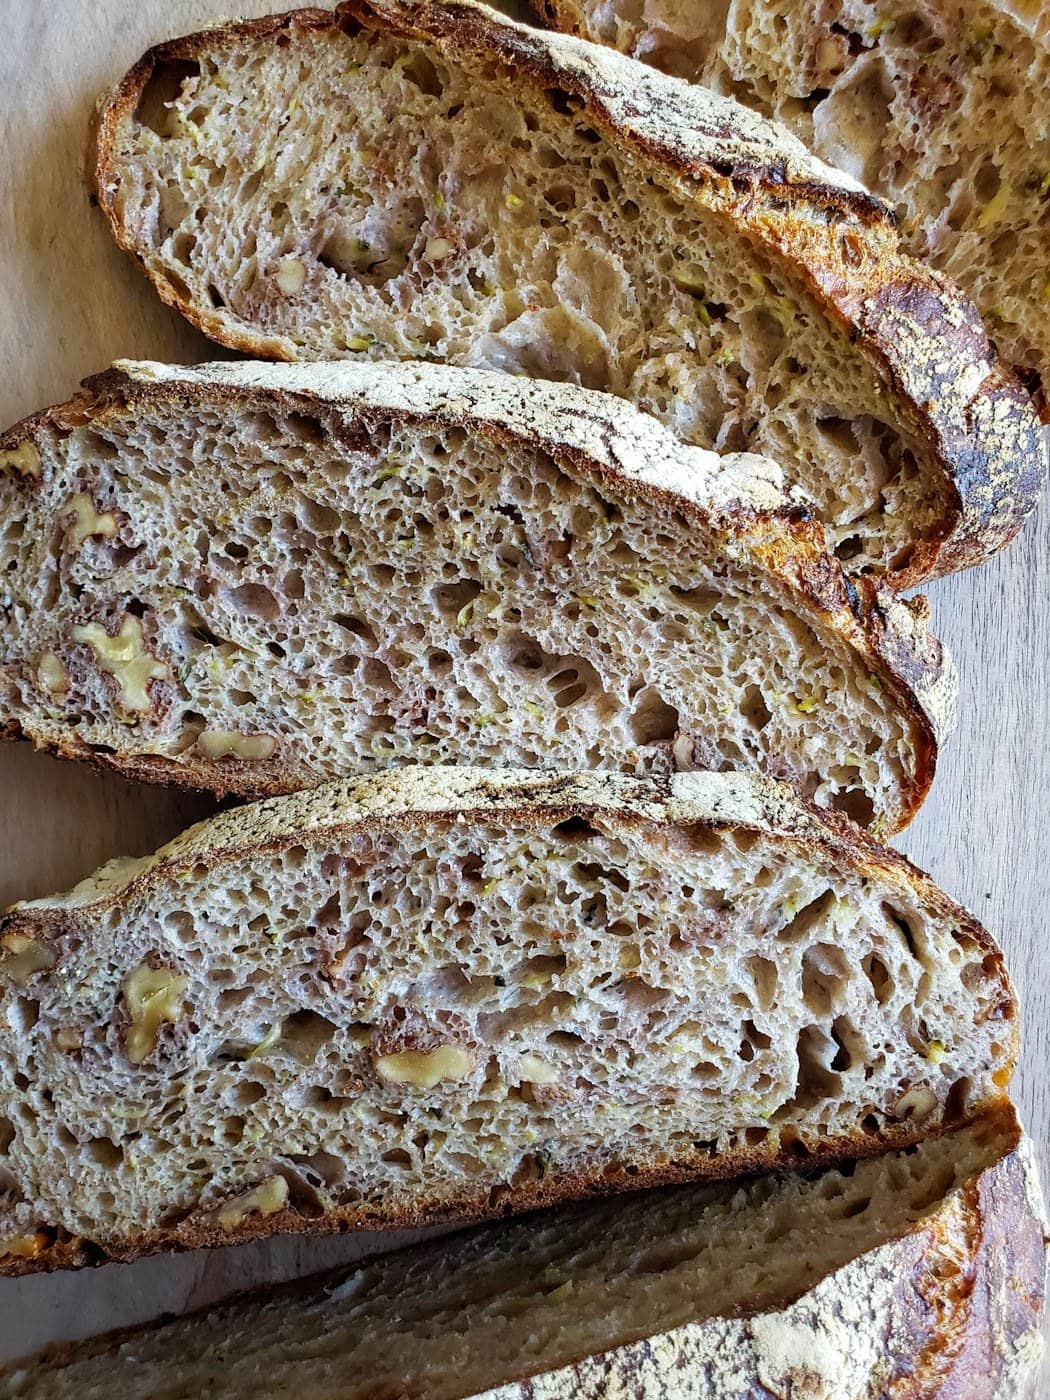
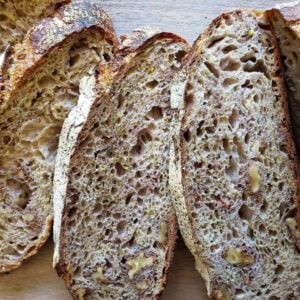
Rustic Zucchini Sourdough Bread Recipe with Walnuts
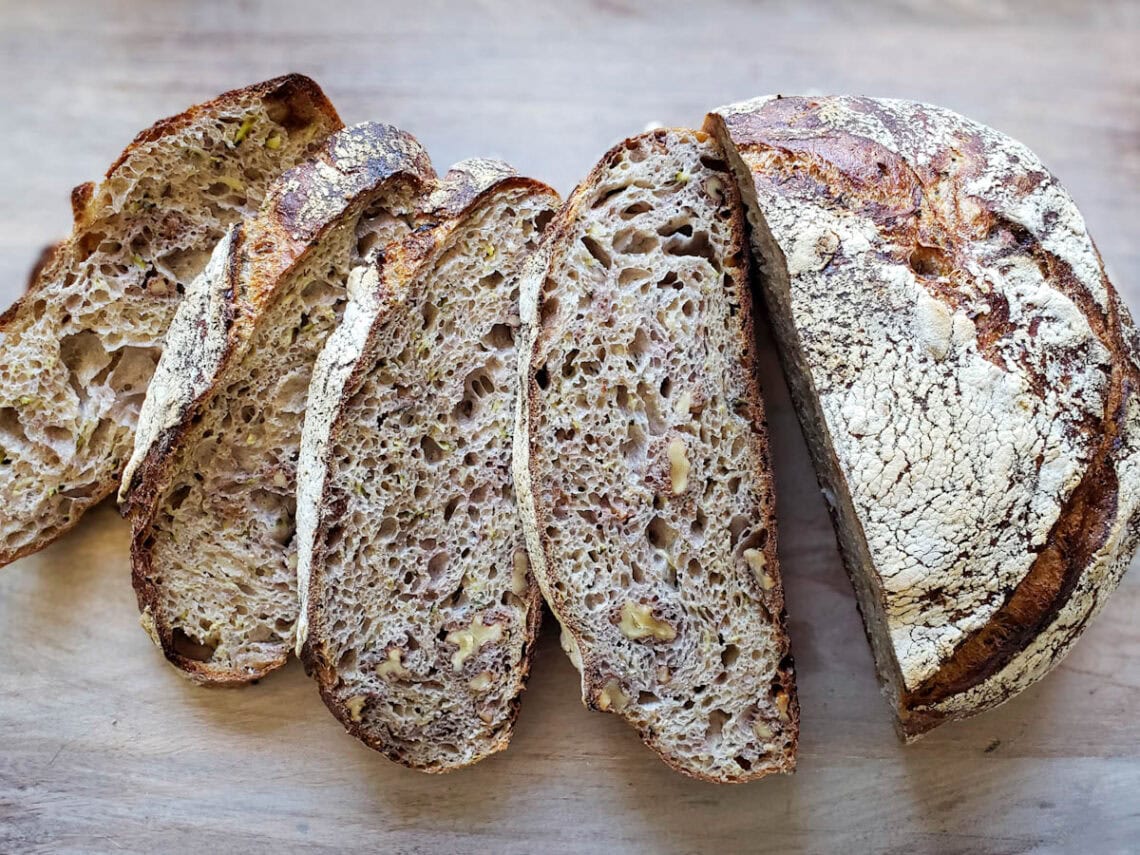
Need more veggies in your life? Try our rustic sourdough zucchini bread! This recipe will show you how to incorporate fresh zucchini into a classic, savory sourdough bread loaf (like a boule or batard) – including optional walnuts for extra protein and crunch. This is one of my go-to ways to use extra zucchini from my summer garden. The result is chewy, nutritious and delicious bread!
If you’re looking for a more traditional sweet bread (you know, the kind that’s baked in a loaf pan), don’t miss our other sourdough zucchini bread recipe!
RELATED: If you’re new to baking sourdough, come learn the basics with our easy no-knead sourdough bread recipe here.
Ingredients
I personally like to use a mix of white, whole wheat, and rye flour to make my sourdough zucchini bread extra nutritious. However, you can easily make this recipe using 100% white flour – simply use 460 grams total.
- 300 grams of white bread flour or all-purpose flour
- 140 grams of whole wheat flour
- 20 grams of rye flour
- 110 grams of active sourdough starter. If you need a starter, you can buy one here or learn how make a starter from scratch.
- 1 ¼ cup of warm filtered water
- 1 to 1 ½ cups grated zucchini* (see sliding scale notes below)
- 9 grams of salt
- ½ cup of walnuts. I like to use raw, unsalted halves and pieces. Unsalted sunflower seeds or pumpkin seeds are a great substitute for those with nut allergies!
- Optional but delicious: 1/2 tsp of garlic powder and/or 2 tsp onion of powder
*If you desire a more tall, open-crumb sourdough loaf, use closer to 1 cup of grated zucchini. I usually use around 1.5 cups (it’s zucchini bread after all) but the additional moisture and weight from the zucchini can make the loaf slightly more flattened than our average loaves. I don’t mind!
Would you like to save this?
RELATED: Looking for more zucchini recipes? Try our sweet and tangy zucchini relish recipe, parmesan zucchini fritters, easy zucchini noodles (zoodles) with pesto, or tips on how to freeze zucchini too.
Baking Schedule/Timing
I generally make sourdough over the course of two days: I feed my sourdough starter in the morning, mix the dough once the starter reaches peak activity in the afternoon, allow it to rest for several hours (and do stretch and folds during that time), and form the loaf in the evening. Then I let the dough cold proof in the fridge overnight, and finally bake it the following morning.
Instructions
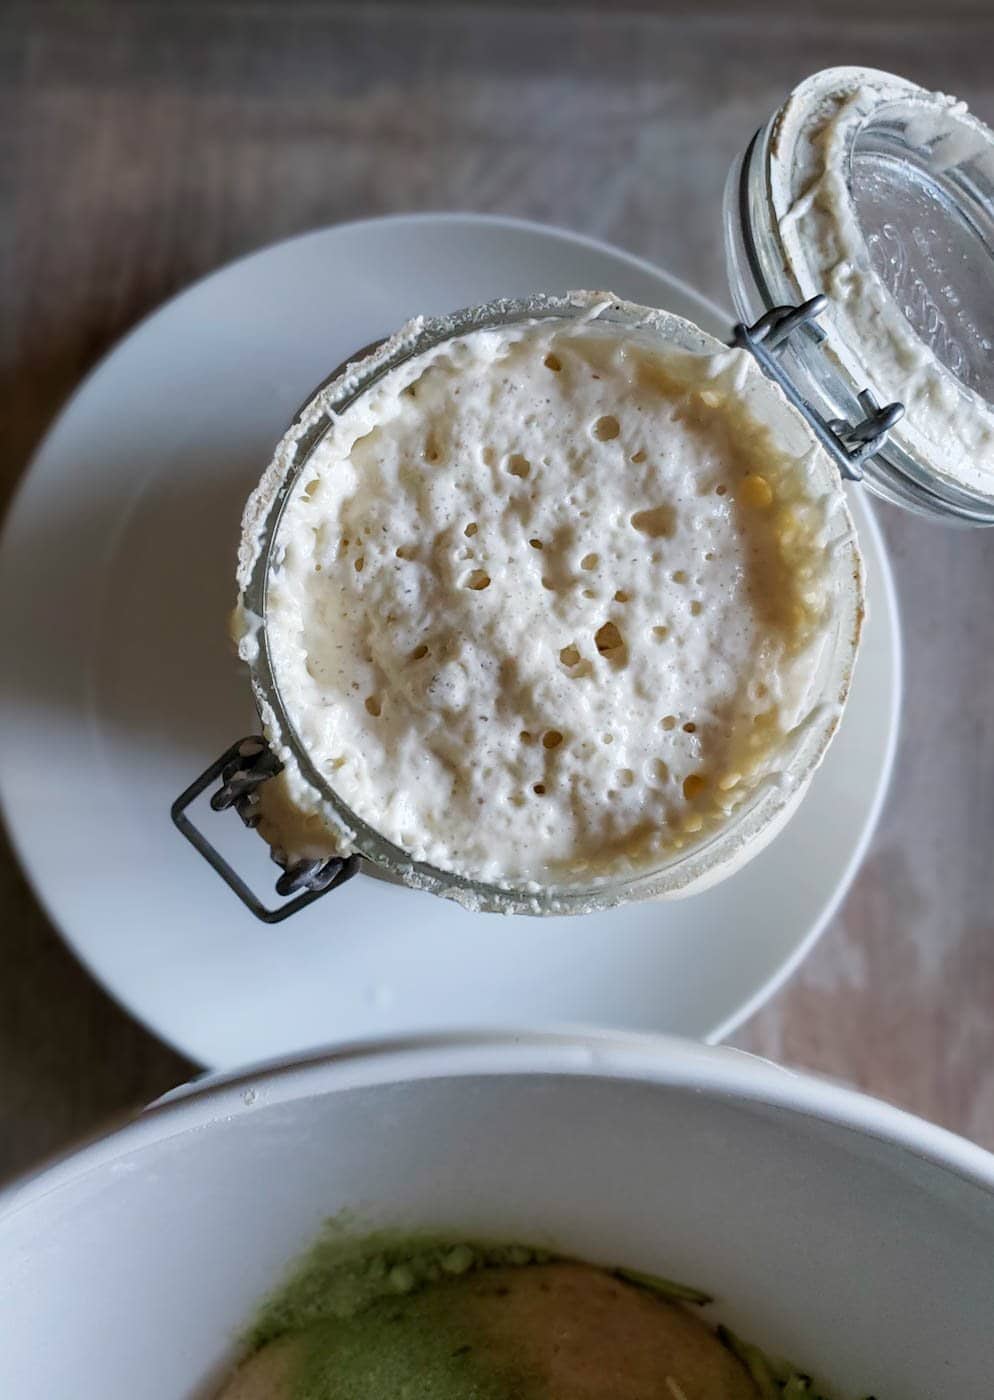
1) Feed Sourdough Starter
Wake up your sourdough starter and get it ready for baking! Feed your starter as you typically would, at least several hours before you plan to make dough. Allow it to reach peak activity before using it in the recipe. If you starter has been stored in the refrigerator, I recommend taking it out the night before to warm up, and feeding it at least twice to fully perk it up.
Learn more about feeding sourdough starter here.
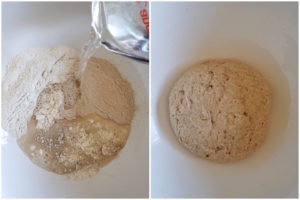
2) Mix Flour and Water (Autolyse)
About an hour before your sourdough starter will reach peak activity, weigh and combine the called-for flour and water only in a large mixing bowl. Avoid adding cold water to the flour. Mix well – I use my hands!
Let the flour and water mixture sit for 1 hour, covered with plastic wrap or a damp tea towel. If possible, keep it in a location with an ambient temperature between 70-75 degrees Fahrenheit for the best fermentation.
This sourdough zucchini bread recipe uses less water than regular sourdough bread, so it may seem more dry than usual. That’s intentional! We need to reduce the water to compensate for the additional moisture the zucchini will add later.
PRO TIP: When my house is cold (which is often!) I like to use a handy sourdough warming plate to keep both my sourdough starter AND the bowl of proofing dough at the ideal temperature.

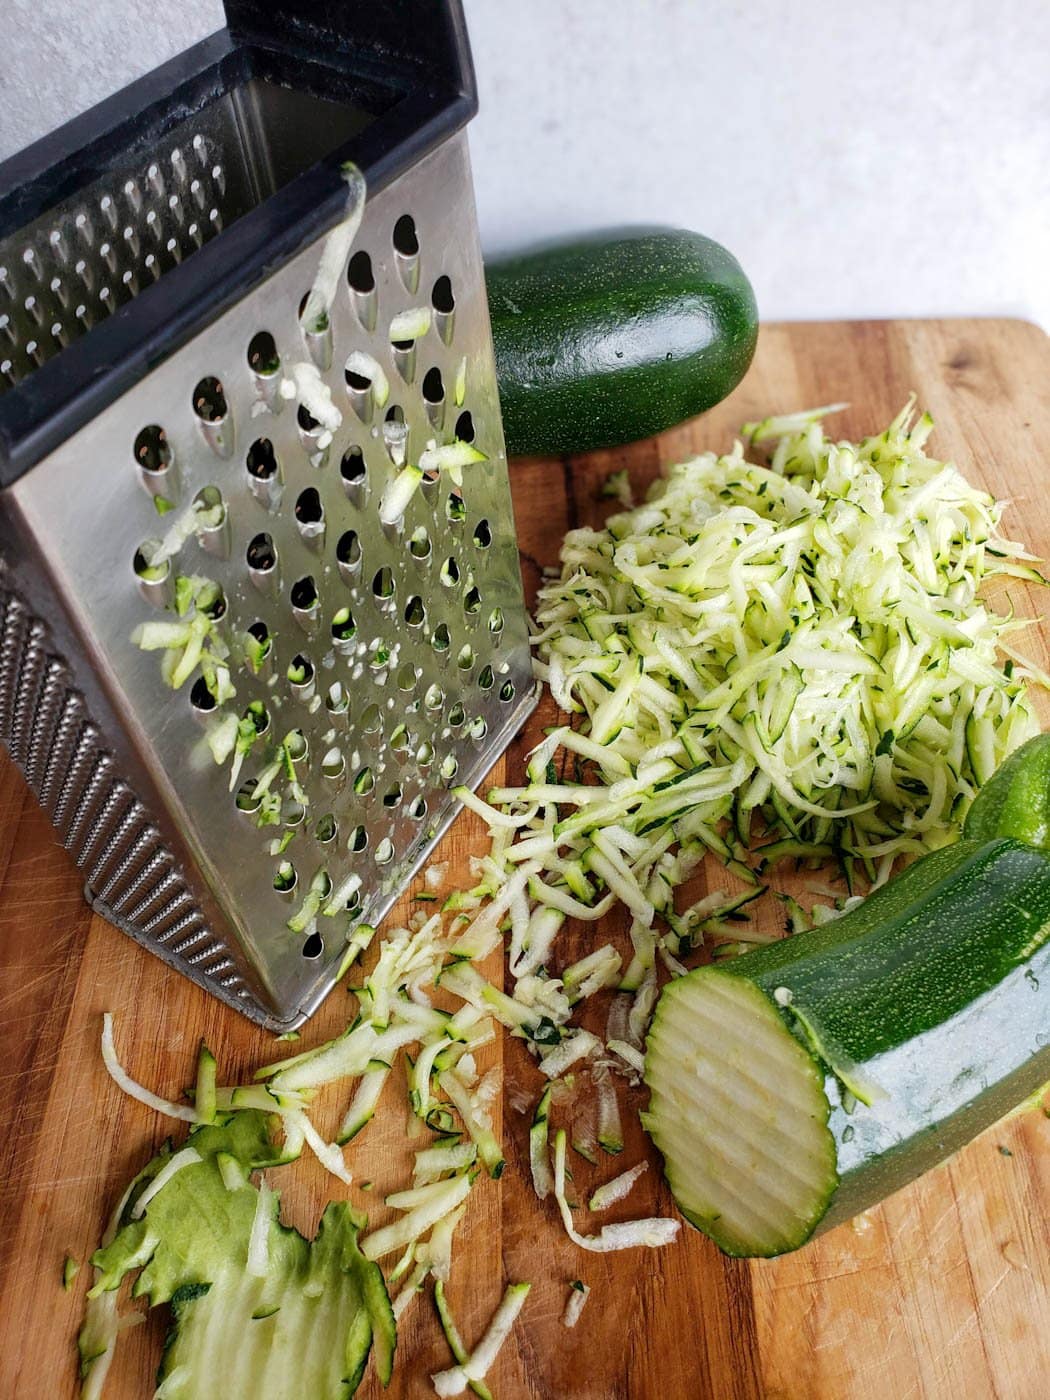
3) Grate and Drain the Zucchini
Once the autolyse has been mixed and resting for about 40 minutes, begin prepping the zucchini. It needs about 15 minutes of its own rest time before you add to the dough.
- Grate the zucchini into medium-fine shreds and add it to a strainer. (I use a basic box cheese grater.)
- Next, add a light sprinkle of salt (no more than 1/2 tsp) over the grated zucchini and toss to mix. Rest the strainer in a very clean sink, or set it over a larger bowl to drain.
- Over the next 15 minutes, the salt is going to help draw excess water out of the zucchini. I recommend tossing, pressing, and lightly wringing out the zucchini a few times to help remove as much moisture as possible.
- Do not add the collected zucchini water to the recipe!

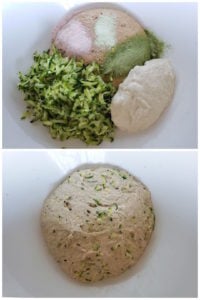
4) Mix Zucchini and Dough
- Now combine the shredded (drained) zucchini with the autolyse (flour and water mixture) along with 120 grams of active sourdough starter and 9 grams of salt. Wait to add the walnuts until the first stretch and fold.
- Here’s where I also like to add ½ tsp of homegrown garlic powder and 2 tsp of onion powder too. If you’re interested, learn how to make your own homemade garlic powder and onion powder here!
- Thoroughly mix to combine all of the ingredients. I usually use clean hands to pinch, mix, and knead everything together. I also like to use the “slap and fold” method to help further combine and tighten the dough.
- Once mixed, cover the dough and bowl and let it rest for 30 minutes.

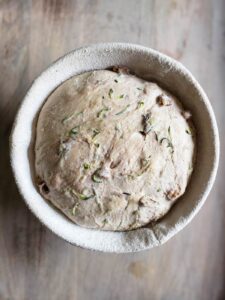
5) Stretch and Fold, Bulk Ferment
- Now allow the dough to bulk ferment at room temperature in a covered bowl for about 4 hours.
- During the first 2 hours, repeat at least 3 more sets of stretch and fold, about 30 minutes apart. Then let the dough rest and rise undisturbed for the remainder of bulk ferment.
- I like to fold in the walnuts during the first set of stretch and fold, which gives them plenty of time to get evenly distributed throughout the zucchini sourdough during the following sets.
6) Form Loaf and Proof
Now that your sourdough has finished fermenting at room temperature, it is time to get the loaf formed, tucked into its banneton (proofing basket), and put away to sleep in the fridge.
On a lightly floured surface, form your loaf into the desired shape with a few folds and tucks. Afterward, we generally let it sit to bench rest for about ten minutes, give it one final fold and form, and then slip it into a floured banneton.
Cover the banneton with a tea towel once again, and allow the dough to cold proof overnight in the refrigerator.

7) Bake
Before baking, I recommend preheating your oven to 475°F for one hour with your empty cast iron combo cooker or dutch oven inside.
Then, carefully slip the cold dough straight from the fridge into the piping hot dutch oven or cast iron. For a smooth transition, we place a piece of parchment paper on top of the banneton, a cutting board on top of that, then flip the whole thing upside down.
Before easing the dough into the hot pan, you can give it a very light dusting of flour and score with a bread lame across the top if you wish.
Bake covered for 40 minutes, then remove the lid and bake for an additional 5 minutes.
PRO TIP: If you struggle with the bottom of your sourdough bread burning or browning too much, try putting an empty baking sheet on the empty oven rack below the Dutch oven. It helps absorb and deflect some of the heat while it bakes. No more burnt bottoms!
8) Cool and Enjoy
Once the loaf is finished baking, immediately (and carefully!) transfer your finished zucchini sourdough bread from the hot pan to a cooling rack. As difficult as it is to resist, allow the bread to cool for several hours before slicing into it. Otherwise, valuable steam will escape and the bread will become stale much faster.
I love to enjoy our zucchini sourdough bread on its own, with veggie sandwiches or avocado toast, or served alongside soup, vegetarian chili, scrambled eggs and more.
Fresh sourdough bread is always best enjoyed within a few days of baking, though it can stay good for up to 5 days or more. For storage, I suggest wrapping the bread in a lint-free tea towel and then storing it inside a paper bag at room temperature. (Storing it in the fridge will make it dry out faster.) Pop it in the toaster if it gets a little stale!

I really hope you enjoy this sourdough zucchini bread as much as we do! Please come back by to leave a review once you give it a try.
You may also like:
- Easy Sourdough Discard Crackers Recipe (Optional Cheese or Herbs)
- Sourdough Granola Recipe (Discard or Active Starter) with Fermented Option
- Simple Sourdough Focaccia Bread Recipe
- Easy Sourdough Pancakes Recipe (Discard or Active Starter) + Topping Ideas
- Sourdough Corn Bread Recipe (with Vegan Options)
Rustic Zucchini and Walnut Sourdough Bread Recipe
Equipment
- Large mixing bowl
- Lined banneton bread basket, for shaping and proofing dough
- Kitchen scale
- Cast iron combo cooker or dutch oven
- Grater, to shred zucchini
- Colander or strainer
Ingredients
- 110 grams active sourdough starter
- 460 grams total flour – we use 300 grams of white bread flour, 140 grams of whole wheat, and 20 grams of rye flour though you can use all white
- 1.25 cups filtered water in very humid climates, start with 1 cup of water and add more as needed
- 9 grams salt – sea salt, kosher salt, or Himalayan salt is preferred over iodized table salt (plus a sprinkle on the zucchini)
- 1 medium zucchini, grated (approximately 1 to 1.5 cups, see sliding scale notes below)
- 1/2 cup walnuts – we use raw, unsalted, halves & pieces substitute with unsalted sunflower seeds or pumpkin seeds as needed
- optional: ½ tsp of garlic powder and 2 tsp of onion powder
Instructions
- Feed your sourdough starter several hours before mixing the dough, allowing it to reach peak activity level.
- Make an autolyse by combining the flour and water only in a bowl until thoroughly mixed. Let it sit covered at room temperature (70-75 degrees is optimal) for about an hour. (The dough may seem more dry than usual sourdough, because the zucchini will add more moisture later)

- Use a box grater to shred one medium zucchini into a colander or strainer. Next, sprinkle the zucchini with a few light shakes of salt (no more than 1/2 tsp) and toss to mix. Rest the strainer in a very clean sink, or set it over a larger bowl. Over the next 15 minutes, the salt will draw excess water out of the zucchini. Toss and lightly press (wring out) the zucchini a few times to remove excess moisture. Do not add the collected zucchini water to the recipe!

- After the autolyse has rested for about an hour, mix in the called-for active sourdough starter, salt, and grated drained zucchini until thoroughly combined. (Also add optional ½ tsp of garlic powder and 2 tsp of onion powder).
- Optional: Lift the dough ball (which may be quite loose) out of bowl and on a clean counter use the “slap and fold” technique to tighten the dough.
- Once finished, put the dough back in the bowl, cover, and allow to rest at room temperature for 30 minutes. This begins the 4-hour bulk fermentation time.
- After 30 minutes, fold in the walnuts during the first round of “stretch and fold” – gently lifting up on one side of the dough and folding it back over itself several times. Cover the bowl again and let sit.
- Repeat 2 or 3 more rounds of stretch and folds about 30 minutes apart, and then let the dough rest undisturbed for the last 2 hours of bulk ferment.
- Next, transfer the dough to a lightly floured surface and shape the loaf into a similar shape as your banneton (proofing basket – e.g. a round loaf, or long oval loaf).
- Place the formed dough ball in a lined, flour-dusted banneton proofing basket of choice. Cover with a breathable towel, and place in the refrigerator to proof for 8 to 16 hours. We usually do this overnight.

- After cold-proofing in the refrigerator, preheat the oven to 475 to 500 degrees F. (Experiment to see what temperature works best for your oven). If you’re using a dutch oven or combo cooker, place it in the oven to preheat for one hour.
- After an hour of preheating, quickly and carefully transfer the cold dough (straight from the fridge) out of the banneton and into the hot combo cooker or dutch oven. Line the combo cooker or dutch oven with parchment paper first. Score the top of the loaf with a bread lame if desired.
- Bake the loaf covered for approximately 35-40 minutes, and then remove the lid and bake for an additional 5-7 minutes uncovered. (Times may vary with individual ovens)
- Once done, immediately transfer the loaf on a wire rack to cool for several hours before cutting.


30 Comments
Pat Parker
Are any of your bread recipes – especially sourdoughs – gluten-free and/or containing pulses or legumes? I’ve looked at most of your, but have I missed that one? I’ve tried a few recipes from elsewhere, that I was given but somewhat unsuccessfully, probably due to lack of experience without the gluten & the fact our oven is a fan one😂. I’ve recently learned they need to slow-cook so am trying an in oven Dutch-oven bake & one in a covered pan in the slow-cooker, with added water below it, which I’ve now been told I need. I used to think I was an experienced baker, but these new ingredients are definitely challenging me.😬
I’d love to have a GF recipe that contains pea, lentil & bean/chickpea flours in – for high protein.
It’s for a community kitchen I help at here in UK and recently a few of our customers have allergies like gluten, nuts & sesame seed, etc. The growing families need nutritious but budget friendly recipes & foods that keep them full longer – especially the growing teens with hollow legs😬
Can you help us & if so, would you mind if I shared the recipe with a few of our customers? We are a relatively small group, so I’m talking about 15 Mums max. These are the ones who offer their help in the kitchen and for fundraisers.
Many thanks & look forward to your reply.
Pat
Aaron (Mr. DeannaCat)
Hi Pat, you can share our recipes with whoever you choose to do so, we have two GF specific baked recipes, one being a GF sourdough bread loaf and a GF sourdough cracker recipe. You would be correct about GF baking needing a lot of experience to really get it down, we have found it comes down to a lot of trial and error. We have mostly used brown rice, sorghum, and millet flours in our GF baking but we would still consider ourselves novice GF bakers. However, we found that even our initial GF sourdough loaves tasted far better than any GF bread that we could find the grocery store. Hope that helps and good luck with your community kitchen, reach out if you have any questions and we appreciate the work you are doing to make your community healthier!
Claire Inches
Hi Aaron, I am anxious to try your recipe, but I do have a quick question: I am a very experienced sourdough baker, and I have never seen a recipe that has you autolyse just the flour and water. When I make sourdough, I combine the flour, water AND starter, and then allow it to autolyse for an hour.
Is there a specific reason you instruct to add the starter AFTER the flour and water has autolysed for an hour?
Thank you!
Aaron (Mr. DeannaCat)
Hi Claire, a true autolyse is just flour and water, although some people like to add starter to the step as well which evidently is called fermentolyse, which I just happened to find out when researching the differences. I believe making an autolyse with just water and flour activates the gluten before the fermentation process begins by adding the sourdough starter, mostly, it’s just the way we learned to make sourdough bread and we like the results we get. With that being said, maybe we will try and add the starter at the beginning so we can compare between the two styles. Hope that helps and have fun baking!
Claire Inches
Thank you so much Aaron! I just read a couple of articles about the differences in the final product regarding autolyse vs. fermentolyse. It sounds like whole wheat flour works better with autolyse because it takes longer for the water to be asborbed in the flour, and could result in better oven spring and a more open crumb sourdough. I will definitely give it a try!
Thanks again! I will submit a recipe rating and feedback after I try your Rustic Zucchini and Walnut Bread recipe.
Aaron (Mr. DeannaCat)
That’s great to hear and thanks for sharing! It’s mostly just the way we learned how to make sourdough and have just stuck with it, hopefully you enjoy the bread and have fun baking!
Belinda Trainor
So glad I came across this recipe today! Here in Australia I am struggling to keep up with the zucchinis in my garden. Took my starter out of the fridge earlier today in anticipation of getting organised to make another loaf. I’m going to give this recipe a whirl, I’ll update you on the result in a few days 😊🤞
Nige B
Exceptional loaf and a great way to use courgettes (zucchini). Makes a loaf with a lovely crust and soft, stretchy crumb. I’ve tagged you in my Instagram post with a couple of pics. This recipe is a keeper!
Aaron (Mr. DeannaCat)
Hi Nige, thanks for sharing your experience and so glad you enjoyed the bread!
Terry K
Just ate a slice or 2 or maybe 3 of this lovely bread. Super moist and flavorful. It is quite a moist messy dough but it turned out perfect. Tip I learned from another site was to use rice flour to coat the banneton so it releases easier. Next time I am going to increase the whole wheat since I mill my own flour and decrease the bread flour. I am hoping the autolyse will help. I am always on a mission to decrease my consumption of white flour. Thanks for developing the recipe!
Aaron (Mr. DeannaCat)
Hi Terry, so glad you enjoyed the recipe and it’s a good way to use extra zucchini during the summer, thanks for sharing the tip about using rice flour to dust the banneton. Have fun baking!