

Delicious Gluten-Free Sourdough Crackers (Discard or Active Starter)

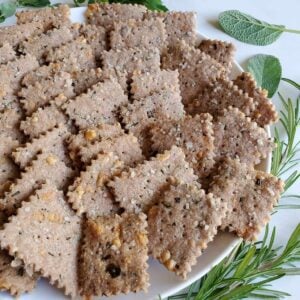
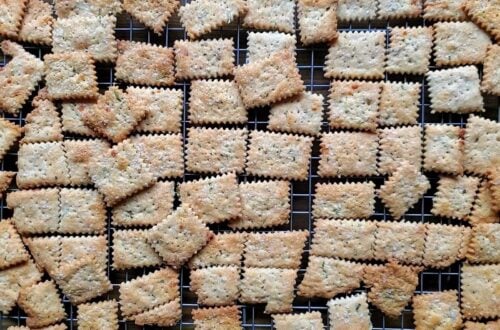
Come learn how to make gluten-free sourdough crackers with this easy step-by-step recipe. They’re crispy, flaky, savory, and just as delicious as our our classic wheat sourdough crackers. You can make them with active GF starter, or use discard to reduce waste! These crackers are perfect for parties, holidays, or just a healthy snack.
While they’re dang good plain, the addition of optional herbs, cheese, or other seasonings make these crackers over-the-top delicious. So much so, my friends can’t believe they’re gluten-free. I love to pack mine full of fresh herbs from the garden but you can use dried herbs too.
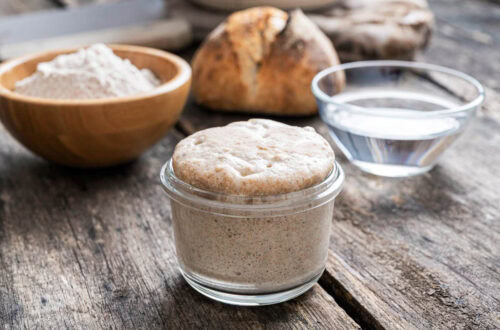
If you need one, learn how to make a gluten-free sourdough starter from scratch here. Then you can enjoy baking your own gluten-free sourdough bread, cornbread, pancakes, crackers, and more.

Want to save this?
Supplies
- 1 or 2 baking sheets
- rolling pin
- parchment paper or silicone baking mats
- a pizza cutter or pastry wheel cutter (or you can cut them with a knife)
- recommended: silicone basting or pasty brush (for brushing olive oil over the top)
Ingredients
YIELD: This recipe makes 2 full baking sheets or approximately 6 dozen gluten-free sourdough crackers – perfect for a family, party, or gathering! With just the two of us here, I often make a half-batch. They’re so addicting, we’d devour them all in a day or two otherwise!
- ½ cup rice flour. I like using brown rice flour, or try half brown rice and half sweet rice flour.
- ½ cup oat flour. I’ve also tried substituting sorghum flour instead of oat flour in this recipe, and the flavor was outstanding! Yet the texture was less light and flaky, though still crisp. The crackers also took about 5 minutes longer to cook. If you experiment with other flour combinations, be sure to let me know what worked well in the comments!
- 1 cup of gluten-free sourdough starter, active or discard. If using discard, you’ll get the best results if it was fed within the last week or two (not from a severely neglected starter.) I use brown rice flour to start and maintain our gluten-free sourdough starter. Therefore, the cracker results may vary with different types of GF starter, such as one maintained with buckwheat.
- 1.5 tablespoons of psyllium husk powder (husk for binding)
- 1/2 teaspoon sea salt
- 1/4 cup (4 tablespoons) of coconut oil, butter, or olive oil. I love the flavor that coconut oil offers!
- 1/2 cup water
- Olive oil, for brushing
- Coarse sea salt, for sprinkling on top
Optional additions:
- 1/4 cup fresh herbs (finely chopped) or 2 tablespoons dried herbs. I most often use a combination of fresh rosemary, sage, oregano, and thyme from the garden.
- 1/2 cup firm grated cheese such as parmesan, sharp cheddar, asiago, or similar
- 1/2 tsp garlic powder, onion powder, or other seasoning of choice – such as “everything but the bagel”

Instructions
1) Mix dough
- In a large mixing bowl, combine all of the dry ingredients first, including the flours, psyllium husk, salt, and any other seasonings/ powders of choice.
- Next, add the gluten-free sourdough starter, oil or butter, water, and optional cheese, herbs or seasonings. If using coconut oil or butter, it should be slightly softened and easy to mix in, so you may need to lightly heat it until it just barely starts to melt.
- Thoroughly mix the dough until it is uniform. I usually start mixing with a fork or spoon, but then finish mixing with my hands. The texture should be similar to cookie dough. It shouldn’t be sticky, especially with the coconut oil.
PRO TIP: Depending on the hydration of your starter (how wet it is) you may need to add a little more water. If the cracker dough is crumbly or will not hold together in a smooth ball, add one additional tablespoon of water at a time until it will.

2) Split and Chill
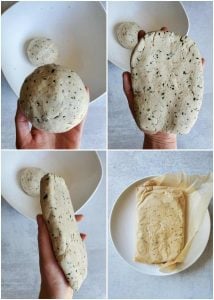
- Divide the large dough ball into two roughly equal smaller balls. (Or one ball for a half-batch of crackers.)
- Using your hands, form each ball into a flattened rectangle. This step reminds me of forming hamburger patties, if that helps. Mine generally end up a little larger than my flattened hand, and about half an inch thick. Repeat for the second ball.
- Next, wrap each flattened dough rectangle with parchment paper, a reusable beeswax wrap, or plastic wrap to prevent it from drying out.
- Finally, refrigerate the dough for at least 30 minutes, up to a few hours. I usually set mine on a small plate in the fridge.
PRO TIP: You can even refrigerate the dough overnight and bake your gluten free sourdough crackers the next day if you wish! In that case, I recommend storing it an airtight container so it doesn’t dry out in the meantime.

3) Roll Out
- Preheat the oven to 350°F.
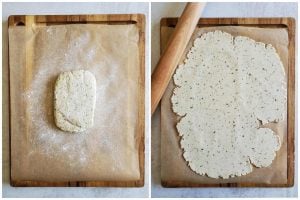
- After chilling, remove the cracker dough from the fridge. Cut a piece of parchment paper to the size of the baking sheet, or use a silicone baking sheet liner. Lightly dust the parchment paper/liner with flour. Carefully unwrap one chunk of flattened dough, place it in the center of the floured parchment paper, and lightly flour the top of the dough. TIP: I like to do this on a large cutting board, which makes it very easy to roll then transfer to a cookie sheet.
- Using a floured rolling pin, roll out the dough until it is nice and thin. The goal is about 1/16th of an inch thick or less. The edges will be a little ragged – that’s okay. Just work it back and forth and side to side to get it spread as evenly as possible while still maintaining a relatively rectangular shape. The thinner you roll it, the more crisp your crackers will be!

4) Oil, Slice and Poke
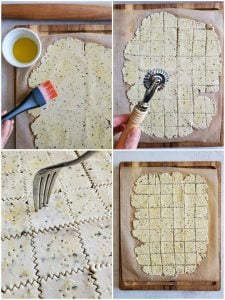
- Once the dough is rolled out, lightly brush the surface with a thin even coating of olive oil. Make sure to get the edges! Then sprinkle some coarse salt over it as well.
- Next, cut the dough into rows of square crackers. Anything from 1 to 2 inches is a good size! A rolling pizza cutter works well, but I love to use a pastry/pasta cutter to get fun wavy edges.
- Finally, poke the top of each cracker with the tines of a fork a couple of times to prevent puffing or big uneven air bubbles.
- Repeat steps 3 and 4 for the second piece of dough.

5) Bake
- Carefully transfer or slide each piece of parchment paper with the dough onto baking sheets. I usually bake two trays at a time, but you could also bake one at a time if needed.
- Bake on 350°F for approximately 30 to 35 minutes*, until the crackers turn golden brown and crisp. (See note below.)
- Rotate the cookie sheets halfway through baking. It is common for the outermost edges to get “done” more quickly than the inner crackers. Personally, I find it worthwhile to ever-so-slightly overcook the ragged edges in order to get the ideal crunch in the rest of the batch. The more crisp they are out of the oven, the longer the crunch lasts in storage too.
- When they’re done baking, immediately transfer your finished gluten-free sourdough crackers onto a wire cooling rack.
*NOTE: Baking times will slightly vary by individual oven, how thin you roll out your crackers, and if you bake 1 or 2 trays at a time. Also, different flours may influence baking time. For example, I’ve using sorghum instead of oat flour increased the baking time by about 5 to 10 minutes.

Storage and Shelf LIfe
After fully cooling, store your gluten-free sourdough crackers in an air-tight container to maintain maximum freshness and crunch for several days. I like to use a glass container with snap-on sealing lid. They do tend to get a little stale after 4 or 5 days, but we usually eat them by then anyway.
Enjoy
These herby gluten-free sourdough crackers are a delicious, healthier alternative to most other types of crackers or chips. Enjoy them with cheese, olives, hummus and other dips. I love them alongside soup, chili, or tuna salad too!
Sourdough crackers are our go-to for charcuterie boards, holiday or party platters. They’re always a huge hit, and people are impressed to learn they’re homemade!

And that is how you make delicious gluten-free sourdough crackers.
In all, I hope you enjoy this recipe as much as we do. Please feel free to ask questions, leave a review once you give them a try, or share this recipe with your friends! Happy baking.
You may also like:
- Easy Gluten-Free Sourdough Bread Loaf Recipe
- Sourdough Cornbread Recipe (Vegan & GF Options)
- Easy Vegan No-Chicken Noodle Soup Recipe (With Protein!)
- How to Feed and Maintain Sourdough Starter: Best Beginner’s Guide
- Easy Stuffed Dates with Goat Cheese, Nuts, Honey and Thyme
Delicious Gluten-Free Sourdough Crackers (Active or Discard Starter)
Want to save this?
Equipment
- Rolling pin
- Pastry Wheel or Pizza Cutter
- Mixing bowl
- Parchment Paper
- Basting Brush
Ingredients
- 1/2 cup Rice flour (we like using brown rice flour, or half brown half sweet white rice)
- 1/2 cup Oat flour (can sub with sorghum flour though the cook time may increase, and flakiness decrease)
- 1 cup Active gluten-free sourdough starter, or discard that was fed within the last 2 weeks (we use a brown rice flour-based stater)
- 1/4 cup Fresh herbs of choice, e.g. rosemary, sage, thyme, oregano (Or 2 tbsp dried)
- 1/4 cup Coconut oil (butter or olive olive)
- 1.5 Tbsp Psyllium husk powder
- 1/2 cup Water
- 1/2 tsp Sea salt
- Olive oil for brushing
- 1/4 to 1/2 tsp Optional: garlic powder, onion powder, "everything but the bagel" seasoning, etc
- 1/2 cup Optional: grated firm cheese (such as sharp cheddar, parmesan, asiago, etc)
Instructions
- In a mixing bowl, thoroughly combine the dry ingredients first: flours, psyllium husk, salt, and any seasoning powder used.
- Next add the "wet" ingredients, including sourdough starter, chopped herbs, water, coconut oil, and optional cheese. Mix thoroughly*. (See Note 1 below)
- Divide the large dough ball into two equal sized balls.
- Next shape and squish each dough ball into a patty like rectangular shape until the dough thickness is about a half inch.
- Wrap the rectangular dough patties with plastic wrap or parchment paper to prevent from drying out, and refrigerate for at least 30 minutes or several hours. Place in an airtight container if refrigerating overnight to bake the next day.

- Preheat the oven to 350 degrees Fahrenheit.
- Place the patties of dough each on their own piece of floured parchment paper and roll out with a floured rolling pin until dough is nice and thin, about 1/16th of an inch thick or less.

- Lightly brush the dough with extra virgin olive oil, and lightly sprinkle salt over the top.
- Cut the dough using a pasta/pastry cutter (or pizza wheel) into 1 to 2 inch squares. Next, use a fork to poke each cracker square several times.

- Place the parchment paper and the cracker squares on a baking sheet and place in the oven for 30 to 37 minutes* (See baking tips below, Note 2)
- Rotate the baking sheets halfway through to help the crackers bake evenly.
- Once finished baking (golden brown and crisp), immediately transfer the crackers to a cooling rack.
- Once cool, enjoy the crackers immediately or store them in an airtight container to enjoy later.
Notes
- Depending on the hydration of your starter (how wet it is) you may find the need to add a splash more water. If the cracker dough will not hold together in a smooth ball, add one additional tablespoon of water at a time until it will. The texture should be similar to cookie dough
- Baking times will slightly vary by individual oven, how thin you roll out your crackers, type of flour used, and also depending on if you bake one or two trays at a time. For example, we found using sorghum instead of oat flour increased the baking time by about 5 to 10 minutes. It is common for the outermost edges to get “done” more quickly than the inner crackers. Personally, I find it worthwhile to ever-so-slightly overcook the ragged edges in order to get the ideal crunch in the rest of the batch. The more crisp they are out of the oven, the longer the crunch lasts in storage.


37 Comments
Dana Chiu
I made these today with a few variations: used almost 1/2 C. nutritional yeast, 1/2 t. EACH onion power, garlic powder, turmeric and paprika…omitted the fresh herbs, everything else per recipe. These were fantastic! Easy dough to mix together and roll/handle. Will definitely make again! Thanks for a great recipe!
Jean
I made the starter last week and the discard crackers today. They are SO GOOD!! We put flake salt on one tray and minced onion flakes on the other. Otherwise, I followed the recipe as is and they are better than the Simple Mills GF crackers I like!! I still have some discard left in the fridge, so plan to make more, thanks for the inspiration!
Aaron (Mr. DeannaCat)
Hi Jean, so great to hear you enjoyed the crackers and your additions sound delicious!
Amanda
The best! Used sweet wite rice and brown rice flours. Dried herbs thyme and black pepper and salt. Used butter. Thanks for sharing!
Aaron (Mr. DeannaCat)
Hi Amanda, sounds delicious! Glad you enjoyed the recipe and had such success.
Jenifer Hanson
I have my first batch in fridge. I am super excited about them. I tasted a small pinch of dough and it is so yummy! I can’t wait!
Judy
I made these with Bob’s red mill one to one gluten-free flour mix. They are awesome. Thanks so much for the recipe. I can’t wait to try with another flour.
Tamar
Made these crackers for the first time tonight. We are in love! I used brown rice flour and a 1/4 cup each of sorghum flour and almond meal. We can’t eat dairy so I subbed some nutritional yeast and included some dried herbs from my garden. Yum!!
Thank you so much for your detailed recipes and instructions. We have our first loaf of GF sourdough proofing tonight and we can’t wait to taste it! I’m so thrilled that your recipes don’t use starch or xanthan gum. Thanks again!
Aaron (Mr. DeannaCat)
That sounds delicious Tamar! Glad you are enjoying the recipes and have fun baking!
Karen Taylor
I made these with purple barley flour and Iraqi Whole Wheat, minus the psyllium husks. My kids LOVE them. Thank you!
Aaron (Mr. DeannaCat)
That sounds amazing Karen! Glad you enjoyed them.
Megan
I substituted ground Flax for the psyllium, and rolled them out between parchment paper and the silicon baking mat they cooked on (the dough was as a little sticky), and they were gone in less than 24 hours, so good! Next time I’ll try to make them a little thinner and cook then a little longer because the crispier edge ones were far superior
Mamie
Hi, I haven’t tried the recipe yet, but I wanted to provide a quick and easy tip. A way to have less “edge-looking” pieces is to exactly roll out the dough WHILE it’s still wrapped in the parchment paper. The dough only goes as far as the parchment paper will allow it to go. So you can give the dough some slack to expand into, and roll from there. Even if you need to roll it a bit more after unwrapping the parchment paper, it’ll generally be more uniform than had you not used this trick.
I learned this trick when I was making my own date breakfast bars. 🙂
Aaron (Mr. DeannaCat)
Thanks for the tip!
Marney
Can you freeze these cracker ,I would like to make yhem as a gift for xmas
Aaron (Mr. DeannaCat)
Hello Marney, we have yet to freeze the crackers so we aren’t sure exactly how they would turn out. Give it a try and let us know your results!