

Easy Sourdough Focaccia Bread Recipe (Overnight or Same Day)
Come learn how to make your own delicious sourdough focaccia at home with our easy sourdough focaccia recipe and step-by-step photos. The final product is everything you could dream of: fluffy and moist on the inside, a lightly oiled crispy crust on the outside, and naturally-leavened to perfection.
If you are familiar with our basic sourdough bread loaf recipe (or baking sourdough in general), this will be a walk in the park. The process is quite similar, just with a wetter dough and different baking pan. And if you’re new to sourdough, no worries! Sourdough focaccia is one of the easiest sourdough recipes to make, perfect for beginners.
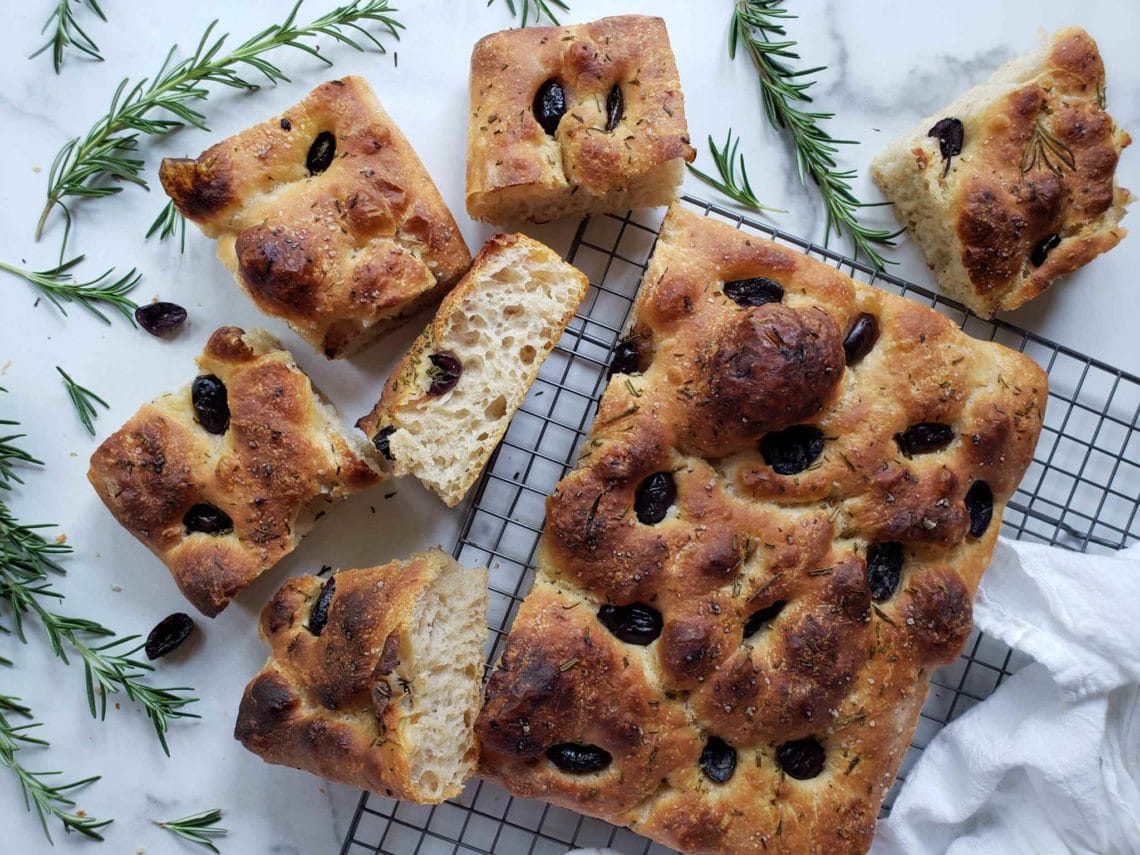
We used olives and rosemary in this particular example, but you can follow this basic recipe and then dress it up however you’d like – or keep it simple with no toppings at all. We love to use thinly sliced tomatoes, cheese, caramelized onions, edible flowers, herbs… whatever is handy or in season. See the best sourdough focaccia toppings and add-in ideas here. Trying new combinations is half the fun!
Need sourdough starter? Learn how to make sourdough starter from scratch. Or better yet, come take home a foolproof, 5-star organic sourdough starter from our shop. One starter will last you a lifetime; it’s the easiest way to get started baking sourdough at home!

Would you like to save this?
Disclosure: Homestead and Chill is reader-supported. When you purchase through links on our site, we may earn an affiliate commission.

Ingredients
- Sourdough starter – Approximately 160 grams of active starter will be used in the recipe.
- Flour – 450 grams total. We often combine 400 grams of organic white all-purpose flour plus 50 grams of organic whole wheat flour, though you can use all white flour too. We love the added nutritional value that whole wheat adds, but large amounts can make focaccia too dense. Also note that this sourdough focaccia recipe calls for all-purpose flour in contrast to bread flour, which we usually use for sourdough bread loaves. Yet due to the higher protein content in bread flour, it can also lead to a more dense and chewy texture than we’re after here. All-purpose flour helps to obtain the quintessential light and fluffy focaccia texture.
- Salt – 9 grams in the dough, plus additional for sprinkling on top. Flaky sea salt, kosher salt, or Himalayan salt is preferred over iodized table salt in sourdough baking.
- Filtered water – 350 to 400 grams (which is about 1.5 cups to just a splash over) *Note that if you live in a humid climate, you’ll want to scale back on the water content. Start off with 350 grams and add more if needed.
- Extra Virgin Olive Oil – 1 tablespoon for the dough itself, plus a couple more for oiling the pan and drizzling over the top later. The better the quality of olive oil used, the better the final sourdough focaccia flavor will be!
- Toppings of Choice – Popular focaccia toppings include olives (green, black, or kalamata), whole or sliced fresh garlic, grated cheese, fresh or dry herbs, tomatoes (fresh or sun-dried), roasted red peppers, artichoke hearts, nuts and seeds, or seasonings such as “everything but the bagel”.


Supplies Needed
- A large mixing bowl or dough tub
- A kitchen scale
- A baking pan. We use this 9 x 13” non-stick (silicone-lined) baking pan. You can either use a similar-sized deep pan, or a larger shallow baking pan – like a cookie sheet. Using a cookie sheet will result in a more rustic oval-shaped sourdough focaccia, rather than one with an obvious taller crust or edge.
- A lint-free tea towel
- Liquid measuring cup
- Dough scraper – helpful but not necessary
Baking Schedule and Timing
This sourdough focaccia recipe can be made the same day or allowed to ferment overnight. Either way, keep in mind that you won’t be baking the bread for at least 5 to 6 hours after starting – if not the next day. (Don’t worry, you won’t be working that whole time! The dough is just passively sitting in various stages of fermentation.)
We typically allow our dough to bulk ferment at room temperature for about 4 hours, proof it overnight in the refrigerator, then let it sit at room temp for a couple hours again in the morning before dressing and baking it. Yet you can also expedite the process: ferment for just a few hours at room temperature, skip the overnight proof, and bake the same day.
Remember that that longer sourdough is allowed to ferment before baking, the more nutritious and easier to digest sourdough becomes – which is why we opt for the longer proof time. You can allow it to proof even longer, up to two days in the fridge! Sourdough focaccia is very forgiving compared to other breads.
Instructions
Step 1: Feed Sourdough Starter
Ensure you sourdough starter is at peak activity, ready for use in a recipe. This usually involves feeding it at least once or twice several hours before using it, depending on how you had it stored. A sourdough starter is considered at peak activity when it is bubbling in its container, has more than doubled in size, is no longer expanding, but hasn’t yet started to fall back down and deflate.
Learn more about how to feed sourdough starter here, along with general storage and maintenance tips.

Step 2: Combine Active Starter, Water, Salt, & EVOO
Using a kitchen scale, measure out the called-for amounts of active sourdough starter, water, olive oil, and salt. I suggest starting on the lower end of the water range, and add small amounts later (after the flour) as needed. Again, this is particularly true for those working in humid environments.
In a large mixing bowl, whisk together the starter, water, oil and salt until thoroughly combined.
It is best to add warm water. If you add cold water, it will start off the dough too cool and can slow down the fermentation process. Around 90 degrees F is perfect. You can either let the water sit out to warm up, or quickly microwave it for 15 to 30 seconds. It should feel lukewarm to the touch, but not hot.
Step 3: Add Flour & Stir
Next, weigh out the called-for amount of flour. Add the flour to the water-starter mixture, and stir to thoroughly combine. If needed, add more water – a tablespoon or two at time. We use almost the full 400 grams of water (though we have very low humidity here). Remember to tare or subtract your container weights as you go!
Sourdough focaccia dough consistency should be slightly more wet than the typical dough for a loaf of sourdough bread. It will also appear slightly chunky and sloppy at first, but will smooth out more in the next step.
A good test of the dough texture is when you stir or move it around with a wooden spoon (after thoroughly mixed), the dough should slowly sink back and spread into the void left by the spoon, rather than staying in place in a firm ball. Yet, it shouldn’t be so wet that you’d call it “runny”. Nor should it fall apart into shreds when lightly lifted.
It is perfectly acceptable to sprinkle and mix in a little more flour if you’ve found your dough has become too runny. As you do with water, adjust using only small amounts of flour at a time!

Step 4: Bulk Ferment + Stretch & Fold
Cover the bowl with a damp lint-free cloth such as a tea towel. If you are using a dough tub or bowl that has a lid, set the lid loosely on top. Now, the focaccia dough needs to sit and ferment at room temperature for about four hours, or until the dough has risen to double in size.
As much as possible, keep the dough in a moderately warm location. Around 75°F is ideal for sourdough fermentation. Cooler temperatures will make this process take longer, and hotter temperatures will speed it up. See the temperature troubleshooting tips at the end of this article for ideas on how to create an ideal sourdough microclimate within your home.
During the first 2 hours of the bulk fermentation time, perform 2 or 3 sets of “stretch and fold” about a half an hour apart. This will help smooth out and further form the dough, and also introduce air. After those 2 or 3 sets, allow let the dough rest and rise uninterrupted for the remainder of the time.
Stretch and Fold
If you aren’t familiar with “stretch and folds” (or coil folding) sourdough:
- Using clean wet hands, grab one side of the dough and lift it up and away from the edge of the bowl. Pull up on the dough until you meet resistance. This is the “stretch”.
- Now lay the dough back down over itself, essentially folding it in half. The “fold”. Don’t push down on the dough after folding – air may be trapped between the folds, which is a good thing!
- Turn your bowl 90 degrees or one quarter, and repeat the process. Stretch, and fold. See the photos below.
Once you’ve gone all the way around the bowl back to where you started, you’ve completed one “set”. Continue with a few more stretch-and-folds if you can without ripping the dough, or simply stop after one set. The dough will become more taught as you go. If you pull it past the point of resistance, it will tear the developed gluten strands – which is what gives your bread structure.

Step 5: Transfer Focaccia Dough into the Baking Pan
Once the dough has risen and expanded to about double the original size, it is time to carefully transfer it into the baking pan. Before doing so, apply a generous layer of olive oil around the pan’s bottom and edges. We don’t want the sourdough focaccia to stick to the pan. Also, let’s be real… an oily crispy crust is one of the best parts about focaccia anyways!
To transfer the dough, I like to use a dough scraper to gently loosen around the edges of the dough ball. Then, tip the bowl and ease the dough onto the middle of the oiled pan. It should spread out into a fairly thin layer on it’s own (an inch or two), and not stay in a tight tall blob in the middle.
To assist in an even spread, use wet or oiled hands to lightly push and pull the dough into the corners of the pan. It will resist, so don’t tear or force it! It will eventually settle in with time. Give it another little push and pull in a half an hour if needed.

Step 6: Continue Proofing Dough (Two Options)
From here you have a couple of options, as we discussed in the “Timing” section above. Depending on the time of day and your personal preference, you can either allow the dough to sit out at room temperature to proof for a couple more hours, or move it into the refrigerator to continue a longer proof.
Either way, the goal is to allow the dough to puff up and rise to about double in size again. On average, this should take around 2 hours at 75°F – though it can vary depending on the strength of your sourdough starter and your climate.
We prefer a longer proofing time, for the added nutritional benefits and also the increased flexibility for our schedule. After transferring the dough to the baking pan, I let it sit for a half an hour to spread out a bit, and then move it to the fridge. From there, it may sit for as little as 8 hours or as long as 14 hours. The key is to take the pan and dough back out of the refrigerator a few hours before you want to bake. Allow it to warm to room temperature, puff up, and reach that ideal doubling in size.
While the dough is proofing, cover the pan with a damp tea towel or plastic wrap.
Step 7: Dimple Dough
Preheat the oven to 450°F.
Here comes the fun part!
By now, the dough should have risen and look a bit bubbly. But to create that distinctive dimpled focaccia top, you need to poke it – aka, dimpling the dough. Wet your hands with either olive oil or water, and press your fingers into the dough repeatedly in many places. Be sure to push all the way down to the bottom of the pan. It should look really bubbly now!
*EDIT: I now usually drizzle olive oil over the surface of the dough and then poke it with oiled fingers, rather than adding oil after with the toppings as shown below… but either way works!


Step 8: Add Toppings
Next, drizzle the top of the dimpled dough with extra virgin olive oil (if you didn’t already). About two tablespoons is recommended, though we never measure. Also sprinkle over a nice little dusting of coarse sea salt.
Finally, dress up your sourdough focaccia with any toppings your prefer! In this example, we used kalamata olives and chopped fresh rosemary from the garden. See more of the best sourdough toppings and add-in ideas here!
TIP: Press larger toppings such as olives, sundried tomatoes, or artichoke hearts down into the crevices to prevent burning in the oven. I also find that grated cheese (cheddar, parmesan, etc) browns quickly in the oven, so you may want to wait to add it on top halfway through baking. Larger chunks of cheese like fresh mozzarella slices, chunks of brie, or cubes of cheddar are fine to add from the start.


Step 9: Bake
Bake the sourdough focaccia on 450°F for approximately 25 to 30 minutes, or until the top is a deep golden brown. Your house should smell damn delectable right about now! Once it is done, allow the bread to cool for a few minutes inside the pan, and then transfer it onto a cooling rack.
Note: Check the bread about halfway through. If the top seems like it is browning too much too quickly, place an empty baking sheet on an empty oven rack above the sourdough focaccia loaf. This floating “cover” will help to deflect some of the heat and prevent burning the top.

Step 10: Serve & Enjoy
Eat up! Unlike recommendations for whole sourdough bread loves, this sourdough focaccia can be cut and enjoyed warm – right from the oven! It is arguably the most delicious this way.
We love our focaccia on its own, or cut in half to create an open-face veggie sandwich. It also goes perfectly dipped in butternut squash & sage soup or creamy roasted carrot & sweet potato soup, or served with our vegan pumpkin 3-bean chili!

How to Store Sourdough Focaccia
To maximize freshness, store the finished focaccia in a sealed air-tight container or covered with plastic wrap. Sometimes I keep it on the cooling rack, and the put the baking pan upside down on top of it as a cover. Since it doesn’t have any preservatives, homemade bread will always be at it’s best on the same day it’s baked, though it’s pretty dang good for the next couple days as well!
Once it starts to get stale, I recommend re-heating the focaccia in the oven on 375°F for 10 minutes to bring the texture back to life. Baked sourdough focaccia can also be frozen in a sealed container or bag for up to a month, and re-heated in the same manner.

Are you drooling yet?
I hope you enjoyed this article, and enjoy your fresh homemade sourdough focaccia even more! Please feel free to ask any questions, and spread the love by sharing or pinning this post.
Keep scrolling below for the printable recipe, along with ways to tinker with your sourdough temperature if needed. If you make this recipe, be sure to report back with a review – or tag me on Instagram with #homesteadandchill @deannacat3 to share your tasty creations!
If you like this recipe, check these out too:
- Herb Sourdough Crackers Recipe (a great way to use your discard when feeding!)
- Cast Iron Whole Wheat & Herb Sourdough Pizza Crust
- Simple No-Knead Sourdough Bread Recipe
- Sourdough Cornbread
- Healthy Sourdough Spiced Pumpkin Bread (or muffins)
- Delicious Sourdough Zucchini Bread (or muffins) with optional nuts, seeds, chocolate or dried fruit
- Sourdough Chocolate Chip Cookies: Cinnamon Spiced & Salted
- Sourdough Ginger Molasses Cookies (Soft and Chewy)

Easy Sourdough Focaccia Bread Recipe (Overnight or Same Day)
Equipment
- Large mixing bowl
- Kitchen scale
- Baking pan (either a deep-sided pan approximately 9 x 13", or a larger shallow standard cookie sheet pan, around 18 x 26")
- Dough scraper (optional)
- Tea towel, or other lint-free towel for cover
Ingredients
- 160 grams active sourdough starter
- 450 grams total flour – we use 400 grams of white all-purpose flour, and 50 grams whole wheat
- 350-400 grams filtered water (about 1.5 cups)
- 9 grams salt – sea salt, kosher salt, or Himalayan salt is preferred over iodized table salt (in the dough mixture) plus more for sprinkling on top
- 1 tbsp olive oil (in the dough mixture) plus more for drizzling on top
- Toppings of choice: olives, chopped fresh herbs, tomatoes, artichoke hearts, garlic, grated cheese, etc.
Instructions
- Before making the dough, be sure to feed your sourdough starter at least twice, allowing it to reach peak activity level.
- In a large mixing bowl whisk the called-for active starter, lukewarm filtered water, olive oil, and salt together. Start on the lower end of the water range, and add more after adding flour if needed to achieve desired dough texture
- Add the called-for flour to the mixture and stir until thoroughly combined. Note that focaccia dough is slightly more wet than typical sourdough bread dough.
- Cover the bowl with a cloth and allow to sit (bulk ferment) at room temperature (70-75 degrees is optimal) for about 4 hours, or until it has risen and doubled in size.
- During the first two hours of bulk ferment, perform 3 to 4 sets of “stretch and fold” every 30 minutes. Then allow the dough to sit undisturbed for the final 2 hours.
- Once the dough doubles from its original size, transfer into a well-oiled baking pan/sheet.
- Using wet or oiled hands, gently push and pull the dough into the corners of the pan (or to spread out some on your shallow baking sheet), but it will spring back and resist. Encourage it, but don't force it. It will continue to spread on its own with time.
- If baking the same day, allow the dough to rise at room temperature (about 2 more hours) until it doubles in size again before next step. OR proof in the refrigerator overnight. If proofing overnight, allow the dough to warm up at room temperature for a couple of hours the following day and doubles in size before the next step.
- Preheat the oven to 450 degrees Fahrenheit.
- Using wet or oiled hands, press your fingers into the dough repeatedly in many places (all the way to the bottom of the pan) until the dough is dimpled and bubbly.
- Drizzle olive oil over the top of the dough, sprinkle with coarse salt, and add toppings if desired. (You can also drizzle oil over the top first, and then dimple it with your fingers). See tips about toppings below.
- Bake at 450 degrees F for about 25 to 30 minutes, or until golden brown.
- Once the bread has finished baking, allow the bread to cool for a few minutes inside the pan before transferring it onto a cooling rack.
- Serve and enjoy warm, or use it within 2 days for optimal freshness.
- Store in an air-tight container or covered in plastic wrap, and re-heat on 375F for 10 minutes if desired.
Notes
- Baking times may vary slightly depending on your oven.
- Check the bread about halfway through. If the top seems like it is browning too much too quickly, try putting an empty baking sheet on an empty oven rack above the sourdough focaccia loaf. This will help to deflect some of the heat and prevent burning the top.
- Toppings Tip: Press larger toppings such as olives, sundried tomatoes, or artichoke hearts down into the crevices to prevent burning in the oven. I also find that grated cheese (cheddar, parmesan, etc) browns quickly in the oven, so you may want to wait to add it on top halfway through baking. Larger chunks of cheese like fresh mozzarella slices, chunks of brie, or cubes of cheddar are fine to add from the start.
Temperature Troubleshooting Tips
Some of the biggest sourdough frustrations that people struggle with – their starter not getting active, or their dough not rising – is often caused by less-than-ideal temperatures. Keeping it in that target range of 70-80°F reallllly helps. Try not to get crazy and overheat it though! Too much heat can make it proof too fast, which also isn’t ideal.
Here are a few ideas for keeping your sourdough warm and content:
- If your house is cool, for example during winter, try keeping it in the warmest location in your house. Maybe in a room with a fireplace or heater in use, or on your counter near the stove.
- Keep it inside the oven (off) but with the oven light on.
- Keep it near or on top of a warm appliance, like the refrigerator – if yours gives off heat. Remember, heat rises too!
- Wrap your bowl or container with classic holiday string lights. We use this trick for our kombucha crocks in the winter time! I say classic lights because newer LED ones don’t give off heat.
- Use a seedling heat mat, if you have one handy. We do this in the winter, but don’t set it right on the mat. I stand it upright against a wall or lightly wrap it around the bowl, creating a warm cocoon instead of hot bottom.
- When in doubt, assess the temperature of the dough itself with a probe thermometer. It won’t always be the same temperature as the air.


124 Comments
sarah gersbach
Made this for Thanksgiving and it was SO fluffy and SO flavorful! Absolutely delicious!!
Lauren
Your focaccia recipe is THE best! Whenever I’m in the mood for it I always come back to your recipe. You give fantastic instructions!
Aaron (Mr. DeannaCat)
Hi Lauren, thank you so much, it is one of our favorites as well!
Crystal Baker
Can I allow this dough to bulk ferment longer? Like 10 hours at room temp and then refrigerate? Trying to make this around my work schedule lol.
Aaron (Mr. DeannaCat)
Hi Crystal, I wouldn’t let the dough bulk ferment for 10 hours at room temperature as it will overproof but focaccia is pretty forgiving in general. You are probably better off trying to let it bulk ferment at room temperature for as long as possible (even just an hour or two) before putting it in the fridge for a longer cold proof. We like taking the focaccia dough out of the fridge for a few hours before we bake it as well and it seems to get more active during this time. Hope that helps and have fun baking!
Nandini Leroux
Have been making this recipe for a couple of years. My favorite foccaccia recipe. I sprinkle toasted sesame seeds on the bottom of the pan. Adds a lovely extra flavor and crunch and allows me to use a bit less oil
Aaron (Mr. DeannaCat)
Hi Nandini, so glad you like the focaccia as much as we do! Great idea on adding toppings to the bottom of the pan to give the crust a little extra something!
Amanda
I’m wondering, can you use a stand mixer with the dough attachment to mix all the ingredients?
This was my first time making sourdough and your extensive instructions made it fool proof!
I also used your starter and am so happy to now have a supply to make bread every week!
Aaron (Mr. DeannaCat)
Hi Amanda, yes you can use a mixer to combine all the ingredients, the ingredients mix pretty easily on their own but feel free to use a stand mixer instead. Thanks for getting your starter from us, have fun baking and enjoy the focaccia, it is one of our favorites!
Stephanie Owen
I just made this this weekend and it was so great! I actually fell asleep and missed the strech and fold portion, put it in an oil pan and into the fridge for the night. Set it out for a few hours in the morning and it baked up so great (even though I missed a whole step)!
Aaron (Mr. DeannaCat)
That’s great to hear Stephanie, it really is an easy recipe that is very forgiving and the bread always tastes delicious!
Kristy
Hello,
I am curious about the initial mixture of the starter, water, salt and EVOO. For some reason, mine does not want to mix throughly even though I am using the starter at its peak.
Any tips for mixing to help it combine better?
Thanks,
Kristy
Aaron (Mr. DeannaCat)
Hi Kristy, we typically use a fork to mix or whisk in the initial wet ingredients first before adding the flour and then switch to a wooden spoon/spatula to thoroughly combine the ingredients after that. If that doesn’t work and your starter is extra thick when it is fully peaked, you may want add a tad more water when you feed it to make it slightly less thick and a tad more runny but whisking first, then using a wooden or silicone spatula to further combine it should do the trick. Hope that helps and have fun baking!
Snigdha
This recipe is literal perfection. I’ve made it so many times and always use different toppings and it’s killer every single time. I will be making this for life. Also using my homesteadandchill sourdough starter of course. Thanks for sharing Deanna! Love everything you do!
Aaron (Mr. DeannaCat)
Thank you so much Snigdha and glad to hear you enjoy the focaccia so much, it is our favorite!
Kelly Adams
The best focacchia recipe, hands down! Easy and delicous — what more could you ask for? The notes and timing schedule were particularly appreciated. Deanna does a great job in breaking it down and not overwhelming the baker!
Lauren
I followed her recipe exactly and my focaccia came out perfect. It was the first thing I made with my sourdough (which I started from the dehydrated powder from H&C) and holy crap. It was so good, my husband and I ate it all the day I made it. This is something I’ll look forward to weekly now! Thanks for sharing such a great recipe!
Kimberly
This focaccia may have been the most amazing thing I’ve ever made!! I followed your recipe exactly, proofing overnight in the fridge, and used sliced tomatoes, fresh rosemary & herb-marinated mozzarella pearls – soooooo good!!!!! Thanks for always coming through with solid, detailed instructions! You guys are the best!
Aaron (Mr. DeannaCat)
Sounds so tasty! We really do love this bread, it is too easy to make and is so delicious.