


How to Start Seeds Indoors: The Ultimate Guide + Seedling Care Tips
Come learn how to start seeds indoors and grow the most strong, healthy seedlings possible! Our comprehensive guide covers everything you need to know to be confident and successful in starting seeds indoors. We’ll go over the supplies you’ll need, tips for timing, and step-by-step instructions with photos – including how to sow seeds as well as care for young seedlings during the weeks after sprouting.
Growing from seed is extremely rewarding. It gives you more selection and diversity of varieties in your garden, along with a jump start on the growing season. Yet I realize it can also feel overwhelming or intimidating, especially if it’s new to you. Don’t worry! This post will share my 15 years of experience and top tips for success in an easy-to-follow manner, whether you’re starting a lot of seeds or just a few.
For you visual learners, there is also a video at the end of this article – albeit a bit old, when we started seeds in a greenhouse at our previous homestead. There is also a printable summary at the end – but don’t miss all the great tips along the way!
NOTE: This post was originally published in January 2019.

Would you like to save this?
RELATED: Though we mostly grow from seed, we still buy started seedlings sometimes too! Come learn how to choose the most healthy seedlings at the nursery (and what do avoid).
When to Start Seeds Indoors
The best time to start seeds indoors varies depending on your location or growing zone, average frost dates, and the type of seeds your starting. For instance, it’s recommended to start tomato seeds inside about 6 to 8 weeks before your last spring frost date. On the other hand, zucchini seeds should be started indoors only 3 to 4 weeks prior to your last frost date.
Don’t worry! To make it extra easy to keep track, we’ve created handy garden planting calendars for you. The charts show when to start seeds indoors, transplant seedlings outside, or direct sow seeds outdoors – for dozens of different vegetables and every USDA hardiness growing zone!
TIP: Our seed starting calendars offer a general timeframe or range, not an exact date, since every garden and microclimate will vary some too. You’ll figure out what works best for you with time! We take notes year-to-year and adjust our schedule as needed.

Disclosure: Homestead and Chill is reader-supported. When you purchase through links on our site, we may earn an affiliate commission.
Starting Seeds Indoors vs Outside
Most vegetables, flowers and herbs can successfully be started indoors and transplanted outside when the time is right. One exception is root vegetables. Carrots, radishes, turnips and parsnips are best to direct sow outdoors since they usually don’t transplant well. We find beets can go either way, as long as you gently transplant them out before they get too large, though we usually direct sow those too.
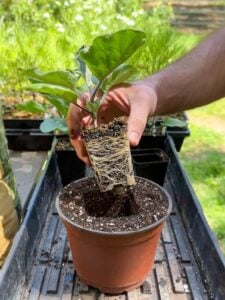
Squash, cucumber, melons, beans, and peas also have sensitive roots, so if you do start seeds indoors, take care to not disturb their roots when transplanting. To help overcome this, we start fast-growing cucumber and squash seeds (including zucchini, butternuts, pumpkins, etc) in larger 4-inch to 6-inch seedling pots to prevent them from getting root bound and to avoid potting up. I prefer to direct sow beans and peas outside.

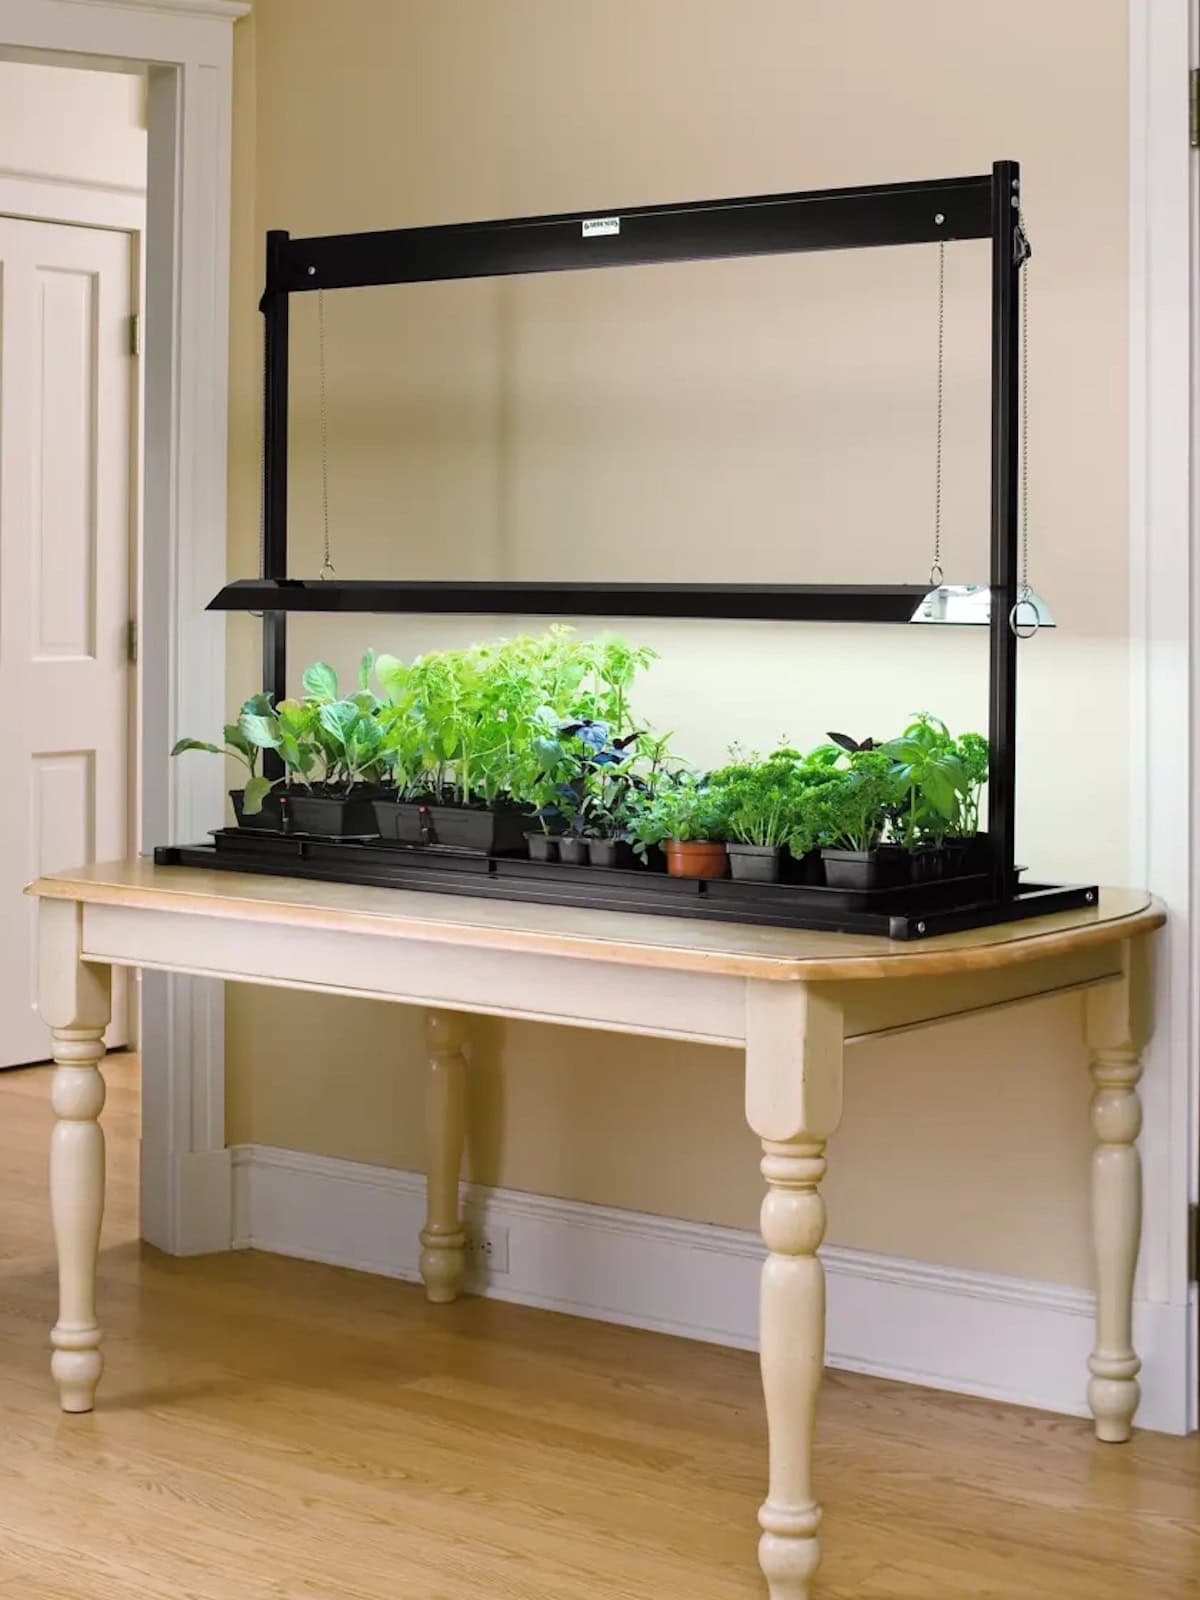
Setting up an Indoor Seed Starting Area
You can start seeds just about anywhere indoors. In a garage, basement, spare room… wherever you have a little free space! Some of our friends start seeds right on their dining room table, or even on a closet floor. Ideally, the area should be protected from extreme temperature swings and have a power outlet nearby. Work with what you have.
In all our years of starting seeds, and have used everything from a single shelf in our guest room to a full-blown greenhouse at our old urban homestead. (Hence the wide variety of photos in this post!) At our new homestead, we turned an old shed into a “grow room“, but ended up converting it into a cat sanctuary for our outdoor kitties last year (The Catchelor Pad) so we currently start seeds in the garage.

Indoor Seed Starting Supplies
Here is a list of supplies you’ll need to successfully start seeds and grow healthy seedlings indoors:
- Seeds. See 13 fantastic places to buy organic and non-gmo garden seeds here.
- Seed starting trays, pots and/or containers*. 6-packs, soil blocks, mini-pots… Every gardener has a preference on what they like use! Lately we’ve been loving the ultra-durable large cell 4-pack seedling trays (3 inch tall version) – and code “deannacat3” saves 5% at Epic Gardening! More sizes and options discussed below.
- 1020 trays and covers. Regardless of the type of seed starting containers you choose, you’ll need bottom trays to set them in. Bottom trays catch and hold water, and also make it easier to move seedlings around as needed. We love these high-quality, extra-strength 1020 trays. They’re so sturdy, you can literally carry bricks without them bending! We’ve had them for 8 years without a single crack. We pair them with these durable humidity dome covers.
- Seed starting soil mix. It’s important to use a light, fluffy, sterile, well-draining seedling mix that is specifically designed for seed starting. Regular potting soil is too dense and rich, and can lead to poor germination or stunted growth. However, I do like to add some gentle worm castings compost into our seedling mix – explained more to follow. Or, you can make your own DIY seed starting mix from scratch.
List continues below…
TIP: Some biodegradable seed starting pots are advertised as “plantable” – but do NOT plant them! The peat or paper pot will degrade more slowly than plant roots grow, leaving the seedlings restricted, root-bound, and stunted in your garden. If you choose to use these, gently peel them off to compost before planting. I don’t feel they perform well in general.

Supplies continued
- Grow lights*. Most often, natural light from even the brightest sunny window isn’t enough to successfully grow healthy seedlings inside. This is particularly true during the shorter, darker days of winter (when most indoor seed starting occurs). Without adequate light, seedlings grow very tall, weak, floppy and leggy – stretching out in search of better light. Therefore, it’s best to use grow lights to successfully start seeds indoors, which come in a variety of sizes and styles.
- Light timer, optional but oh-so-handy! Since our LED grow light shelves have 3 sets of lights (and we have two of them), we use this 8-outlet surge protector that has a built-in timer. We also use this basic single outlet timer for single lights too.
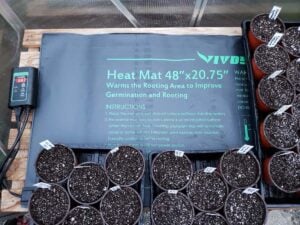
- Seedling heat mats are also optional but highly recommended. Providing heat will help increase seed germination speed and success! I love this heat mat and thermostat combo that comes in various sizes.
- Labels to mark your seedling containers, and transfer into the garden come transplant time. We use permanent marker with these labels, which we reuse for years as we often grow the same varieties over and over. They can also be wiped clean with rubbing alcohol. The popsicle stick idea is cute so we have tried that before, but found the writing faded too quickly.
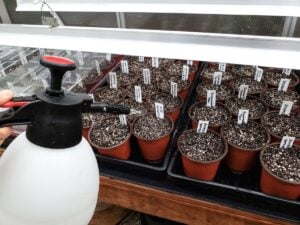
- Water. Filtered water is best for seedlings, but tap water works just fine too. We use my favorite petite pump sprayer to keep the top of the seedling soil damp before germination, and then switch to bottom-watering with a slender watering can once they sprout.
- Airflow, such as via an oscillating fan (not needed until a week or two after seeds sprouts).
*RELATED: To see more details on various grow light options, seed starting trays, soil blockers, and more (including pros and cons of each) please see 7 Useful Supplies for Starting Seeds Indoors.


Seed Starting Tray Sizes (Pros and Cons)
Seed starting trays come in a wide variety of styles and sizes, ranging from tiny 72-cell trays (where 72 individual seedlings can fit in a single 1020 tray) to larger 4 or 6-packs (that fit a couple dozen seedlings per 1020 tray) or even bigger mini pots. Each has their pros and cons! We personally use several different size trays to start seeds indoors, depending on the type of plant.
Small 6-packs are ideal for starting a large volume of seedlings while maximizing space on shelves or under grow lights. However, the seedlings quickly outgrow the tiny cells, so they’ll need to transplanted outside or potted up to larger containers within a few weeks after sprouting. Keep in mind that once they’re potted up, they’ll take up a lot more room (including under grow lights) so plan accordingly.
That said, we prefer larger 6-packs or 4-packs with more spacious cells to start seeds indoors. While they take up more space from the get-go, using larger cells reduces our need to pot up (one of my least favorite gardening tasks ever TBH) since most seedlings can live happily in them a couple weeks longer – until it’s time to go outside.
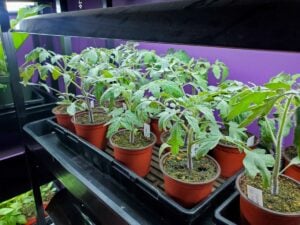
We also start a select handful of larger, fast-growing seedlings in mini pots. For instance, we start our tomatoes in these 4″ nursery pots and eventually pot them up to 8″ pots. We start zucchini seeds in these 6″ pots, and don’t have to pot up at all.
TIP: To reduce waste and save money long-term, invest in high-quality, durable seed starting supplies that you can reuse for many years. Don’t forget to sanitize your seedling supplies between seasons!

How to Start Seeds Indoors: Step-by-Step Instructions
1) Mix Seedling Soil
It’s perfectly acceptable to use seed starting mix as-is (right out of the bag) particularly if it already contains some gentle amendments, worm castings, and compost like this organic seedling mix does.
However, when working with basic seed starting mix (one that’s mostly just peat moss and perlite) we usually like to add just a little bit of compost and potting soil. This helps to bulk up the seedling mix, and give it some extra nutrients, longevity, and oomph since we typically do not pot up the majority of our seedlings.
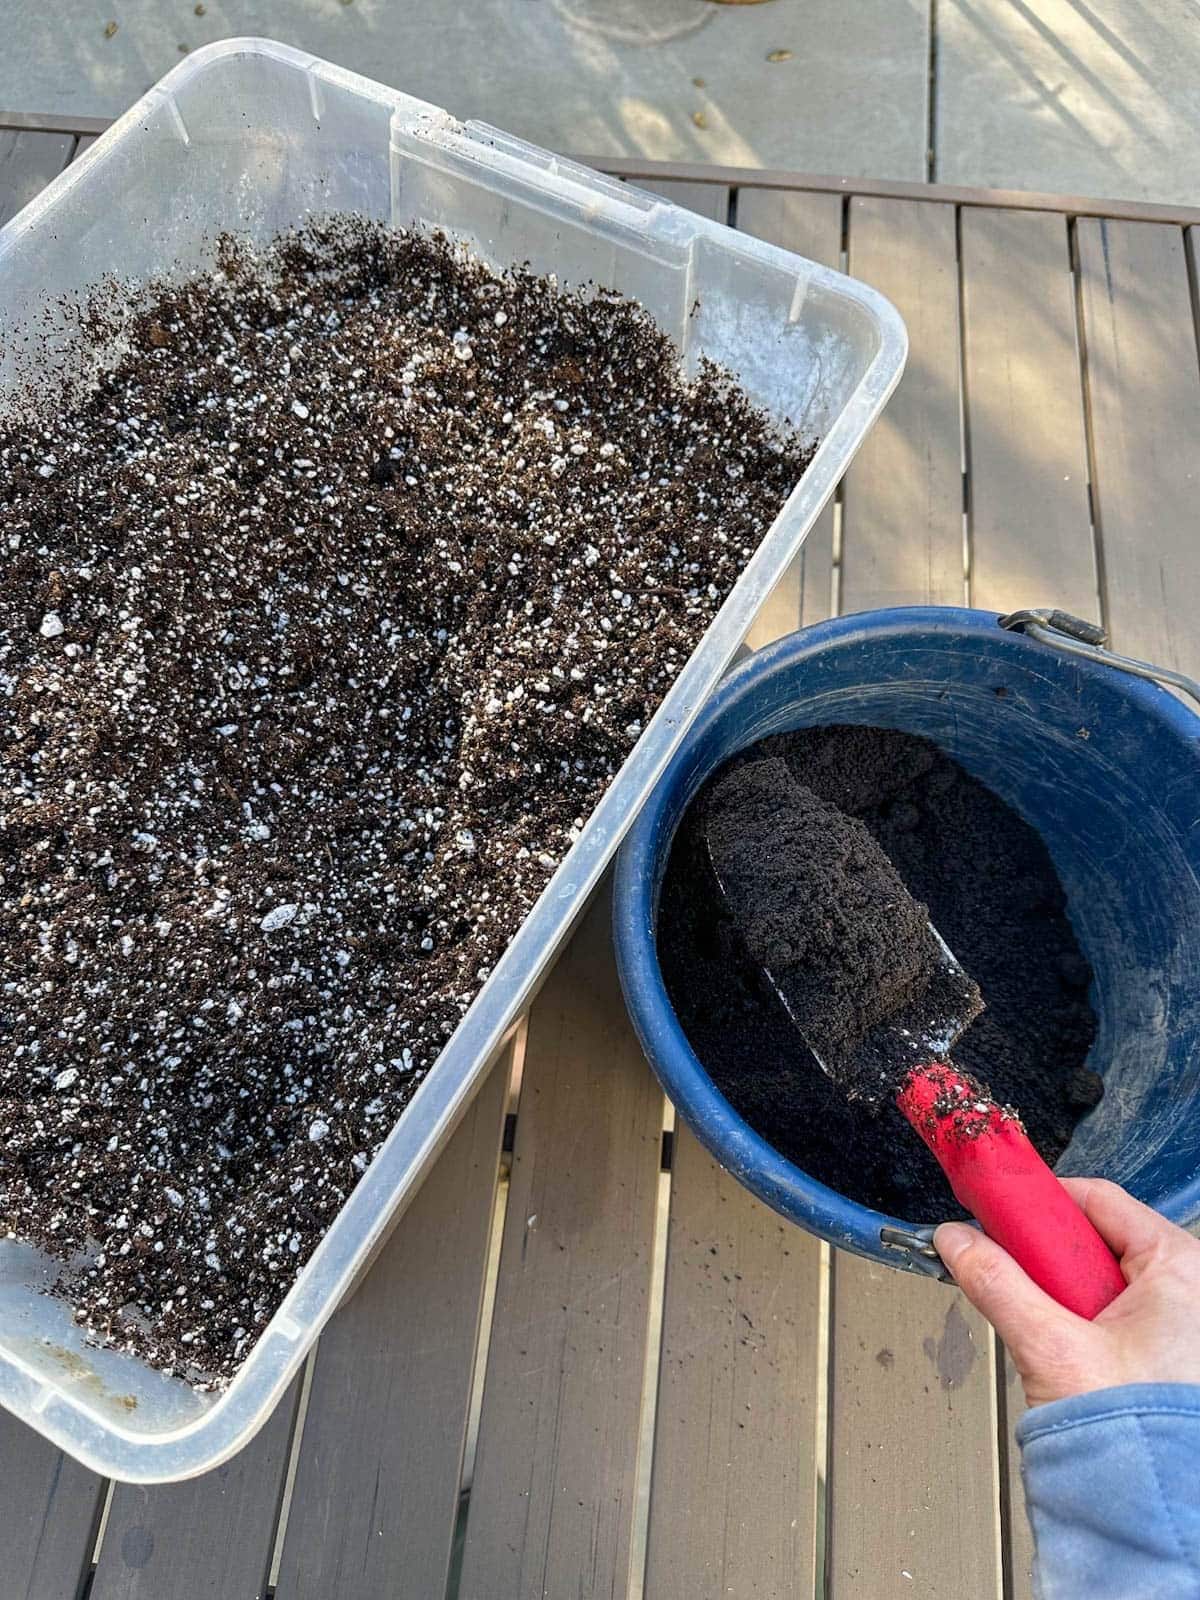
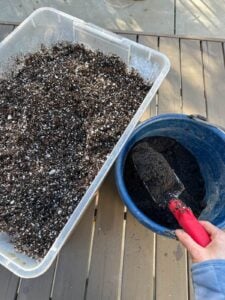
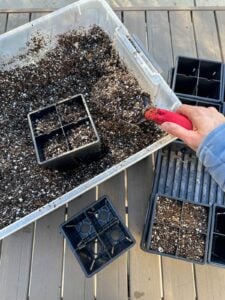
Our usual mix is about 70% seed starting soil, 20% organic potting soil, and 10% worm castings or other fine, aged and screened compost. We mix it all up in a in a large storage tote or other container that can hold it all, which also makes it easy to pre-moisten (the next step). We also make or own homemade seed starting mix from scratch sometimes.
TIP: Since it gets a bit messy, we usually fill our seedling trays with soil outside, and then bring them inside after planting seeds. But working on top of a handy waterproof potting mat is an easy way to your workspace clean if you’re starting seeds indoors!
RELATED: Learn how to set up a worm compost bin to reduce food waste and create your own “black gold” worm castings at home!
2) Pre-Moisten the Seedling Mix
It’s best to sow seeds into damp soil. So, pre-moisten your seed starting mix by adding small amounts of water at a time, mixing as you go until the desired consistency is reached. The goal is the consistency of a wrung out sponge – damp, but not sopping!
Pre-moistening soil is good idea for many reasons:
- It reduces the need to heavily water immediately after sowing seeds – which in turn reduces the risk of disturbing the seeds (e.g. pushing them too deep, or making them float to the top).
- It also helps the soil absorb water more evenly going forward. Sometimes when soil or seedling mix has dry spots, it can actually repel water instead of absorbing it!
- Lastly, pre-moistening the soil keeps your seedling trays filled to a desirable level. In contrast, if you add dry soil and then water it later, it tends to shrink way down and compact.


3) Fill Seedling Trays or Pots
When filling seedling trays with soil, it’s best to avoid compacting it. If anything, give the containers a little shake and tap on the table surface to help it settle and fill any large voids, and then top off as needed. But do not press it down. Seedlings and their tiny fragile roots grow best in loose and fluffy soil!
Having the seed starting mix in a tub makes this step really easy and less messy. I set my seedling trays or pots right inside the tote, and then use a small trowel to scoop the soil into them.

4) Sow Seeds
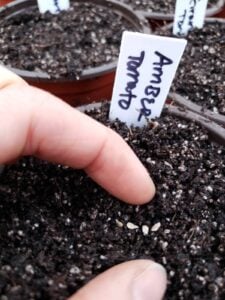
Next, create a shallow hole or indentation in the soil to plant the seeds in. The depth depends on the type of seed, and each seed package should provide guidance on how deep to plant them. For example, it may call for ¼” deep, an inch deep, or “surface sown”. Even for surface-sown seeds, I like to sprinkle just the tiniest dusting of soil on top to help prevent them from drying out.
The smaller the seed, the less deep it is planted. As a general rule of thumb, plant seeds 2 to 3 times as deep as the diameter of the seed itself. For example, if you have a seed that’s about 1/8 inch thick, it should be planted about 1/4 inch deep.
We generally sow 2 to 3 seeds per cell or container, and then thin them down to just one sprout per cell later. Planting more than one seed helps guarantee successful sprouting! I may sow 4 or 5 when using older seeds.
Gently cover the seeds with soil, but do not pack it down. And don’t forget to label everything as you go!


Pre-Soaking Seeds
Some seeds sprout best if they’re soaked in filtered water (non-chlorinated) for a few hours or overnight prior to planting to help expedite sprouting. This is usually recommended for big, hard-shelled, wrinkled seeds like peas, pumpkins, squash, beans, corn, nasturtiums, fava beans, and even beets or cannabis. That said, it’s not a necessary step, so don’t fret it you skip it!

5) Water
If you already pre-moistened your seed staring soil, you don’t need to water much now. I like to use my favorite sprayer to gently mist the top of the soil to get the seeds damp. Repeat as needed over the next several days so the top of the soil doesn’t dry out during germination.
If you didn’t pre-wet your soil, use a sprayer to gently water from above, and also add some water into the lower seedling tray so the soil can soak it up from below.
Avoid using a watering can from the top if possible, as the strong stream of water can disturb the soil and seeds. It’s also easier to accidentally over-water using a watering can.

6) Cover
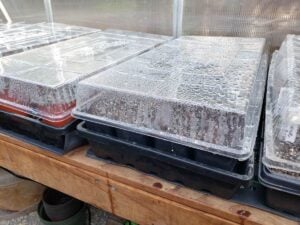
It’s best to cover seedling trays until they’ve sprouted, which prevents the soil and seeds from drying out, reduces your need/frequency to water, and helps keep warmth in. We use these specialized heavy-duty humidity domes.
Yet be sure to remove the covers once the majority of the seeds sprout! I usually do so once about half are up. Failing to remove lids can lead to damping off (seedling death).
If you don’t have clear covers, you could substitute with plastic wrap (poke a couple holes in it) or a spare black 1020 tray turned upside down on top. Most seeds do not need light and can germinate in dark conditions (with the exception of lettuce), but be sure to check frequently and remove any non-transparent lids as soon as seeds sprout! Without good light right away, seedlings will immediately start to get leggy.

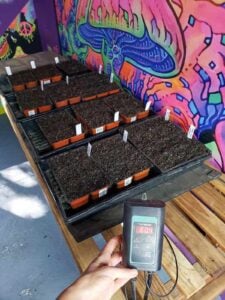
7) Provide Warmth
The optimum soil temperature for most seeds to germinate is 70-80°F. So, if your indoor seed starting area is regularly less than 70°F, use a seedling heat mat to help your seeds sprout consistently and quickly.
To keep our seedling soil at the perfect temperature (with zero effort!) we use a seedling heat mat with an automatic thermostat. A probe in the soil signals the heat mat to turn on or off as the temperature changes throughout the day. Set it at 75° and walk away!
A few plants like lettuce prefer cooler soil to germinate. Furthermore, most seeds can sprout in the 50-60s, though slower and with less success. If your house is just below 70°F and you don’t have a heat mat, find a warm place to keep your seedling trays. This could include the top of a refrigerator or next to a sunny (but not cold and drafty) window.
Do not heat seeds over 95°F! This can sterilize and kill them.

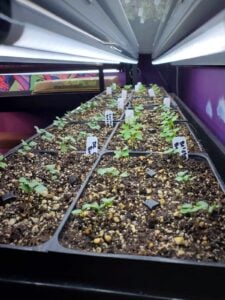
8) Light
Seedlings need ample bright light from the moment they sprout. Without it, they quickly get lanky and leggy, even within just a day or two. (Taller seedlings does NOT mean better!) So, you may want to keep your grow lights over your seeds even before they sprout, so they’re on and ready as soon as they do.
For the best results, keep grow lights on over seedlings for about 14 to 16 hours per day. An outlet light timer really comes in handy here! It’s also best to keep the lights low over the seedlings, hung just a few inches above them and then raise the light as the plants grow. (Some LED lights require more clearance, so check the manufacturer’s recommendations.)

Ongoing Seedling Care
On average, most seeds should germinate within one to two weeks, though some may sprout as soon as two to three days (depending on type and conditions). Once they do, follow the best practices below on how to take care of indoor seedlings – including essential tips for water, light, fertilizer, thinning, airflow, potting up, and hardening off.
Watering Seedlings
Watering seedlings is like Goldilocks: not too little, not too much, just right in the middle! Try to keep the soil damp at all times, but not soggy. If anything, err on the side of caution and let the soil dry out just ever-so-slightly between watering. Tiny roots easily rot and drown when they’re water logged.
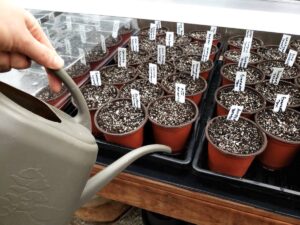
Before seeds sprout, it’s great to use a gentle sprayer to keep the top of the soil moist. However, once they do sprout, it’s best to switch to bottom-watering: when you pour water into the tray below the seedlings, and the soil drinks it up from the bottom. It will only soak up what it needs, then stop.
Bottom-watering seedlings offers many benefits. It encourages roots to grow deep into the soil, keeps the soil more evenly moist, and reduces the risk of damping off or disturbing seedlings. It also reduces the likelihood that you’ll overwater! Just be sure to only add so much water that the soil can completely soak up within a few hours. If there is still standing water after that, carefully pour it off.
Your watering frequency will vary depending on your unique seed starting set-up, soil, and also the size of the seedlings. As they grow larger, they’ll drink up more water and faster. Personally, we find that watering 1 to 2 times per week for brand new seedlings and 2 to 3 times a week for larger seedlings works well.

Heat
Heat is most essential during the germination stage, but can be slowly dialed back thereafter.
Seedlings will grow fast and healthy if the soil is moderately warm (65-75°F) for the first few weeks after sprouting, whether from your naturally warm house or continued use of a heat mat. However, overly hot soil can make seedlings get leggy, which isn’t ideal!
We typically set our seedling heat mat thermostat to 80°F during germination, and leave it there for about a week (or two, for things that sprout more slowly). During cold winter months, we then turn down the heat by 5 degrees per week to slowly acclimate the seedlings to cooler temperatures as part of the hardening off process. Yet when we’re starting seeds during the warm summer months (for our fall/winter garden) we simply remove the heat mats immediately after germination.

Lights
Again, it’s best to keep grow lights on over seedlings for about 14 to 16 hours per day. Also keep the lights hung low, just a few inches above the seedlings. Raise the light as the plants grow taller. (Some LED lights require more clearance, so check the manufacturer’s recommendations.)
If your seedlings don’t all get equal light exposure (e.g. if you’re trying to fit too many plants under a smaller grow light) rotate the trays and containers every few days to make sure everyone gets their chance in the spotlight!

Thinning Seedlings
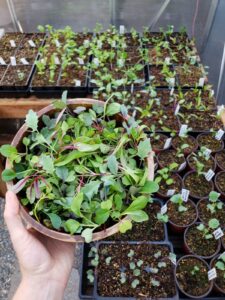
As painful as it may be, it’s best to thin your seedlings down to the one healthiest sprout per cell or pot within the first couple weeks, shortly after the first set of true leaves appear. (“True” leaves are the second set that grows after the initial sprout.)
Seedlings that are not thinned compete for nutrients, water, air, and root space. Crowded seedlings grow much slower! On the other hand, thinned seedlings will explode with rapid growth thereafter. Trust me, I’ve done side-by-side experiments. The difference is insane!
I personally prefer to use small garden snips to cut out excess seedlings at the soil level, and keep the most thick, robust and healthy looking one. Other folks like to pluck out extra seedlings, which does risk breaking the roots of the keeper. Or, you can gently tease apart extra seedlings and pot them up separately.
RELATED: See our complete guide on thinning seedlings for more details, including which types of thinned sprouts are edible as microgreens!

Air Flow and Movement
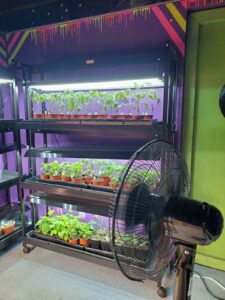
Seedlings started indoors need movement to develop strength and prepare for the great outdoors. In contrast, seedlings grown outside are naturally strengthened through exposure to wind, rain, or other conditions in the garden. Coddled, immobile seedlings make for weak seedlings!
An easy way to help grow strong seedlings is to provide a gentle breeze via an oscillating fan once they’re a few weeks old. Go easy though! Avoid blasting them too close or strong, especially at first. Good air circulation also helps prevent disease, mold, and a fatal seedling condition called “damping off”.
In lieu or addition to a fan, many gardeners like to gently run their hands over the tops of the seedlings, giving them a little tickle. This too induces the same strengthening response as wind.

Fertilizing Seedlings
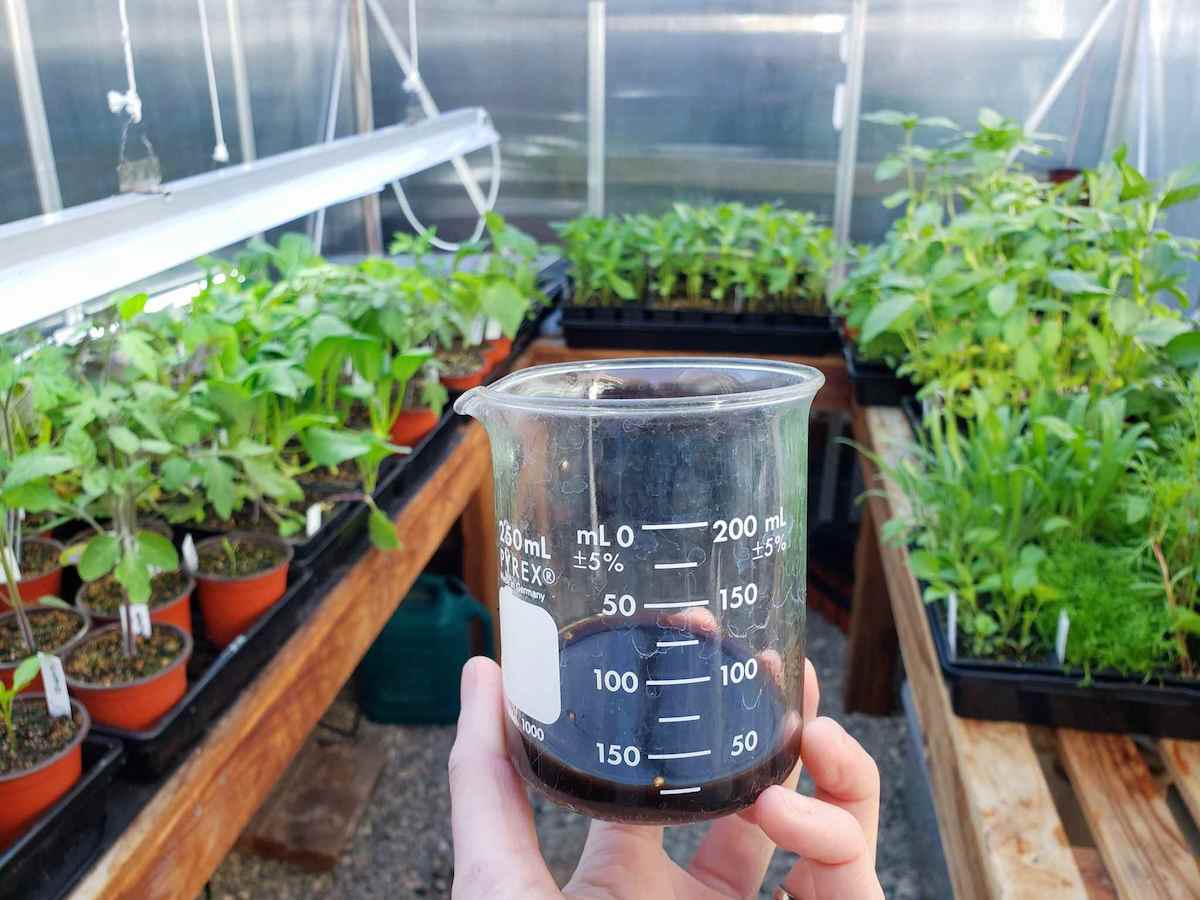
Baby seedlings do NOT need fertilizer in the first couple weeks of life. In fact, fertilizer can easily “burn” or hurt them! But once their first set or two of true leaves appear (a few weeks after sprouting), you can start to feed seedlings very lightly with a gentle seedling-safe fertilizer.
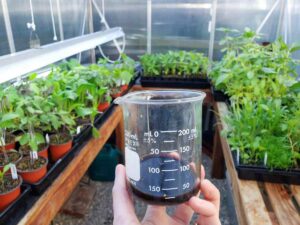
We like to use dilute seaweed extract and/or dilute fish fertilizer, mixed with water and poured into the tray below. Go even lighter than what the bottle recommends for seedlings! Since our seedlings are only indoors for a month or two maximum, we typically only need to fertilize once or twice before they get transplanted outside.
**If you’re planning to pot up into a larger container with richer pottering soil and compost soon, you likely don’t need to fertilize your seedlings!
Potting Up
A few weeks after germination, start keeping an eye on the bottom of your seedling containers. Are roots starting to poke through the bottom drainage holes? How big is the plant looking? Does it still look happy and healthy? Has it still been growing steadily, or has it slowed?
Seedlings stuck in too-small of a container can get root bound, where root growth is restricted and can stunt the plant. So, you may need to “pot-up” your seedlings (gently transplant them into larger containers) once or twice before transplanting them outside. This will depend on the size seed starting trays you started with, and how long it is from the time they sprouted until it is time to plant them out.
When the roots start to poke through the bottom of the container a lot, or if you started seeds in super tiny containers but they can’t be planted out for several more weeks, it’s probably time to pot up to a larger size. Also, if you started in straight seedling mix, the plants will enjoy a slighter richer soil now.
RELATED: See this article for more tips and best practices on potting up seedlings.

Hardening Off
You’ve tended to your seedling babies for weeks or even months. You’ve checked your planting calendar, and your last frost date is approaching or just past. Are you feeling ready to move them outside? Hold tight! Before transplanting, they need an adjustment period.
Hardening off is the process of slowly introducing indoor seedlings to the great outdoors. This is done by taking them outside for short periods to gradually increase their exposure to direct sunlight, wind, cold, and other outdoor conditions over the period of a week or longer. Without being hardened off first, tender seedlings are subject to transplant shock, injury, or even death.
RELATED: See our complete guide on hardening off seedlings for step-by-step instructions.

Transplant Time
After hardening off, try to choose a mild-weathered day to transplant your seedlings outdoors. This guide shows how we like to transplant our seedlings, including soil prep and amendments. And don’t forget about companion planting!
Once they’re out in the garden, keep an eye on the weather forecast, especially if your area is known to be a bit unpredictable. Have a plan and be prepared to protect seedlings against unexpected frost or heat waves if needed. They’re especially sensitive for the first couple weeks after transplanting.
Also keep an eye out for critters like squirrels, rabbits, or birds that tend to go after seedlings. We always cover our extra tender leafy greens, brassicas, and direct-sow beds with hoops and insect netting to protect them. There is nothing more frustrating than raising seedlings and then losing them all!
RELATED: Learn how we use garden hoops and row covers to protect our plants from pests, frost, and heat.

And that concludes this lesson.
Congratulations, new plant parent. Now that you know how to start seeds indoors, it’s time to enjoy healthy homegrown food for years to come. I hope you found this article to be helpful and easy to understand. If so, please leave a review below! Also please let us know if you have any questions in the comments. Happy seed starting!
Here is a video that goes through just about everything we discussed here today:
You may also enjoy:
- Garden Companion Planting Chart, Plans, and Benefits
- Garden Zones 101: New Hardiness Zone Map, Planting Charts, Limitations
- How Long Do Seeds Last? (Seed Viability Chart)
- How to Build a Raised Garden Bed: Step-by-Step Guide
- Composting 101: What, Why & How to Compost at Home
Printable summary

How to Start Seeds Indoors (and Take Care of Seedlings)
Equipment
- seeds
- seed starting mix (soil)
- seed starting trays of choice – including top and bottom trays
- water – sprayer and/or watering can
- labels
- worm castings (optional but recommended)
- grow lights and timer (optional but recommended)
- seedling heat mat (optional but recommended)
- humidity dome covers (optional but recommended)
Instructions
Starting Seeds Indoors
- Start with a fine, fluffy, well-draining soil mix that is made for seed starting, not regular potting soil (which to too heavy and rich on it's own). I often mix 70% seed starting mix with 20% potting soil and 10% worm castings or other well-aged, fine, screened compost. I like to do this in a storage tote.

- Use a sprayer to slowly pre-moisten the seed starting soil mix until it's evenly damp, but not sopping wet.
- Fill seed starting trays with soil, but do not compact.
- Sow (plant) seeds following the recommended depth on the seed package, varying depending on the size and type of seed. (Most common seeds call for about 1/4" deep, though larger seeds like peas or beans can be planted 1/2-1" deep). I usually sow 2 to 3 seeds per cell or container. Gently cover with soil, and don't forget to label!
- Gently mist the top of the soil using a water sprayer to moisten where the seeds were just planted, but avoid the heavy stream of a watering can.

- Cover the seedling trays with clear humidity domes to help keep the soil moist during germination. Remove the covers once the majority of the seeds have sprouted.
- Place the seedling trays in a warm location to help aid in germination (70-80F) is ideal, such as on a seedling heat mat with an adjustable thermostat. Do not heat seeds over 95F!
- Immediately after the seedlings or sprout (or even before) provide bright direct light for 14 to 16 hours per day. A grow light + timer is highly recommended. Most grow lights should be hung just a few inches over the seedlings.

Ongoing Seedling Care
- WATER: Try to keep the soil damp at all times, but not soggy. If anything, let it dry out slightly between watering. After seeds sprout, switch to bottom-watering: add just enough water to the lower tray that the soil absorbs it all within a few hours. Pour off excess as needed to avoid sitting in standing water.
- HEAT: is most essential during germination but then can be slowly dialed back. If your house is warm (regularly 65-75) you could remove the heat mats after the seeds sprout. If your seeds are in a cooler location, gradually reduce the heat by 5 degrees each week after sprouting
- LIGHT: Hang the light low over the seedlings, just a few inches above, and gradually raise it as they grow. (Some LED lights require more clearance, so check the manufacturer’s recommendations.) Keep the lights on 14-16 hours per day. Rotate your seedlings trays every few days if they don't all get equal light exposure.
- THINNING: A week or two after they sprout, carefully thin the seedlings down to just one strong, healthy-looking sprout per cell or container. I like to snip out the extras at the soil line instead of pulling.
- AIR FLOW: A week or two after sprouting, introduce a light breeze via an oscillating fan. Don't blast them hard, just enough to cause a wiggle and movement (which strengthens seedlings stems)
- FERTILIZING: Do NOT fertilize young seedlings until at least a few weeks after sprouting. Then you can use a very gentle, seedling-safe fertilizer such as dilute seaweed extra or dilute fish fertilizer. Water from below, and go lighter than what the manufacturer recommends. If you're going to pot up into richer soil soon, you likely don't need to fertilize.
- POTTING UP: Pot up growing seedlings into larger containers with slightly richer potting soil (or mix half seedling soil and potting soil) as needed – when they seem too large for their containers, have a lot of roots coming out the bottom, or seem to stop growing. You'll likely need to do this once or twice before transplanting seedlings outdoors, depending on the size of seed starting trays/pots you began with.
- HARDENING OFF: A week prior to transplanting outside, harden off (introduce) seedlings to outdoor conditions by taking them outside in the shade for a short period of time – gradually increasing the time and direct sun exposure each day.
- TRANSPLANTING: Choose a mild-weather day for transplanting. Keep an eye on the weather forecast, and have a plan to protect tender young seedlings from frost, extreme heat, and pests. (We use hoops and various types of row covers like shade cloth, frost cloth or insect netting as needed)


Deanna Talerico
Deanna Talerico (aka DeannaCat) is a garden educator and writer with over 15 years experience in organic gardening. She is a retired Senior Environmental Health Specialist, and holds a M.A. in Environmental Studies and B.S. in Sustainability and Natural Resources.


197 Comments
Carol
Super helpful tutorial! Question for you – this was the first year that I put a dome over my seedlings while they germinated. I’m guilty of leaving it on a day or two too long and my tomatoes and zinnias got leggy fast. They’re under grow lights now – will they recover or should I cut my losses and start over? Thank you!
Aaron (Mr. DeannaCat)
Hi Carol, so great to hear you found the article so helpful! For your tomato seedlings, while being “leggy” isn’t optimal, you can bury their stems in soil as they mature which should help cut down on their lankiness. When we pot up our tomatoes we will bury part of the stem and when we plant out in the garden, we will bury them even deeper as they will grow roots off their stems. For zinnias, I have hear some people do something similar but I am not sure how readily they grow roots off of their stem, you also have to be more concerned with stem rot as well.
In all, it’s still fairly early for you so you can just sow more seeds and get them under the lights as soon as they germinate but you should be able to still make it work (even if it takes a tad more work) if you leave them be while burying parts of their stem as they mature or during a pot up. I hope that helps and reach out if you have any other questions.
leticia anaya
Hi! Thank you for the thorough explanation. Some of my tomato seedlings have started to turn yellow, do you know what that signifies?
Aaron (Mr. DeannaCat)
Hi Leticia, my guess is the seedlings have been overwatered, seedlings don’t need a lot of water when they are just starting out. What size containers are the tomato seedlings in (if you are using bigger containers, the soil will hold more water versus smaller containers that would need water more often)? If you have them in seedling treys, we typically water from below by filling up the seedling tray with a layer of water, the soil in the containers should absorb the water within an hour or two, if there is leftover water in the tray after this time, dump out the excess water as it’s more than they needed. Also be sure your seedlings have adequate lighting as well. Hope that helps and reach out if you have any other questions.
Patti Rummel
Covers everything you need to know. The pictures and videos really help.
Jessica Pipitone
So helpful! Thank you for all you do and the content you create.