

How to Install Drip Irrigation for Raised Garden Beds (Drip Tape)

Come learn how to set up and install a handy drip irrigation system for raised garden beds. This guide will walk you through everything you need to know – including the supplies needed, step-by-step instructions, real-life photos from my garden, and a demonstration video – so you can feel confident to set up a similar drip system of your own.
I honestly can’t imagine watering my garden without automated drip. Compared to hand-watering, it saves me SO much time, energy and water – and also keeps my plants growing healthier! Plants thrive with deep, consistent moisture.
NOTE: The system in this tutorial utilizes drip tape, though the skils you’ll learn can apply to a variety of drip irrigation systems. See my other easy raised bed drip irrigation tutorial to see how to use 1/4″ drip line instead. (That system also connects right to a nearby hose spigot.)
2026 UPDATE: It’s been over 4 years since I installed the drip system shown in this tutorial, and it’s still performing exactly as expected! Everything is in great shape and we haven’t needed any replacement parts. I’ve found that a drip tape line will pop loose from it’s header once in a blue moon, but it’s quick and easy to reconnect.
In this article you will find:
- A brief introduction to drip tape irrigation, including best practices about line spacing and water pressure.
- A list of supplies needed to set up drip irrigation to raised garden beds. Nearly everything on this list was purchased through Drip Depot. We’ve been long-time Drip Depot customers, and I recently signed up as an affiliate with them as well. So, we’ll receive a small commission if you shop through our links – which is greatly appreciated and supports our work!
- A YouTube video. I will walk you through the supplies and process of installing drip irrigation for raised garden beds using drip tape. I also show a quick demo of how to glue PVC pipe, and a few other styles of raised bed drip irrigation systems too. If irrigation feels intimidating or confusing to you, it may be best to start by watching the video and then come back to digest everything else!
- A written summary of the steps shown in the video, with example photos of my own drip system.
- Frequently asked questions about burying drip tape, how long to run drip irrigation, and tips for winterizing drip systems at the end.
Jump straight to the video here.

Would you like to save this?
Disclosure: Homestead and Chill is reader-supported. When you purchase through links on our site, we may earn an affiliate commission.
Benefits of Drip Irrigation
In addition to saving you previous time, labor, and energy compared to hand-watering, drip irrigation boasts numerous of science-backed benefits! It reduces water consumption by 30 to 70% (mostly through reduced runoff and evaporation), increases plant vigor and crop yields, reduces weeds and fertilizer needs, and limits the spread of disease between plants. Essentially, it’s better for you, your garden, and the planet!
What is drip tape?
Drip tape is essentially a flattened version of drip tubing. It lays flat on the soil surface but puffs up once it’s pressurized and full of water.
Drip tape comes with drip emitters pre-installed at a set spacing, such as every 6, 9, 12, 18, or 24 inches apart. Each individual emitter will emit a set quantity of water – from 0.25 gallons per hour (GPH) up to 1 GPH depending on the type of drip tape you choose.
Drip tape operates at a lower water pressure (8-15 psi) than standard drip irrigation (20-40 psi).
It’s important to note that not all drip tape is created equal. In fact, drip tape often gets a bad rap as being short-lived or even “disposable” because of the way it’s commonly used in big ag. Yet the lifespan of drip tape depends on the quality and thickness of the tape used. We chose the thickest commercial-quality drip tape we could find (15 mil), rated to last up to 10 years when taken care of!

Why we chose drip tape
We chose to use drip tape in our raised bed drip irrigation system for a number of reasons:
- I love the convenience of pre-installed emitters, rather than punching holes and adding emitters to solid ½” irrigation tubing as we’ve done in the past.
- I also like the close emitter spacing that drip tape offers. Our drip tape has emitters every 6 inches. There is another style of round drip tubing with pre-installed emitters (like this one). But from what I saw, 9 inches was the closest emitter spacing available in that type. We’ll talk more about spacing below.
- Drip tape has the reputation of being less prone to clogging than other types of emitter tubing. Drip tape is well-designed not to clog, even when buried below soil or mulch! It was highly recommended by a friend of mine who does professional garden installation and maintenance.
Spacing drip irrigation in raised garden beds
I recommend spacing drip irrigation in that evenly saturates the whole garden bed, with the rows spaced no wider than 12” apart. 8 to 10 inches between rows is ideal. Then you can plant anywhere between the rows of drip line, not only right next to them.
Keeping the entire garden bed damp (rather than watering only at the base of plants) also keeps the soil microbiome healthy and encourages roots to explore, growing larger and wider. That leads to bigger, healthier plants!
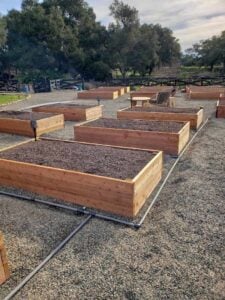
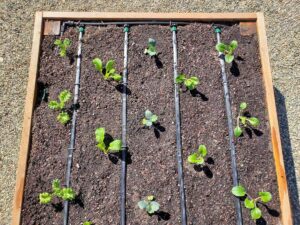
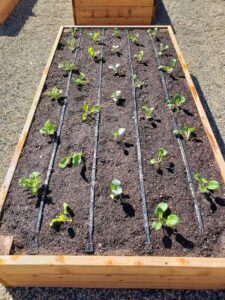
In my 4×8’ raised garden beds, we installed our drip lines about 9 inches apart evenly across the bed – or four lines total per bed. Each row of drip tape has .25 gph emitters every 6 inches.
It’s best to position the header in one short end of your raised garden bed. Then attach the drip tape (or other drip tubing and emitters) from the header down the length of the garden bed.

Understanding water pressure in drip irrigation systems
Average household water pressure is around 40 to 60 pounds per square inch, also known as PSI. That is an ideal pressure for sinks, showers and outdoor hose bibs. Yet drip irrigation systems cannot handle such high water pressure. Too much pressure can cause “blowouts” or damage. Therefore, you’ll likely need to add a pressure reducer to your raised bed drip irrigation system.
The best operating pressure for standard drip irrigation tubing and emitters is between 20 to 40 psi. Most times, one pressure reducer at the start of the system is adequate (e.g. where it connects to a faucet or control valve). Our main irrigation valves already had 40 psi pressure reducers installed at the head assembly. Note that lengths of over 100 feet of standard ½” irrigation tubing may start to lose pressure at the farthest end.
Yet drip tape needs even lower pressure, from 8 to 15 psi, depending on the thickness and specifications of the chosen drip tape. ***In order to maintain good water pressure throughout our large garden space, we kept our main PVC lines at 40 psi but then added a 15 psi pressure regulator inside each raised bed before connecting drip tape.***


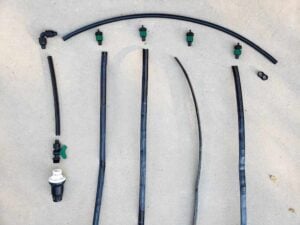
Supplies Needed
Here’s a list of the supplies you’ll need, along with a numbered photo of each item below. At the end, I also listed a few alternative supplies and adjustments if you prefer to use standard ½” drip tubing instead of drip tape.
- A main water supply. We ran PVC to each raised bed, and then converted to drip tubing within each bed. However, you can easily run the same type of drip tape irrigation system from a regular faucet or hose bib. This article and video will show you how to attach drip to a hose bib with an automated timer.
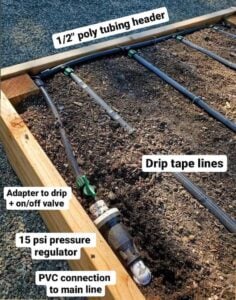
- Standard ½” irrigation tubing, which you can buy here in 50 to 1,000-foot rolls. This will be used to create the main “header” that the drip tape lines will attach to.
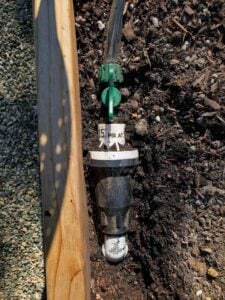
- An adapter to connect the ½” drip tubing to your main water supply. We used this adapter to convert from threaded ¾” PVC pipe to ½” irrigation tubing (which has an option for ½” threaded pipe size under the same link). On the other hand, this 4-in-1 adapter is ideal to attach drip to a regular faucet or hose bib instead. It includes a pressure reducer, backflow device, filter, and drip tubing connector.
- Optional but recommended: a valve to control or turn off each raised bed individually. Our PVC-to-drip adapter (described just above) has a valve already included. However, you can buy these separate valves to install within your ½” tubing too.
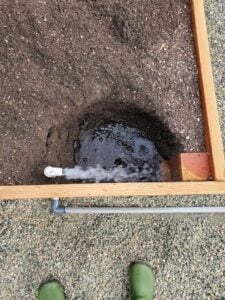
- Pressure reducers. Standard drip systems should be reduced between 20 to 40 psi, which can occur at the main connection (such as at a hose bibb or irrigation valve). Our main irrigation valves already had 40 psi pressure reducers installed. Systems using drip tape must be further reduced to 8 to 15 psi (check your drip tape specifications) so we added an additional 15 psi pressure regulator at each bed. Note that our regulator is made to connect to ¾” pipe thread, but other sizes are available.
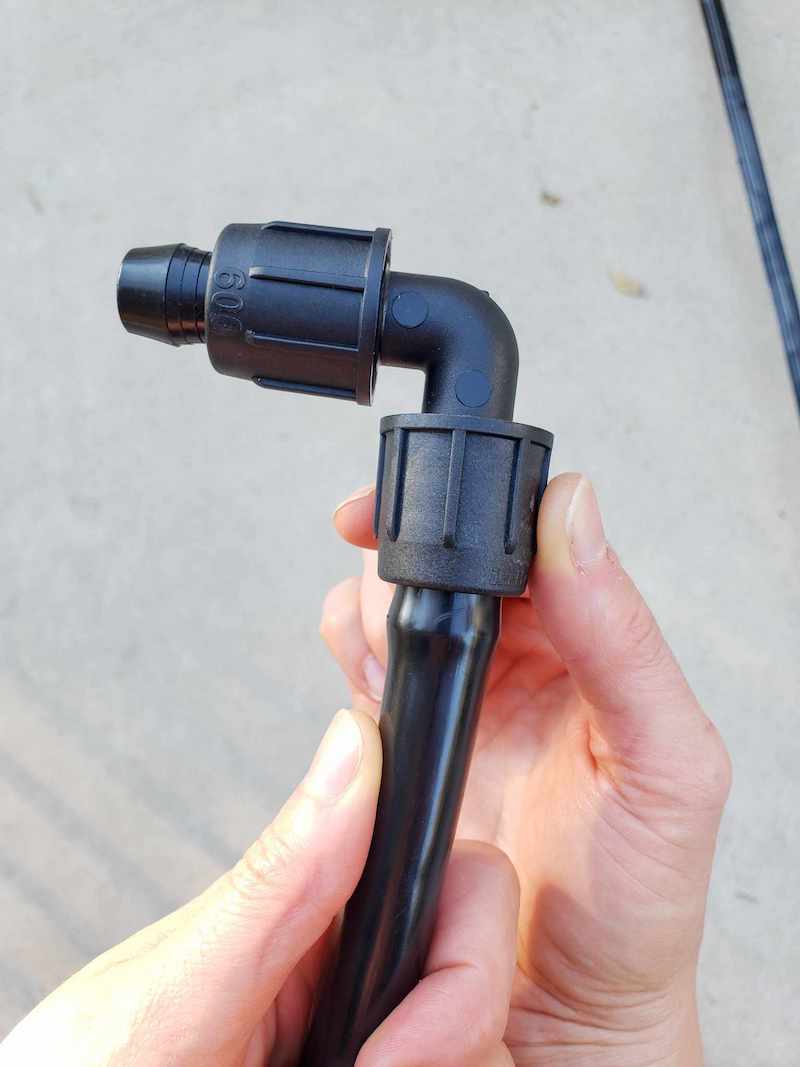
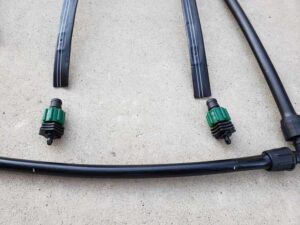
- Elbows and/or tee connectors to create the header. We prefer these Perma-loc connectors that screw on over the tubing. They can easily be disconnected as needed for repairs or changes. Rather, these common compression-style connectors are more permanent; things need to be cut apart to make changes.
- Drip tape of choice. We used this heavy-duty 15 mil drip tape with 0.25 gph emitters every 6 inches. The 0.5 gph would be ideal for raised beds too! Drip tape comes in rolls of 100, 500, 1000 feet or more. Run some quick math to determine how much you need. For example, we installed (4) 8-foot rows per 4×8’ bed. So that’s 32 feet per bed X 16 beds (plus a few smaller beds) = about 600 feet. See above for more info on spacing.
- Barbed adapters. We used these 3.6 mm barb adapters to connect the ⅝” drip tape to the ½” header tubing.
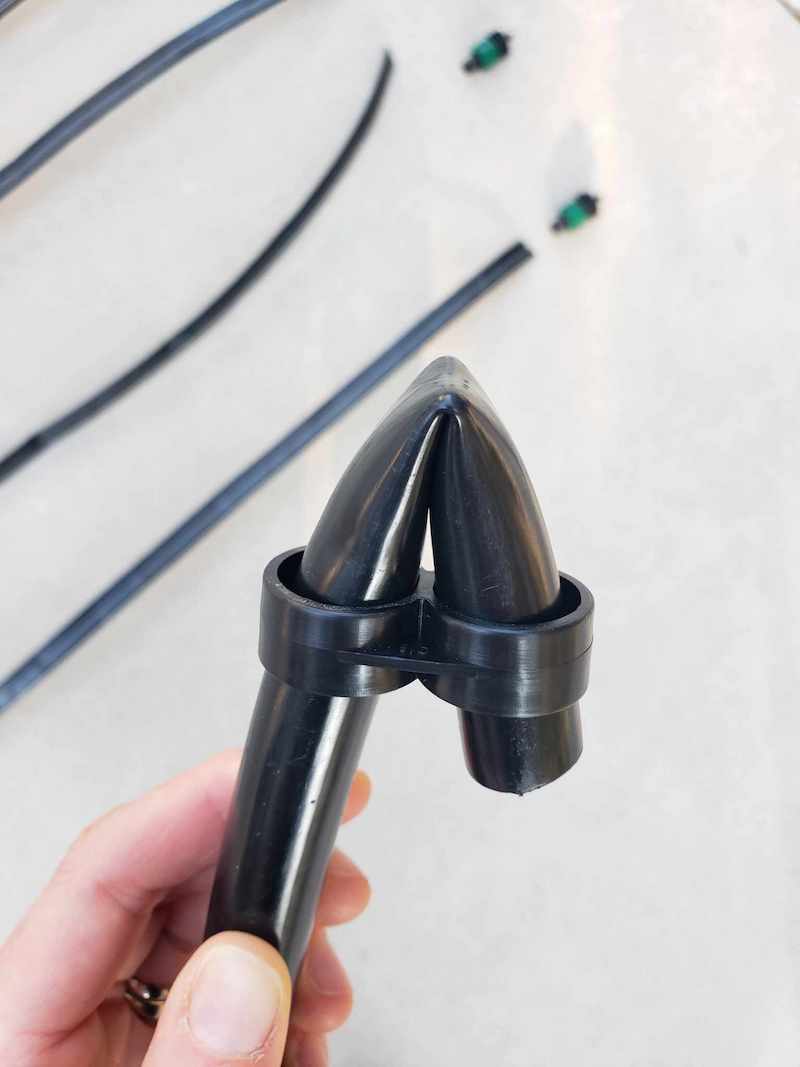
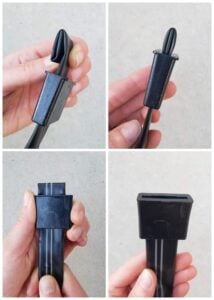
- End caps or clamps. We use figure 8 clamps to end the ½” irrigation tubing header. These closure clips are what we used to end each line of drip tape.
- A punch tool. Used to add holes to the ½” irrigation tubing and then connect various adapters or drip emitters to. Here is a simple hand punch, or this option is similar to what we use.
- Stakes, pins or galvanized landscape staples to hold everything in place.
- If you’re working with PVC, you’ll need PVC primer, glue, and a good set of ratchet-style pipe cutters.
- Optional: a timer or controller to automate the system. Our orchard, existing garden, and new raised bed drip irrigation systems are connected to a solar-powered Hunter 6-station controller. The other drip systems we run from hose bibs have this simple faucet timer.
- A backflow preventer and filter. It’s best practice to have a backflow prevention device to stop soil or other contaminants from getting back into your household water supply. Similarly, a filter will prevent debris from entering and clogging your drip irrigation system. There are a few backflow preventer options, depending on your main water supply connection. Hard-piped systems like ours usually have a filter and backflow preventer within the mainline head assembly. Or if you are connecting to a hose bib, use a 4-in-1 faucet adapter – which has a backflow device, filter, pressure reducer and drip connection. You can add a timer too! See photos of both below.


This all-in-one adapter makes it a breeze to attach your drip irrigation to a hose bib or faucet!
Drip Irrigation for Raised Garden Beds (Video)
Now, please enjoy this video demonstration that will walk you through the installation process. Then, keep scrolling for a written summary and additional photos of our system. Before getting started creating your own raised bed drip irrigation system, draw it all out! That will help you visualize the system as well as develop a list of the parts you need.
Steps to Set Up Drip Irrigation in Raised Garden Beds (written summary)
1) Run water supply lines to each raised garden bed
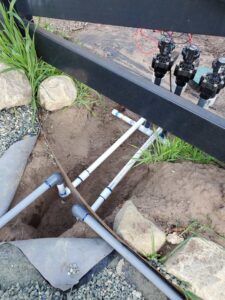
The main water supply lines may be PVC, other hard piping, or ½” black drip tubing itself. One option is to add water lines and risers concealed under/inside every raised bed, either before the garden beds are installed or trenched under existing beds after-the-fact. Or, simply run the water lines up the outside of the bed wall.
After construction or modifications, flush the main water lines to remove any debris before connecting drip irrigation components or valves. Simply turn them on and let the water run for a few minutes. Keep the lines elevated or otherwise protected from anything getting back in during the process.


Notes on our water line installation:
You’ll see in the photos that we installed our PVC lines on top landscape fabric, under several inches of gravel. However, please keep in mind we live in a mild climate that doesn’t freeze over winter. It also doesn’t get all that hot in summer!
Otherwise, it’s best practice in most places to trench and bury pipes at least 6 inches minimum (usually 12″ to 18”) to protect them from freezing or temperature extremes. Therefore, please look into the best practices for irrigation water line installation in your climate.
To offset how shallowly we installed the supply lines, we used schedule 80 PVC (grey) rather than schedule 40 (white). Schedule 80 is thicker, more resilient to temperature swings, and UV-resistant. Unlike white PVC, it won’t get brittle and crack from sun damage. Therefore, schedule 80 is recommended for above-ground installations (or in situations similar to ours). It is more expensive than schedule 40, so only use it if you have to.


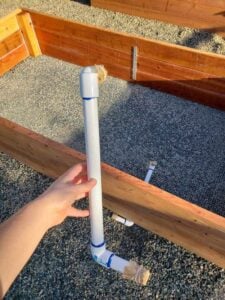
2) Convert from the main water supply lines to drip
Next, use an appropriate adapter for your system to connect the main water supply lines to ½” drip irrigation tubing. (That is, unless you’re already using 1/2″ irrigation tubing for your supply lines).
The right adapter will depend on your particular supply lines (various sizes of PVC, other hard-piping, a hose bib, etc) as discussed above and in the video.
To use the same adapter we used, you’ll want your PVC point-of-connection to have a threaded female fitting. The adapter is available for either 1/2″ or 3/4″ threaded PVC connections, but be sure to choose the 1/2″ Perma-loc size!

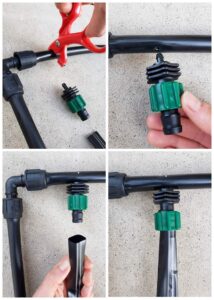
3) Assemble the header and drip tape lines
If you’re installing drip irrigation in multiple raised garden beds of the same size, I recommend making one header in/near the garden bed to be sure everything fits and is spaced the way you like it. Then, use that header as your guide or prototype and assemble the remaining headers in a clean work space. (Such as a concrete patio. We even put some together on our dining table.) That way, there is less risk of getting soil inside the parts as you work – which can clog your emitters!
- Measure and cut the solid 1/2″ poly tubing to fit inside one short end of your raised bed. If you’re using figure 8 end clamps like us, leave a couple inches extra to fold over.
- Measure and cut the smaller/side section of the header that will connect to the main water supply/adapter.
- Connect the pieces of header tubing with elbow connectors.
- Measure and mark where you want each row of drip tape to attach, spaced evenly in the bed (between 6 to 12 inches apart).
- Use a punch tool to create holes in the main header tubing. Be sure the holes are oriented in a way that will have the drip tape laying flat on the soil surface.
- Insert barbed adapters into the holes.
- Attach drip tape. Completely loosen the perma-loc nut (exposing as much of the barb as possible), slip the drip tubing over the barb, then hold it in place while you tighten the nut down over it. Remember, keep the emitters facing UP!
- Add end caps/clips to both the main header line and drip tape lines.


4) Install the drip system – and enjoy!
Finally, install your new drip irrigation in the raised garden beds. Be sure that the emitters face upwards. Pin everything in place with landscape staples. Connect your header to the main water supply, and turn on the system to test it. Tighten or adjust any leaky connections as needed. Cover the drip components with a little soil or mulch if desired to protect it from sun.
Now you can sit back, relax, and enjoy your brand new easy, efficient, time-saving raised bed drip irrigation system!

Frequently Asked Questions
Can you cover or bury drip tape irrigation?
Yes! Drip tape can be installed on the soil surface, buried up to a foot below the soil, or covered with mulch without clogging. Even better, covering drip tape (or other drip irrigation components) can offer protection from sun damage and temperature extremes, thereby extending its lifespan.
In order to keep the very top of our soil well-irrigated, I keep our drip tape fairly close to the soil surface but usually cover it with a little mulch.
How long should I run drip irrigation in raised garden beds?
It depends! Every garden will have different water demands based on the unique climate, season, temperatures and rainfall patterns. It also depends on your mulching practices, and how thirsty your plants are. Larger, mature plants generally “drink” more water than smaller ones. Soil protected with a nice 2 to 4″ layer of mulch will stay damp much longer than bare soil, greatly reducing water needs.
In general, it best to provide less frequent, deep, long watering as opposed to short shallow bouts of water every day. This will encourage deep healthy roots and stronger, more resilient plants.
Try to water enough to keep the soil evenly moist at all times, but allow it to dry out ever-so-slightly between watering. (Never fully dry, but not constantly soggy.) Remember that plants breathe through their roots!
In my climate, I typically run our drip system for about an hour twice per week but increase to 3x a week during heat waves. This will also vary depending on the type of emitters used. For instance, if we used drip tape with .5 gph emitters (instead of .25 gph), we could run the system for half the amount of time.
When direct-sowing seeds, plan to provide additional overhead or hand-watering during the first few weeks. That will help keep the top of the soil nice and damp during germination and early root development.

Winterizing a raised bed drip irrigation system
As with all types of irrigation, it’s best to winterize your raised bed drip irrigation system before freezing conditions arise. At minimum, thoroughly drain the system and protect it with a nice deep layer of mulch. Leaving standing water in pipes or valves can cause them to crack when the water freezes and expands.
Or, to further reduce the risk of damage, folks in extremely cold climates may want to remove the drip irrigation components completely – storing them in a protected location over winter. There is no need to take the whole system apart however! Use a threaded adapter at the point of connection in each raised bed. Then you can simply unscrew it, remove the entire header and attached drip lines together in one piece, and hang it in the garage (or something similar).
And that concludes this lesson on how to set up drip irrigation in raised beds!
Well folks, I realize I just shared quite a bit of information to digest. Who knew irrigation could be so dry? 😂 But now your garden beds should be the opposite of dry! I hope this article took some of the mystery out irrigation for you. I also hope you now feel prepared and comfortable to install drip irrigation in raised garden beds of your own!
Please feel free to ask any questions in the comments below. If you found this information to be valuable, please spread the love by pinning or sharing this post. Thank you so much for tuning in, and happy watering!
You may like these related articles:
- How to Install Drip Irrigation to a Hose Bib or Faucet (video included)
- How to Build a Raised Garden Bed (video included)
- 17 Ways to Save Water in the Garden and Landscape
- Rainwater Harvesting 101: How to Set up a Rainwater Collection System
- How to Remove or Kill Grass (and Grow Food, Not Lawns!)

How to Install Drip Irrigation in Raised Garden Beds (Drip Tape)
Equipment
- A main water supply. We ran 3/4" PVC to each raised bed, and then converted to drip tubing within each bed. However, you can install a similar drip system using 1/2" irrigation tubing instead of PVC too. This article and video will show you how to attach drip to a hose faucet or spigot with an automated timer.
- heavy duty scissors
- drip irrigation hole punch tool
Ingredients
- 1 roll Standard ½ inch irrigation tubing (solid)- this will be used to create the main “header” that the drip tape lines will attach to.
- Adapters to connect the ½” drip tubing to your main water supply in each bed. We used this adapter to convert from threaded ¾” PVC pipe to ½” irrigation tubing (which has an option for ½” threaded pipe size under the same link). On the other hand, this 4-in-1 adapter is ideal to attach drip to a regular faucet or hose bib instead. It includes a pressure reducer, backflow device, filter, and drip tubing connector.
- Optional but recommended: a valve to control or turn off each raised bed individually. Our PVC-to-drip adapter (described just above) has a valve already included. However, you can buy these separate valves to install within your ½” tubing too.
- Pressure reducers. Standard drip systems must be reduced to 20 to 40 psi, which can occur at the main connection (such as at a hose spigot or irrigation valve). Our main irrigation valves already had 40 psi pressure reducers installed. Systems using drip tape must be further reduced to 8 to 15 psi (check your drip tape specifications) so we added an additional 15 psi pressure regulator at each bed. Note that our regulator is made to connect to ¾” pipe thread, but other sizes are available.
- Elbows and/or tee connectors to create the header. We prefer these Perma-loc connectors that screw on over the tubing. They can easily be disconnected as needed for repairs or changes.
- Drip tape of choice. We used this heavy-duty 15 mil drip tape with 0.25 gph emitters every 6 inches. The 0.5 gph would be ideal for raised beds too! Determine how much you need. For example, we installed (4) 8-foot rows of drip tape per 4×8’ bed. So that’s 32 feet per bed X 16 beds (plus a few smaller beds) = about 600 feet.
- Barbed adapters. We used these 3.6 mm barb adapters to connect the ⅝” drip tape to the ½” header tubing.
- End caps or clamps. We use figure 8 clamps to end the ½” irrigation tubing header. These closure clips are what we used to end each line of drip tape.
- 1 If you’re working with PVC, you’ll need PVC primer, glue, and a good set of ratchet-style pipe cutters.
- Optional: a timer or controller to automate the system. Our orchard, existing garden, and new raised bed drip irrigation systems are connected to a solar-powered Hunter 6-station controller. The other drip systems we run from hose bibs have this simple faucet timer.
- A backflow preventer and filter. There are a few options,depending on your main water supply connection. Hard-piped systems like ours usually have a filter and backflow preventer within main valve head. Or if you are connecting to a hose bib, use a 4-in-1 faucet adapter – which has a backflow device, filter, pressure reducer and drip connection.
Instructions
Run Water Supply to Each Bed
- Ever bed will need a water supply line, which could be PVC, other hard piping, or ½” black drip tubing.

- Each bed will need a "riser" that brings the water line up to the soil surface. The water lines and risers could be concealed under/inside every raised bed, either before the garden beds are installed or trenched under existing beds after-the-fact. Or, simply run the water lines up the outside of the bed wall.
- For main water lines, follow best practices for your area in regards to materials, depth, etc. For instance, our climate doesn't freeze so we buried schedule 80 (UV resistant) PVC only a few inches deep in gravel.
- Flush the main lines to remove dirt or debris before adding any further components
Connect Pressure Reduce and Drip Adapter at Each Bed
- Connecting to the main water supply/riser at each bed, add a pressure regulator at each bed for drip tape (8-15 psi) unless your system already has that low of pressure.
- Next, use an appropriate adapter for your system to convert to ½” solid drip irrigation tubing. The right adapter will depend on your particular supply lines (various sizes of PVC, other hard-piping, a hose bib, etc) as discussed above and in the video.
- For example, we used these adapters to connect our 3/4" PVC (female threaded fitting in the pressure regulator) to 1/2″ drip tubing. The adapters also have a shut off valve so we can turn off each bed as desired.

Assemble Headers and Drip Lines
- Each raised garden bed needs a “header” made of ½” solid tubing that sits inside one of the short ends of the bed, that the rows of drip tape connects to.

- I like to assemble my headers in a clean easy workspace away from the garden, such as a patio or table (especially if making several). Make and measure one header fit to the beds as a guide and then repeat.
- Measure and cut the solid 1/2″ solid tubing to fit inside one short end of your raised bed. Leave a few extra inches at the end to fold over and use a figure 8 end clamp to end the line.
- Use a elbow coupler and additional tubing as needed where the header will connect to the main supply line.
- Measure and cut drip tape lines – long enough to run the length of the bed and connect into the header.
- Measure and/or mark where each row of drip tape will attach to the ½” header, spaced evenly across the bed 6 to 12 inches apart. (We typically space our rows of drip tape about 8-9" apart, or 4 evenly spaced across a 4×8' bed)
- Use a punch tool to create holes in the main header tubing. Be sure the holes are oriented in a way that will have the drip tape laying flat on the soil surface. Insert a barbed adapter into each hole.

- Attach drip tape. Completely loosen the perma-loc nut (exposing as much of the barb as possible), slip the drip tubing over the barb, then hold it in place while you tighten the nut down over it. Remember, keep the emitters facing UP!
- Add end caps/clips to both the main header line and drip tape lines (flat clips for drip tape, and a figure 8 end clamp for the main 1/2" tubing)

Connect Headers
- Connect the headers to the risers you’ve added to each raised bed. Tuck the header inside the short end of the bed and attach it to the riser. Secure it in place with landscape staples or pins.
- Next, position the drip tape lines evenly down the length of the bed and pin them in place too. Remember to keep the emitters facing up.
- It’s okay to cover or bury the drip tape with mulch
- See the main post text for FAQ about how long to run the system, winterizing tips, and more.


112 Comments
Jen Topp
Your drip system advice has been the single biggest game changer in my gardening life! So simple and sooo much more efficient. Thank you!
Deanna Talerico
Hey Jen! Yes it really can make a world of difference huh? I’m so glad you’ve jumped on board with drip and are reaping the benefits! Thanks for the review!
Becky Johnson
Hi Deanna, just wanted to thank you – your tutorials have turned me into a drip irrigation junkie! I’ve now done front and back yards, raised beds, grow bags, and our mini orchard too. Thank you, you’ve saved so much time for me to enjoy my garden instead of watering it!!!