

How to Start a Garden: 15 Best Tips for Beginners

Welcome budding gardeners! Come learn how to start a garden to grow vegetables, fruit, flowers, herbs and more – in any size space. This beginner’s guide will cover everything you need to know including my top tips for location, layout, soil, plant selection, pest prevention and more.
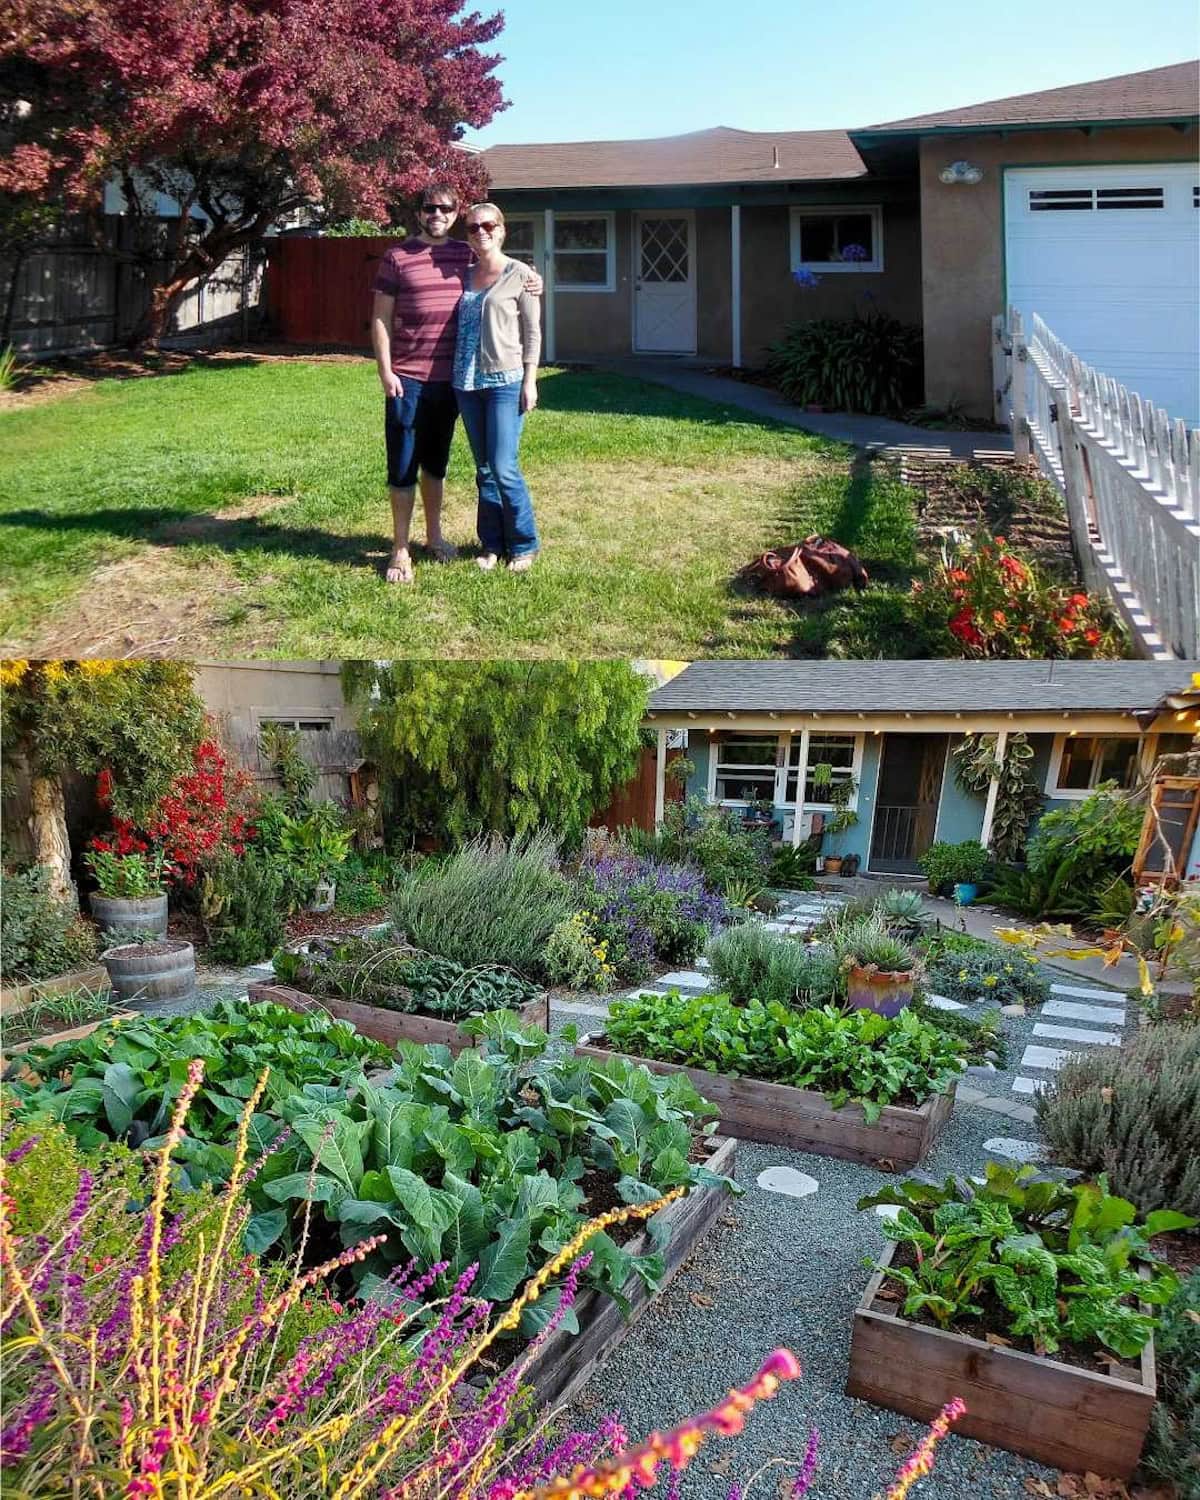
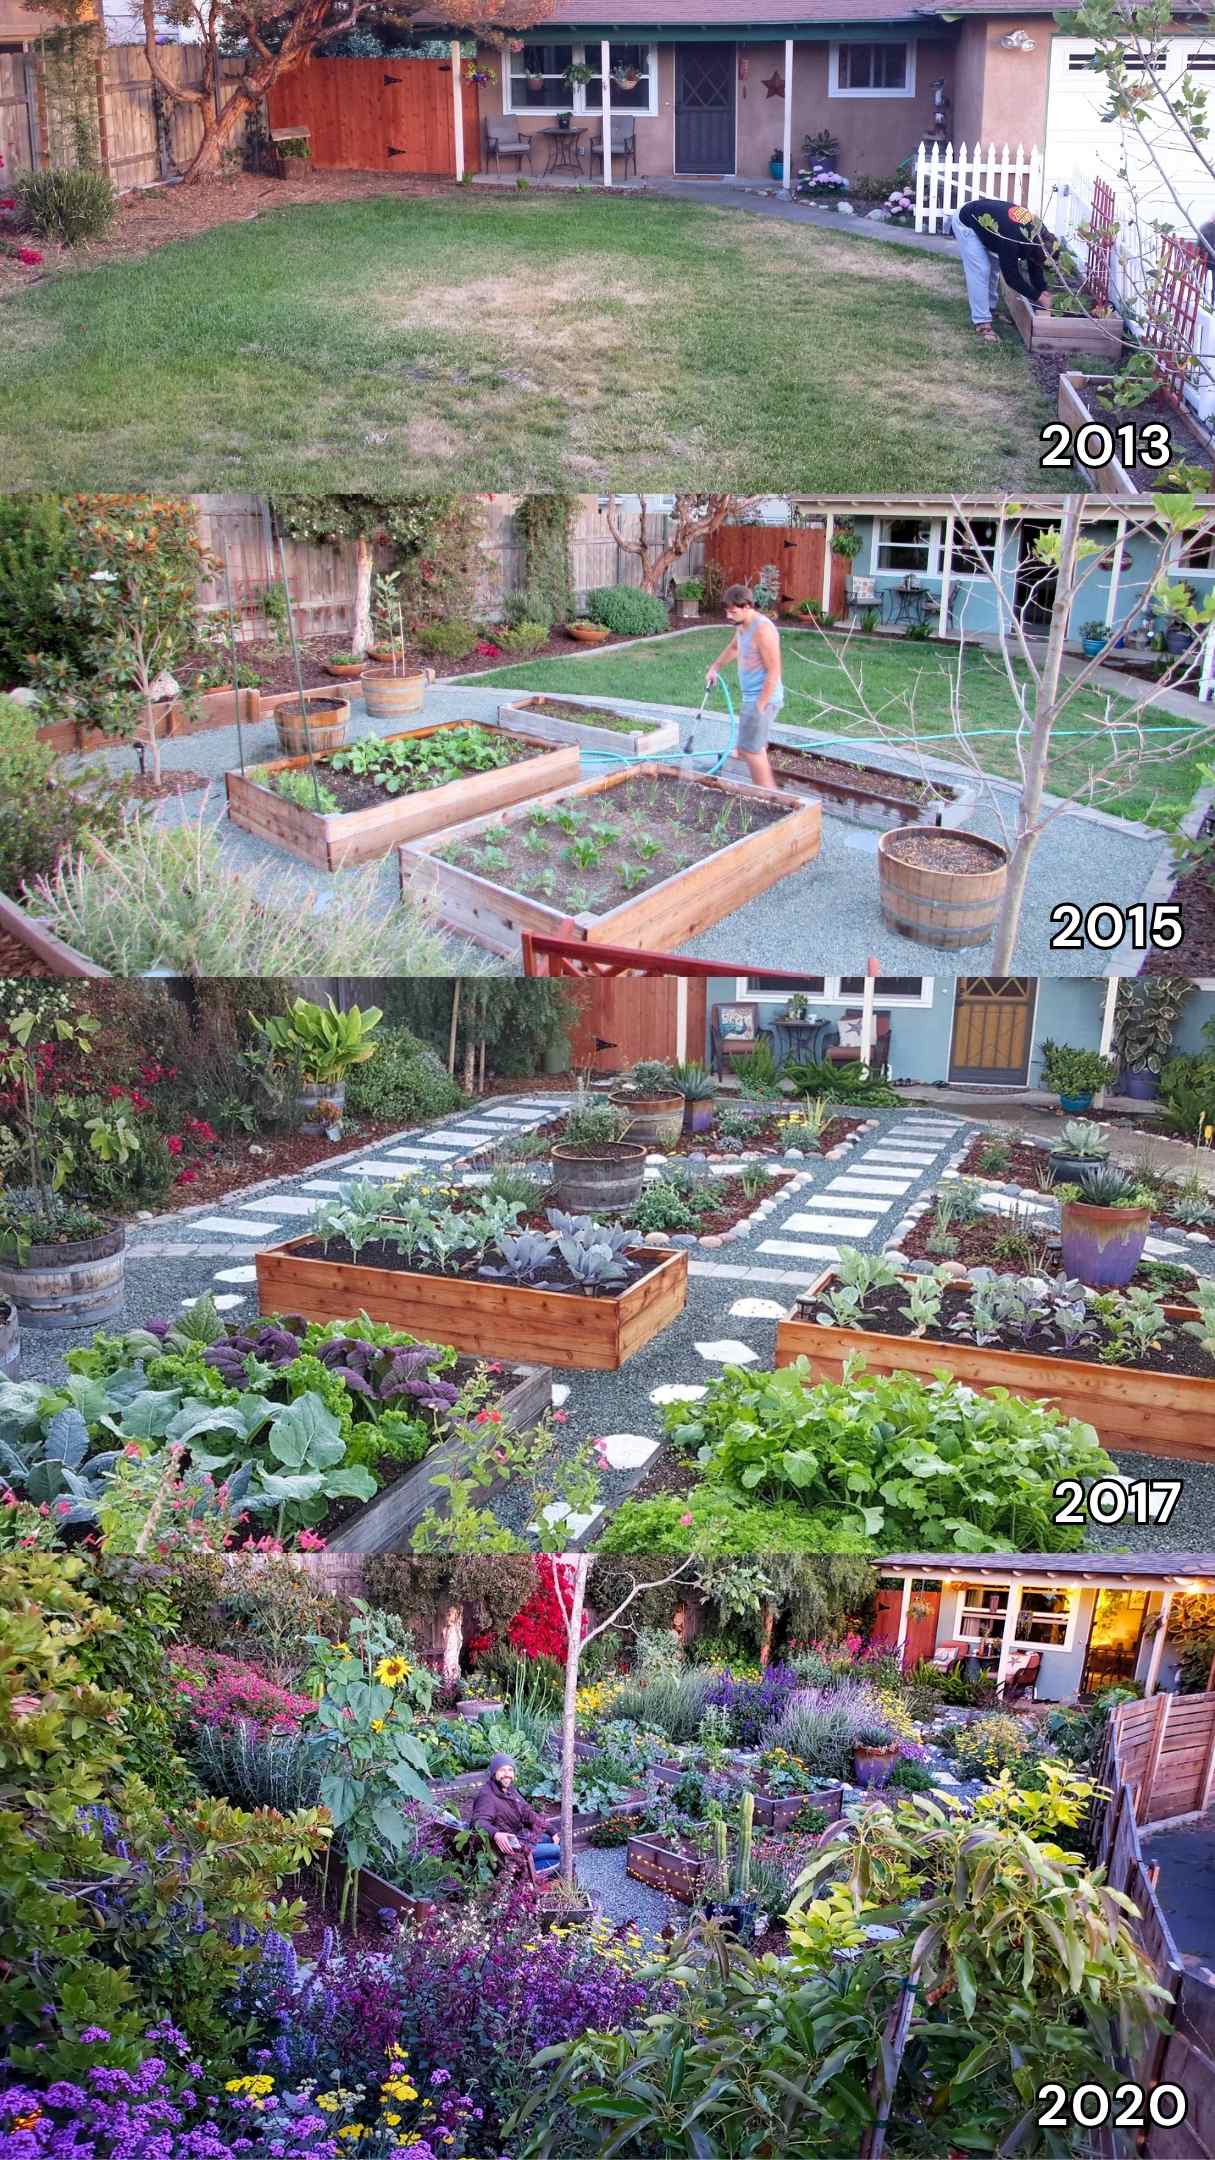
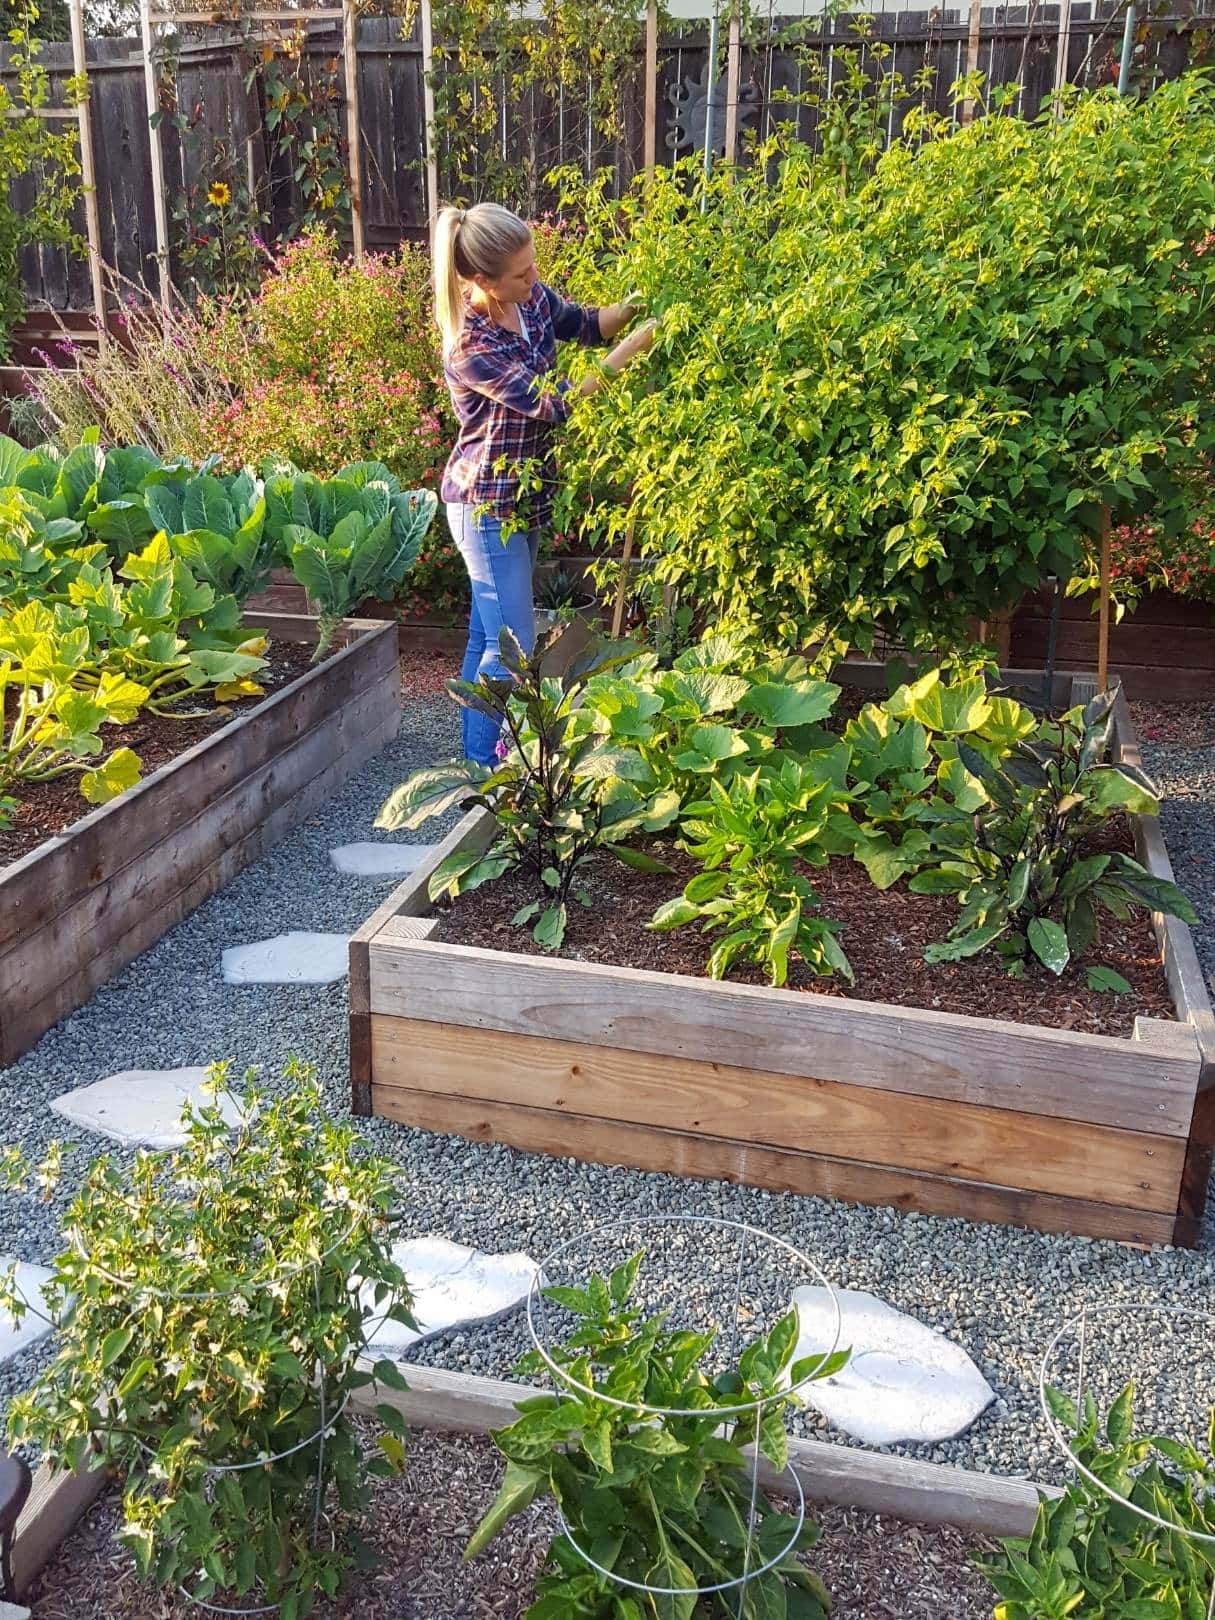
You can grow a beautiful, productive garden just about anywhere. Work with what you have! I’ve been gardening for nearly 20 years in everything from small rentals and balconies to larger acreage, so I’ve included photos from many different gardens for examples and inspiration.
NOTE: This post was originally published in December 2018 but has been significantly updated since.
Would you like to save this?
Disclosure: Homestead and Chill is reader-supported. When you purchase through links on our site, we may earn an affiliate commission.
After 10 years of teaching, this post covers the most common questions I get about starting or setting up a new garden. I’ve also provided links to related articles where you can dive deeper into each topic. Don’t miss my nuggets of wisdom and encouragement in the last three tips especially!
1) Start Small
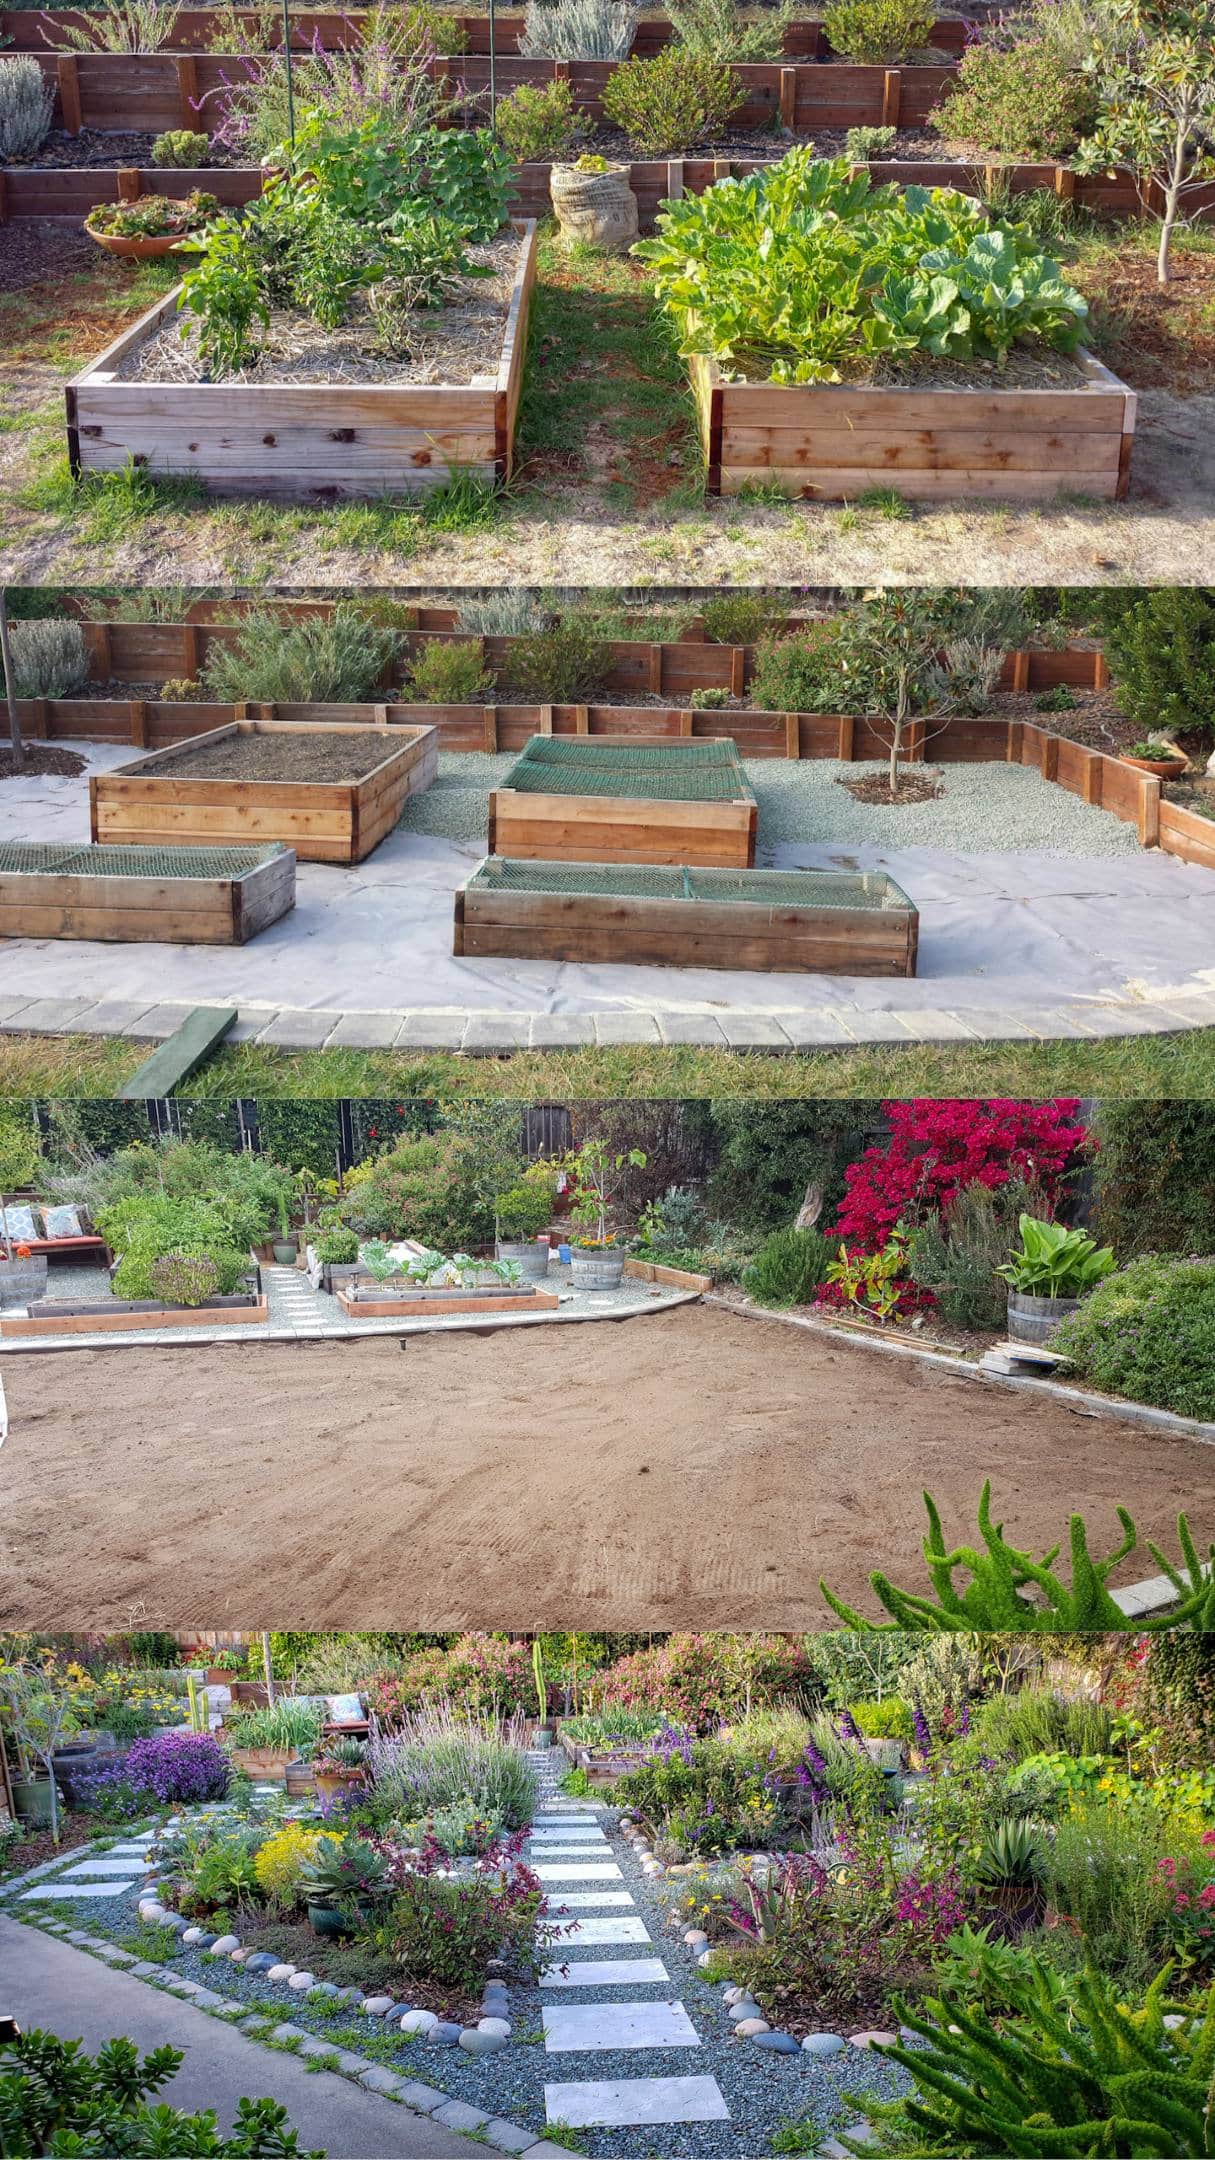
I usually tell new gardeners to start small – such as just a few raised beds in an area that could expand with time. That’s what I did! To this day, we still slowly modify or add to our garden spaces year-after-year. It’s a marathon, not a sprint.
Starting with a modest, manageable garden is a great way to get your feet wet (or hands dirty), learn and experiment, and then scale up once you feel ready. Starting small is also far more affordable. The cost of beds, soil, compost, gravel and mulch can add up fast!
Yet if you have the vision, determination, and budget to start an elaborate new garden right away, go for it!
PRO TIP: If you’re tight on space, don’t forget to utilize containers, garden towers, and/or trellises to grow vertical and maximize your growing area.
2) Choose the Best Location
Here are a few things to consider when choosing where to put your new garden:
- Sun Exposure: Try to find an open spot away from trees and structures that receives as much sunlight as possible. Most vegetables, fruit, and flowers thrive in full sun (or at least 6 to 8 hours of direct sun per day).
- Ground Surface: It’s best to start a garden on a fairly flat, level surface. It makes installing raised beds easier, and reduces water and soil runoff. To garden on a slope, plan to terrace or dig out flat spots for your garden beds or planters, which should be installed level.
- Water: Is there a water source or spigot nearby? If not, consider installing one (even if that means hiring a plumber). You don’t want to be lugging watering cans a long distance, trust me!
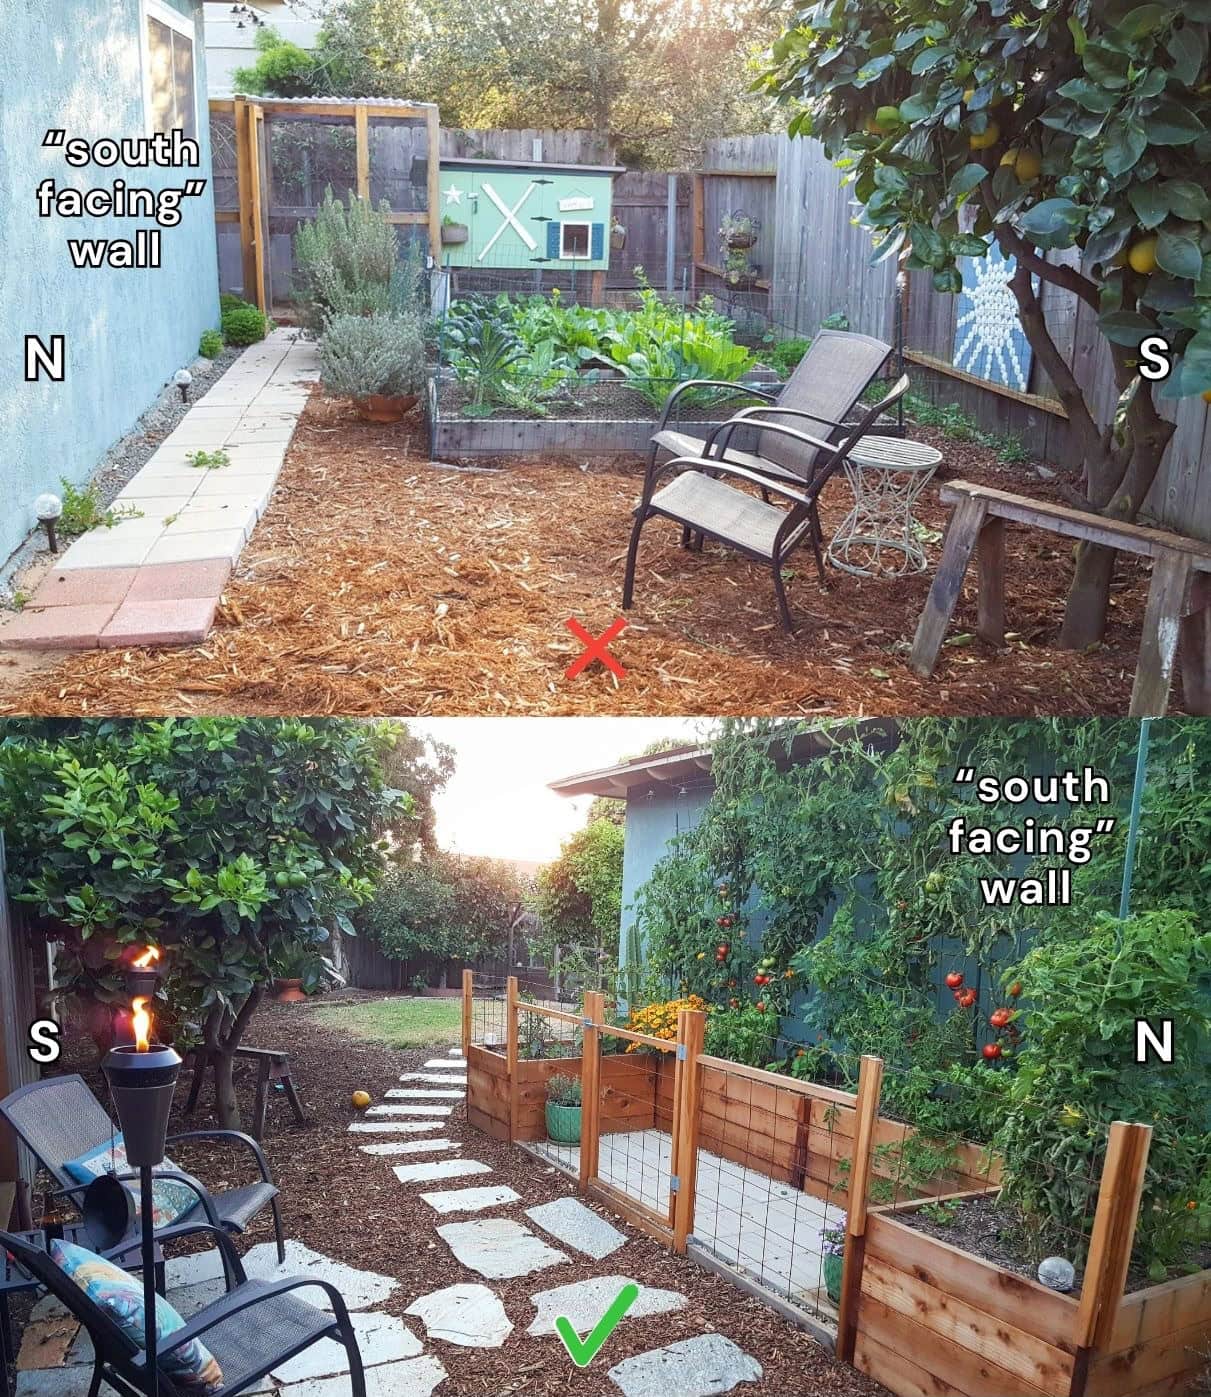
- Seasonal Shifts: Consider how the sun exposure may change throughout the seasons, especially if you hope to garden year-round like we do! The sun stays lower in the sky during winter, making it easier for trees, fences, or buildings to cast shade.
- If you’re in the northern hemisphere, a south-facing garden is an ideal choice, or one that is oriented in a way to receive maximum sun exposure from the south in all seasons. It’s the opposite if you live in the southern hemisphere; a north-facing garden would be best.
PRO TIP: If you aren’t sure, it may be worthwhile to wait and observe the sun patterns in your garden space for a year before embarking on any major permanent projects. There are also a number of sun-tracking apps that can help you visualize and plan.
3) Style and Budget (Raised Beds vs In-Ground)
Next it’s time to think about your overall vision and budget. Do you dream of a tidy garden full of raised beds, or a more natural, wild space with in-ground beds? Are you most interested in growing vegetables, flowers, or both? Create a vision board to help organize your ideas and priorities.
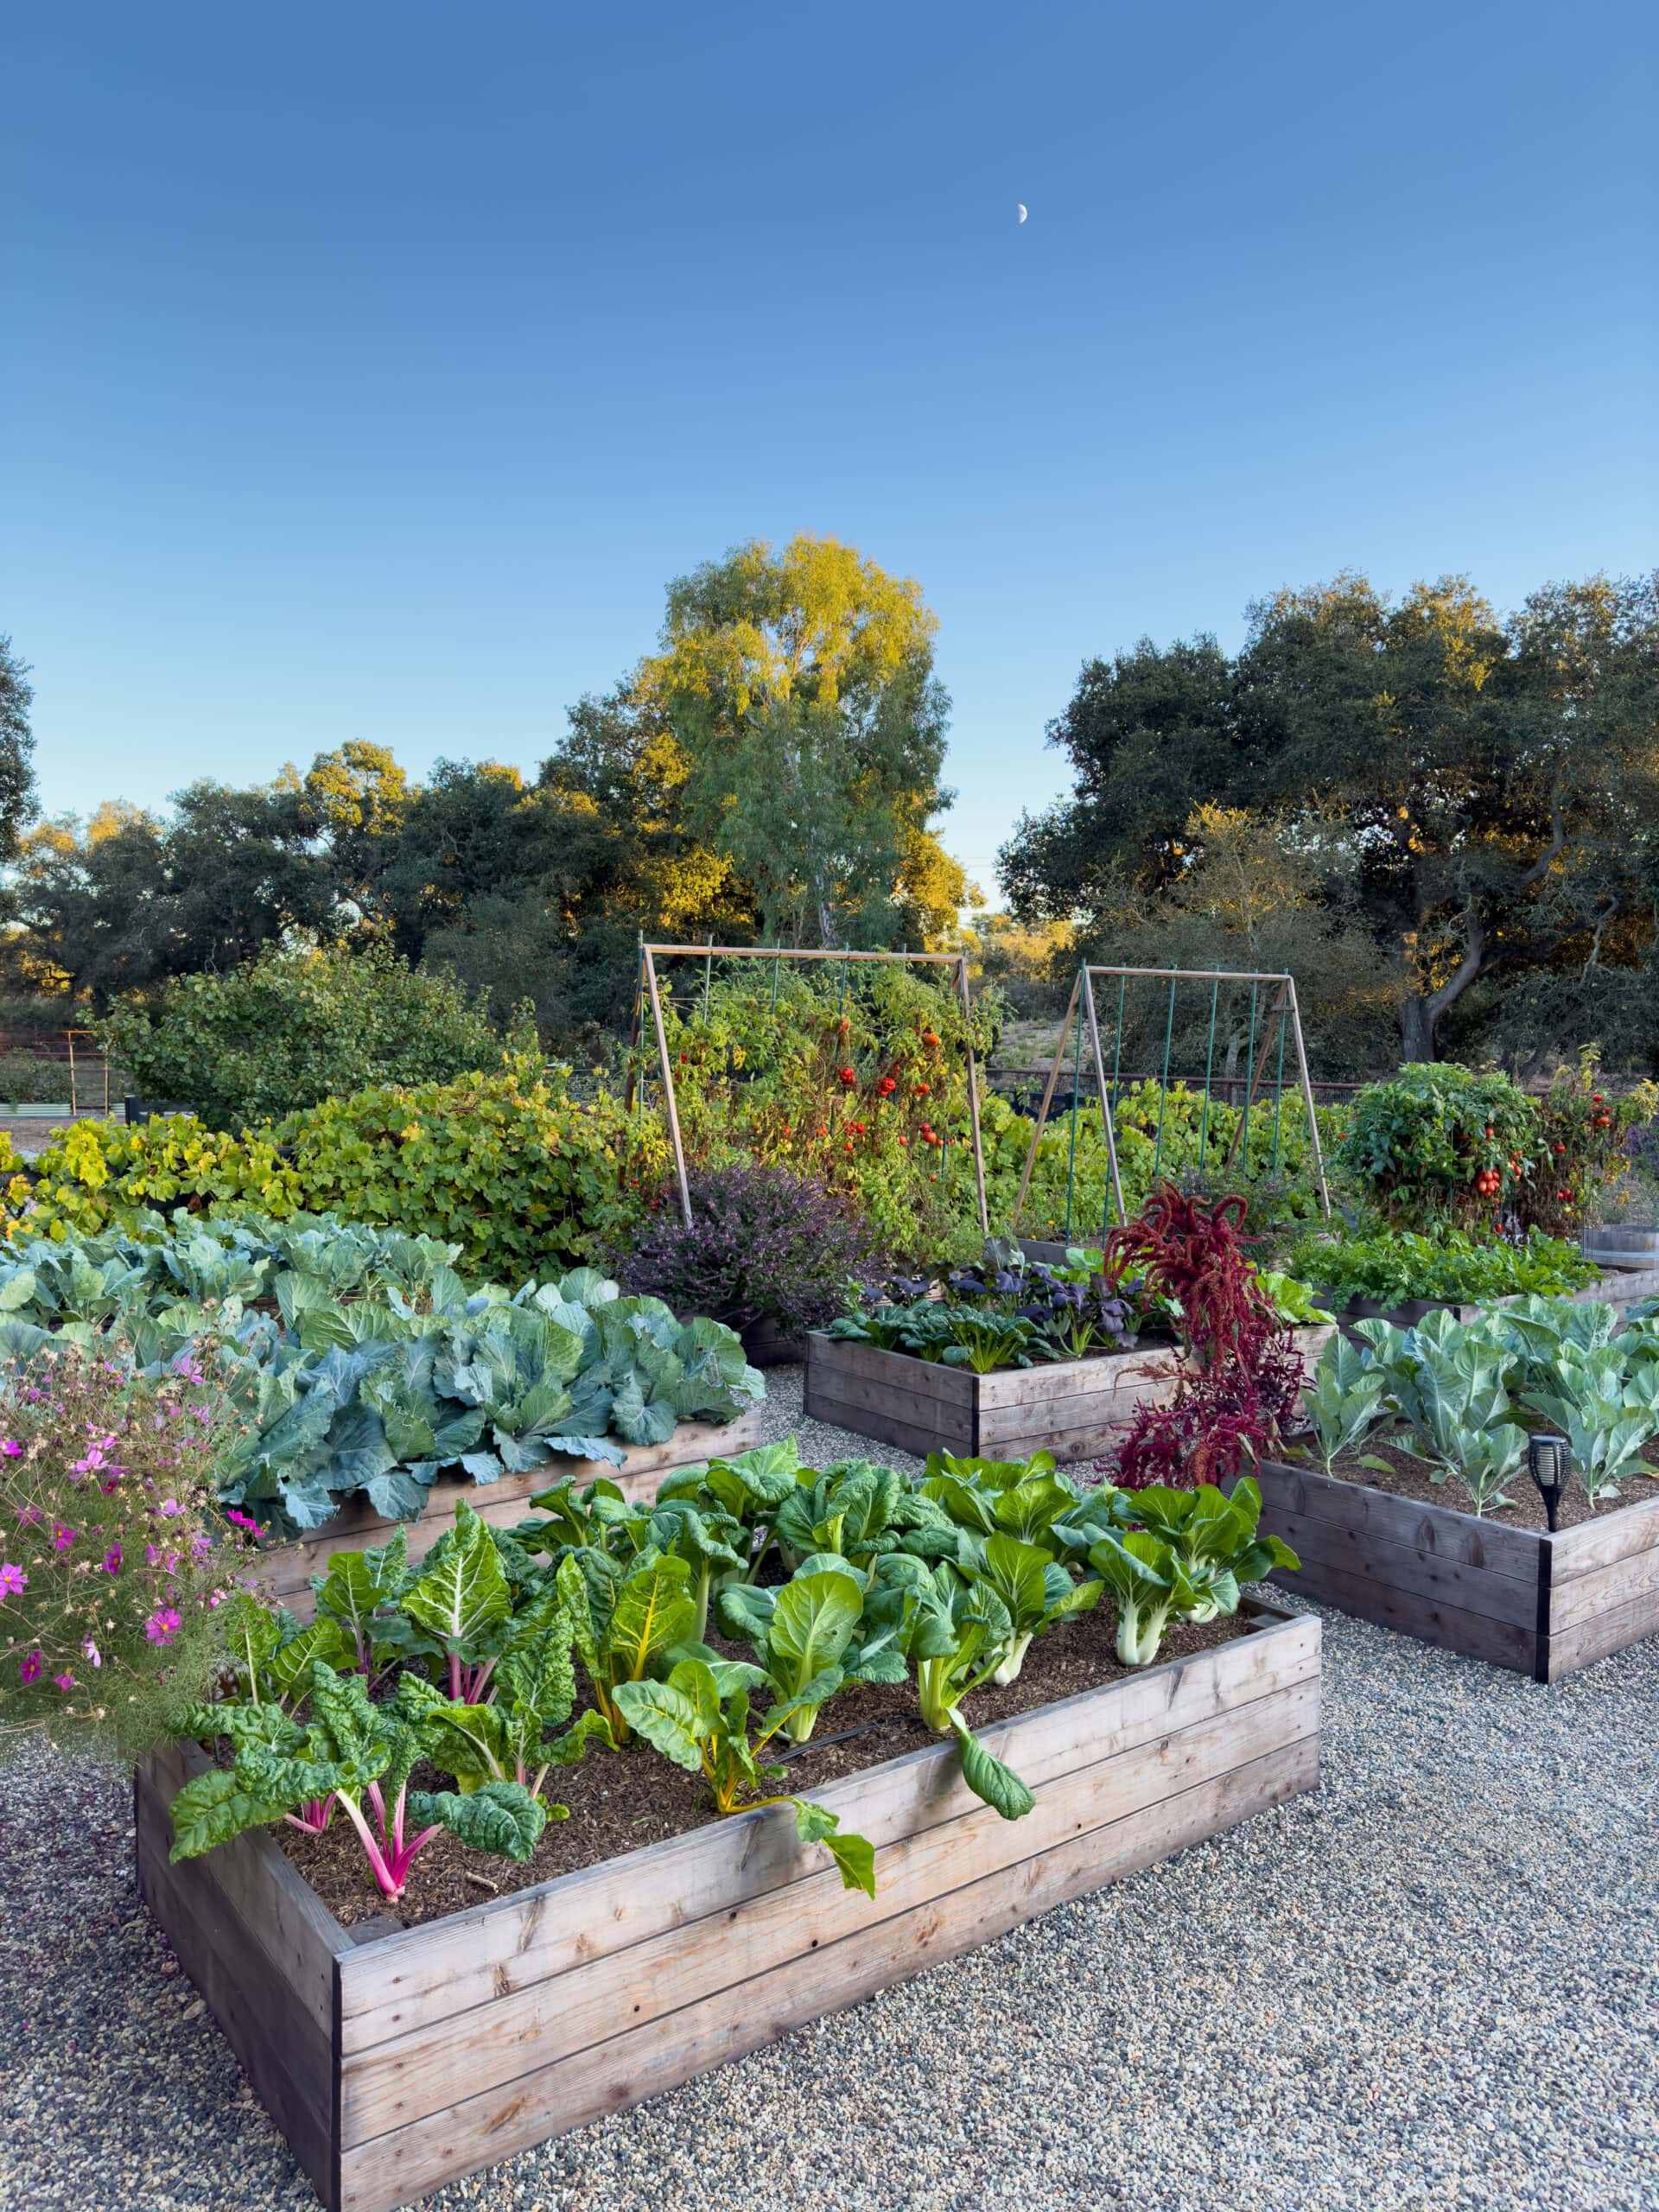
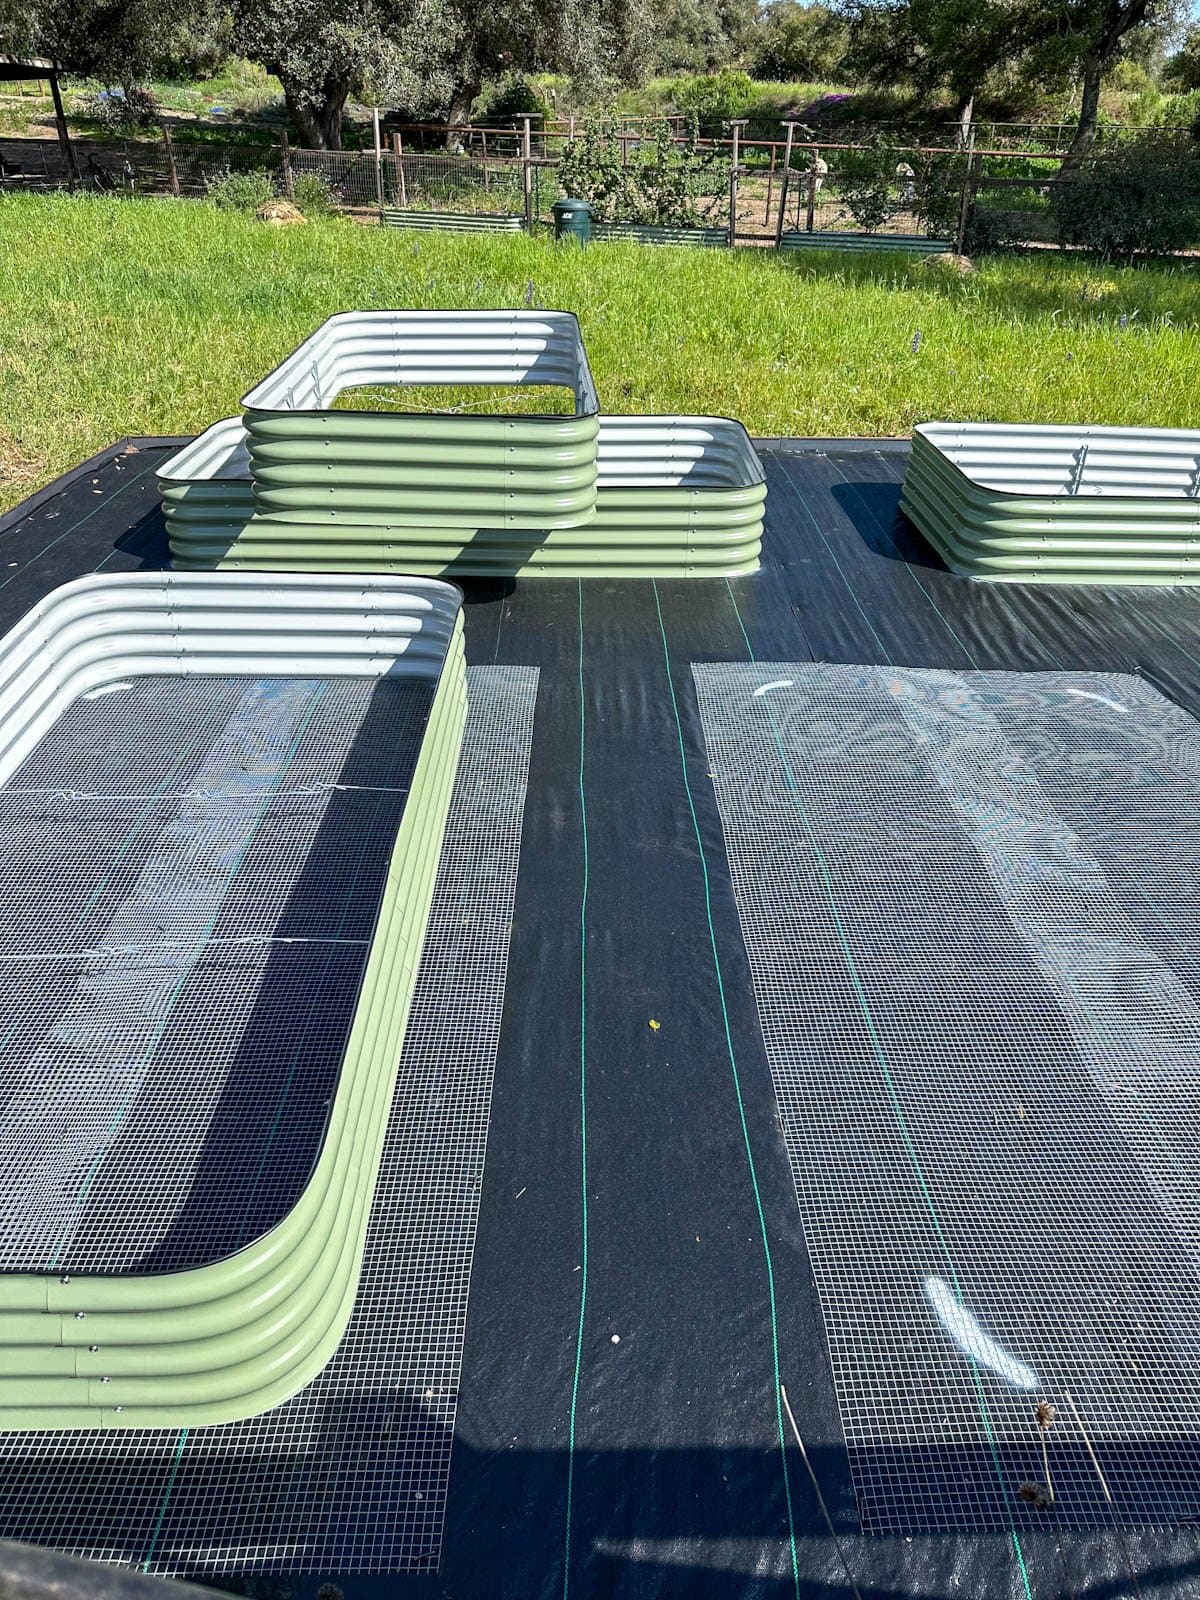
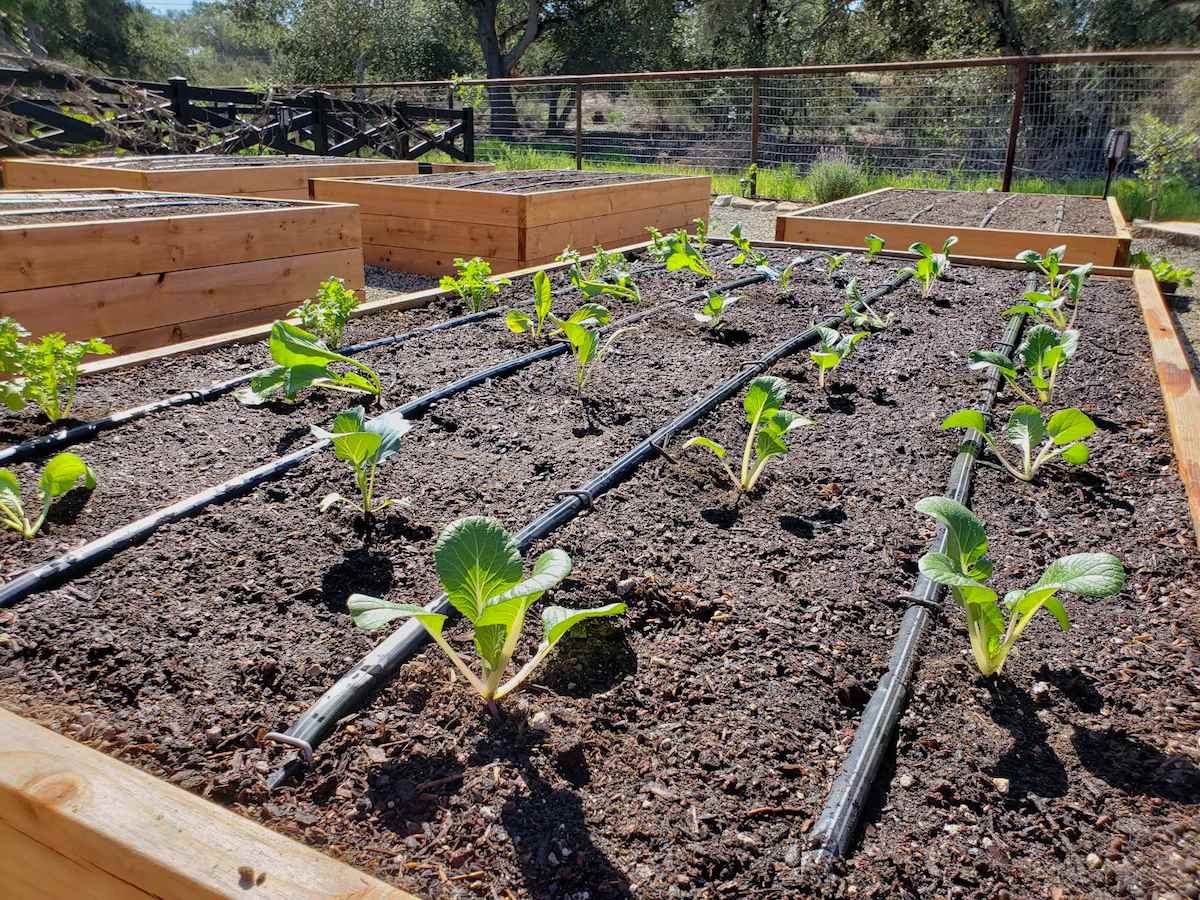
I personally love the appearance and ergonomics of raised beds, though they’re more costly than planting right in the ground. Raised beds also make it easier to control soil quality, prevent weeds, and block out burrowing pests like gophers (essential in our garden).
I’ve always built DIY garden beds in the past, but quality lumber has gotten quite pricey (and they’re heavy to work with). So I’ve used Birdies metal raised bed kits more in recent years; they’re durable, easy to work with, and more affordable than cedar or redwood!
Keep an eye on your local Facebook marketplace for free or discounted garden materials. Getting free chip drop from local tree trimmers or buying bulk mulch/soil from a local landscape supplier are great ways to save money too.
RELATED: Visit our step-by-step guide on how to build a raised garden bed (video included) for more tips on bed dimensions, materials, and installation. Explore the pros and cons of raised beds vs in-ground gardens here, or the pros/cons of different raised bed materials like various types of wood, metal, stone, brick, or alternative materials.

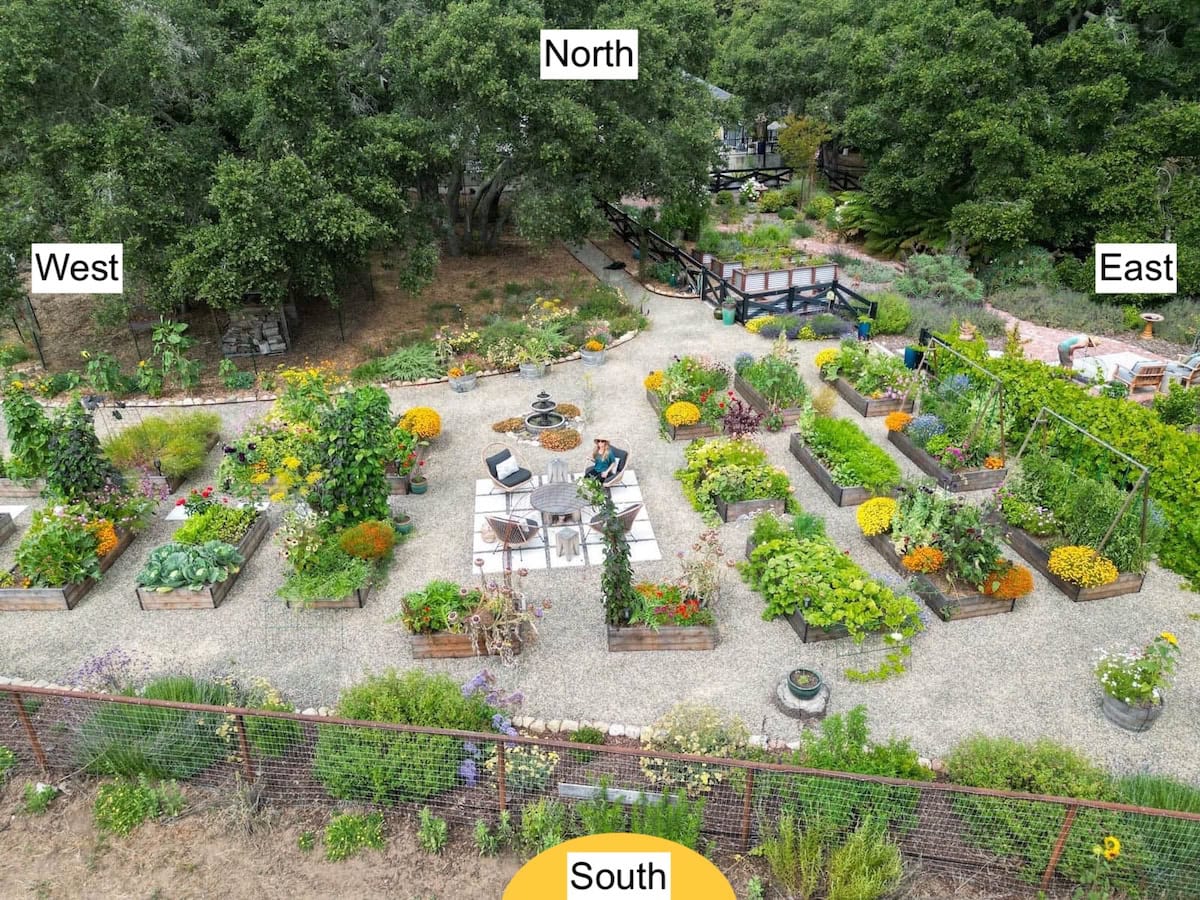
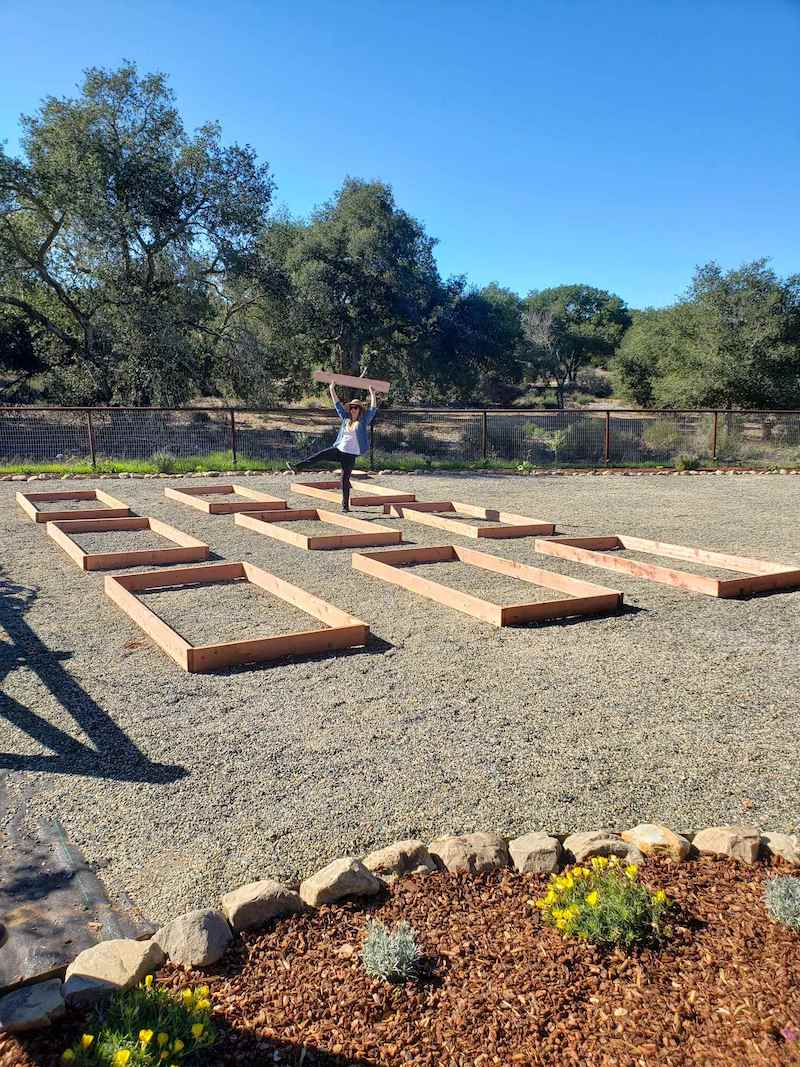
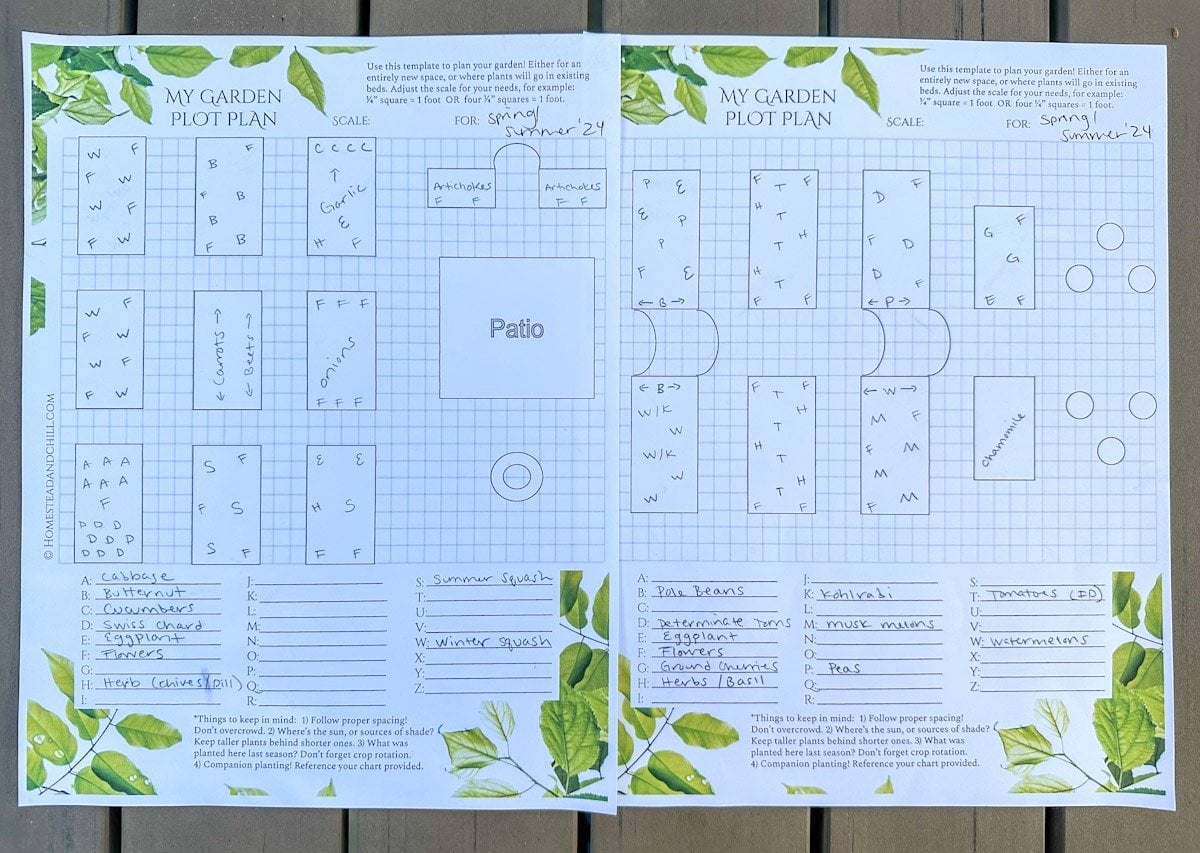
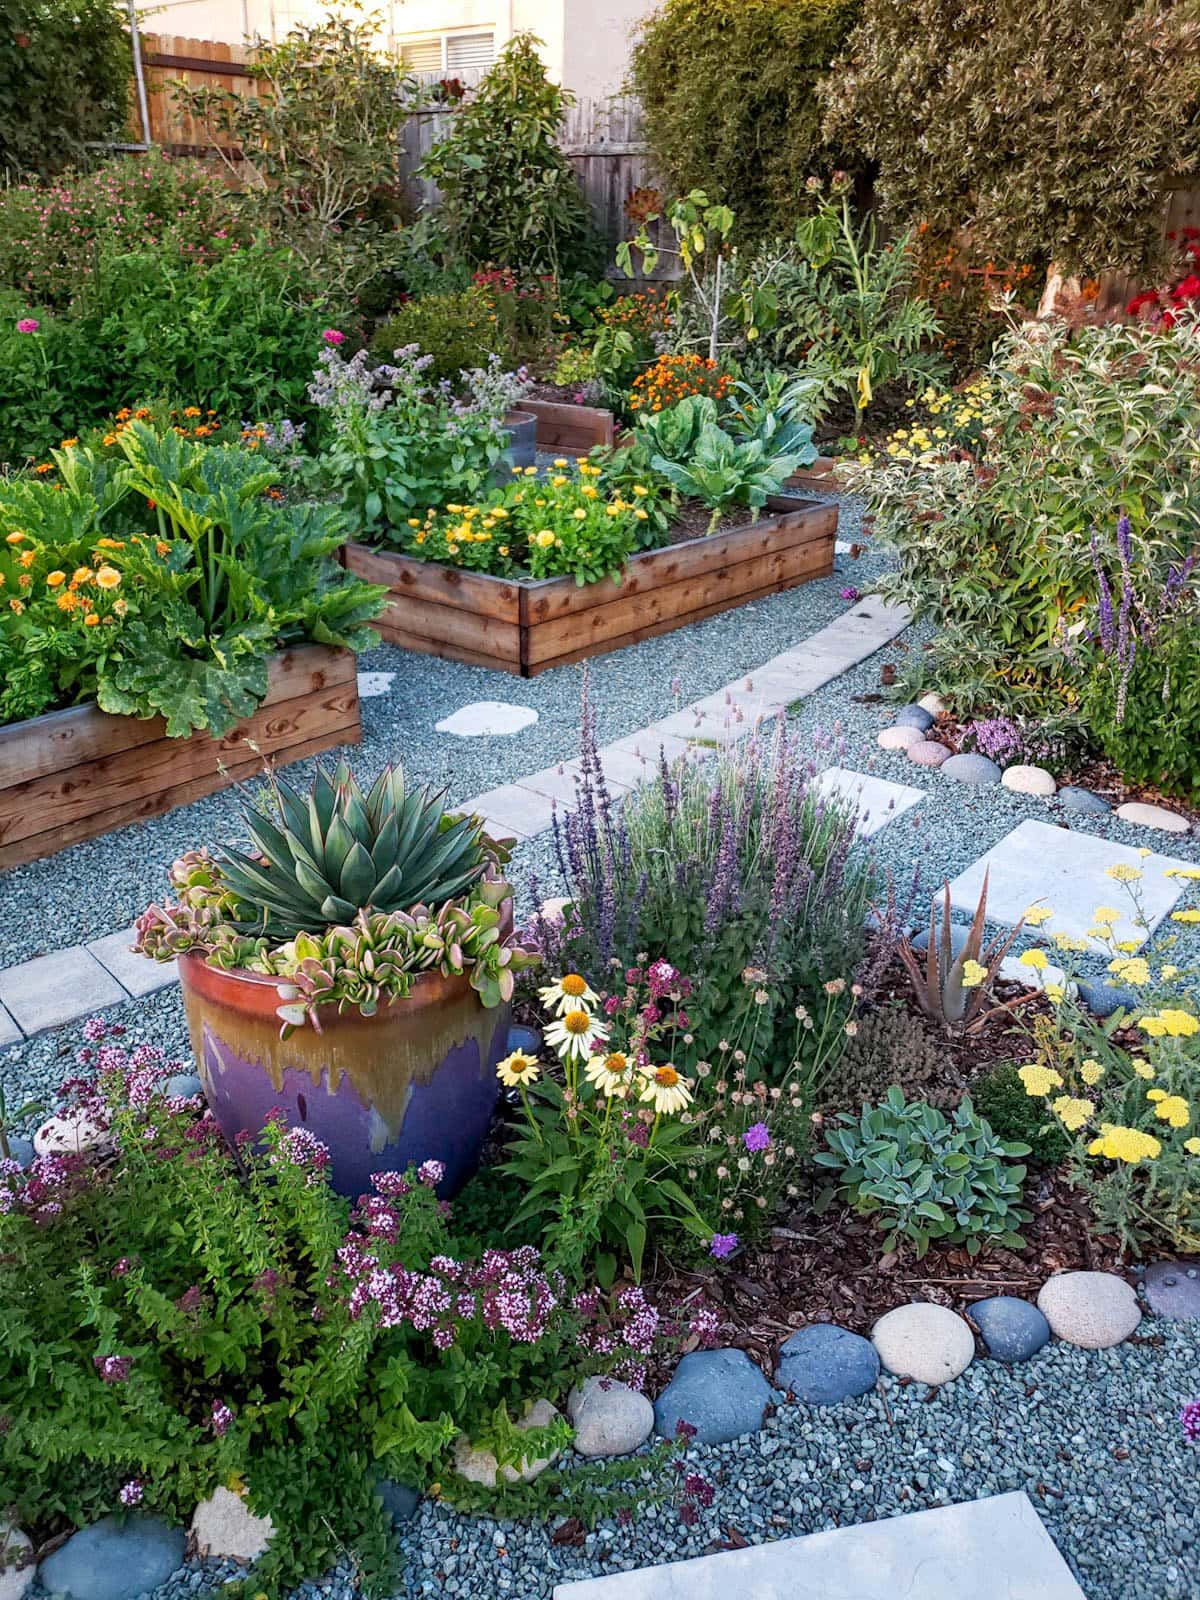
4) Plan a Layout
Now let’s think about the size and orientation of your garden beds, pathways, and other details like arches or trellises. Take measurements in your space to figure out what could realistically fit and where.
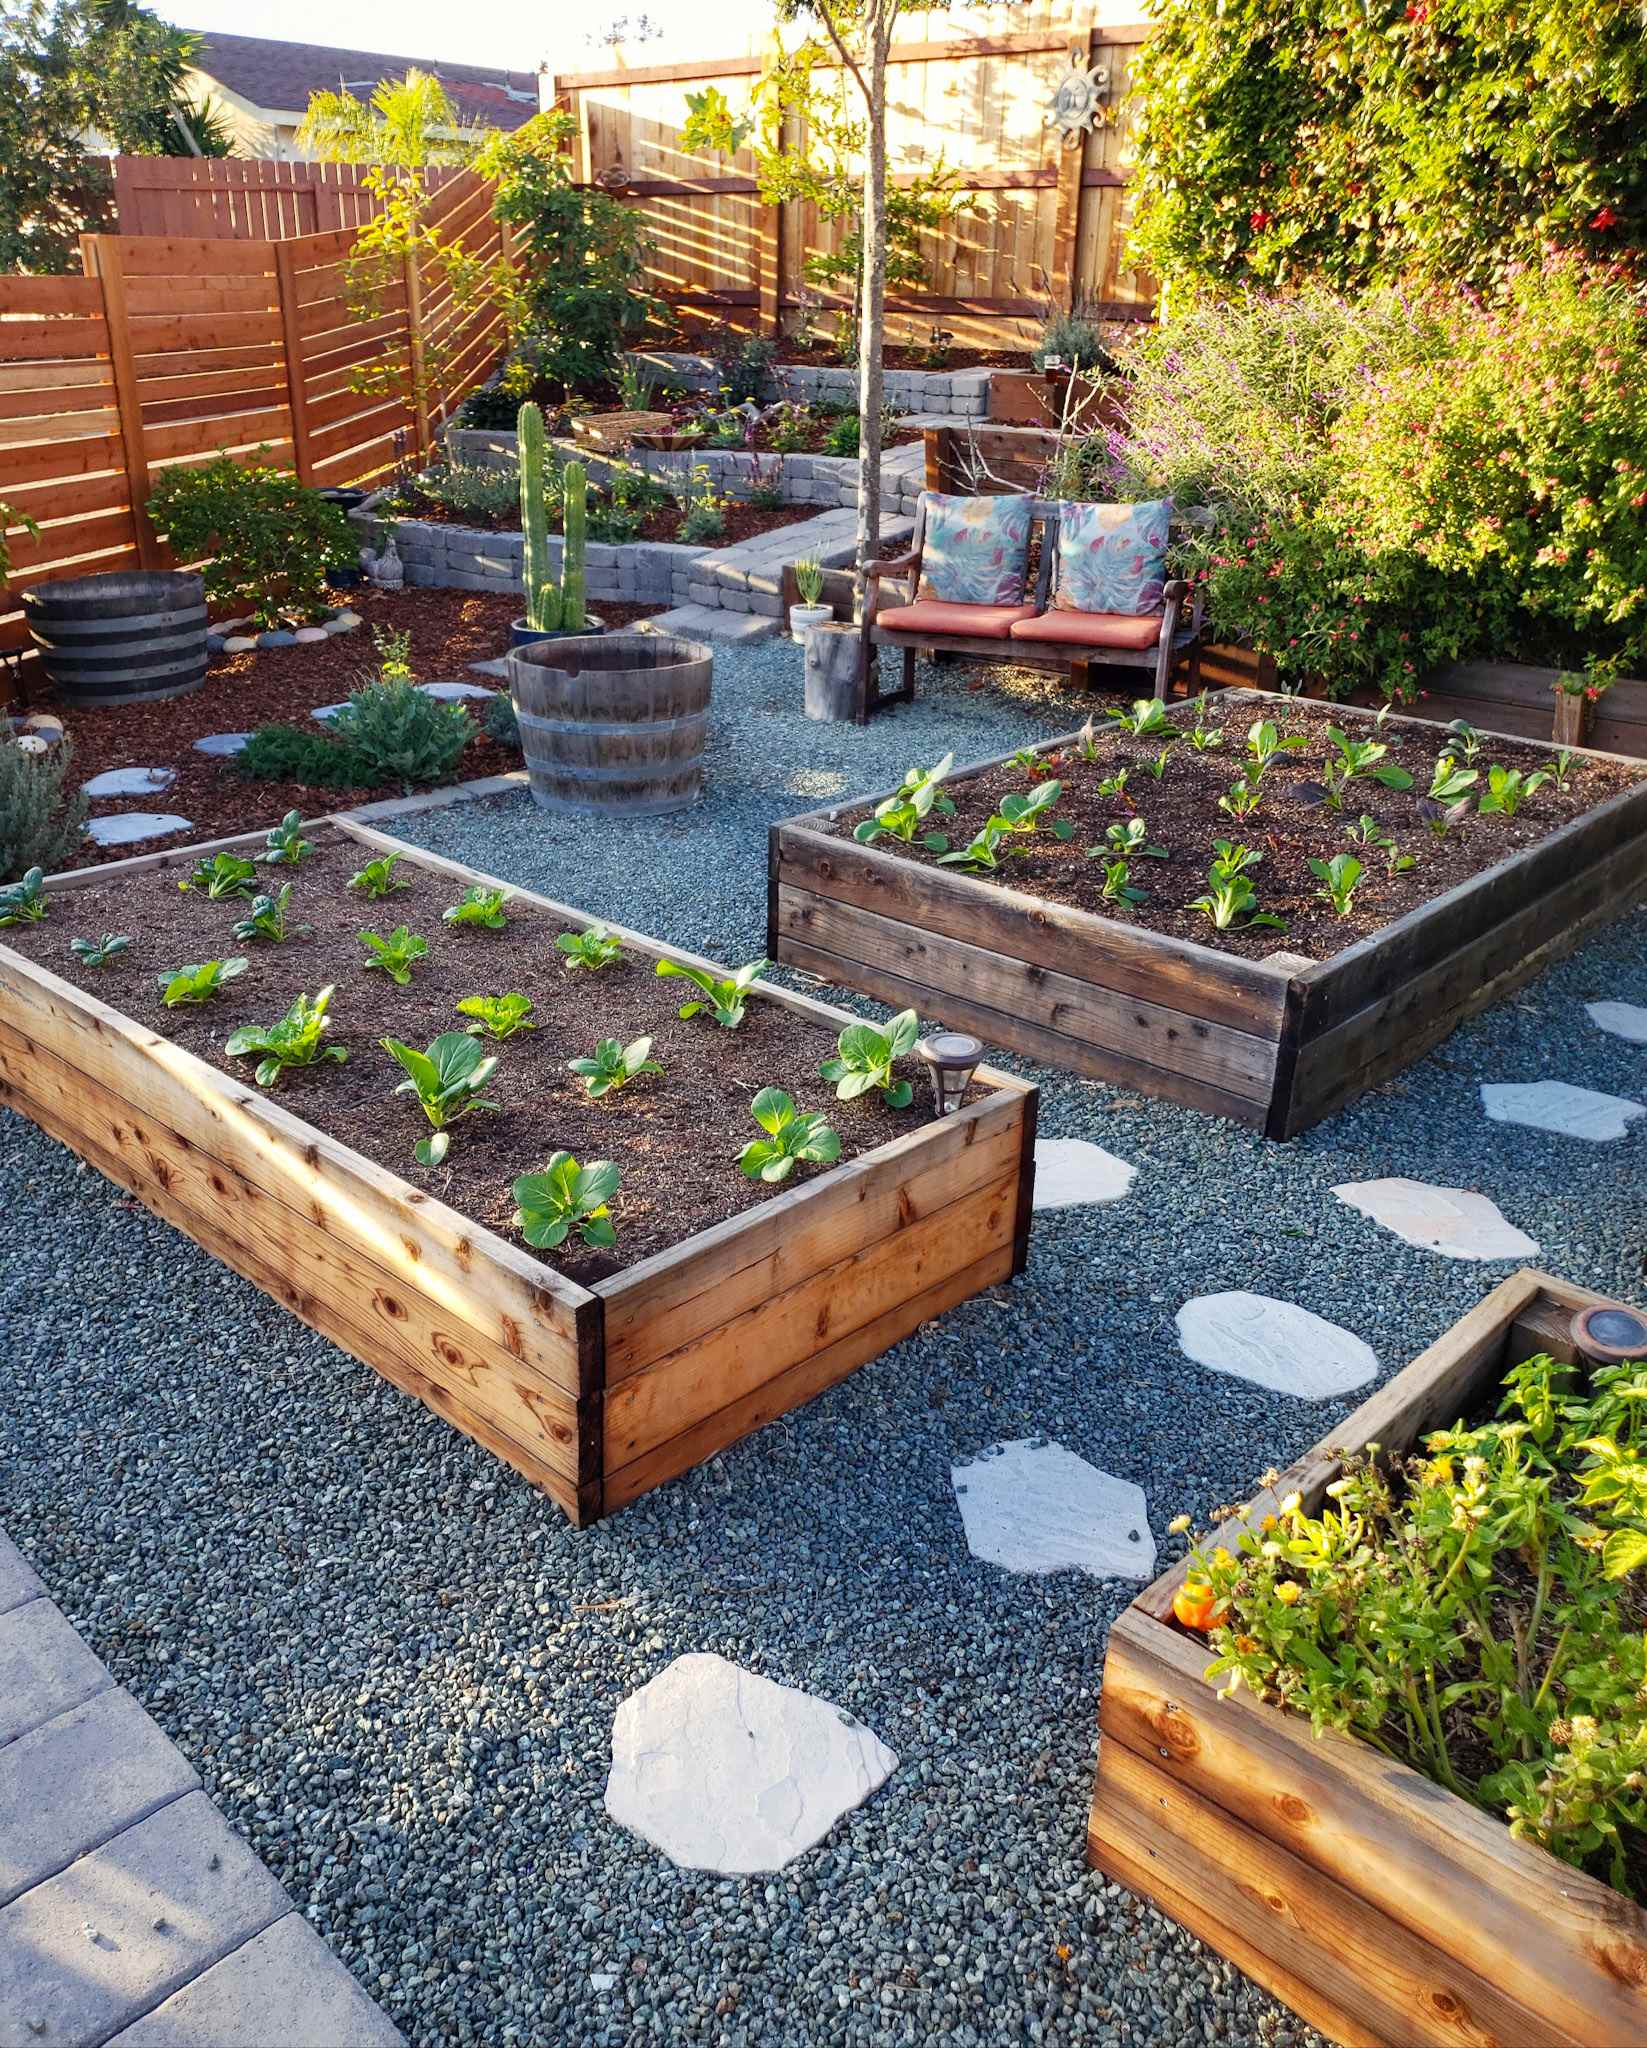
- 4×8 feet is a common, practical size for garden beds. You can make them longer or smaller, but never go any wider than 4 feet or it becomes difficult to reach across for planting and maintenance. You can also get creative with an L-shaped layout. 15 to 18 inches deep is ideal for all annual vegetables, flowers and herbs.
- Though not mandatory, it’s best to install garden beds with their long sides following a north-south orientation to minimize plants shading one another.
- I recommend leaving at least 28 inches of space between garden beds. Our current beds are spaced 36 to 48 inches apart – enough room for a wheelbarrow or our favorite garden cart in the pathways.
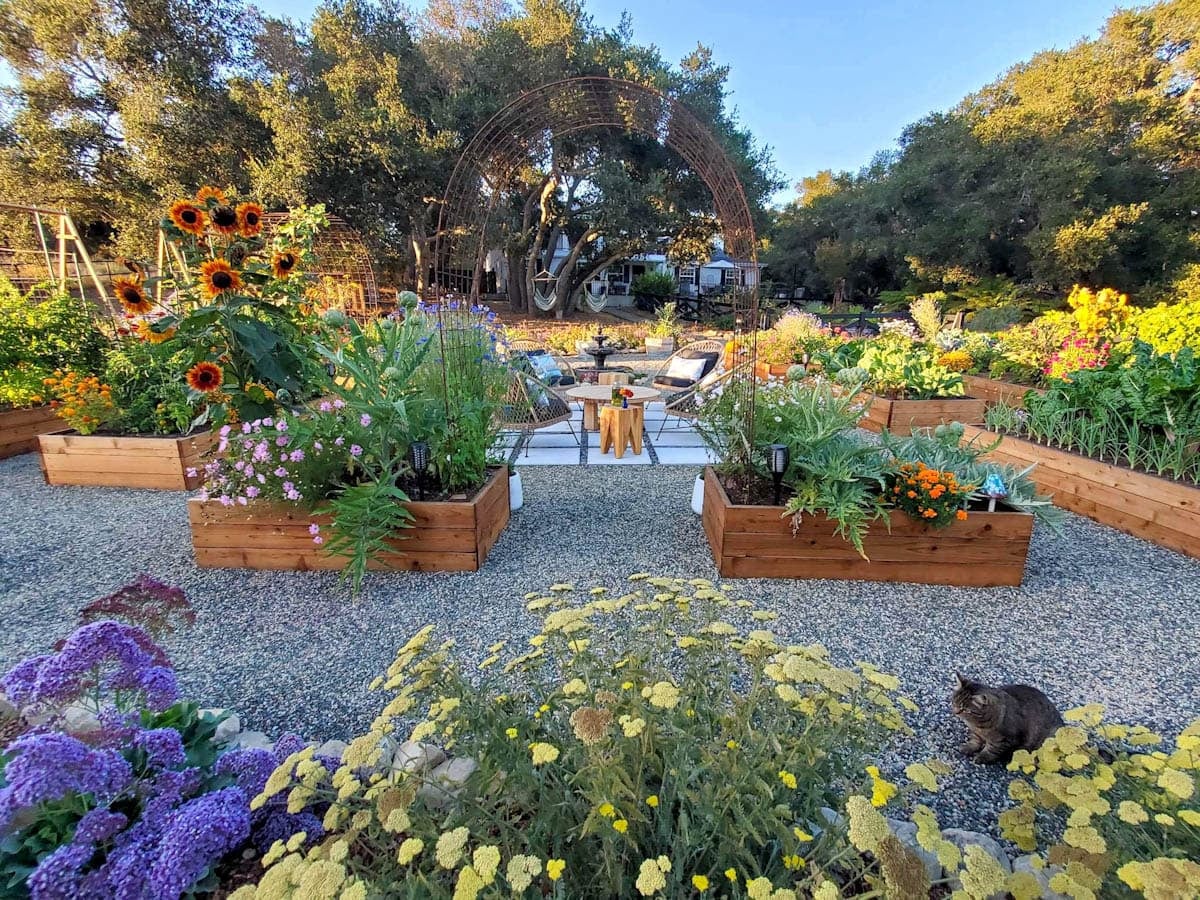
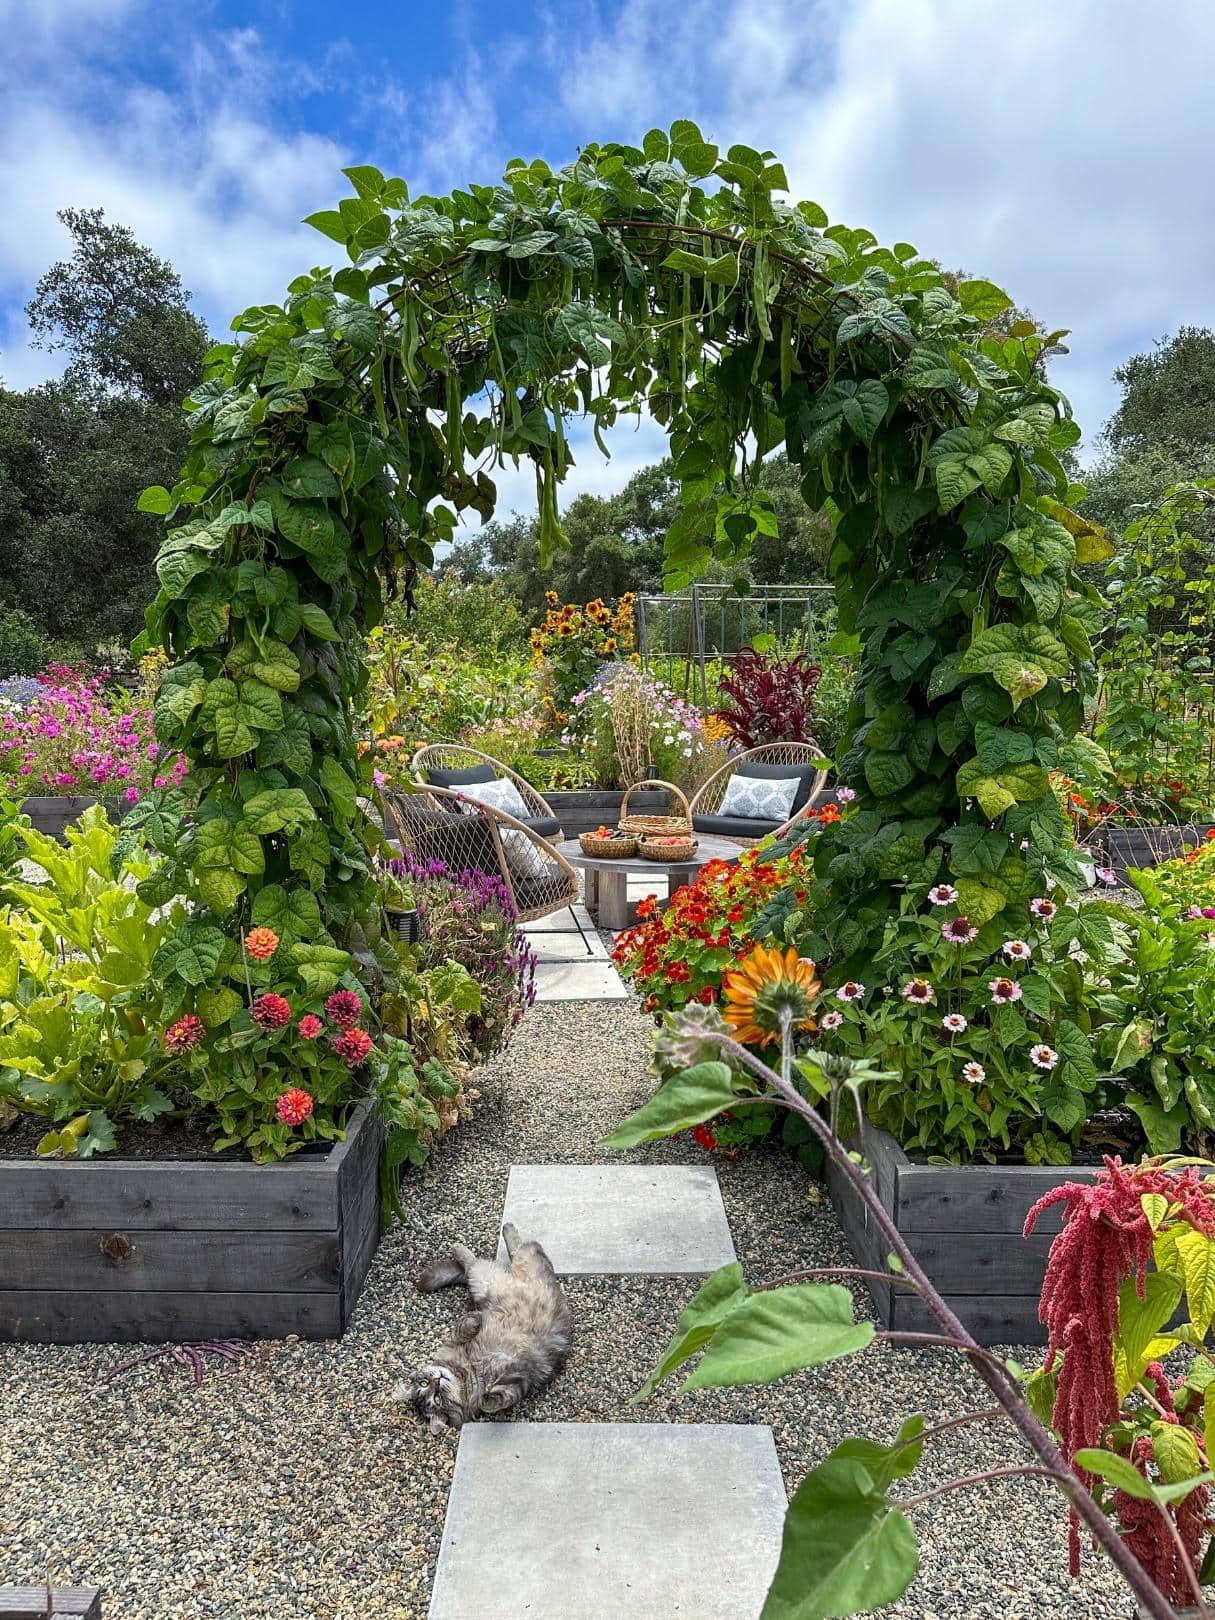
- Some of my favorite gardens include a center focal point, such as a seating area, fountain, arched trellises, herb spiral, or other unique feature.
- I also love to incorporate in-ground beds (and/or pots) for perennial flowers around the perimeter of my vegetable garden, which we’ll discuss more below! It’s also best to keep fruit trees around the perimeter (or in a different location) to reduce shading and crowding.
PRO TIP: Before making any final decisions, test it out! I like to use rope, stakes, scrap wood, broom sticks, etc to lay out the approximate size and shapes I’m envisioning. This gives me a better idea of what the garden would actually look and feel like once it’s all in place. I also use our handy garden plot planner to draw everything to scale.
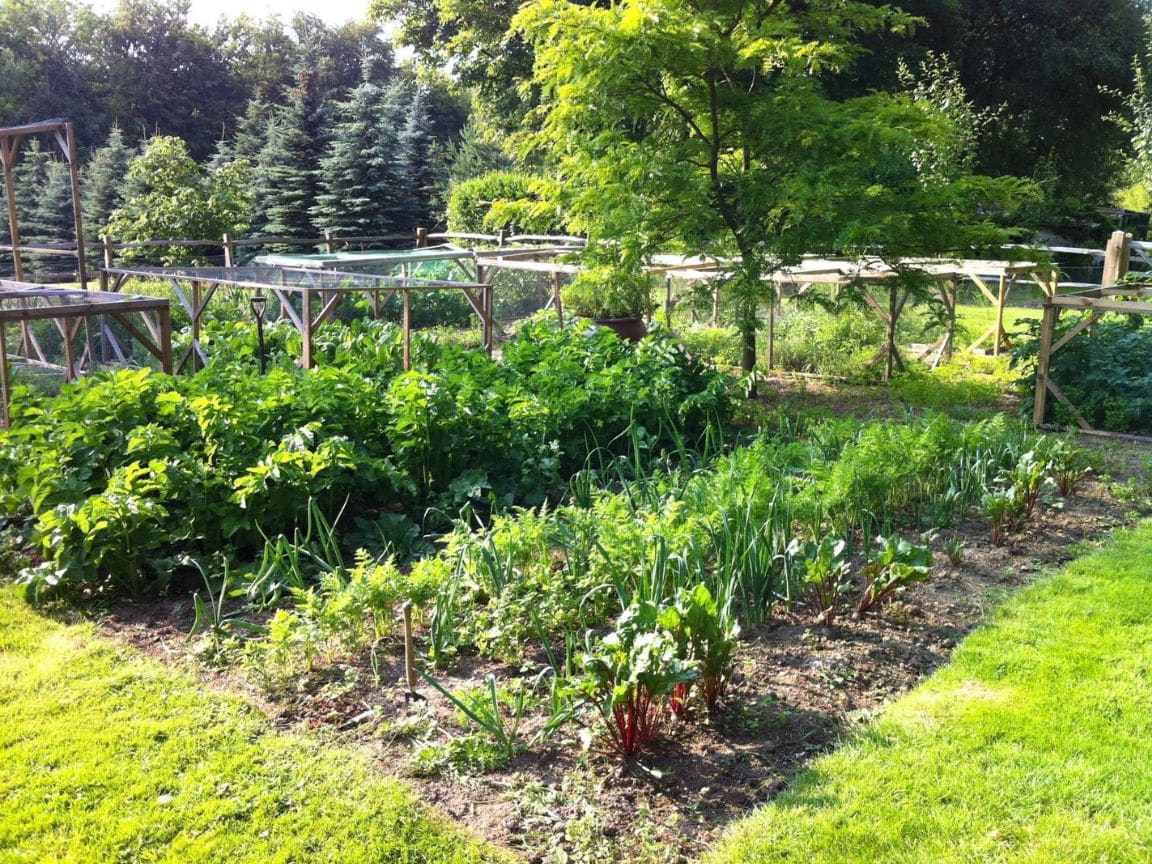
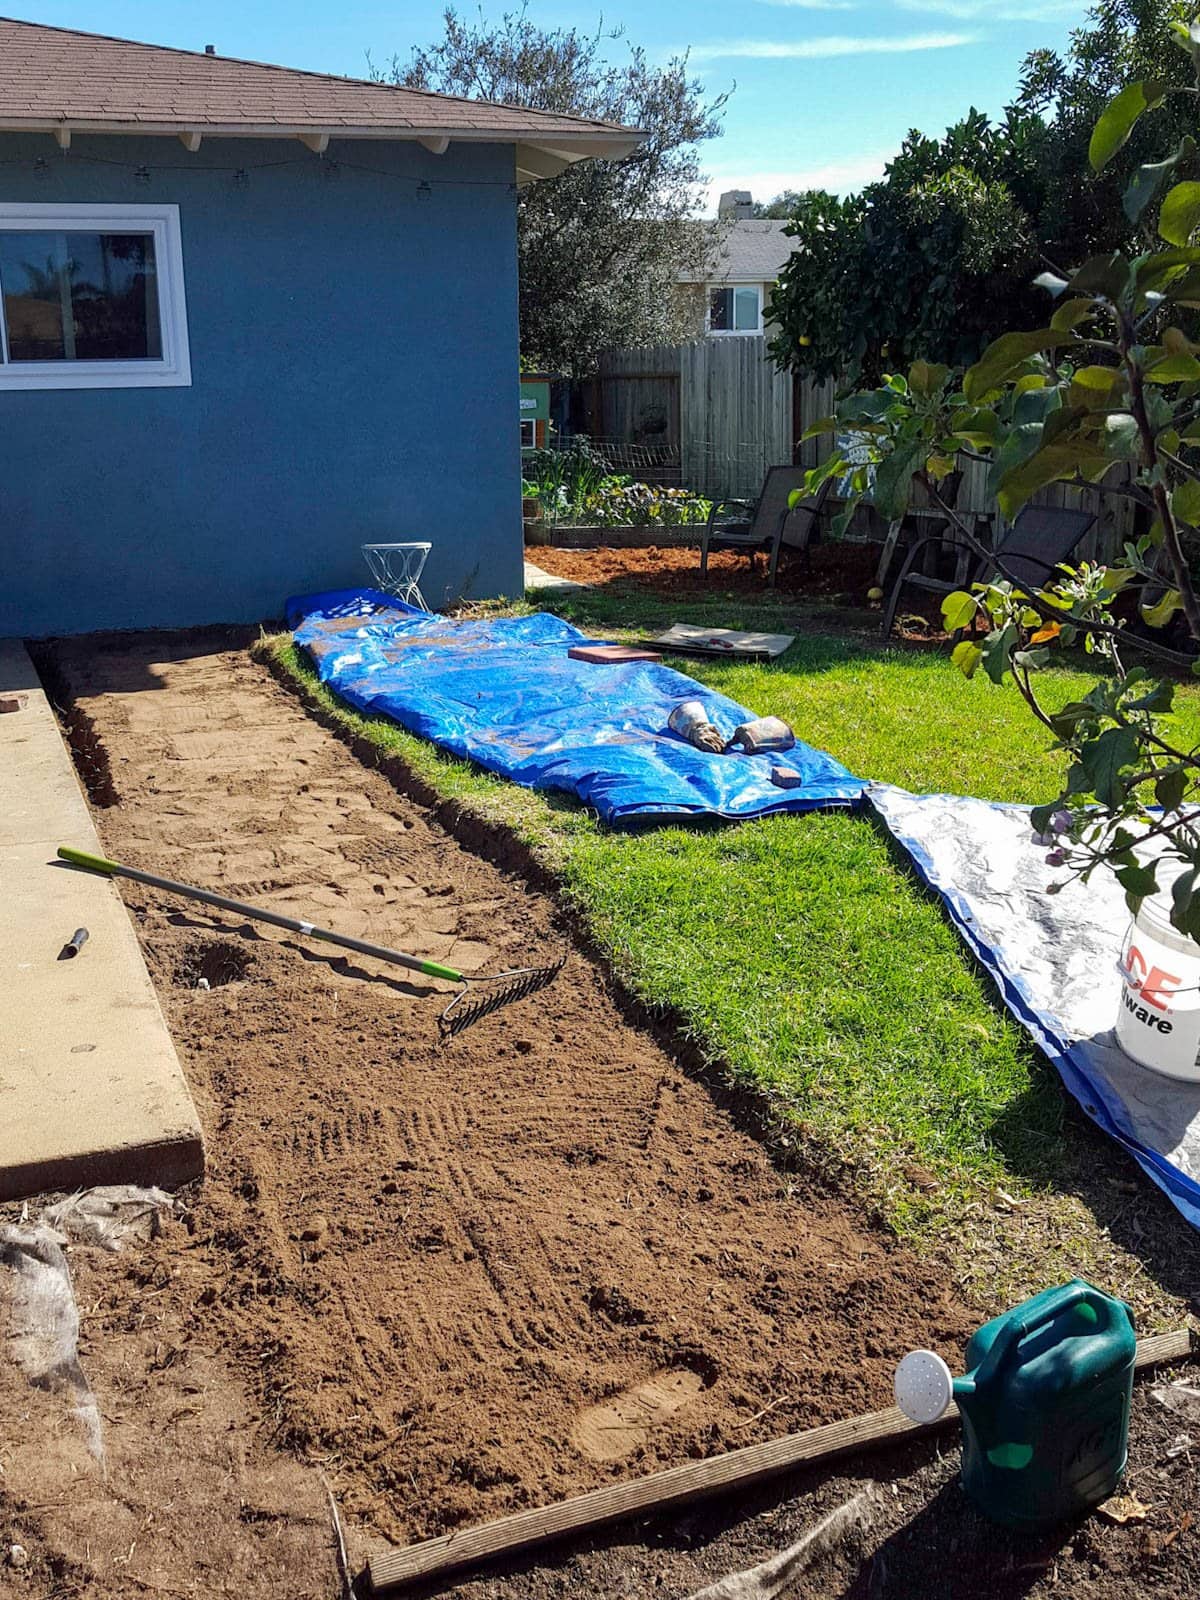
5) Prepare the Area
Before adding beds, you’ll likely need to do some preparations to the existing space such as clearing weeds or leveling the soil if needed. If your new garden area currently has lawn, come see several ways to kill or remove grass here.
I usually like to install edging and/or a rock border around a new garden, which helps to define the space and also hold in any mulch or gravel. We use hammer-in steel edging from Edge Right.
If the area is weedy, you may also want to cover the ground surface with a base layer of weed suppressant such as natural burlap or landscape fabric – which can also act as a base for pathway gravel or mulch (discussed more to follow).
I prefer to build my raised beds on a flat, clean work surface (e.g. patio or driveway) and then move them into the garden space when ready. If you plan to install water pipes to each bed, think about that now too!
RELATED: You can see the complete installation of our newest raised bed garden here or how we terraced a slope to plant fruit trees and pollinator plants.
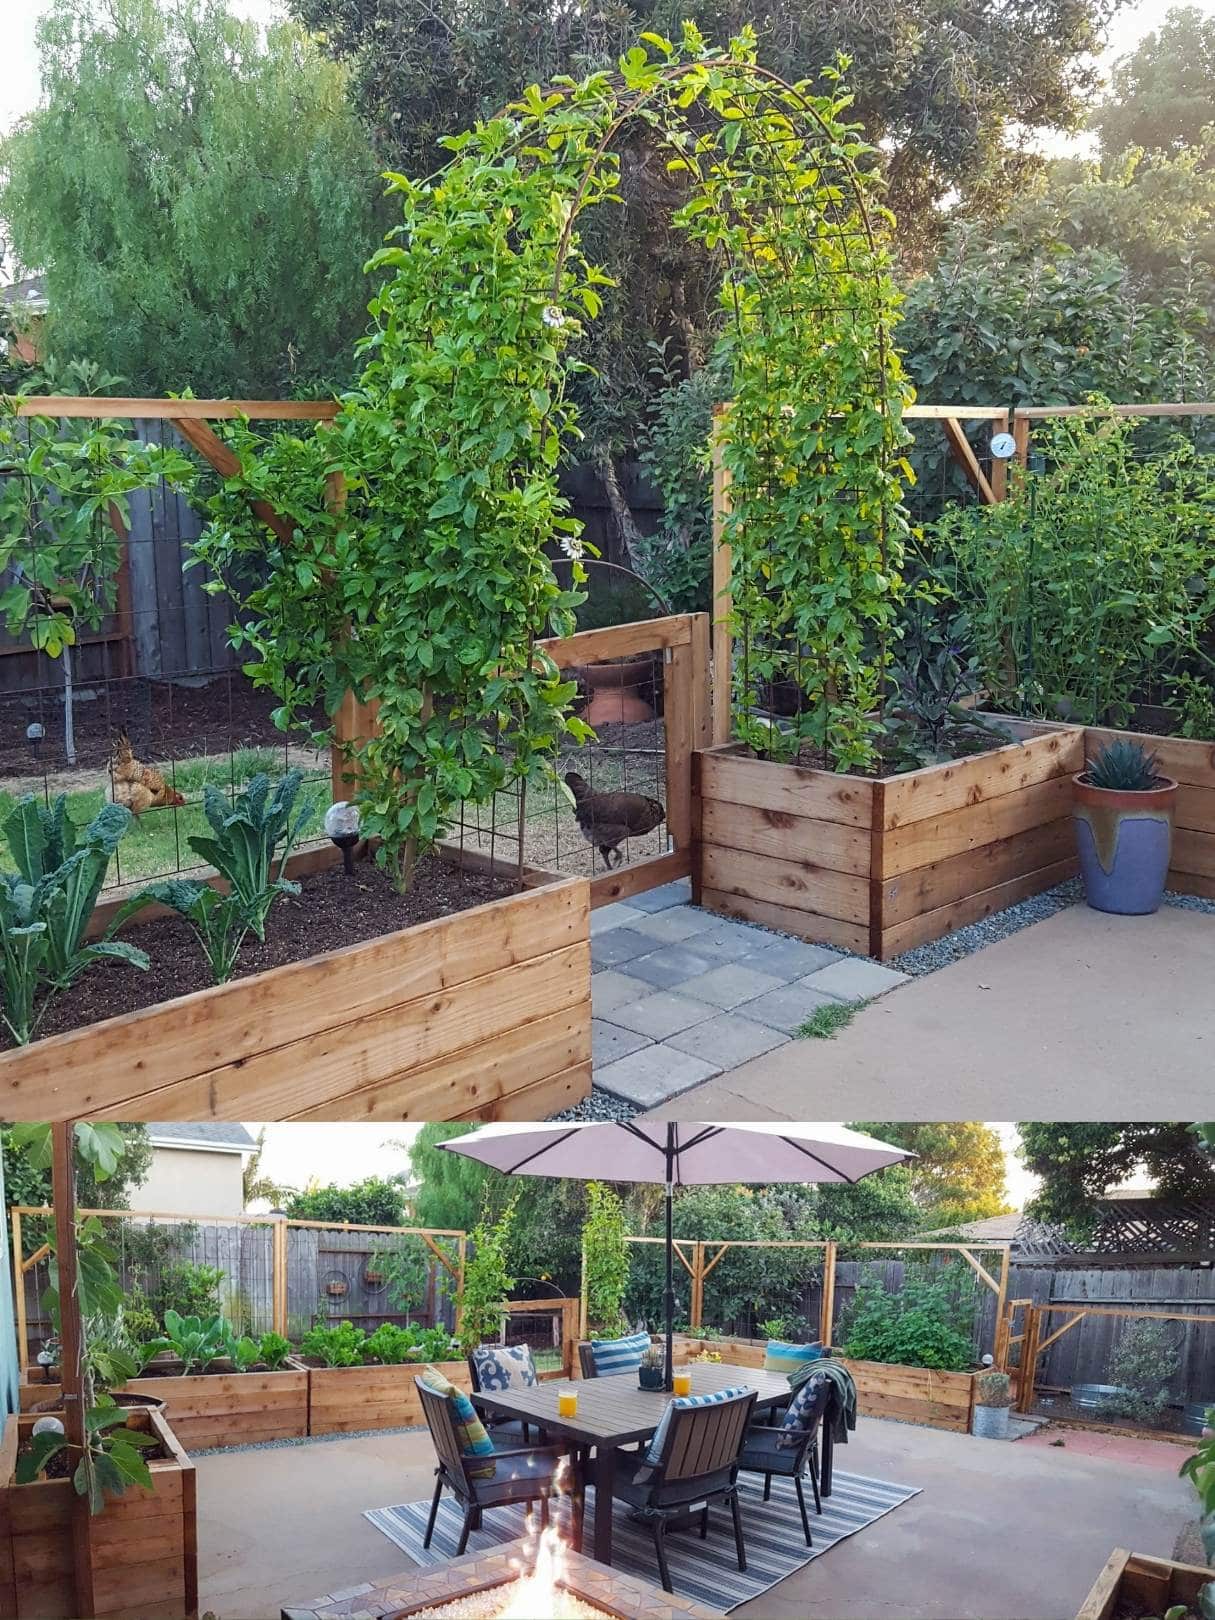
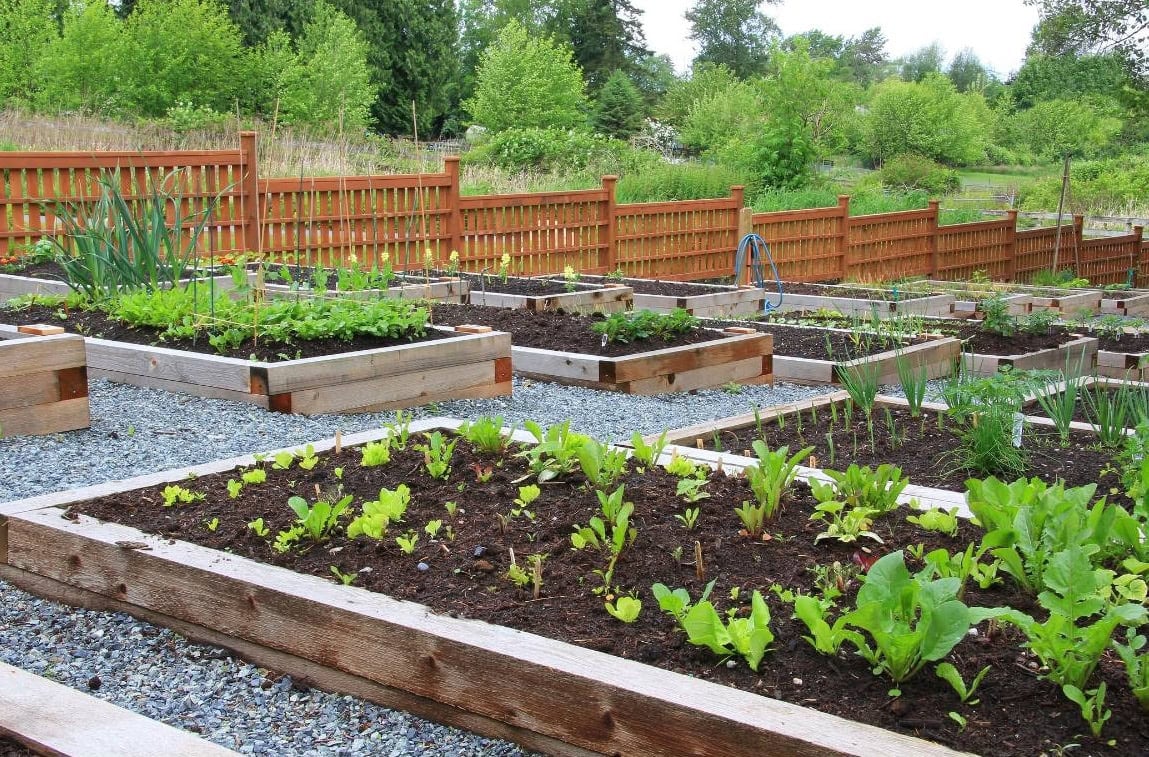
6) Ground Cover and Pathways
- Gravel or mulch (e.g. wood chips or bark) are two common ground cover options for pathways between raised beds. Both should be installed about 2 to 3 inches deep, usually after the raised beds are in place.
- Mulch or wood chips offer a more natural appearance (and is the better option around in-ground beds) but needs to be topped off once every year or two as it degrades. It may also harbor more pest insects than gravel.
- Gravel is generally more expensive upfront but is a one-time installation, and is less prone to pests or weeds. I always use 3/8″ crushed rock because it compacts and stays in place much better than smooth pea gravel.
- You can also experiment with other natural ground cover or pathways like grass or clover (though you don’t want overhead sprinklers spraying your garden beds). I also like to incorporate large stepping stones in my garden paths, nestled in the gravel or mulch.
RELATED: Learn more about the pros and cons of 8 different types of garden mulch here.
Landscape Fabric vs Burlap or Cardboard
- If you use landscape fabric, I strongly recommend using commercial grade landscape fabric. It’s incredibly durable and won’t shred or fall apart over time like the cheaper, thin, plastic-like stuff does. I like to use landscape fabric under gravel since it’s a more permanent installation, and it prevents the gravel from mixing or disappearing into our sandy soil below. It’s also ideal for areas with aggressive weeds such as Bermuda grass or crab grass.
- Using burlap or cardboard to suppress weeds is a more natural approach. Both materials are biodegradable so they’ll break down within a year or two. I prefer to use burlap under bark or wood chips around shrubs and fruit trees, where the mulch needs to be topped off every couple of years anyways.
7) Think About Wildlife
Do you routinely see deer, rabbits, burrowing pests, or other critters in your yard? I’ve learned (the hard way) that it’s best to have a pest plan and prepare in advance. It can save you a lot of work, heartache, and expensive revisions later!
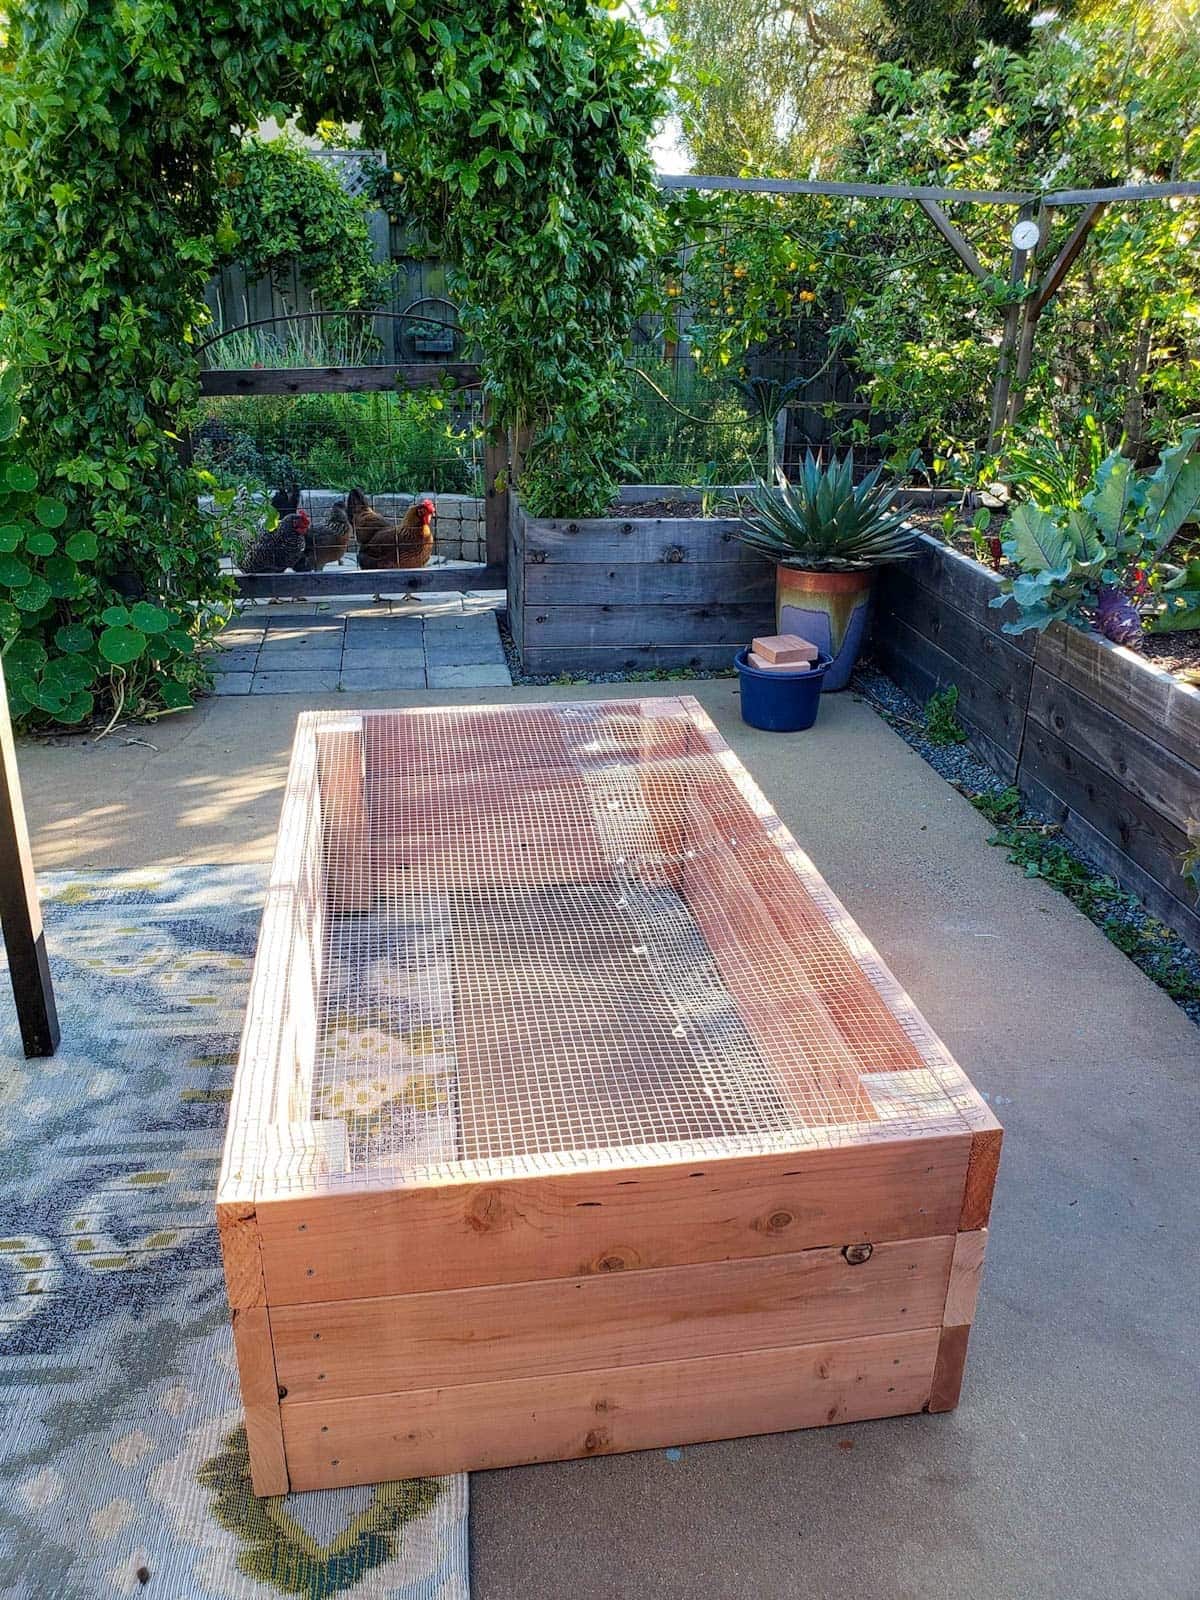
For instance, gophers are a huge issue in my area. They’ll eat and kill anything we plant in the ground! So, I always firmly secure hardware cloth (NOT chicken wire!) below my raised garden beds to block them out. We also have to plant all our fruit trees in DIY gopher baskets.
If deer are common in your area, you may want to install a tall perimeter fence around your garden to block them out.
After planting, I also use hoops and insect netting to cover garden beds and protect tender seedlings from birds or insects as needed.
RELATED: If you also struggle with gophers, please don’t use poison! Come see 7 non-toxic ways to get rid of gophers instead.
8) Invest in Your Soil
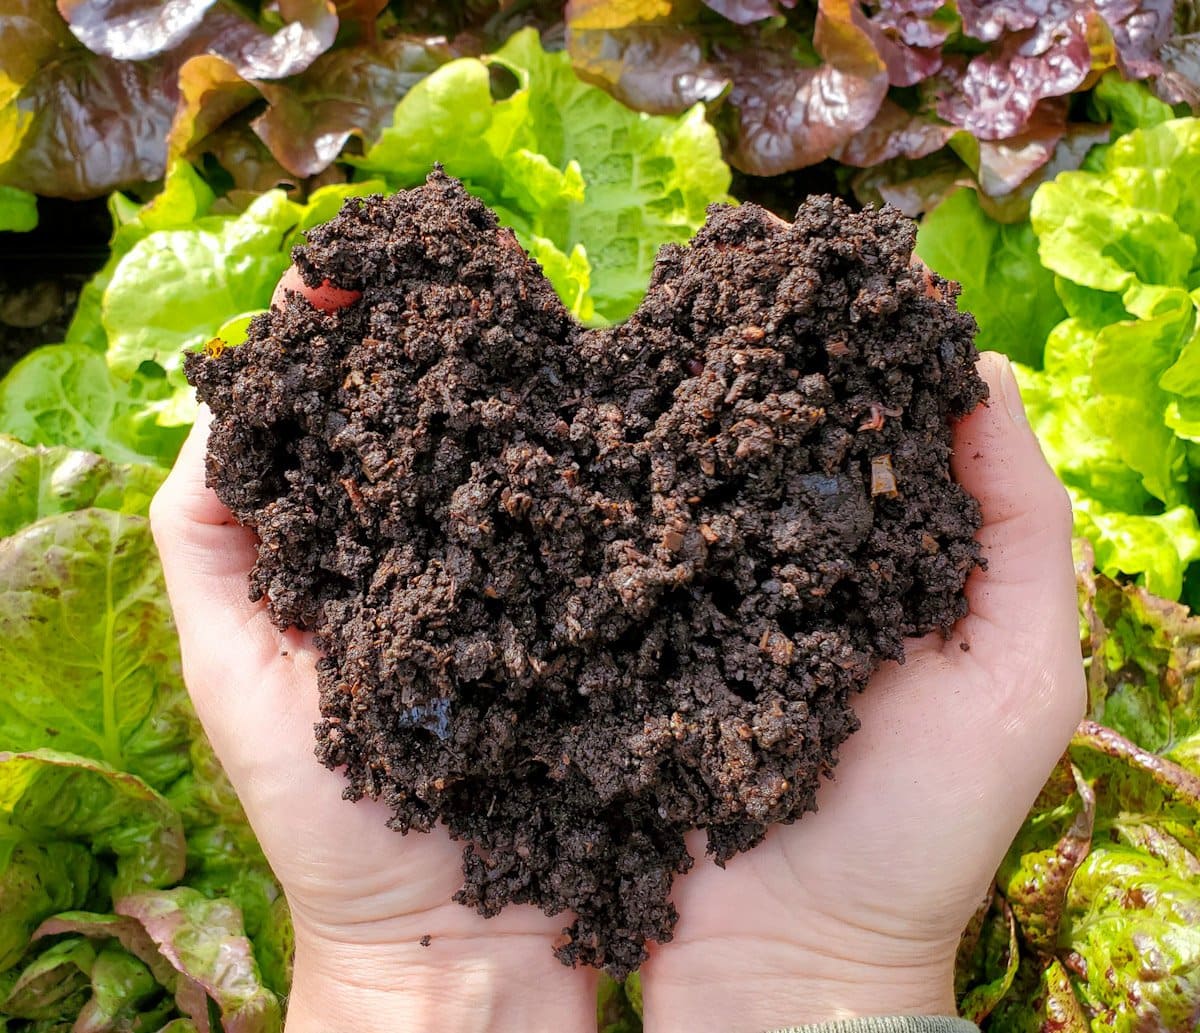
Once your beds are in place, it’s time to fill them up! Soil quality is KEY to plant health, so it’s worth getting right.
I recommend filling new raised beds with about 60-70% quality soil, 20% well-aged compost, and about 5-10% aeration additions – such as pumice or 3/8″ lava rock. If you’re filling many beds at once, order at least a portion of your soil or compost in bulk from a local landscape supplier to save money and reduce plastic waste.
Please see my guide on filling raised garden beds for more details, soil and fertilizer recommendations, using leaves or wood as “filler”, and more.
To establish new in-ground garden beds, till and amend native soil as needed to improve the quality and texture. For example, I always add plenty of compost and organic matter to our fine sandy native soil. If you have dense clay soil, you’ll want to add compost along with horticultural sand and/or potting soil to help fluff it up and improve drainage.
Last but not least, say no to synthetic fertilizers! Choose natural inputs like slow-release organic fertilizer, worm castings, compost, and compost tea that support overall soil health instead.
PRO TIP: Brand new garden beds (filled with fresh soil and compost) may not need much fertilizer the first growing season. But after the first year, you’ll want to amend your garden soil at least once or twice per year. Also learn 6 ways to compost at home to reduce waste and create your own free fertilizer.
9) Know Your Zone
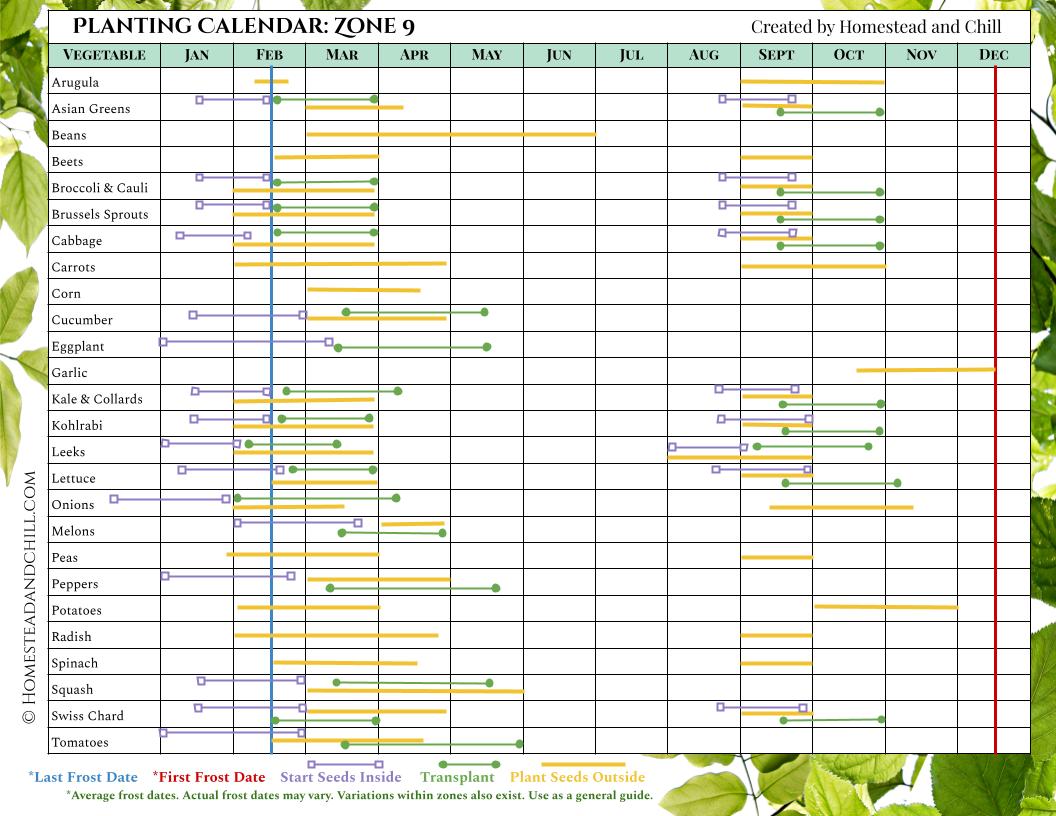
Do you know your growing zone? USDA hardiness zones are based on common low temperatures and frost dates, and are essential for planning when and what to plant.
Here is an easy hardiness zone lookup tool by zip code. Then get a Homestead and Chill planting calendar for your zone – which shows exactly when to start seeds or transplant seedlings outside for dozens of different annual vegetables!
Your hardiness zone will also dictate what perennials, shrubs, or fruit trees will survive in your garden. Read plant descriptions to check zone compatibility.

10) Where to Get Plants (Seeds vs Seedlings)
For beginner gardeners, it’s most simple and stress-free to start with seedlings (aka starts or transplants) from a local nursery rather than growing from seed. One exception is root vegetables like carrots, beets, or radishes; those are always best to plant from seed directly outside.
If possible, try to buy seedlings from a local nursery NOT a big box store. Local establishments will have better quality options, and are more likely to carry plants suited to your area for the given moment. (Unlike others, who sell tomato starts in the middle of winter…)
Starting from seed gives you the ability to grow even more unique varieties (and is super rewarding to do!) but does require more equipment and planning in advance. See our step-by-step guide on starting seeds indoors to learn more.
RELATED: Come learn how to choose the best seedlings at the nursery (including what to AVOID) or browse this list for the 13 best places to buy organic and heirloom garden seeds.

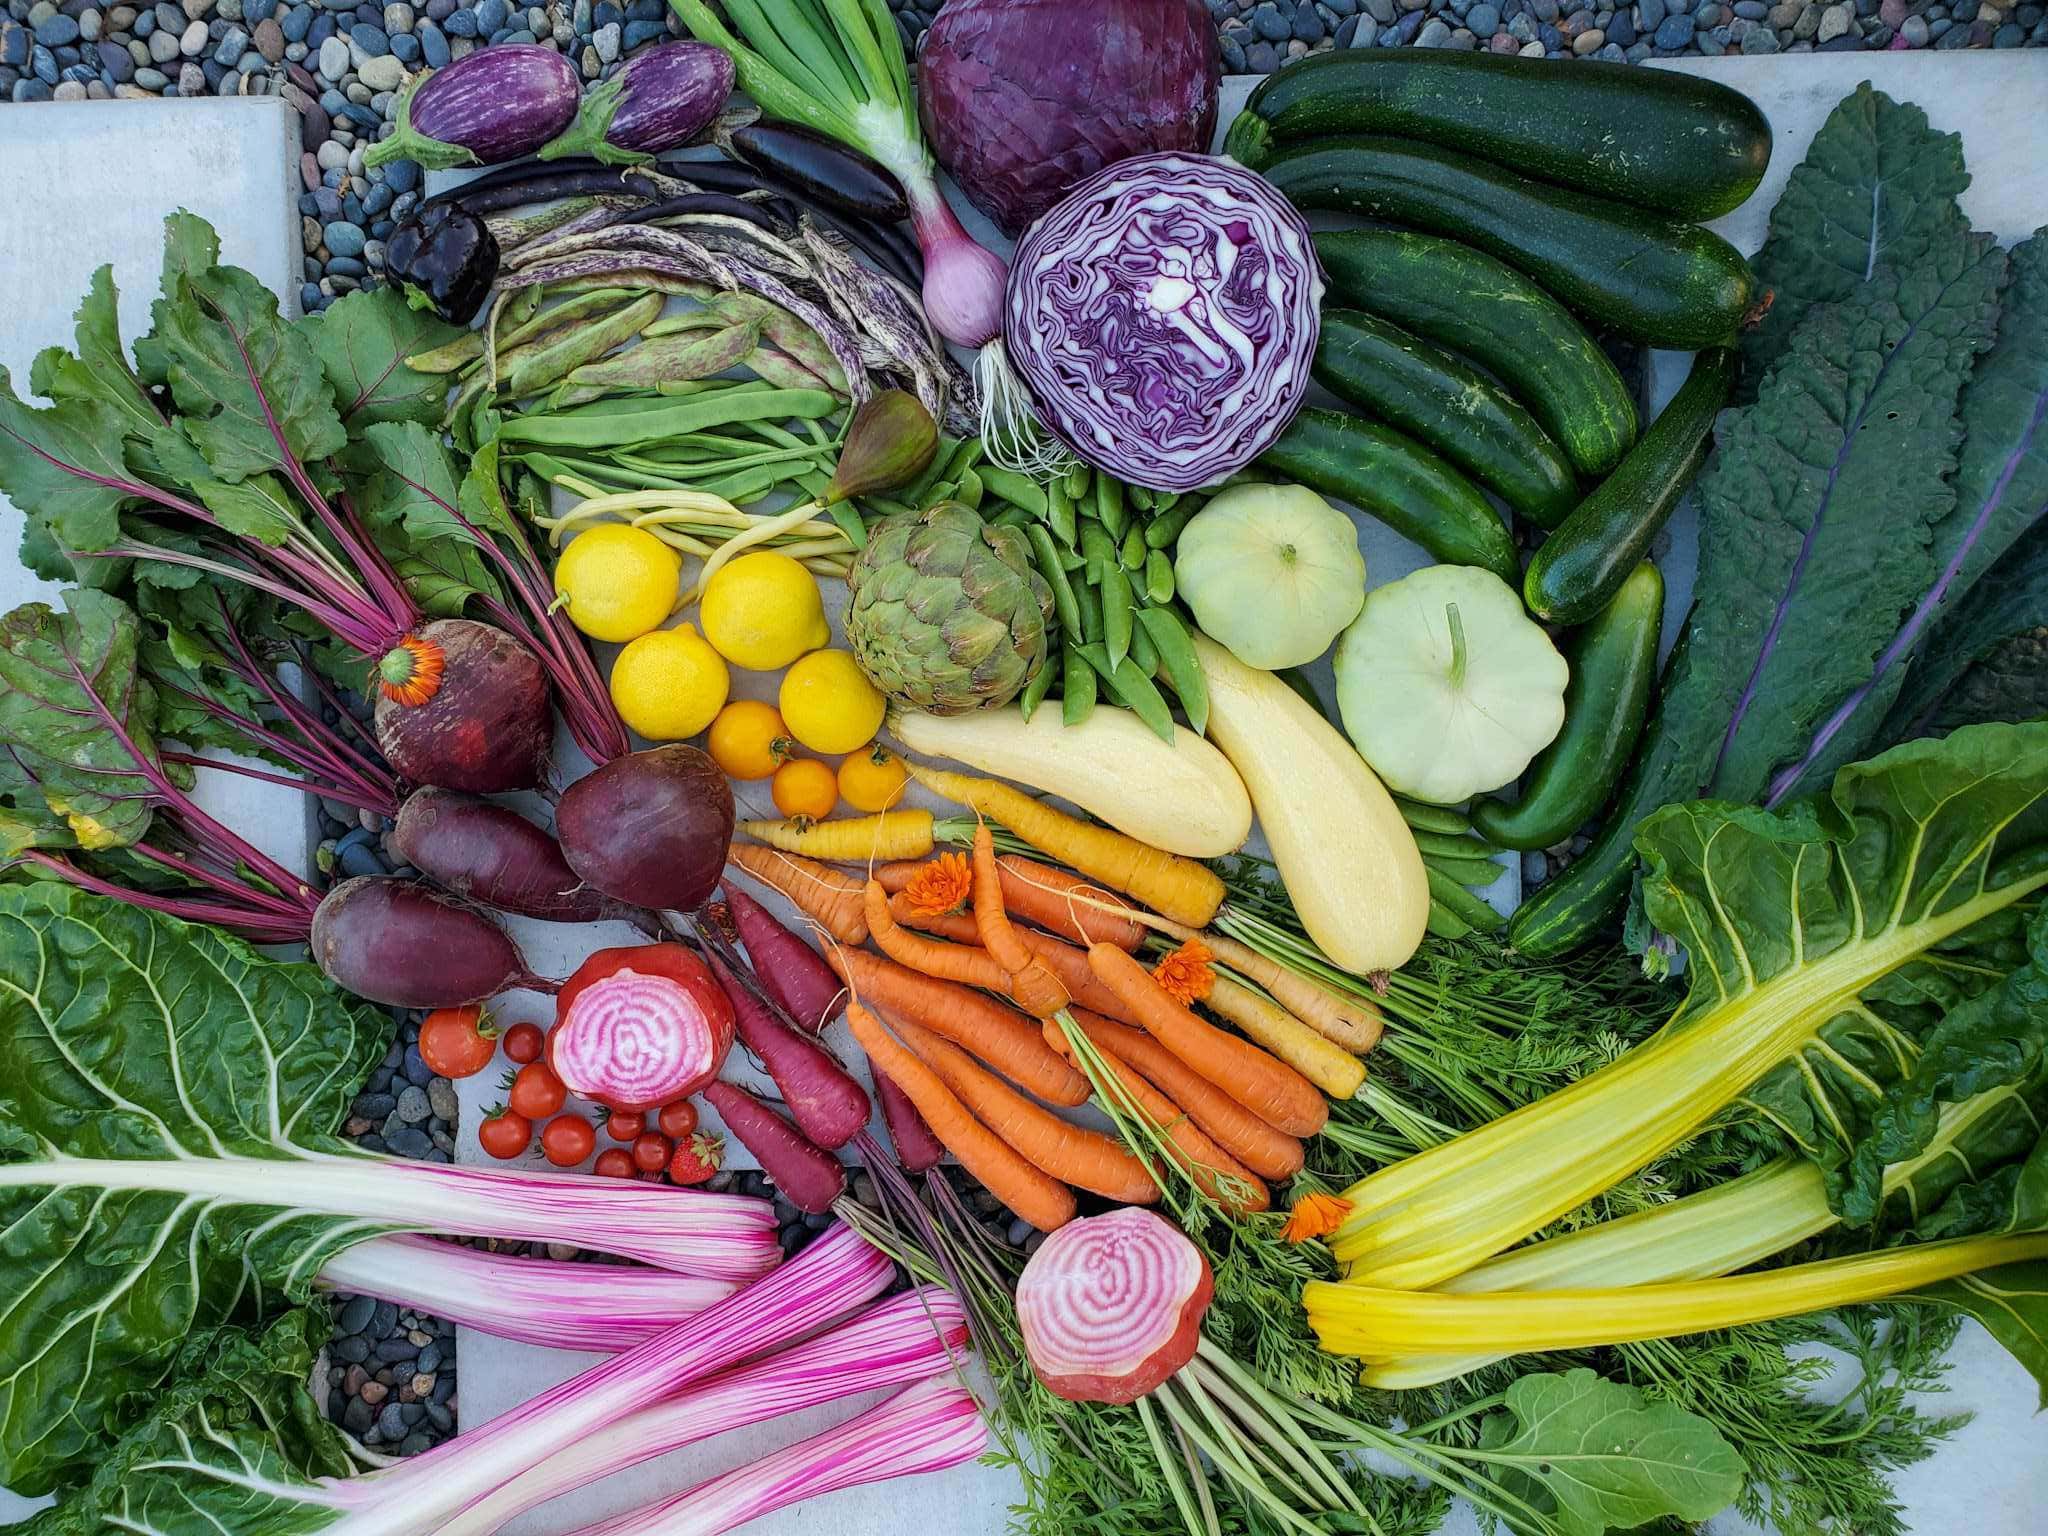
11) What to Grow
Grow what you and your family like to eat most! Zucchini, tomatoes, green beans (bush or pole beans), radishes, snap peas, and leafy greens are some common beginner-friendly crops. I grew cherry tomatoes, summer squash, and honeydew melon in my very first garden.
Start with just a few things at first. Then you can venture out and try new or different crops with time – and probably find some new favorites too! You’ll be pleasantly surprised at just how much better fresh homegrown fruit and vegetables taste than store-bought.
Talk with fellow local gardeners (like nursery staff, neighbors, online gardening groups, or your local master gardeners program) to get tips on what plants or varieties thrive in your area. This improves your chances of success and lowers the stress and potential disappointment.
When it’s time to plant, come see my top tips for transplanting seedlings here.
RELATED: I have Grow Guides for dozens of different crops including tomatoes, lettuce, zucchini, radishes, carrots, cucumbers, garlic, onions, herbs, and more!
12) Watering Tips
- The frequency and amount of water your garden needs will vary depending on your climate, weather, soil type, plant size, bed depth, and more.
- Most plants prefer their soil to be moderately damp at all times: never fully dry, but not constantly soggy either. Plants breathe through their roots, so they can actually “drown” with too much water! When in doubt, check your soil with a handy moisture meter before watering.
- Plants thrive with a consistent watering schedule, and prefer deep but infrequent water (vs watering a little bit every day.) The goal is to water deep, down into their root zone and beyond, and then back off for a few days to let them breathe (but not dry out completely).
- If you only water shallowly, plant roots stay shallow too. Yet watering deeply encourages deeper roots, larger plants, and increased resistance to stress like drought, wind, and temperature swings.
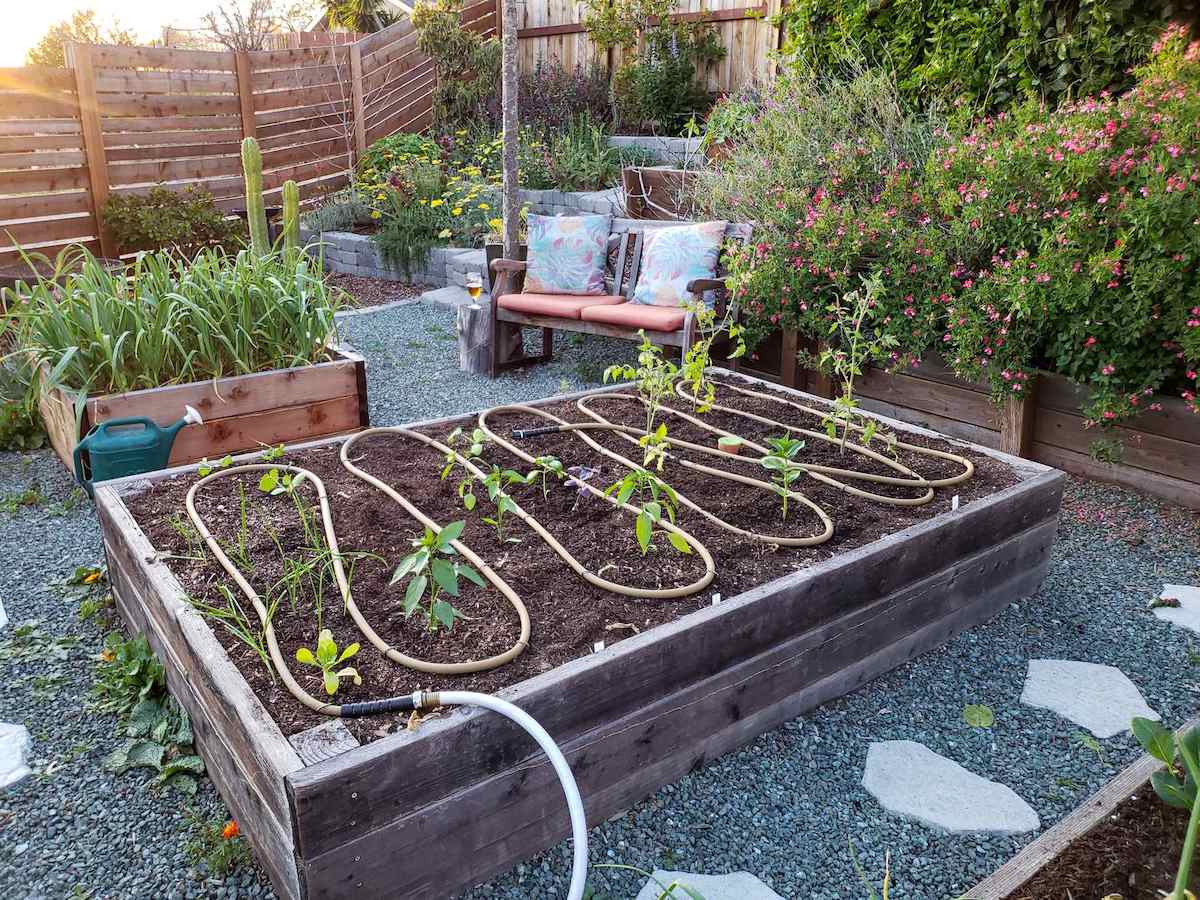
- I love drip irrigation because it saves me a ton of time, and provides my garden the type of water it loves. Before we had automatic drip, I used these drinking water grade soaker hoses in our beds so I could offer similar long, deep water without having to stand there with a hose.
- Add a couple inches of natural mulch (e.g. compost or straw) on top of your garden beds to prevent the top from drying out, reduce evaporation, and help the soil stay more consistently moist.
RELATED: Come see how I set up an easy drip irrigation system for raised beds that connects right to a nearby hose spigot, or browse all of our irrigation tutorials here.
13) Pollinators and Flowers
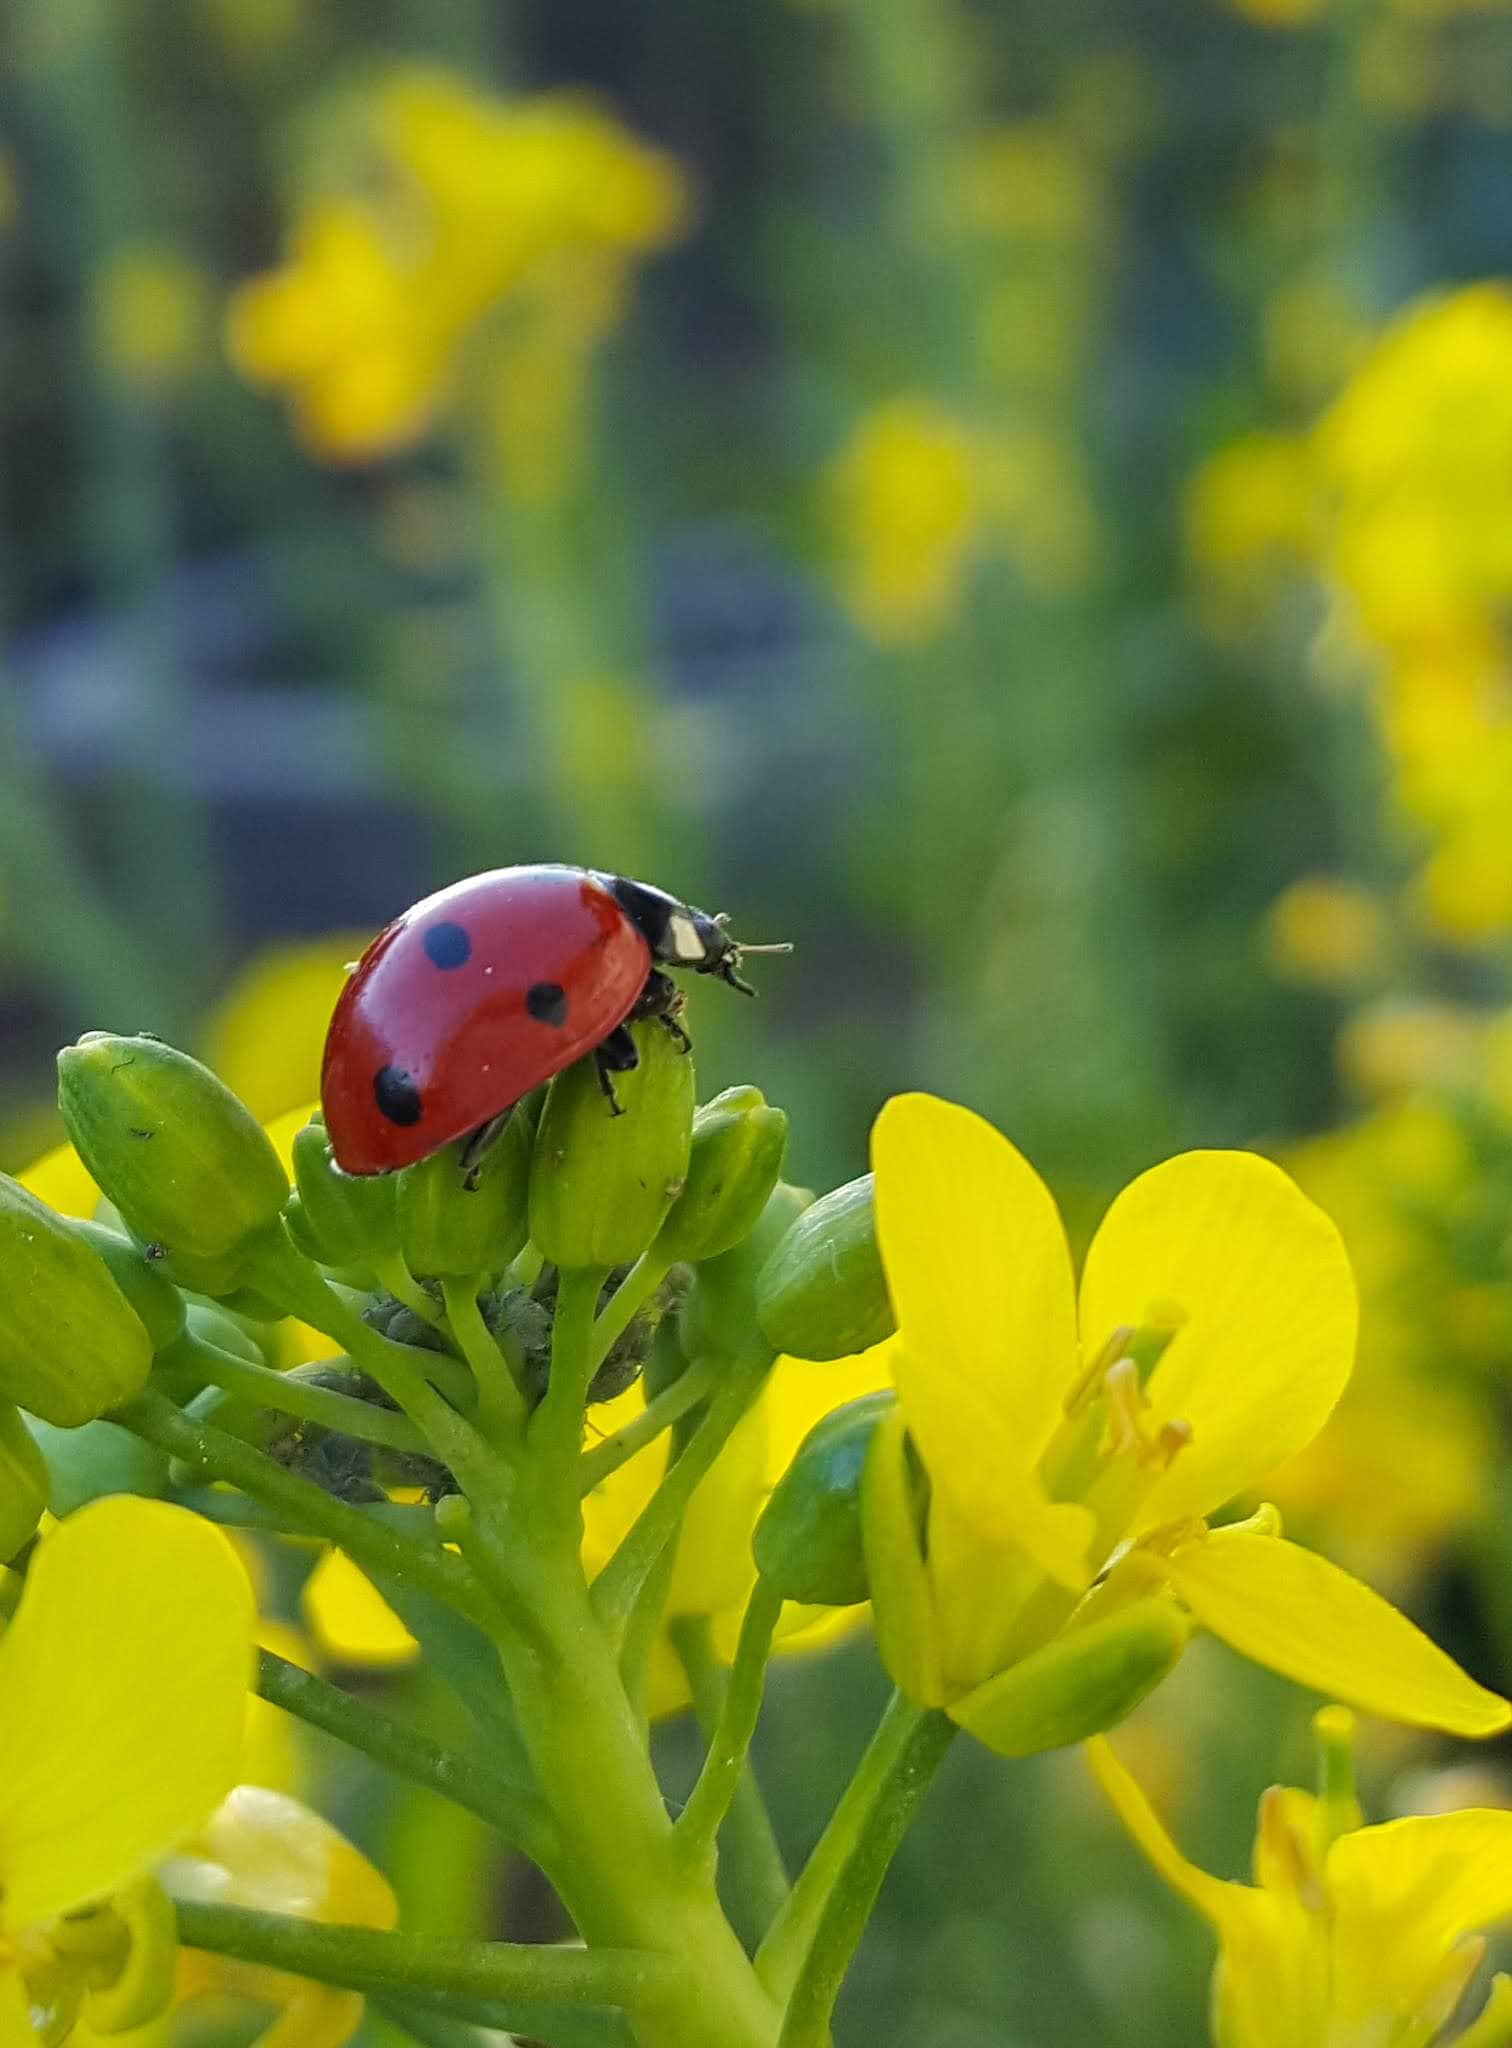
Don’t forget the pollinators! Even if your primary goal is to start a vegetable garden and grow food, add at least a few flowers to the mix. They add invaluable beauty, biodiversity, and attract pollinators – which can help increase your harvests too. Some companion flowers can also naturally deter pests!
In our garden, I always plant my favorite annual flowers mixed among the vegetables in our raised beds, such as cosmos, calendula, zinnia and more.
We also have what I call “pollinator zones” around the perimeter of our gardens, where we grow flowering perennials, herbs, and native plants in in-ground beds and/or containers. Salvias, lavender, verbena, coneflower, milkweed, rosemary, thyme and oregano are some of my go-to perennials.
RELATED: Here are the 7 best easy annual flowers to grow from seed (or seedlings) plus the top 23 plants for pollinators.
14) Keep It Organic, Not Perfect
“If something isn’t eating your garden, then your garden isn’t part of the ecosystem.”
People often see my garden from afar and say “oh wow it’s so perfect!” but honestly, it’s not. Nor do I want it to be! We have plenty of pests and weeds, because perfection is not the goal. Rather, I want to create beautiful, healthy gardens that feed our bodies and our souls – AND support local wildlife and beneficial insects too.
So please, for the love of the planet and everything on it (including your own health), do not use broad-spectrum pesticides or herbicides!
Of course you don’t want to let pests run amok and ruin all your hard work. Yet there are plenty of gentle organic ways to target certain pests when needed while still maintaining natural balance in the garden – like covering plants with insect netting, using mulch to smother weeds, hand-picking cabbage worms, DIY soap spray for aphids, or setting beer traps for slugs and snails.
RELATED: Browse all of our organic pest control guides for more tips, or see how to turn your yard into a certified wildlife habitat like ours!
15) There’s Always Next Year
I’ll be frank: you’re going to make mistakes. But I prefer to think of them as important lessons to learn! Even after all this time, I still mess up or kill plants… quite often. Life gets busy, I take shortcuts or make mindless mistakes, and sh*t happens.
And even when your garden game IS on-point, Mother Nature may have other plans! I can’t tell you how many times unpredictable or strange weather has thwarted my best laid plans. (Thanks, climate change.)
But here’s one of the best things about gardening: there’s always next year. To try again, to learn something new, to hone your skills, and continue to grow. So don’t get discouraged, and please don’t give up! The health benefits of gardening are profound.
Last but not least, have FUN! That’s just as important as what you harvest.
And that concludes my beginner’s guide to start a garden.
I hope these tips are useful, and help you feel more comfortable and confident to dig in! Please let me know if you have any questions (or simply say hello!) in the comments below. For more foundation garden tips, check out our “Start Here” page at the top of Homestead and Chill articles, including plenty of preserving recipes.
You may also like:
- How to Start a Homestead: 9 Must-Read Tips for Beginners
- 16 Best Gardening Books + Other Homestead Guides
- Garden Companion Planting Chart, Plans, and Benefits
- A Beginner’s Guide to Using a Hobby Greenhouse


26 Comments
Arthur
I recently started gardening then I saw this article! This will help me a lot with my gardening, thanks for sharing great tips and tricks!
Shihab Ali Arian
Following study a few of the weblog posts on your web site now, and I genuinely like your way of blogging. I bookmarked it to my bookmark site list and might be checking back soon.
Pls take a look at my web site too and let me know what you feel.
Samantha
Hi Deanna!
Just wanted to say how happy I am that you are putting your knowledge out there to the world. I just got my first community garden plot and started planning!! Thank you for providing all of this information, I am going to need it!
Sheri Nugent
I have never commented before – but want to let you know that I read your blog and follow on IG every day. Your garden is my dream and inspiration. I just bought a house in January and am using your garden as a model for my own. I have large front and back yards with no rhyme or reason… a hideous expanse of bark (which I hate) and grass/weeds. Your garden is my guidepost to making my own lovely space. I so appreciate everything you share – stories, pictures, how-to’s…
One thing you said stays with me every day… about not rushing or feeling anxious because it’s not all done right away. I am taking that approach – building and expanding piece by piece, section by section. It’s hard not to be impatient. But your before and after pics really help!
Thanks so much! Sheri
DeannaCat
I am so glad to help! Is your bark area in a good sunny spot? That space sounds like it may be waiting for some raised beds 🙂 Congrats on the new home and yard, and yes, take your time and enjoy the process!
Sheri Nugent
Yes – the bark is in a sunny spot! I ordered 3 raised beds from a guy I know who builds them. And – I never would of thought of this if not for you – the best, sunniest, most south-facing area is in the FRONT yard!
So the beds will go in the front yard – and it will be fabulous. Yesterday I had my gardener help me tackle the north side of the back yard – we had print outs from your website to guide us in the design.
Little by little it’s coming together. And you are my spirit animal! Thanks!!
Jen
Hi Deanna! Ive followed you on Instagram for a few years now. Almost a month ago my hubby and I spontaneously built two raised vegetable beds and planted them with started just from Home Depot. Just to get us started! We used a soil mix from a local landscaping company that was supposed to be a mix of soil compost and aeration. But after I see my plants are just just not growing like they should in this warm/hot weather (SoCal) and I think it doesn’t drain well. I think it’s more of a sandy loam to loam. When I water, it site on the surface for a bit before soaking into, almost a minute. How can I improve aeration without a disturbing my existing plants? Especially my zucchini, squash and a couple tomorrow’s that aren’t doing too bad. All my herbs and even my marigolds are suffering. I have a bag of worm castings and I was wondering if I should work in some perlite in the surface and it’s eventually work it’s way down? What do you think?
DeannaCat
Bummer! Yeah that sound sounds like it could use a little amending. The thing is, perlite and pumice just sort of float up with time anyways, so if you work it into the top, it will just stay in the top. You can gently try to work in some compost around the top layer for now, and plan to amend and re-mix it between seasons. Another way to help get water to absorb is poke holes around the top of the soil before watering, like either with your finger or a chopstick/pencil. It breaks up that caked crust and lets water seep in more. Try mulching around your herbs, flowers, and more shallow-rooted plants to help the moisture control there too. I hope that gets you through the rest of the summer!
Jen Liguori
Poke holes, that’s a great idea! Yes I’m going to try amending like you said. I pulled some that just didn’t make it, and I’m going to try and amend those barren areas a little more and get a few nursery starts and see how they do. Ok now mulch, yes I need to do that. What do you use?
Jen Liguori
Hi Deanna! Never mind on that mulch question. I reread your blog post on filling raised beds and got my question answered. Thank you so much for the advice!
DeannaCat
You’re most welcome! In our raised beds, we usually use some compost along with some sort of woody “soil” conditioner/amendment, not quite like bark though. Good luck!
Shanonn
Hi Deanna, My husband and I have been following you on Instagram for a few months and you’ve inspired us to completely reconfigure our yard. We’ve got a plan for 4 large raised garden beds to start out. We live in northern Colorado and are getting started a little late in the season. Do you have tools that you recommend for harvesting/trimming? Any gloves or small tools? I really appreciate this blog. Cannot wait to get started.
DeannaCat
Hi Shannon! Sorry for the delay. Ugh, I am finding a bunch of comments that went to spam somehow! Congrats on your new garden! I have all kinds of our favorite garden and homestead supplies listed here, for your browsing pleasure 🙂
Kirisi
Hey Deanna,
When I stumbled across your Youtube channel while researching gardening tips, it got me super hooked!! Super inspired me to be persistent and to just give it a go! Clear, super informative information and easy to understand. Please share more video! Love them!
PS: By the way, love the mary j’s wish we could grow them here, legally! Lol
Your house and garden is beautiful!
All the way from New Zealand!
LAUREN CHILD
Thank you so much for this post! Do you have a shop light or grow light you’d recommend? Thanks!
DeannaCat
Hi Lauren! Yes, we like these lights, with cool white bulbs for veggies and the option with reflectors for a little extra oomph 🙂
Daniel
Hi Deanna, thanks for the great post. My wife and I recently purchased our first home in the LA area, and will be redoing our garden area in the next month. Your yard has definitely inspired me to go with gravel. The question I have is, when situating the raised bed down (as shown in the video), do you line the bed itself with landscape fabric so as to retain the soil in the bed, or do you simply clear the gravel away and set it down on the existing fabric? Your insight is greatly appreciated.
Best,
Daniel
DeannaCat
Hey Daniel,
I would say it depends on the situation. If you are clearing a huge area and plan to cover the entire area with landscape fabric, then you can just set the bed down on it. If you are putting in a bed somewhere that won’t have fabric around it and could be weedy (like tucking it in amongst existing gravel that has no barrier below), then I would line the bottom inside of the bed. Does that make sense? Enjoy the renovations! We don’t have any big projects planned right now for the first time in a long time, and it’s kind of sad! 🙂
Deanna
Fernanda
Hi Deanna! I´m from Argentina. I´ve been following you on Instagram and I´m a big fan of you work.
I’m a new gardener (I started a gardening course last year) and with my father we´ve been doing our edible garden this year. We comitted so many mistakes! Now with your blog we know what was wrong. Thanks for sharing al te secrets with us (I had to translated to spanish all the information fiuuuuuu haha)
I LOVE all the things that you do. Now, with this blog, I´m so happy!
Thanks thanks thanks for your generosity!
Love
Fernanda
DeannaCat
Hi Fernanda – Thank you for following along from Argentina! I hope that many of the tips you find here will be able to be used there also! That is very sweet that you are able to garden with your father. That warms my heart. Thank you for saying hello!
Teresa Green
I stopped growing for about 3 years while I went to law school. SO rusty now! Thank you for this thorough post!!! I have 2 short raised beds on the southside of our house. Those beds have gotten out of control since I went dormant. This I am starting back. Planning to add one new raised bed near my herb garden I planted last year. I’m planning on using your raised bed plans. Much appreciated! Also going to replace some of the soil in the other raised beds to get some use. On the bright side, my compost pile from 3 years ago is very ready. Also planning on revisiting this post when I start looking at using our extra city lot to grow on. Hubby will be building a shop for his hobbies and I will be gardening (currently has 3 long raised beds covered and blackberry bushes galore. Looking forward to any posts on water reclamation since we currently have no water source but have a roof we can reclaim water from on the lot. Also looking forward to posts on greenhouses, fruit trees, and chickens (we are the only suburb of Oklahoma City that allows chickens).
DeannaCat
Ah, it’s just like getting back on a bicycle – I’m sure you’ll pick it right back up! That is awesome (and hilarious) about your compost! She is like “use me!!” I am excited for you to get back out there and get your hands dirty. Congrats on finishing grad school. That’s huge! And yes I will have lots of posts that you mentioned coming in the future – with a backyard chicken 101 in the works now! Thanks for the feedback, and have fun out there!