

Easy Raised Bed Drip Irrigation System (from Faucet or Spigot)
Are you tired of watering your garden by hand, or using other inefficient methods? Let me show you how to set up an easy drip irrigation system for raised garden beds – with step-by-step photos and video!
This DIY raised bed drip system doesn’t require any plumbing skills, and connects right to a nearby spigot or faucet. It’s simple, straightforward, and saves me tons of time, energy and water! It’s also easily automated with an optional hose timer, and can be disconnected to store over winter if needed too.
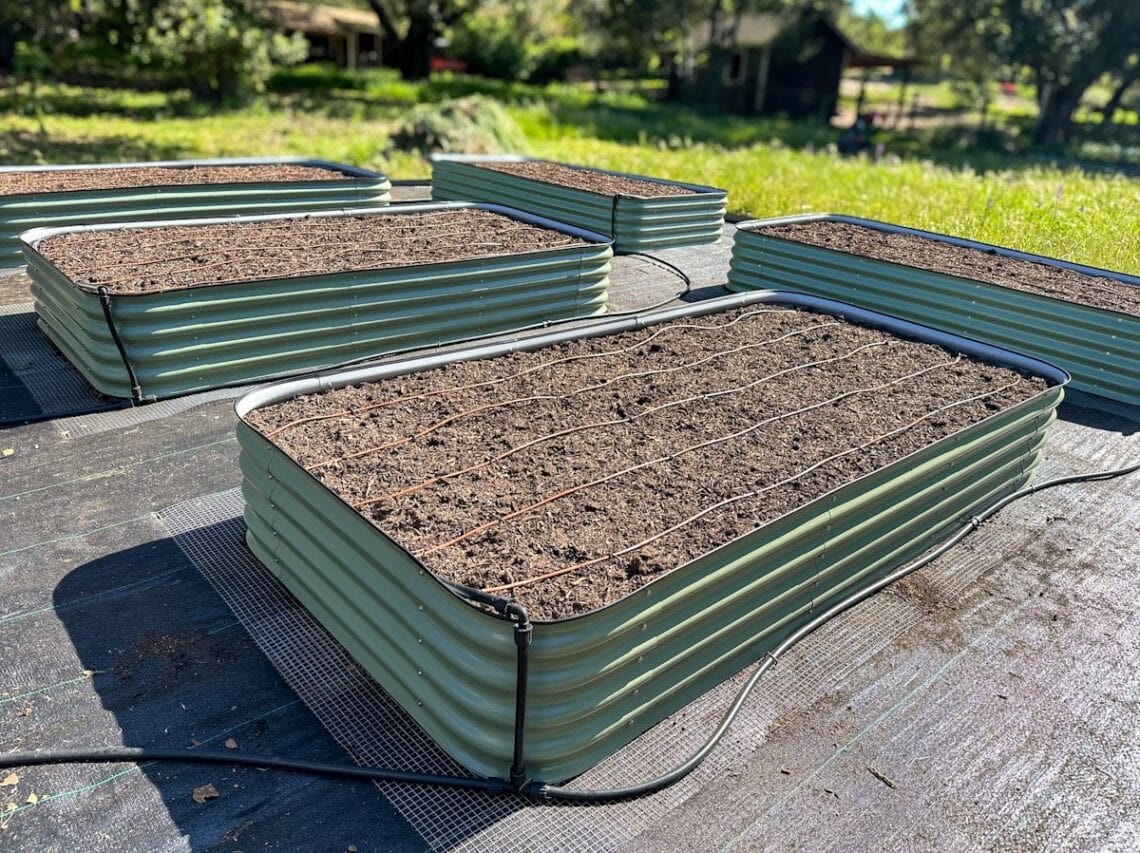
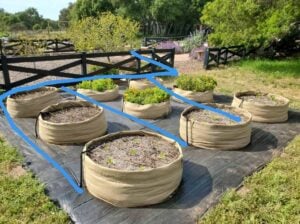
In this tutorial, you’ll see me set up a drip system to water our large grow bag garden, yet it’s perfectly suited for traditional wood garden beds, metal raised bed kits, in-ground garden plots, and more.
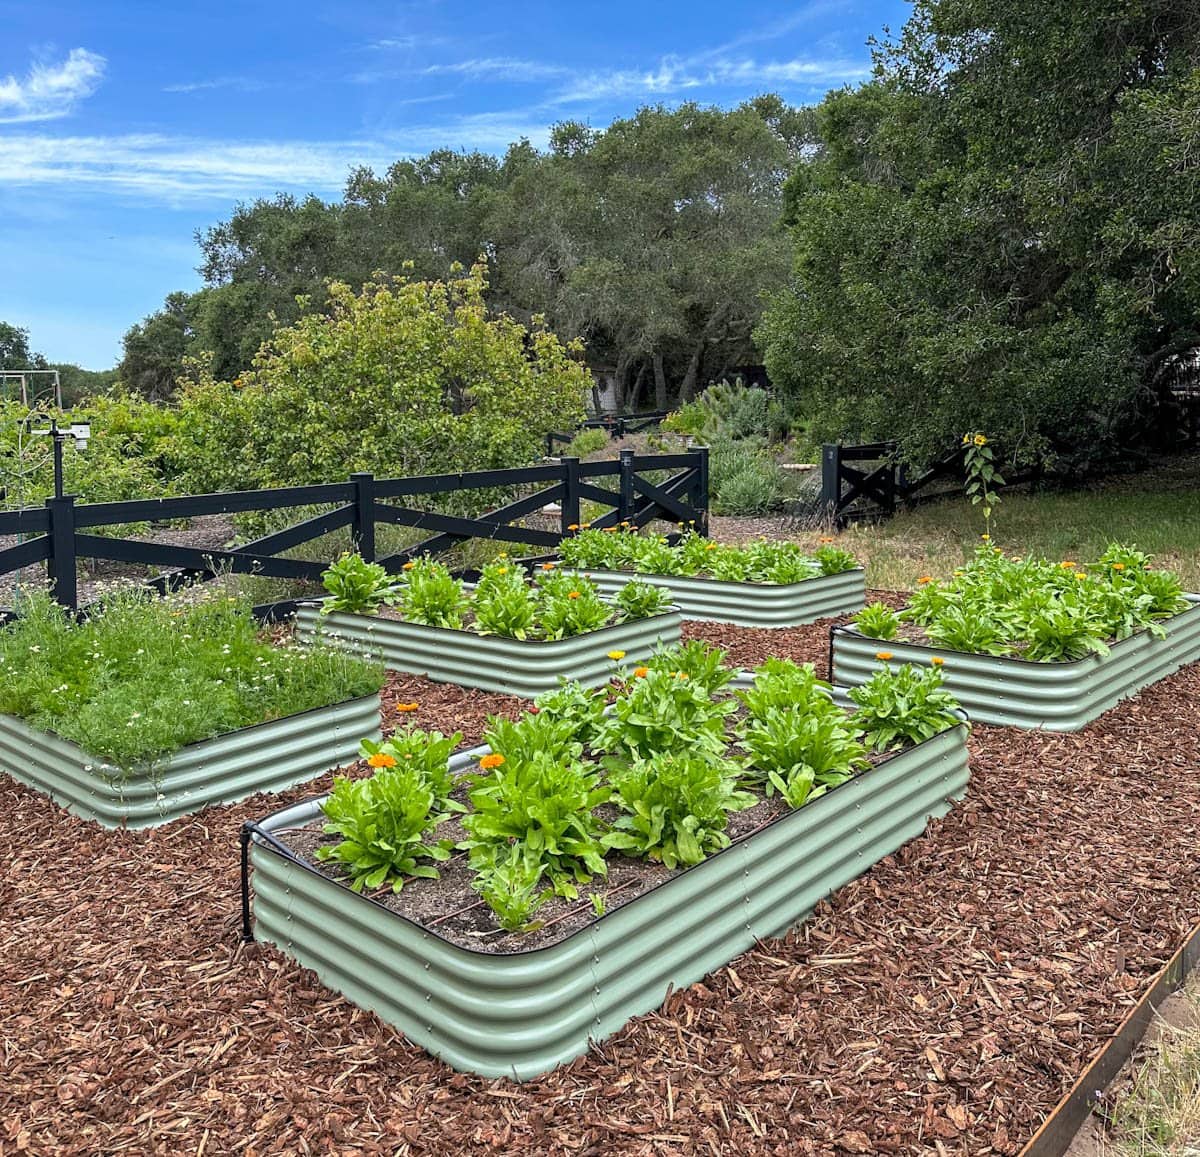
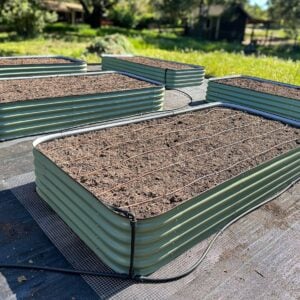
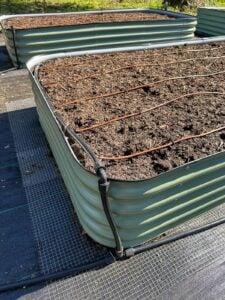
2026 UPDATE: Last year we replaced the grow bags with metal raised beds. I was able to easily adapt the existing drip system to fit, so I’ve included updated photos of those beds too.

Would you like to save this?
Disclosure: Homestead and Chill is reader-supported. When you purchase through links on our site, we may earn an affiliate commission.

RELATED: I also have a tutorial on how we installed a drip irrigation in our wood raised beds using drip tape, PVC pipe, and automated valves. We love that option too, but the system I’ll show you today is even easier to set up (and is what I usually recommend for beginner’s).
In this article you will find:
- A list of supplies needed to make a simple raised bed drip irrigation system that connects to an outdoor faucet or tap.
- A YouTube tutorial that shows the step-by-step process.
- A written summary of the steps shown in the video, with photos for quick and easy reference.
- I’ll also provide some tips about water pressure, winterizing, and how long to run raised bed drip irrigation systems.
A note on our grow bags: I used a mix of 100-gallon and 150-gallon grow bags in our old “calendula farm”. Unfortunately the exact bags are no longer available, but this is another well-rated option with similar dimensions and specs.

Supplies Needed
I get almost all of our drip irrigation supplies from Drip Depot. They’re fantastic! The affiliate links found in this article gives us a small commission at no cost to you. We greatly appreciate your support, which enables us to share tutorials like this with you!
- A nearby hose tap (spigot or faucet). For the best results and pressure, choose a tap that’s within 50 feet or closer from the raised beds. See pressure notes to follow. It’s usually not all that difficult or expensive to have a new faucet installed closer to your beds if needed!
- A 4-in-1 faucet adapter, which is specifically designed to connect drip irrigation to a hose tap. It comes with all the parts you need (that you can also buy separately): 1) a filter to prevent sediment from entering and clogging the drip system, 2) a backflow preventer to protect your drinking water supply from contamination, 3) a pressure regulator (drip systems need to operate at 20 to 30 PSI), and 4) a coupler/adapter that the ½” drip irrigation tubing connects to.
- Standard ½ inch irrigation tubing, commonly available in 100 foot rolls. For larger projects, consider 250 foot rolls or a 500 foot roll if necessary. This tubing will create the bulk of your raised bed drip irrigation system. Get enough tubing to run from the tap, between the beds, up the sides of the beds, and also to create the “header” inside each bed”.
- ¼” dripline tubing with pre-installed drip emitters. You’ll need enough to run several lines down the length (longest side) of each raised bed – explained more in the “header assembly” section to follow. For example, one 4×8’ raised bed with 4 rows of dripline will require about 32 feet of dripline tubing.
Note that drip tubing comes in various flow rates and emitter spacing. For this project, I chose drip tubing that has ½ gallon per hour emitters every 6 inches, and space the rows of dripline every 8 or 9 inches across the bed. I find that 6-inch spacing provides nice even saturation and allows for flexible planting throughout the raised beds.

Supplies continued
- ¼” barbed couplers to connect the ¼” drip tubing to the ½” main line tubing headers.
- A punch tool, used to add holes and attach the drip tubing to the ½” black supply line.
- Figure 8 clamps to end the main ½” lines. You’ll need one for each header, and possibly more to end other lines in your system – depending on the layout.
- Goof plugs, to end/cap each of the ¼” drip tubing lines. These can also be used to plug unwanted holes in the 1/2″ tubing.
- Various ½” couplers (including tees and elbows), used to run ½” tubing line between and up the sides of your raised beds. This varies depending on your system layout. I suggest drawing out your system to determine how many couplers you’ll need. We prefer to use PermaLoc couplers over compression fittings. They’re durable and reusable, making it easy to make adjustments or repairs! On the other hand, compression fittings are more permanent and tubing must be cut to make changes.
- Galvanized landscape staples to hold the drip line in place.
- Scissors to cut the drip tubing. I also find pliers are helpful when working with the ¼” couplers.

Optional Supplies
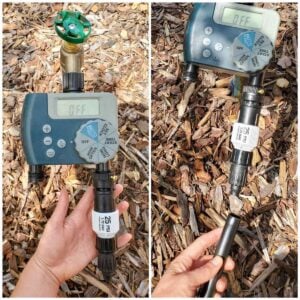
- A battery-operated faucet timer to easily automate your raised bed drip irrigation system. In this particular project, we used a 2-outlet hose timer (what we already had on hand) that can be used to connect two drip lines to a single tap. Or, you can use asingle outlet hose timer. They even make 3-outlet timers for systems with 3 zones. I’ve been using these timers for years and they still work perfectly! I haven’t even had to change batteries on some that have been running for two years.
- Shut-off valves for each bed. Install one of these simple on/off valves in the header or riser of each raised bed for the utmost control! That way, you can turn off the water to certain beds if some are in use while others are not. Or, turn the valve halfway to restrict/reduce water flow to beds that have less water demand than others (e.g. for drought tolerant crops like peppers). We skipped this option in this particular project, but I did install individual valves on each raised bed in our main garden space.
- A hose splitter or Y-valve. With this, you can connect the drip irrigation system to a faucet (on one side of the splitter) while also still maintaining a free outlet to use a garden hose, fill watering cans, etc.
Drip Irrigation System Layout and Pressure
Drip components are designed to operate under 20 to 30 PSI. It’s usually necessary to use a pressure regulator in drip irrigation systems because high pressure can “blow out” sensitive drip parts. (For reference, normal house water pressure can be as high as 80 PSI.)
In order to maintain good pressure throughout your drip system, it’s best to not surpass 100 to 200 feet of solid ½” irrigation tubing (the main line that runs from the tap and between beds). Otherwise, your the furthest beds may not have adequate pressure.
For larger systems (where more than 200+ feet of line is needed), it’s best to split the system into separate zones or shorter lines that will run at different times if possible. For instance, by using two different taps or a 2-outlet hose timer with two separate lines attached. This is also helpful if you have various beds/areas with different water needs.
PRO TIP: If pressure seems too low in your raised bed drip system (and your house/tap pressure isn’t crazy high), you could experiment with NOT using a pressure reducer at the tap. When in doubt, use a hose thread pressure gauge at the tap you’re connecting the system to to assess the pressure starting point. Then you can simply unscrew and remove the pressure reducer component from the 4-in-1 adapter if needed.


How far should I space drip lines in raised garden beds?
It’s best to space drip irrigation lines in raised garden beds every 6 to 12 inches – and no wider than 12” apart.
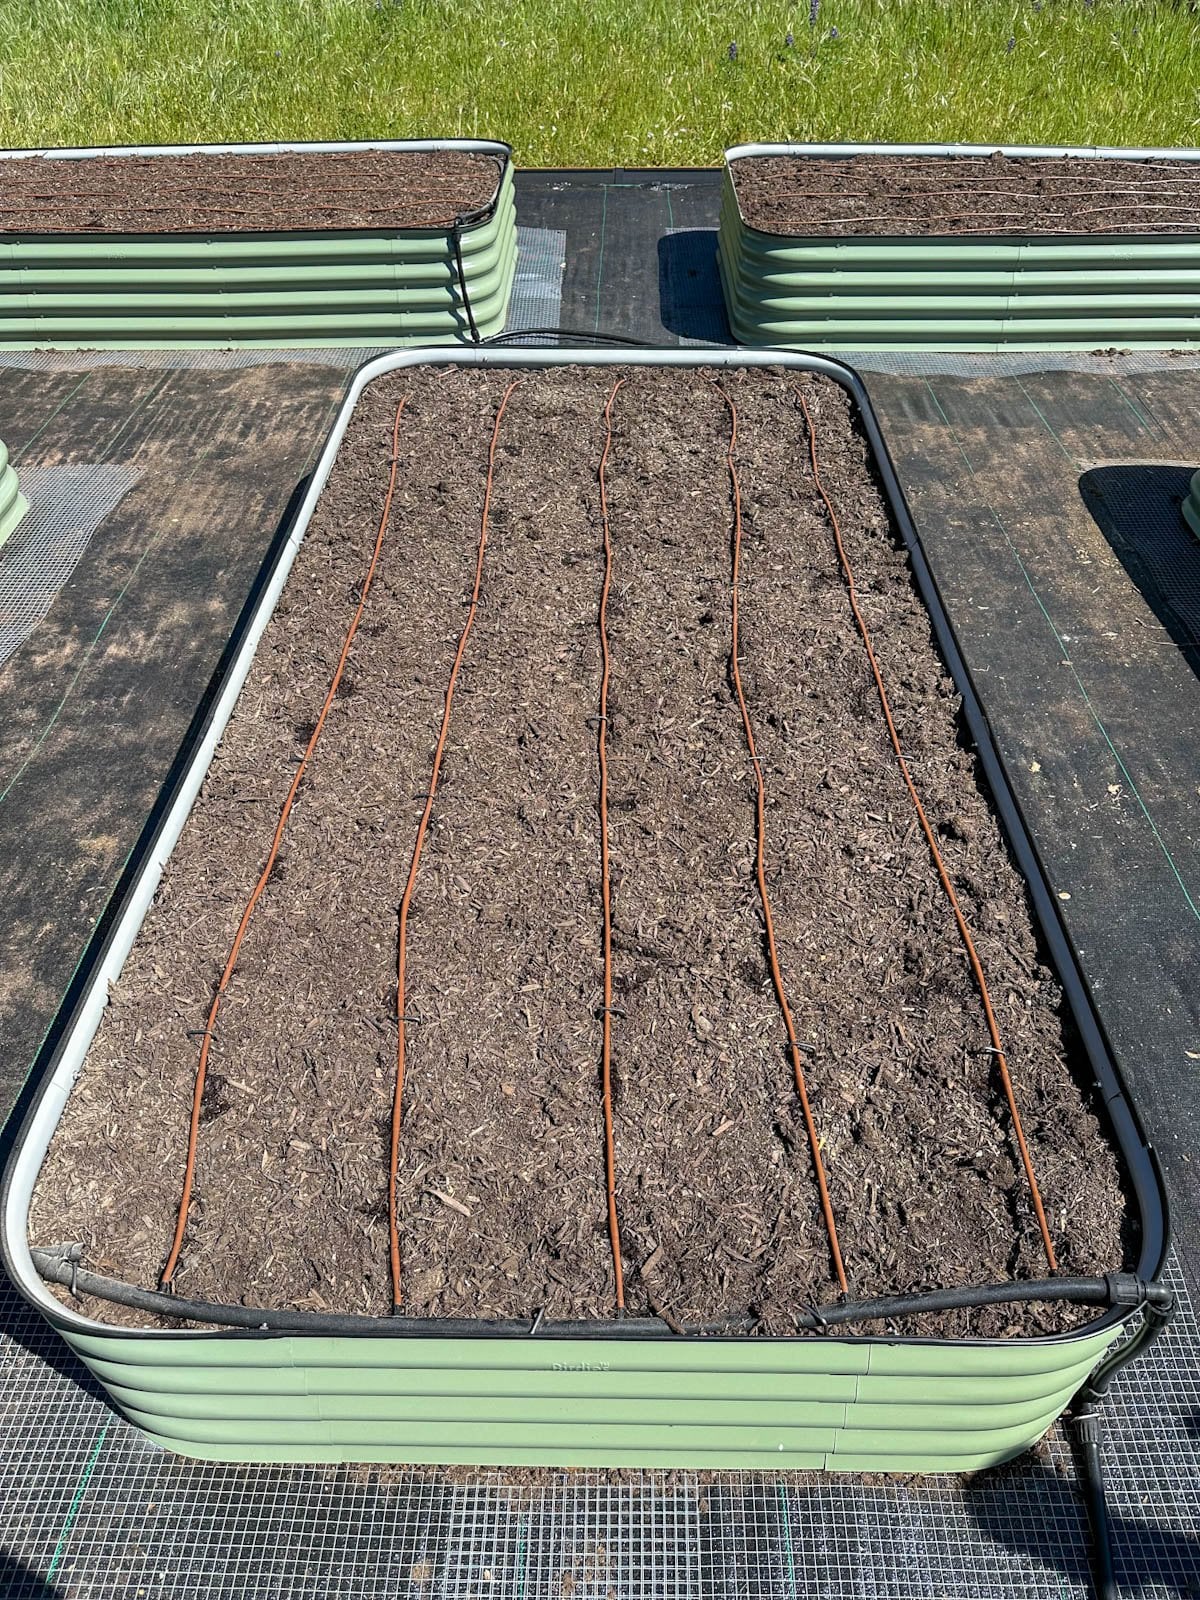
In our metal 4×8’ raised garden beds, I installed rows of 1/4″ dripline about 8 inches apart evenly across the bed – or five lines total per bed. With emitters every 6” along the lines, this provides a nice even distribution of water that saturates the entire bed, allowing us to plant along the drip lines or in between. This is especially helpful for closely-spaced plantings like root veggies.
Keeping the entire garden bed damp (rather than watering only at the base of plants) also keeps the soil microbiome healthy and encourages roots to explore, growing larger and wider. That leads to bigger, healthier plants!


Instructions
Step 1: Assemble Headers with Drip Lines
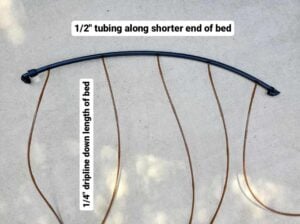
Each raised garden bed or planter needs a “header”. The headers are made with ½” solid tubing that sits inside one of the short ends of the bed, where the smaller dripline tubing connects to.
If you’re installing drip irrigation in multiple raised garden beds of the same size, I find it’s easiest to make just one header in or near the garden bed to figure out the size and spacing.
Take note of the measurements, and then use that header as a guide or prototype to pre-assemble the remaining headers in a clean work space. (Such as a concrete patio or large table.)
That way, there is less risk of getting soil inside the parts as you work – which can clog your emitters! Assembling the headers first also makes the rest of the system install very quick and easy.

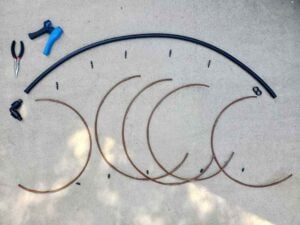
Header Assembly
- Measure and cut the solid 1/2″ solid tubing to fit inside one short end of your raised bed. If you’re using figure 8 end clamps to end the line, leave a couple extra inches to fold over.
- Cap one end of the header line with a figure 8 clamp or other end cap.
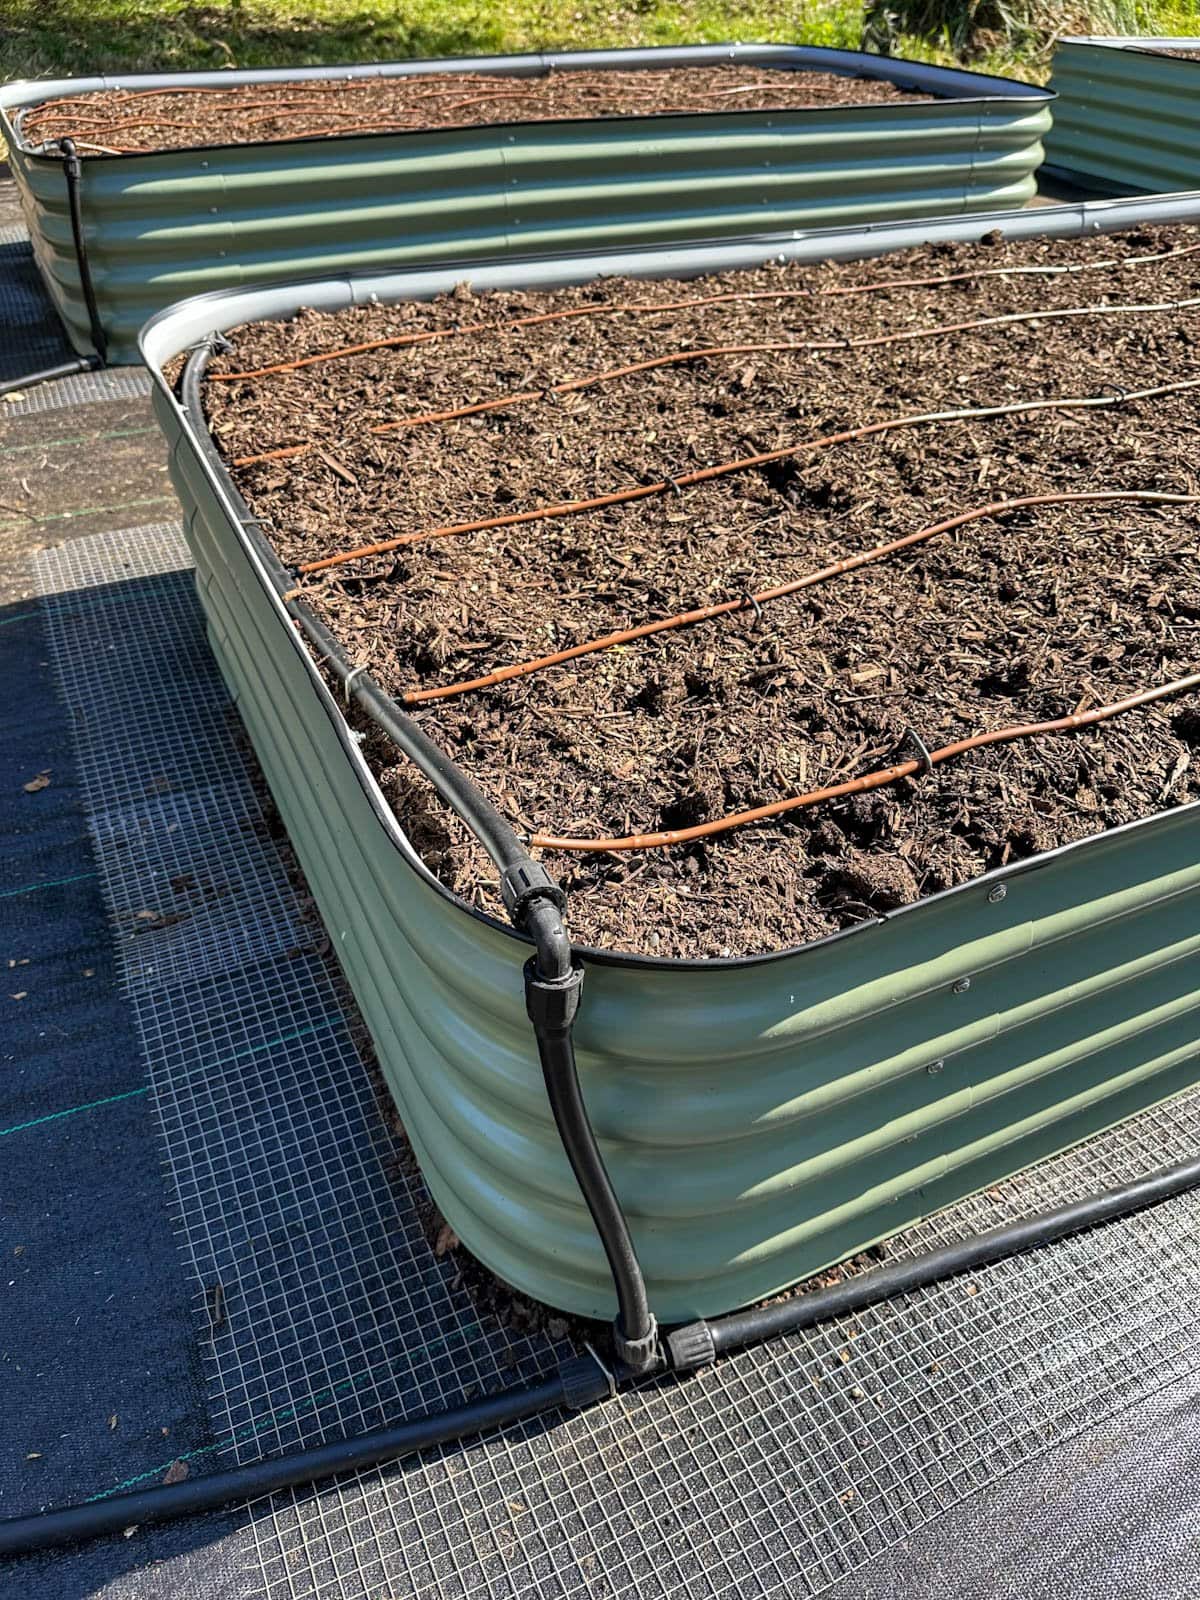
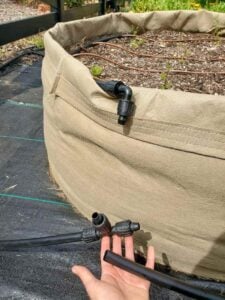
- The other end of the header will receive water from the main supply line and riser. The design of your header connection will vary depending on your system layout. We added an elbow (90°) PermaLoc adapter to one end of our header, which connects to a riser that runs up the outside of the bed. See photos below.
- Measure and cut ¼” drip tubing lines. Make them long enough to run the length of the bed and connect into the header.
- Measure and/or mark where you want each row of drip tubing to attach to the ½” header, spaced evenly across the bed (between 6 to 12 inches apart).
- Use a punch tool to create holes in the main header tubing. Be sure the holes are all facing the same direction so the drip tubing will lay flat on the soil surface.
- Attach drip tubing to the header. Insert a ¼” barbed coupler into one end of the ¼” drip tubing. Then push the other end of the barb into the header tubing.
- Finally, cap/end each ¼” drip tubing line with a goof plug.


Step 2: Connect Drip Line to Tap
- Optional: To easily automate the raised bed drip irrigation system, add a simple faucet timer to the tap first. You can also add a hose splitter before the timer, leaving one side of the tap free for other things.
- Next, screw on the 4-in-1 faucet to drip adapter.
- Connect the ½” drip tubing to the coupler at the end of the adapter.

Step 3: Run Drip Line Between Beds
- Run the ½” main line from the hose tap or faucet to the raised garden beds. Use tees, elbows or other couplers to create rows between beds as needed.
- Each bed will need a point of connection and riser. Cut into the main line near the bed, insert a tee or elbow (depending on the layout of your lines), and add another piece of ½” tubing up the side of the raised bed. Another option is to hide the riser by running it under and inside the garden bed.
- Optional: Add a shut-off valve for each bed, explained in the supplies section above. The valve can be installed along the riser, or as part of your header.
- It’s okay to cover or bury the ½” mainline drip tubing in several inches of mulch, bark, soil, gravel, or other cover.
- I like to leave the very ends of the lines open for now (not capped) so I can flush the lines before adding the drip components.


Step 4: Install and Connect Headers
Before adding the headers to your raised beds, flush the main lines to remove any potential debris that could clog emitters. Simply turn the water on and let it run freely out of the end of the lines for a minute or so.
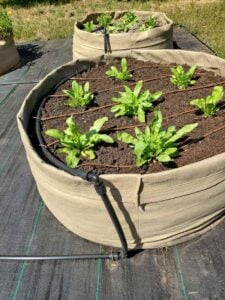
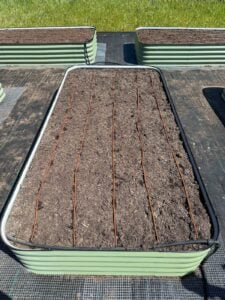
After flushing the lines, connect the headers to the risers you’ve added to each raised bed. Tuck the header inside the short end of the bed and attach it to the riser. Secure it in place with landscape staples or pins. Next, position the drip tubing lines evenly down the length of the bed and pin them in place too.


Tips on Using the Drip System
When you’re ready to use your new raised bed drip irrigation system, simply turn on the tap! If you’re using a hose timer, leave the main faucet ON at all times, set the timer, and it will let water into the lines per the schedule you specify.
Once the system is set up, it’s easy to calculate water use and flow rate! Count the number of emitters per bed, then multiply that by the emitter flow rate. For example, each grow bag shown in this example has 28 emitters, and each emitter is rated for ½ gallon per hour. That means each grow bag would receive 14 gallons of water per hour the system runs.
How long should I run my raised bed drip irrigation system?
It depends! Every garden has different water demands based on the unique climate, soil, season, temperatures and rainfall patterns. It also depends on your mulching practices, and how thirsty your plants are. Larger, mature plants generally “drink” more water than smaller ones. Soil protected with a nice 2 to 4″ layer of mulch will stay damp much longer than bare soil, greatly reducing water needs.
In general, it best to provide less frequent, deep, long watering as opposed to short shallow bouts of water every day. This will encourage deep healthy roots and stronger, more resilient plants.
Try to water enough to keep the soil evenly moist at all times, but allow it to dry out ever-so-slightly between watering. (Never fully dry, but not constantly soggy.) Remember that plants breathe through their roots!
In our climate, I typically run our raised bed drip irrigation system for about 45 minutes, twice per week. This will also vary depending on the type of emitters used (e.g. 1/4 gallon per hour emitters will need to run longer than 1/2 gph emitters).
PRO TIP: When direct-sowing seeds, I also like to provide additional overhead or hand-watering during the first few weeks. This helps keep the top of the soil nice and damp during germination and early root development.

Winterizing raised bed drip irrigation systems
As with all types of irrigation, it’s best to winterize your raised bed drip irrigation system before freezing conditions arrive. At minimum, thoroughly drain the system and protect it with a nice deep layer of mulch. Leaving standing water in pipes or valves can cause them to crack when the water freezes and expands.
Or, to further reduce the risk of damage, folks in extremely cold climates may want to remove the drip irrigation components completely. Store your supplies in a protected location over winter, such as in a garage or similar.

Thanks for irrigating with me!
After reading this, I hope you feel empowered and prepared to go install an easy raised bed drip irrigation system of your own. Once you understand the basics of irrigation, the options are endless! You should be able to adjust and tweak things to create an ideal irrigation system for your garden or project.
Please consider pinning or sharing this post if it was useful. Also feel free to ask any questions in the comments below. Thank you so much for tuning in today, and enjoy!
You may also enjoy:
- How to Build a Raised Garden Bed (video included)
- All About Calendula: How to Grow, Harvest, and Use Calendula Flowers
- How to Install Drip Tape Irrigation in Raised Garden Beds
- 17 Ways to Save Water in the Garden and Landscape
- Rainwater Harvesting 101: How to Set up a Rainwater Collection System
- Companion Planting 101 and Printable Chart
- How to Remove or Kill Grass (and Grow Food, Not Lawns!)
Easy Raised Bed Drip Irrigation System (to Faucet or Spigot)
Equipment
- a nearby hose tap (spigot or faucet)
- heavy duty scissors
- drip irrigation hole punch tool
- needle nose pliers
Ingredients
- 1 roll Standard ½ inch irrigation tubing (solid)- you'll need enough length to go from your hose tap to your beds, including between and up the side of each bed, plus to make a "header" along the short side of each bed
- 1 roll ¼” dripline tubing (with pre-installed emitters) -enough to run several lines down the length (longest side) of each raised bed. For example, one 4×8’ raised bed with 4 rows of dripline will require about 32 feet of dripline tubing.
- 1 4-in-1 faucet adapter which includes a pressure regulator (mandatory), filter, backflow preventer, and adapter to connect the drip tubing to
- ¼” barbed couplers to connect the ¼” drip tubing to the ½” main line tubing headers
- Figure 8 clamps to end the main ½” lines. You’ll need one for each header, and possibly more to end other lines in your system – depending on the layout
- Goof plugs, to end/cap each of the ¼” drip tubing lines. These can also be used to plug unwanted holes in the 1/2″ tubing.
- Various ½” couplers (including tees and elbows), used to run ½” tubing line between and up the sides of your raised beds. This varies depending on your system layout. I suggest drawing out your system to determine how many couplers you’ll need.
- Galvanized landscape staples to hold the drip line in place.
Optional Supplies
- 1 A battery-operated faucet timer to easily automate your raised bed drip irrigation system. In this particular project, we used a 2-outlet hose timer (what we already had on hand) that can be used to connect two drip lines to a single tap. Or, you can use asingle outlet hose timer.
- Shut-off valves for each bed. Install one of these simple on/off valves in the header or riser of each raised bed for the utmost control!
- A hose splitter or Y-valve. With this, you can connect the drip irrigation system to a faucet (on one side of the splitter) while also still maintaining a free outlet to use a garden hose, fill watering cans, etc.
Instructions
Assemble Headers and Drip Lines
- Each raised garden bed or planter needs a “header” made of ½” solid tubing that sits inside one of the short ends of the bed, where the smaller dripline tubing connects to.

- I like to assemble my headers in a clean easy workspace away from the garden, such as a patio or table (especially if making several). Make and measure one header fit to the beds as a guide and then repeat.
- Measure and cut the solid 1/2″ solid tubing to fit inside one short end of your raised bed. Leave a few extra inches at the end to fold over and use a figure 8 end clamp to end the line.
- Measure and cut ¼” drip tubing lines – long enough to run the length of the bed and connect into the header.
- Measure and/or mark where each row of drip emitter tubing will attach to the ½” header, spaced evenly across the bed 6 to 12 inches apart. (The drip tubing looks short in the photo because it was made for a large round grow bag in this example, but will be much longer in a traditional raised bed.)

- Use a punch tool to create holes in the main header tubing. Be sure the holes are all facing the same direction so the drip tubing will lay flat on the soil surface.
- Attach drip tubing to the header. Insert a ¼” barbed coupler into one end of the ¼” drip tubing. Then push the other end of the barb into the header tubing.
- Finally, cap/end each ¼” drip tubing line with a goof plug.


Connect Drip Line to Tap
- Optional: To easily automate the raised bed drip irrigation system, add a simple faucet timer to the tap first. You can also add a hose splitter before the timer, leaving one side of the tap free for other things.
- Next, screw on the 4-in-1 faucet to drip adapter.
- Connect the ½” drip tubing to the coupler at the end of the adapter.

Run Drip Line Between Beds
- Run the ½” main line from the hose tap or faucet to the raised garden beds. Use tees, elbows or other couplers to create rows between beds as needed.
- Each bed will need a point of connection and riser. Cut into the main line near the bed, insert a tee or elbow (depending on the layout of your lines), and add another piece of ½” tubing up the side of the raised bed. Another option is to hide the riser by running it under and inside the garden bed.

- Optional: Add a shut-off valve for each bed, explained in the supplies section above. The valve can be installed along the riser, or as part of your header.
- It’s okay to cover or bury the ½” mainline drip tubing in several inches of mulch, bark, soil, gravel, or other cover.
- Leave the very ends of the lines open for now (not capped) so you can flush the lines before adding the drip components.
Install and Connect Headers
- Before adding the headers to your raised beds, flush the main lines to remove any potential debris that could clog emitters. Simply turn the water on and let it run freely out of the end of the lines for a minute or so.
- Connect the headers to the risers you’ve added to each raised bed. Tuck the header inside the short end of the bed and attach it to the riser. Secure it in place with landscape staples or pins.
- Next, position the drip tubing lines evenly down the length of the bed and pin them in place too.
Using the System
- When you’re ready to use your new raised bed drip irrigation system, simply turn on the tap! If you’re using a hose timer, leave the main faucet ON at all times, set the timer, and it will let water into the lines per the schedule you specify.


58 Comments
gene deerman
hey there! wondering whether you’ve compared irrigation outcomes spiraling the 1/4″ drip emitter tubing instead of setting up rows?
My raised beds are 3’x6′ and I was thinking that spiraling the 1/4″ tubing would yield better coverage? And allow me to plant very densely.
Maybe I would make two spirals, overlapping a bit in the center of the bed.
Thanks! Gene
Aaron (Mr. DeannaCat)
Hi Gene, we find that we get plenty of irrigation coverage with rows of the drip tubing and we can still plant really densely when needed. You can space the rows of tubing even closer if it’s something you are concerned with but it’s much easier to amend the raised beds when there are rows as opposed to a spiral of irrigation tubing to work around. You will likely get more even irrigation as well if you have four 6 foot long rows of emitter tubing compared to if you had two spirals of drip tubing that were twice as long. Hope that helps and reach out if you have any other questions.
Becky Johnson
I just installed drip irrigation in my raised beds today following you guide, and it was so easy and so simple. I would not have known where to begin! Just wanted to pop on and thank you for all you do, I don’t know if I’d be gardening at all without your influence!
Deanna Talerico
Awesome, so glad to hear it Becky! Thank you for the very kind feedback, and enjoy your growing season!
MamaRed
I did so much research on drip irrigation and it felt soooo overwhelming. Your guides finally made it all click in my head and gave me the confidence to try and I’m so glad I did beacuse it’s been a game change for heat waves we get here! I refer to them every year as I expand. Thank you!!
Jennifer Fuhrman
Life saver! Very good explanation from Deanna! I followed her instructions and I have 10 raised beds that I’ve put on a timer to run daily- once you have the supplies – easy to follow along! Especially nice because the beds are watered even when I’m on vacation.
Aaron (Mr. DeannaCat)
Thank you so much for sharing Jennifer and we are glad you have found the drip system to be so helpful!
Allison Peterson
So helpful for planning my new garden irrigation. Thank you
Aaron (Mr. DeannaCat)
Thank you Allison and good luck on your irrigation project!
Michaela E
This was incredibly helpful as I worked on upgrading my garden watering system while pregnant with my second—my version of nesting! The step-by-step instructions were clear and thorough, making the whole process easy to understand. I even shared it with my elderly neighbor, who was able to upgrade her irrigation as well thanks to Deanna’s guidance / blog posts. Very much appreciated here in the Seattle area (zone 8b)!
Aaron (Mr. DeannaCat)
Hi Michaela, congratulations on expecting another one into the family! We are so glad to hear you found the instructions helpful and approachable and you as well as your neighbor have been able to upgrade your garden irrigation, have fun growing (and nesting)!
pamela
I find your articles and instructions very clear and helpful. Thank you for all your help
Aaron (Mr. DeannaCat)
Thank you so much Pamela!
Kathy
I have the same raised beds and this is EXACTLY what I’ve been wanting to do! Thank you for the clear, easy-to-follow instructions and video .
Aaron (Mr. DeannaCat)
Amazing to hear Kathy and good luck on setting up your drip irrigation!
Laura
This was so helpful for us!