

How to Plant and Grow Onions From Seed, Sets, or Seedlings

Homegrown onions are the best! Come learn how to grow onions from seed, seedlings, or sets. This guide will teach you everything you need to know, like how to choose the best onion varieties for your garden, how to start onions from seed, when and how to plant onions (including in containers), and ongoing care. We’ll also cover how to harvest, cure and store onions too. With these tips, you’ll be harvesting your own big beautiful onions in no time!
As strange as it may sound, onions are one of my favorite crops to grow. They’re fairly fuss-free, last a long time in storage, and are really versatile to use in the kitchen. In addition to using fresh onions for cooking, I also love to make onion powder, quick pickled onions, use them in homemade fire cider and more!
NOTE: This article was originally published in February 2021.

Would you like to save this?
Disclosure: Homestead and Chill is reader-supported. When you purchase through links on our site, we may earn an affiliate commission.
Growing Onions: An Overview
- You can grow onions from seed, seedlings, or small bulbs called “sets”.
- Onions are usually planted in early spring and harvested in summer to early fall. In some locations, they can grow over winter too.
- After sprouting, onions take three to five months to reach a mature storage size, depending on climate and variety. However, you can harvest onions to eat fresh at virtually any stage.
- Onions love full sun, consistent moisture, and moderately rich but well-draining soil.
- Onions don’t attract many pests – they actually repel them! This makes onions great companion plants.
- Planting the right variety of onion for your location is paramount to success! Learn more about short day, long day, or intermediate day onion varieties below.

When to Plant Onions
Onions are generally considered a cool season crop because onion seedlings like to start their life when conditions are still cool. Then as the weather warms up, they switch to focus their energy on bulb formation.
Spring is the best time to plant onions in most places. If you hope to grow onions from seed, be prepared to get a jump start and plant seeds during winter (about 8 to 10 weeks before your last spring frost date), discussed more to follow.
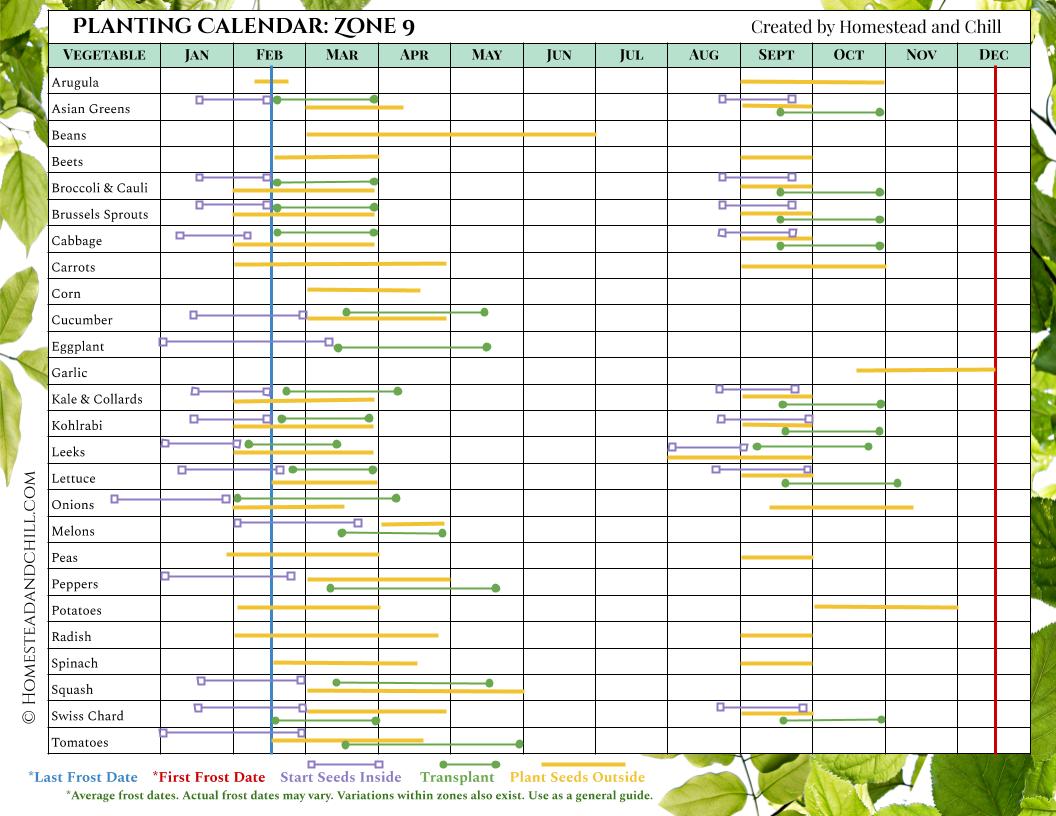
We’ve created handy planting calendars that show exactly when to start onion seeds indoors, plant seedlings outside, or direct sow seeds outside for every growing zone!
Gardeners with mild winters can also plant onions in fall to harvest in the winter or early spring (starting from seed in late summer). Here on the temperate Central Coast of California, we can grow onions essentially year-round!
In colder climates, it’s also possible to plant onion sets in fall, allow them to overwinter, and harvest mature onions in the spring to early summer. In that case, plant onion sets when the soil is still warm – at least a month before your first fall frost date. That gives them time to establish healthy roots before they go dormant for the winter. Add mulch over winter for protection.
Types of Onions
- Whether you prefer red onions, white onions, or sweet yellow onions, they all have similar growing requirements. However, different onion varieties have varying storage potential, so be sure to read descriptions if you hope to store them long-term!
- Onions are called different things depending on the age they’re harvested. For instance, before forming large bulbs, immature onions may be picked and used as green onions – also known as scallions. If you allow them to mature a little longer and form a modest (but still underdeveloped) bulb, then they’re considered spring onions!
- In addition to size and color, different onion varieties are further classified as either short-day, long-day, or day-neutral onions – explained below.

Short-day, long-day, and day-neutral onions
Onions are categorized as short-day, long-day, or day-neutral depending on the number of daylight hours required to trigger good bulb formation. So, a key to successfully grow onions is to choose the right variety of onion to plant for your specific location and latitude! Otherwise, onions may fail to grow bulbs.
See the map below too see what type is best for you. If you’re located close to a boundary, have fun experimenting with a wider variety.
- Short-day onions form bulbs once daylight hours increase to 10 to 12 hours per day. They are ideal for southern gardeners (south of the 35th parallel) where daylight hours are consistently shorter throughout the growing season compared to the longer days up north. If grown in the north, short-day onions may go to flower too early in the season as the days become increasingly longer – resulting in stunted, small bulbs. Short-day onions are rumored to be sweeter than long-day. Some popular varieties of short day onions include Red Burgundy, Grano, White Bermuda, Southern Belle, and ‘Yellow Granex’ (also known as Vidalia).
- Long-day onions form bulbs once they’re provided 14 hours of daylight or more. Without sufficiently long days, they’ll stay small and stunted. Long-day onions perform best in the northern half of the US and Canada, north of the 35th parallel. Yellow Sweet Spanish, Walla Walla, Calibra, Southport White Globe, Rossa di Milano, Red Baron, Red Carpet, Cortland, and Sweet Spanish White are a few awesome long-day onion varieties.
- Day-neutral or “intermediate day” onion varieties form bulbs with 12 to 14 hours of daylight, and are perfect for folks gardening in the middle latitue across the United States. Check out these intermediate day onions: Cabernet, Gladstone, Sierra Blanca, Talon and Red Amposta.

Where each type of onion grows best. The black star shows where we’re located, on the California Central Coast, almost right on the 35th parallel. According to this graphic we should be growing short day onions, but we grow stellar long-day varieties too! So, if you’re close to a latitude border or in the central “intermediate” area, don’t be afraid to experiment. Thanks for the great map, Johnnys Seed!
Starting with Onion Seeds, Seedlings or “Sets”
There are three main ways to grow onions: from seed, seedlings, or by purchasing onion sets. Every gardener has their preference between the three! We personally like to grow onions from seed, or from seedlings we buy at a local nursery. Onion sets are the most finicky and likely to have issues.
- Growing onions from seed is easy to do, and allows you to choose the exact varieties you want to grow.
- Onion seedlings are like tiny tender green onions, recently started from seed (within the last couple months). If you don’t grow your own, you can often find onion seedlings at your local garden center. Purchasing and planting onion seedlings will give you a head start over seed.
- Onion ‘sets’ are small, dry, immature onion bulbs that were grown from seed the previous year. They are allowed to partially develop, then are harvested as a tiny bulb and kept dormant to later sell or plant as “seed” – though they’re not really a seed. Because they’re on their second year of life (and onions are biennial), onion sets have the tendency to bolt more readily or result in small, underdeveloped bulbs. So if you’ve ever planted onion sets and failed, try growing from seed or seedlings instead!
TIP: If you’re growing onions from sets, either order online or visit a small locally-owned nursery. Big box garden centers are notorious for selling the wrong varieties for the given area!

Growing Onions from Seed
To grow onions from seed, you can either start seeds indoors, sow seeds directly outside, or use the winter sowing method (depending on where you live).
To get a jump start on the growing season, I prefer to start onions indoors. Then we have onion seedlings ready to transplant in the garden right away in spring. Northern gardeners with short growing seasons should also start onion seeds indoors, since planting seeds outdoors won’t give the onions enough time to mature.
Option 1: Plant Onion Seeds Outside
- Plant onion seeds outside in late winter to early spring, once the ground is no longer frozen and can be worked in your area. Read the soil preparation and site selection tips below before you start, and check your zone’s planting calendar to see if you can also direct sow onions in the fall.
- Sow onion seeds approximately 1/4 to 1/2″ deep and about 4 inches apart. Cover the seeds lightly with soil, and maintain damp to promote germination. (Note that germination rates will be slower and less consistent compared to indoors)
- Once they sprout, thin to one onion seedling per 4 inches to avoid crowding.

Option 2: Starting Onion Seeds Indoors
- Start onion seeds indoors about 8 to 10 weeks before the last spring frost date in your area.
- Follow common best practices for starting seeds indoors: use a fluffy seed starting mix, keep the soil damp but not soggy, and provide at least 12 hours of bright light per day after germination. You’ll need a few supplies such as seedling trays, small containers or pots, and a grow light or other supplemental light fixture.
- To maximize space, I like to plant about 6 to 12 onion seeds per seed starting container or cell and then gently tease them apart later at planting time.
- Onion seeds will readily sprout in consistently warm soil (70-75°F, a seedling heat mat will help!) but then can be moved to a cooler spot in the 60s.
- Once the onion seedlings reach 5 or 6 inches (or taller), trim the tips of their greens down to 3 or 4 inches. This encourages thickening, stronger root development, and prevents them from flopping over. Eat those trimmed bits as green onions!
- See transplanting tips below.
RELATED: See our complete guide on how to start seeds indoors for more details and our favorite supplies.


Option 3: Winter Sowing Method
A final option is to use the ‘winter sowing method’: when you plant onion seeds inside a covered container outside, almost like a little mini greenhouse. (See photo below.) Winter sowing combines the pros and cons of the other options: you won’t get quite the same early advantage as starting indoors, but it’s almost as low-maintenance as directly sowing seeds outside.
To grow onions with the winter sowing method, start onion seeds outdoors during the winter – between late December to February in most locations. The seeds will stay dormant while its cold but sprout in spring once the conditions are right. Then, you can transplant the already hardened-off seedlings to their final location in the garden.
Choose a wide shallow container with drainage holes that can be covered with a clear or opaque dome or lid (or, one that already has one). Add at least a couple inches of seed-starting soil to the bottom, evenly sprinkle onion seeds inside, and then lightly cover the seeds with about ¼ to ½ inch of soil. Add at least one or two air holes for ventilation to the cover.
Set the container in a sunny location, water as needed to maintain the soil damp, and wait for the seeds to germinate. Once the seeds sprout, open the container lid on warm days (but close them back up on cold nights). If snow or a hard frost is a threat, move the container to a protected location or cover it with a blanket for insulation.

How to Plant Onion Sets
- For the best results, choose the smallest bulbs you can find. Sets around a half-inch in diameter or smaller are ideal. Contrary to what you may think, bigger isn’t better! Experts say that larger onion sets are more likely to halt bulb development and bolt (go to seed and flower) sooner than more petite bulbs.
- Plant onion sets in in the garden 2 to 4 weeks before the last spring frost date in your area. (Or, about a month before the first fall frost if you plan to overwinter them.)
- Space onion sets about 4 to 6 inches apart, depending on the expected mature size of the variety you’re planting.
- Bury them deep enough that the bulb is mostly under the soil, but with the pointed tip level with the soil surface or just poking out.

How to Plant Onion Seedlings (Transplanting)
Before transplanting, be sure to harden off indoor-raised seedlings to prevent transplant shock. (You can skip this step if you’re planting nursery seedlings or if you used the winter sowing method.)
- Transplant homegrown or nursery onion seedlings outdoors about 2 to 3 weeks prior to your areas last spring frost date.
- Gently tease apart or separate clusters of seedlings, taking care to break as few roots as possible.
- Create a slender hole that is deep enough to accommodate the seedling’s roots (I use a pencil or chopstick) and bury the seedling so the base is about a half-inch to an inch deep.
- Plant each onion seedling 4 to 6 inches apart, depending on expected mature size for the given variety. Or, plant them closer if you want to harvest them as green onions or small spring onions.
- Rather than making individual holes, you can also dig a long shallow trench and plant onion seedlings in rows.
- If you haven’t already, cut off the tips of the greens with clean scissors, which helps focus energy on growing a large onion bulb. Take the seedlings down to about 5 inches tall.
- Onion seedlings that have been hardened off can usually withstand a light frost, but need to be protected from a hard freeze. If needed, shelter young onion transplants with frost cover, cloches, buckets, or other protective insulation. Learn more about protecting crops from frost here.


Sun and Soil Requirements
Plant onions in a location that receives full sun, or at least 6 hours of direct sunlight per day. If your garden is on the shady side, choose short day varieties to encourage bulb development. Some varieties of green onions can also grow in partial shade.
Onions grow most happily in moderately rich, well-draining soil. Amend heavy clay soil with organic matter (e.g. compost) or potting soil to improve drainage.
Fertilizing Onions
Before planting, amend the soil with a balanced, mild, slow-release organic fertilizer. I also recommend lightly working in well-aged compost and/or worm castings to the top couple inches of soil.
Avoid high-nitrogen fertilizers. Excess nitrogen will encourage ample green top growth, but at the expense of the bulb.
It’s also a great idea to inoculate the soil with mycorrhizae, either by applying some to the soil or watering with a mycorrhizae solution after transplanting. Mycorrhizae are beneficial fungi that promote healthy root development and nutrient uptake for all plants. However, onions are especially reliant on root-mycorrhizal partnerships to take up phosphorus that’s essential for their growth!
During the growing season, we also water our onions at least once with homemade compost tea to provide extra nutrients. Or you can use dilute fish fertilizer, watered in once they start to form bulbs.

Water
Onions have shallow root systems, so it is important to keep them well-watered. A lack of consistent water will result in smaller onion bulbs. We use automated drip irrigation in all our raised beds. The onions (and all the other plants in the garden) love a consistent watering schedule!
Adding a layer of mulch around the onions is an excellent way to prevent the soil from easily drying out. We love to use compost as mulch. It is dual purpose since it helps feed the soil as well as retain even moisture.
Remember, good drainage is crucial too. Soggy soil or standing water increases chances of onions rotting.

Growing Onions in Containers
Onions are easy to grow in pots too. In addition to raised garden beds, we’ve planted onions in various containers over the years including in Earth Box planters, 15-gallon grow bags and half wine barrel planters.
To grow onions in a pot, follow the same tips provided in this guide: use moderately rich but well-draining soil (such as quality potting soil), provide full sun, routine water, and mulch to prevent the soil surface from drying out.
Ensure the container has excellent drainage since onions will rot if the soil becomes water-logged. A simple moisture meter can help you determine how wet (or dry) the soil in your pot is before watering again.
FAQ: What size pot is best for onions?
That depends on how many onions you want to grow! Keeping in mind that onions should be spaced 4 to 6 inches apart, I recommend using a wide container with ample surface area (as opposed to a deep narrow pot) to maximize the number of onions you can plant. Onions have fairly shallow roots, but choose a pot that is at least 8 to 10 inches deep.

Onion Pests and Disease
Very few pests are attracted to onions. Rather, onions and other alliums actually repel many pest insects!
On the other hand, onions are susceptible to a number of diseases including botrytis, bacterial rot, and downy mildew. Using good crop rotation practices is key to preventing onion disease. We also search out varieties that are described to have good natural disease resistance – particularly those resistant to downy mildew, which is common in our garden. See a complete list of onion diseases and control measures here.
Growing Onions as Companion Plants
Onions make excellent companion plants in the garden! Since they naturally deter pest insects including aphids, flea beetles, cabbage loopers, ants, and carrot rust flies, onions can be interplanted among other pest-prone crops to help provide natural, organic pest control. For example, we’ve had success keeping our Swiss chard plants almost completely aphid-free (usually a big issue) by tucking miscellaneous onions between them.
RELATED: See our printable garden companion planting chart for more ideas and information.

Onion Flowers and Bolting
An onion will grow a large flowering spike for a couple different reasons. One, if a mature onion is left to sit in the garden too long past it’s prime harvest window, it will then start to flower with the intention of producing seed.
Onions may also prematurely send up a flowering stalk (even before it forms a nice bulb), also known as “bolting“. Onions usually bolt in response to stress, triggered by a sudden cold snap, extreme heat, drought or inconsistent water, or insufficient daylight.
If your onions go to flower, don’t stress! You can still eat around the tough center of the onion bulb. However, flowering onions won’t last well for long-term storage, so they’re prime candidates to make onion powder to preserve them!
Removing the flowering stem can also help an onion re-focus on bulb development. We often just leave a few onions to flower in the garden. They’re beautiful, and the pollinators love them.

How to Harvest and Cure Onions
You can technically harvest and eat onions at any age! Yet for maximum storage potential as dry bulbs, you must wait to harvest until they reach full maturity and then properly cure them after.
Onions are almost ready for harvest when the greens turn yellow to brown, and the tops may get weak and flop over just above the large mature bulbs. A couple weeks after that happens, harvest onions by gently pulling the onion bulb up out of the soil. Take care not to break the greens off, or damage or bruise the onions or they won’t store well.
After harvest, leave them to lie on top of the soil to dry for a day or two in the sun, and leave the roots and tops intact! Don’t cut those off until after curing.
Curing onions is the process of allowing them to finish drying and sealing after harvest, which is essential for onions to last in long-term dry storage! Hang or spread onions out in a dry, shaded, well-ventilated area for 7 to 10 days, such as on a wire shelf or hanging in a drafty garage, carport, covered patio, or shed.
Once they’re nice and dry, trim off the roots and tops before tucking them away for long-term storage.
RELATED: See more step-by-step tips and photos about how and when to harvest onions, the curing process, and storage best practices in our new detailed guide!


How to Store Onions
Store cured onions in a cool, dark, dry location with decent airflow. For example, in wire baskets or cardboard boxes in a spare closet or cabinet, root cellar, basement, or similar temperate location. We store our onions, garlic, and winter squash on this nifty harvest storage rack in a a cool (north-facing) guest room closet.
Flowering onions or dry onions that were not cured as well (or at all) should last at room temperature for several weeks, but they’ll last longer in the fridge. Be sure to use up any dinged or bruised ones first.
Store immature onions (green, spring, scallions, etc) in an airtight container in the refrigerator for maximum freshness.

Preserving Onions
In addition to long-term dry storage, there are a number of ways to preserve onions. We love to make homemade dried onion powder, especially with immature onions or those that have started to flower and thus can’t be cured. We even dry the green tops for powder!
Another great option for preserving onions is to make quick pickled onions. They’re awesome on top of salads, sandwiches and more.

And that is all you need to know to successfully grow onions!
Well friends, I hope you learned a few new tips that will enable you to grow big, beautiful, flavorful onions of your own! In all, they’re quite low-maintenance and fun to grow, especially once you figure out what varieties grow best in your area. Let me know if you have any questions in the comments below! If you found this information to be valuable, please spread the love by pinning or sharing this article. See ya next time!
You may also like:
- How to Plant and Grow Garlic: The Ultimate Guide
- Preserving Onions: Oven-Roasted Onions for the Freezer
- Best Creamy Roasted Cauliflower Soup Recipe (Vegan Options + Freezer Tips)
- How to Make Chive Blossom Vinegar + 8 Ways to Use it


23 Comments
Dani
I was fretting over what type of onion seeds to order and I came straight to you because I knew you would have a one-stop-shop in-depth article to answer all of my questions. This article was so helpful and answered all of my questions. I appreciate you so much!
Aaron (Mr. DeannaCat)
Amazing to hear Dani, we hope you have fun growing onions and we appreciate your support of our website!
Terry Burton
Thank you for the great article! I use so many onions in my cooking, and my harvest last year was very disappointing. First time grower, I planted from sets, and they never got bigger than scallion size. I chose the sets based on variety, not growing time; and I planted them in a bed that gets partial shade. Now I know what to fix for this year.
Aaron (Mr. DeannaCat)
Hi Terry, that’s too bad your onion harvest was so disappoint last year, some times it does happen. However, I think if you grow the correct variety for your location as well as starting form seed, you will have a lot more success. Have fun growing!
Derek Fairley
Hi Deanna, I live in Scotland, Europe the longnitude is 56.4396° North, What Zone would that make me.
Aaron (Mr. DeannaCat)
Hi Derek, I believe your hardiness zones in the UK can vary between zones 6-9 depending on your specific location. Yet, in regards to which type of onions you should grow, since Scotland is so far north, you would definitely want to grow long day onion varieties. Hope that helps and have fun growing!
Julie James
Thank you for such good information! We planted our onions in our greenhouse from dried onion bulbs that we purchased from our local farm store. There were MANY of them in the bag, but were not grown locally. They have all sprouted, and quickly! My question is, do I trim the green tops, when and how much/often? We grew them the same way for the last 2 years, following various opinions on trimming, “spooning” and drying/curing, but we never get them to grow as large as they should or keep as well. So, we’re rather confused as to what we need to do! Thanks for any help you can offer!
Aaron (Mr. DeannaCat)
Hello Julie, we have found that planting onions from bulbs isn’t as reliable as growing onions from seeds or started seedlings from the nursery. Onion seedlings from the nursery are a good option because they usually come in 6 cell pack trays and are over seeded, meaning you can lightly separate each onion seedling and plant it directly in the ground. As far as trimming the greens, we usually only do it one time once they are at least 6 inches long. Hope that helps and good luck this year with your onion harvest!
Jane
Great article – you’ve inspired me to start my onions from seeds this year!
Aaron (Mr. DeannaCat)
So great to hear and we hope you enjoy growing onions from seed!
rebekah
I’m just starting out with gardening and growing veggies and herbs this year – your site has been helpful! We built some deep raised garden beds and have planted some goodies, including onions 🙂
But… oh no! When I transplanted the seedlings I picked up from the nursery, I think I trimmed the tops a little too much. There’s still green but I think they are shorted than you recommend. Will they survive?? lol Do they just need some extra love and care? What do I do? haha
Aaron (Mr. DeannaCat)
Hi Rebekah, so glad to hear you’ve started gardening and congrats on building some raised beds. Don’t be too worried about your onion seedlings, they should be just fine and will continue to grow. Just water them and treat them as you would the rest of your garden. Good luck and happy gardening!
Gino Razionale
Hi, I’m in zone 7a outside of Philly and I started a 72 cell indoor 2 varieties onion seed from Territorial Seeds(Amazing). They started popping after 3 days so I took off dome and have them under 2 of the Ferry-Morse 2ft grow lights indoors. I have my main grow stations 4 ft x 2 ft lights in my unheated garage. I don’t think I’ll be able to direct sow until end of March or April. Is it ok to transplant seedlings to a bigger cup and move them to the garage under lights or leave them in the small 72 cell and move them to garage until ready to direct sow? I’m not using my heat mats with the onions. So far in February we are having night time temps in the 20’s. Hopefully when I move them to garage they’ll be ok if it’s still cold at night. I have a cover for the grow station.
BTW, this was my 2nd year making lavender oil and salve from my lavender plants using your amazing guide. Thank you!!!!!
Aaron (Mr. DeannaCat)
Hi Gino, it’s great to hear you are making salve and making good use of your lavender plants. As far as your onions go, we typically sprout close to 6 seeds per cell in a 6 cell pack and when it comes time to transplant outside, we pull apart the seedlings and plant each on individually. Leaving your seedlings in the smaller cells may work depending on how big the cells are and how many seeds are in each one. If there is only one seedling per cell, they may be able to grow for quite awhile in the single cell, transplanting that many seedlings into large containers doesn’t sound like fun but it may be necessary depending on how big they get. If you need to move your seedlings into the garage, hopefully the low temperature stays above freezing but they can handle mid 30’s to 40’s as long as it gets warmer during the day. The colder temperatures will also slow down their growth. We used to start and grow seedlings in our greenhouse which wasn’t insulated and it would routinely dip into the mid 30’s to 40’s overnight and our seedlings never froze or died, however, the seedling growth does slow down with daily temperatures in that range. Hope that helps and reach out if you have any other questions.
Carlyn
I’m growing intermediate day and day neutral onions from seed using this guide. You mention having them under lights for at least 12 hours a day, my other seedlings will be getting around 15-16 hours of light, would onions do better with that amount as well? I’ve seen conflicting info about if they’re exposed to too much light too early it can cause premature bulbing. Appreciate any insights on this!
Aaron (Mr. DeannaCat)
Hi Carlyn, so glad to hear you are going to be growing onions from seed using our guide! Your onion seedlings should be absolutely fine with 15-16 hours of light, that is typically what ours get or even more and they do amazingly well (we have them under the lights right along with our other vegetable seedlings). We started a few six packs a couple weeks ago and they are currently on a roughly 16 hour light schedule to be planted out around mid March or so. Hope that helps and have fun growing!
Renee Lim
Does everything from this article also represent growing leeks from seed to harvest?
Aaron (Mr. DeannaCat)
Hello Renee, you can more or less apply the same principles to leeks. Leeks are fairly fuss free once they get going (if you start from seed) and are a joy to grow, harvest, and use. Good luck!
Ridzi Arora
This article is very helpful. Thanks for sharing with us.
Daise
Thank you so much for all your helpful information. I love that you give the science and reason behind it all!
My plants have been so much happier since adopting no dig and your pointers!
From zone 5A, this homesteading Mainer appreciates you!
Aaron (Mr. DeannaCat)
Thanks for reading and being a part of the community, we’re glad you have found some of the information useful! Good luck and happy gardening!
Aasm
Happy gardens from Egypt
Aaron (Mr. DeannaCat)
Absolutely Aasm, have fun growing!