


Best Refrigerator Pickles Recipe: Quick, Easy, Crunchy Dill Pickles
Last Updated on June 28, 2025
Got cucumbers? Let’s make refrigerator pickles! Our homemade dill pickles recipe is exceptionally quick and easy to make – perfect for large or small batches. Without the fuss of canning, refrigerator pickles naturally stay more crisp since they’re not subjected to high heat. I’ve included a few tips on how to make your pickles extra crunchy too.
Whether you’re growing your own or are simply in the mood for a fun summer project, making refrigerator pickles is a great way to preserve cucumbers – and create a delicious and refreshing snack. We use homegrown cucumbers from the garden to make pickles all summer long!
Would you like to save this?
Disclosure: Homestead and Chill is reader-supported. When you purchase through links on our site, we may earn an affiliate commission.
RELATED: Learn how to plant and grow cucumbers here, or check out the 7 best clever, cheap, and easy DIY cucumber trellis ideas! You may also enjoy our lacto-fermented cucumber dill pickles recipe.
What cucumbers are the best to make refrigerator pickles?
Petite pickling cucumber varieties will make the best, most crunchy homemade pickles. (You know… the small bumpy ones.) That is especially true for canned pickles.
However, I find refrigerator pickles are more forgiving for texture, so we often use slicing cucumbers too. They stay plenty crisp for us! I’ve also heard Armenian cucumbers make for extra crunchy refrigerator pickles.
Always choose the most fresh and firm cucumbers you can find. Farmer’s Market cucumbers will always be more fresh than those you can buy in the grocery store. If you grow your own, make plan to make pickles within a few days of harvesting – and store them in the fridge in the meantime.
Never use cucumbers that have mold, and avoid those with major dings, bruises, or soft spots to make refrigerator pickles.

How to make refrigerator pickles crunchy and crisp
One of the most common questions (and qualms) is how to prevent homemade pickles from getting soft. One way is to add a crisping agent like “pickle crisp” (calcium chloride), though some folks prefer to avoid that. Thankfully, there are many ways to naturally make pickles crunchy too:
- Always use the freshest cucumbers possible. Just-picked cucumbers (e.g. from the garden or farmer’s market) make the most crunchy pickles!
- Cut off and discard the blossom end of the cucumber to prevent a soft pickle.
- Choose smaller cucumbers over extra-large ones. Petite ones will have a higher skin-to-flesh ratio and also fewer seeds – the part that gets most soft. Little guys (or gals) fit better in jars with less waste too.
- Add tannins. Include a couple grape leaves, horseradish leaves, oak leaves, blackberry leaves, or black tea leaves in each jar. The natural tannins found in these leaves help make pickles crunchy.
- Never peel cucumbers before making homemade pickles. The skin is what makes pickles crunchy!
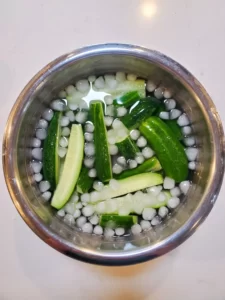
- Keep the cucumbers cold before making pickles by storing them in the refrigerator. For maximum crunch, soak your sliced cucumbers in a large bowl of ice water for several hours or overnight before adding them to the jar.
- For smaller batches and where cold storage space isn’t a concern, use a refrigerator pickles recipe (like this one!) rather than high-heat canning.


How to Make Refrigerator Pickles
Ingredients
The recipe below is per quart jar. Scale up or down as needed.
- Approximately 4 to 6 small pickling cucumbers, or 2 to 3 small to medium slicing cucumbers
- 3/4 cup water
- 3/4 cup distilled white vinegar
- 1/2 cup apple cider vinegar. We love the balance of sweet and sharp flavors by using two types of vinegar for this recipe.
- 2 tsp sea salt, kosher salt or pickling salt (not table salt)
- 1 Tbsp cane sugar
- Dill: about 6 sprigs of fresh dill (a small handful), 1-2 large dill flower heads, or 1 Tbsp dried dill
- 3 large cloves of garlic, peeled
- 1 tsp mustard seed
- 1 tsp black peppercorns
- a pinch of red chili flakes, more or less per personal preference (I like about a half a teaspoon)
- Optional (though highly recommended for crunchy pickles): 1 or 2 grape leaves or oak, horseradish, or black tea leaves. Another alternative is to use a pickle crisp granules.
- Optional: A few slices of onion and/or fresh hot chili peppers (e.g. jalapeño pepper). I added some homegrown sweet Walla Walla onion to this batch!
Instructions
Prep
- In cool water, thoroughly wash the fresh dill and cucumbers. Again, avoid using cucumbers that are bruised, soft, or otherwise damaged.
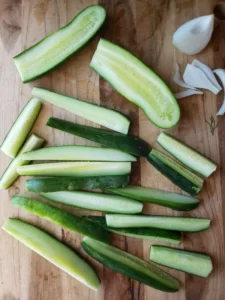
- Trim off the ends of the cucumbers, and then cut them into your desired shape such as round slices, halves, or my personal favorite, thick spears. Pay attention to the height of your jar versus the length of your cucumber pieces (so they aren’t too tall to fit inside). You can also leave small pickling cucumbers whole.
- If time allows, feel free to soak the cut cucumbers in ice water for several hours before proceeding to packing the jars. When I’m not going to soak them, I usually start the brine on the stove first (described next) so it can cool slightly while I am prepping the cukes.

Brine and Pack
- Create the pickling brine by combining the called-for water, vinegars, sugar and salt in a pot on the stovetop. Heat lightly and stir until the sugar and salt both completely dissolve, and then remove the pot from the heat. (The remaining spices will go right in the jar.)
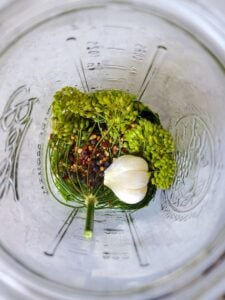
- Add the washed dill to the bottom of a clean jar. Then add the peeled garlic cloves and remaining called-for spices into the jar. Also toss in any optional goodies like onion or hot chili peppers now.
- If you’re using grape leaves (or other leaves) for tannins, you can either add those to the bottom of the jar now or put them on top at the very end, pressing them down into the brine. Alternatively, add a pickle crisping agent following the product instructions.
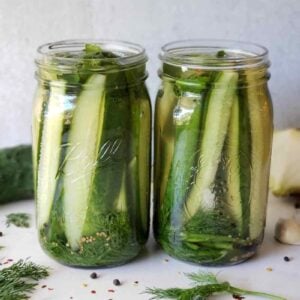
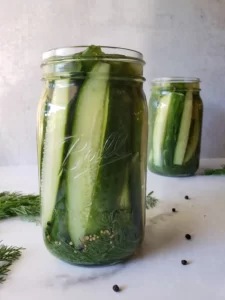
- Finally, fill the jar with cucumbers. Pack them in tightly to reduce wasted space.
- Once the brine has cooled to lukewarm, pour it over the cucumbers until they’re completely submerged and the jar is full. Using a hot brine will slightly cook the cucumbers and thereby make them less crunchy. You may have a little brine leftover. That’s okay! Better to have extra than not enough. (If you do happen to need more to completely fill the jar, simply splash a little more vinegar in on top).

Rest and Enjoy!
- Add a lid to the jar and then move it to the refrigerator. You can use a standard jar lid, though we’ve come to prefer using these BPA-free plastic mason jar lids for refrigerator pickles since the high acid content can make regular metal mason jar rings corrode and get rusty.
- Now, allow your refrigerator pickles to sit and marinate in the refrigerator for about 5 days before consuming in order to develop maximum delicious dilly pickle flavor. (I always sneak a few before then though!) Over the first couple days in the fridge, gently shake the jar every now and then in order to mix and wet the ingredients that may be exposed or floating on the very top of the jar. This isn’t crucial; I just do it when I see them and remember.
Now enjoy your delectable crunchy homemade refrigerated pickles! For the best quality and texture, consume within 2 to 3 months. Continued refrigeration is required.
If you end up eating the pickles fairly quickly (within one month) feel free to toss in more fresh cucumbers or other veggies to reuse the brine and create more pickles!

I told you it was quick and easy.
Are you officially craving pickles now? I sure am. I hope you love these crunchy refrigerator pickles just as much as we do. If you’re dreaming of homegrown pickles, be sure to check out our guide on how to grow cucumbers, including tons of cucumber trellis ideas!
Please let me know if you have any questions in the comments below, and be sure to stop back by to leave a review after you try them! Also please feel free to spread the dill pickle love by pinning or sharing this post. As always, we appreciate you tuning in. Happy pickling!
You may like these related recipes:
- The Best Zucchini Relish Recipe (Canning, Freezer or Refrigerator)
- Easy Refrigerator Pickled Peppers
- Best Cowboy Candy Recipe (Candied Jalapeños) Canning or Refrigerator
- Probiotic-Packed Lacto-Fermented Dilly Green Bean Pickles
- How to Make Simple Sauerkraut
- Preserving Apples: How to Make Homemade Apple Cider Vinegar
Best Refrigerator Pickles: Quick, Easy, Crunchy Dill Pickles
Ingredients
- 2-6 Fresh cucumbers (depending on type and size)
- 3/4 cup Water
- 3/4 cup Distilled white vinegar
- 1/2 cup Apple cider vinegar
- 2 tsp Sea salt, kosher or pickling salt
- 1 Tbsp Sugar
- 6 sprigs Fresh dill (a small handful), 2-3 dill flower heads, or 1 Tbsp dry dill
- 3 cloves Fresh garlic cloves, peeled
- 1 tsp Peppercorns, to taste (about a dozen per jar)
- 1 tsp Mustard seed
- 1 pinch Red chili flakes (scant 1/2 tsp), or 1 fresh hot chili pepper (optional)
- 2 whole Grape leaves – substitute with horseradish, oak, or black tea leaves (optional, for maximum crispness)
- Optional: onion slices
Instructions
- Wash the fresh dill and cucumbers (avoid using bruised or damaged ones).
- Trim off the ends of the cucumbers, and then cut them into your desired shape and size (slices, spears, halves, etc).

- If time allows, soak the cut cucumbers in ice water for several hours before proceeding to packing the jars (for extra natural crisp!)
- Prepare the pickling brine by combining the water, vinegars, sugar, and salt in a saucepan on the stove. Heat lightly until the sugar and salt dissolve, but then allow the brine to cool to lukewarm/room temperature before adding to the jar.
- Add the fresh dill, garlic cloves, and remaining called-for spices to the bottom of a clean quart jar.
- Add recommended grape leaves (or oak, horseradish or black tea leaves) to the bottom of the jar now, or on top of the cucumbers.
- Add the cucumbers into the jar until full, carefully packing to reduce wasted space.
- Pour the brine over the top of the cucumbers until they are completely submerged. If you happen to run out, top off with plain white vinegar if needed.
- Place an air-tight lid on the jar, and then move to the refrigerator.
- For optimum flavor, allow the pickles to marinate in the refrigerator for at least 5 days before consuming.
- Enjoy your homemade pickles within 2 to 3 months for best quality and flavor. Maintain refrigerated at all times.

Deanna Talerico
Deanna Talerico (aka DeannaCat) is a garden educator and writer with over 15 years experience in organic gardening. She is a retired Senior Environmental Health Specialist, and holds a M.A. in Environmental Studies and B.S. in Sustainability and Natural Resources.


87 Comments
Kristi Aaker
This is the best refrigerator pickle recipe. This is my 2nd time making them. My family went nuts for them. Even the 2 year olds. Thank you so much for sharing this recipe. It’s a perfect gardeners go to. 😁
Aaron (Mr. DeannaCat)
Amazing to hear you and your family enjoy the pickles so much, thanks for sharing!
Becca
Hey Deanna! I wanted to let you know that this is my first EVER pickle recipe that I am making. I’ve never been a pickle-loving gal, but I have plenty of friends and family who loooove them. This is for them and thanks for to you for making this easy to follow recipe!
Aaron (Mr. DeannaCat)
So great to hear Becca, hope your friends and family enjoy them!