

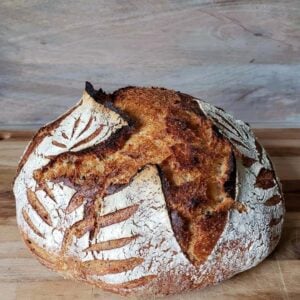
Easy No-Knead Sourdough Bread Recipe (Beginner Friendly)

Let’s made delicious, nutritious homemade bread! My easy no-knead sourdough bread recipe is perfect for beginners or experienced bakers alike. It has a beautiful crisp crust and soft, chewy center. I love to combine white bread flour with whole wheat and touch of rye to create a well-balanced, gut-healthy loaf.
This guide will walk you through the step-by-step process to make artisan-stye sourdough at home, with plenty of photos and tips along the way. I’ve also included a video tutorial at the end.
Once you get comfortable with the basic recipe and process, the options to get creative are endless! Then you can experiment with different flour ratios or fun additions like herbs, cheese, nuts, fruit, and more.
NOTE: This recipe was originally published in February 2019 but has been updated to include new photos and tips I’ve learned over the years.
Would you like to save this?
Sourdough Made Easy
If you’re new to sourdough, please don’t be intimidated! I’ve been baking sourdough for nearly 10 years now, and have helped thousands of beginner’s successfully learn how to make sourdough too.
My goal is to make it as easy, fun, and approachable as possible. I don’t want to confuse you with complex bakers terminology, hydration ratios, or other jargon. Instead, I’ll help explain the basic process and vocabulary so you can get comfortable with it.
For me, perfection isn’t the goal. Life is busy, my timing and schedule gets off at times, and some loaves turn out less tall or fluffy than others. But they’re all delicious and nutritious, and that’s what matters most!
Benefits of Making Sourdough at Home
- It’s super fresh and delicious. Few things beat a slice of just-baked, chewy, crusty homemade sourdough.
- You have full control over the ingredients in your bread – such as using certified organic flour, whole wheat, or tasty sourdough inclusions like herbs, nuts, olives or cheese.
- It’s fun and rewarding! Once you get your groove, the recipes and opportunities to be creative are endless.
- Making your own bread is more cost effective, and reduces waste and packaging associated with buying store-bought bread.
- Homemade sourdough is naturally fermented, which makes it more nutrient-dense and easier to digest than commercial yeast breads. It also reduces the gluten content – so much so that many folks with gluten sensitivities (not allergies) can tolerate sourdough much better than other bread, myself included!
Temperature Tips
Sourdough is happiest in warm conditions; around 70 to 80°F is ideal. In this range, both your sourdough starter and dough will readily get active, ferment, and rise the best. Try not to overheat it though! Temperatures over 85°F can quickly lead to over-proofing.
If your home is on the cool side, do your best to find a warm spot for your sourdough. Some bakers put theirs inside the oven with the light on (but oven OFF) to create warmth, though that can easily lead to accidents… (I’ve heard many horror stories about baked starter and melted bowls!)
Instead, I like to use this handy warming plate for both our starter and bowl of proofing dough, or use a seedling heat mat if you have one. I’ve also found that using warm water in the starter and dough will help boost activity.
To help assess temperature, you can use a food probe thermometer to check the dough or use an ambient thermometer nearby.

Supplies Needed
- large mixing bowl and/or dough tub
- kitchen scale
- liquid measuring cup
- dough scraper
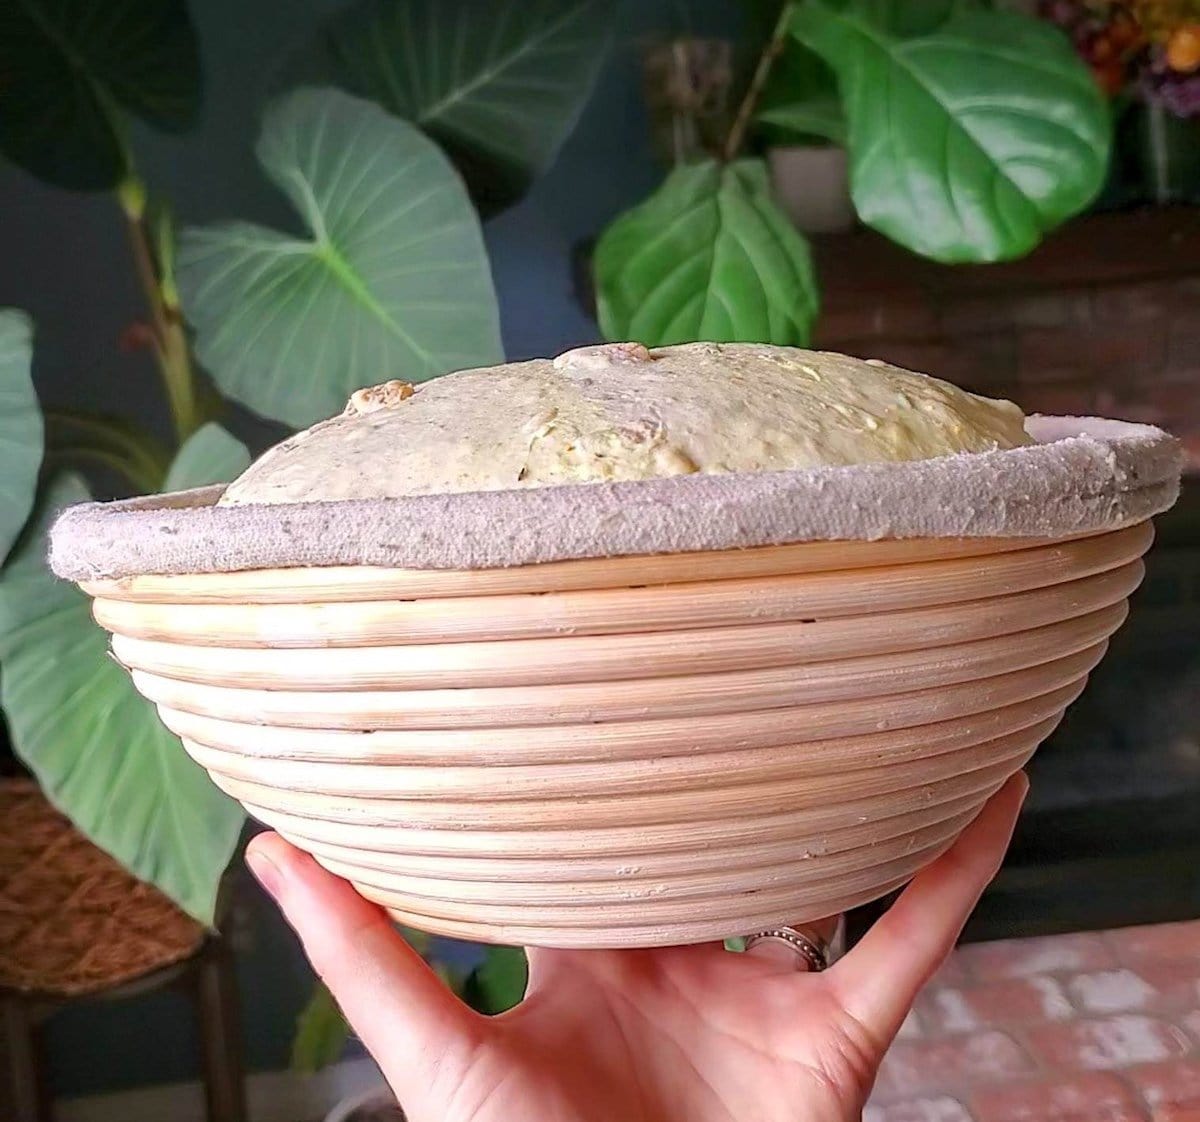
- proofing basket aka banneton, which helps the loaf keep its shape while rising. Choose between a round “boule” shape or an oval “batard” shape.
- lint-free tea towel or other bowl cover
- Dutch oven or cast iron combo cooker. We love our Lodge combo cooker! It’s best to bake sourdough bread inside an enclosed container to trap in steam, which helps the bread rise and get a nice blistered, crisp, chewy crust.
- parchment paper or reusable silicone bread mat with handles
- high-heat oven mitts
- optional: probe thermometer or an ambient room thermometer
RELATED: Pop over to this list of my favorite useful sourdough baking supplies for more details, tools, and information.
Ingredients
This recipe makes 1 average size loaf of sourdough bread, though you can double it and split the dough into two loaves after bulk ferment.
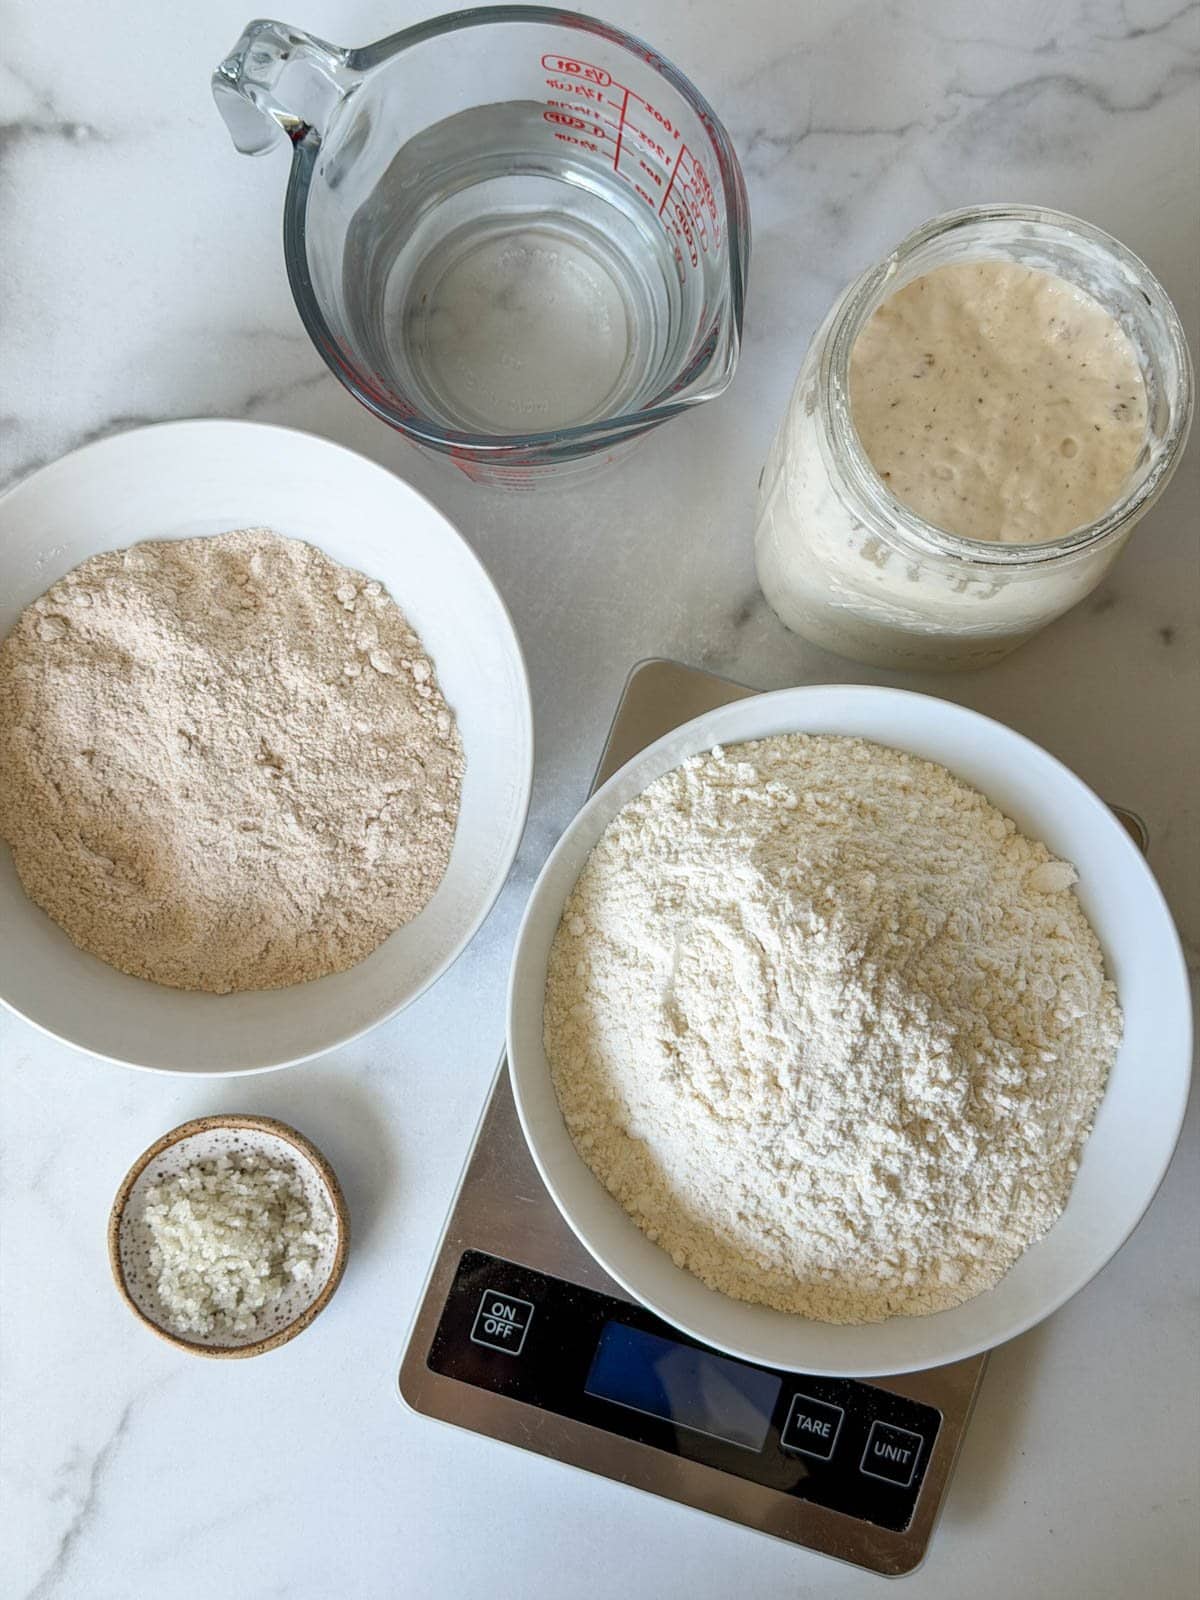
- Active sourdough starter – 100 grams. If you need one, learn how to make sourdough starter from scratch here. Or pick up an easy, foolproof organic sourdough starter from our shop!
- Flour – 470 grams total. I like to use a combination of 310 grams of bread flour, 140 grams of whole wheat, and 20 grams of rye flour – but you can use all bread flour or experiment with different ratios as long as it adds up to 470 (though the more whole wheat you add, the more dense the loaf often becomes). EDIT: This recipe used to call for 455 grams of flour. We recently started using a tad more, but feel free to use the old recipe if you prefer higher hydration!
- Salt – 10 grams. Sea salt, kosher salt, or Himalayan salt is preferred over iodized table salt.
- Filtered water – 350 grams (about 1.5 cups) *If you live in a very humid climate like Florida or Hawaii, use slightly less water. Start with 1.25 cups and add more if needed.
Example Baking Schedule
Before we get into the step-by-step, keep in mind that making sourdough bread is generally a two-day process. Don’t worry, the dough is just sitting there proofing or in the refrigerator most of that time! Your active time is only a couple of hours.
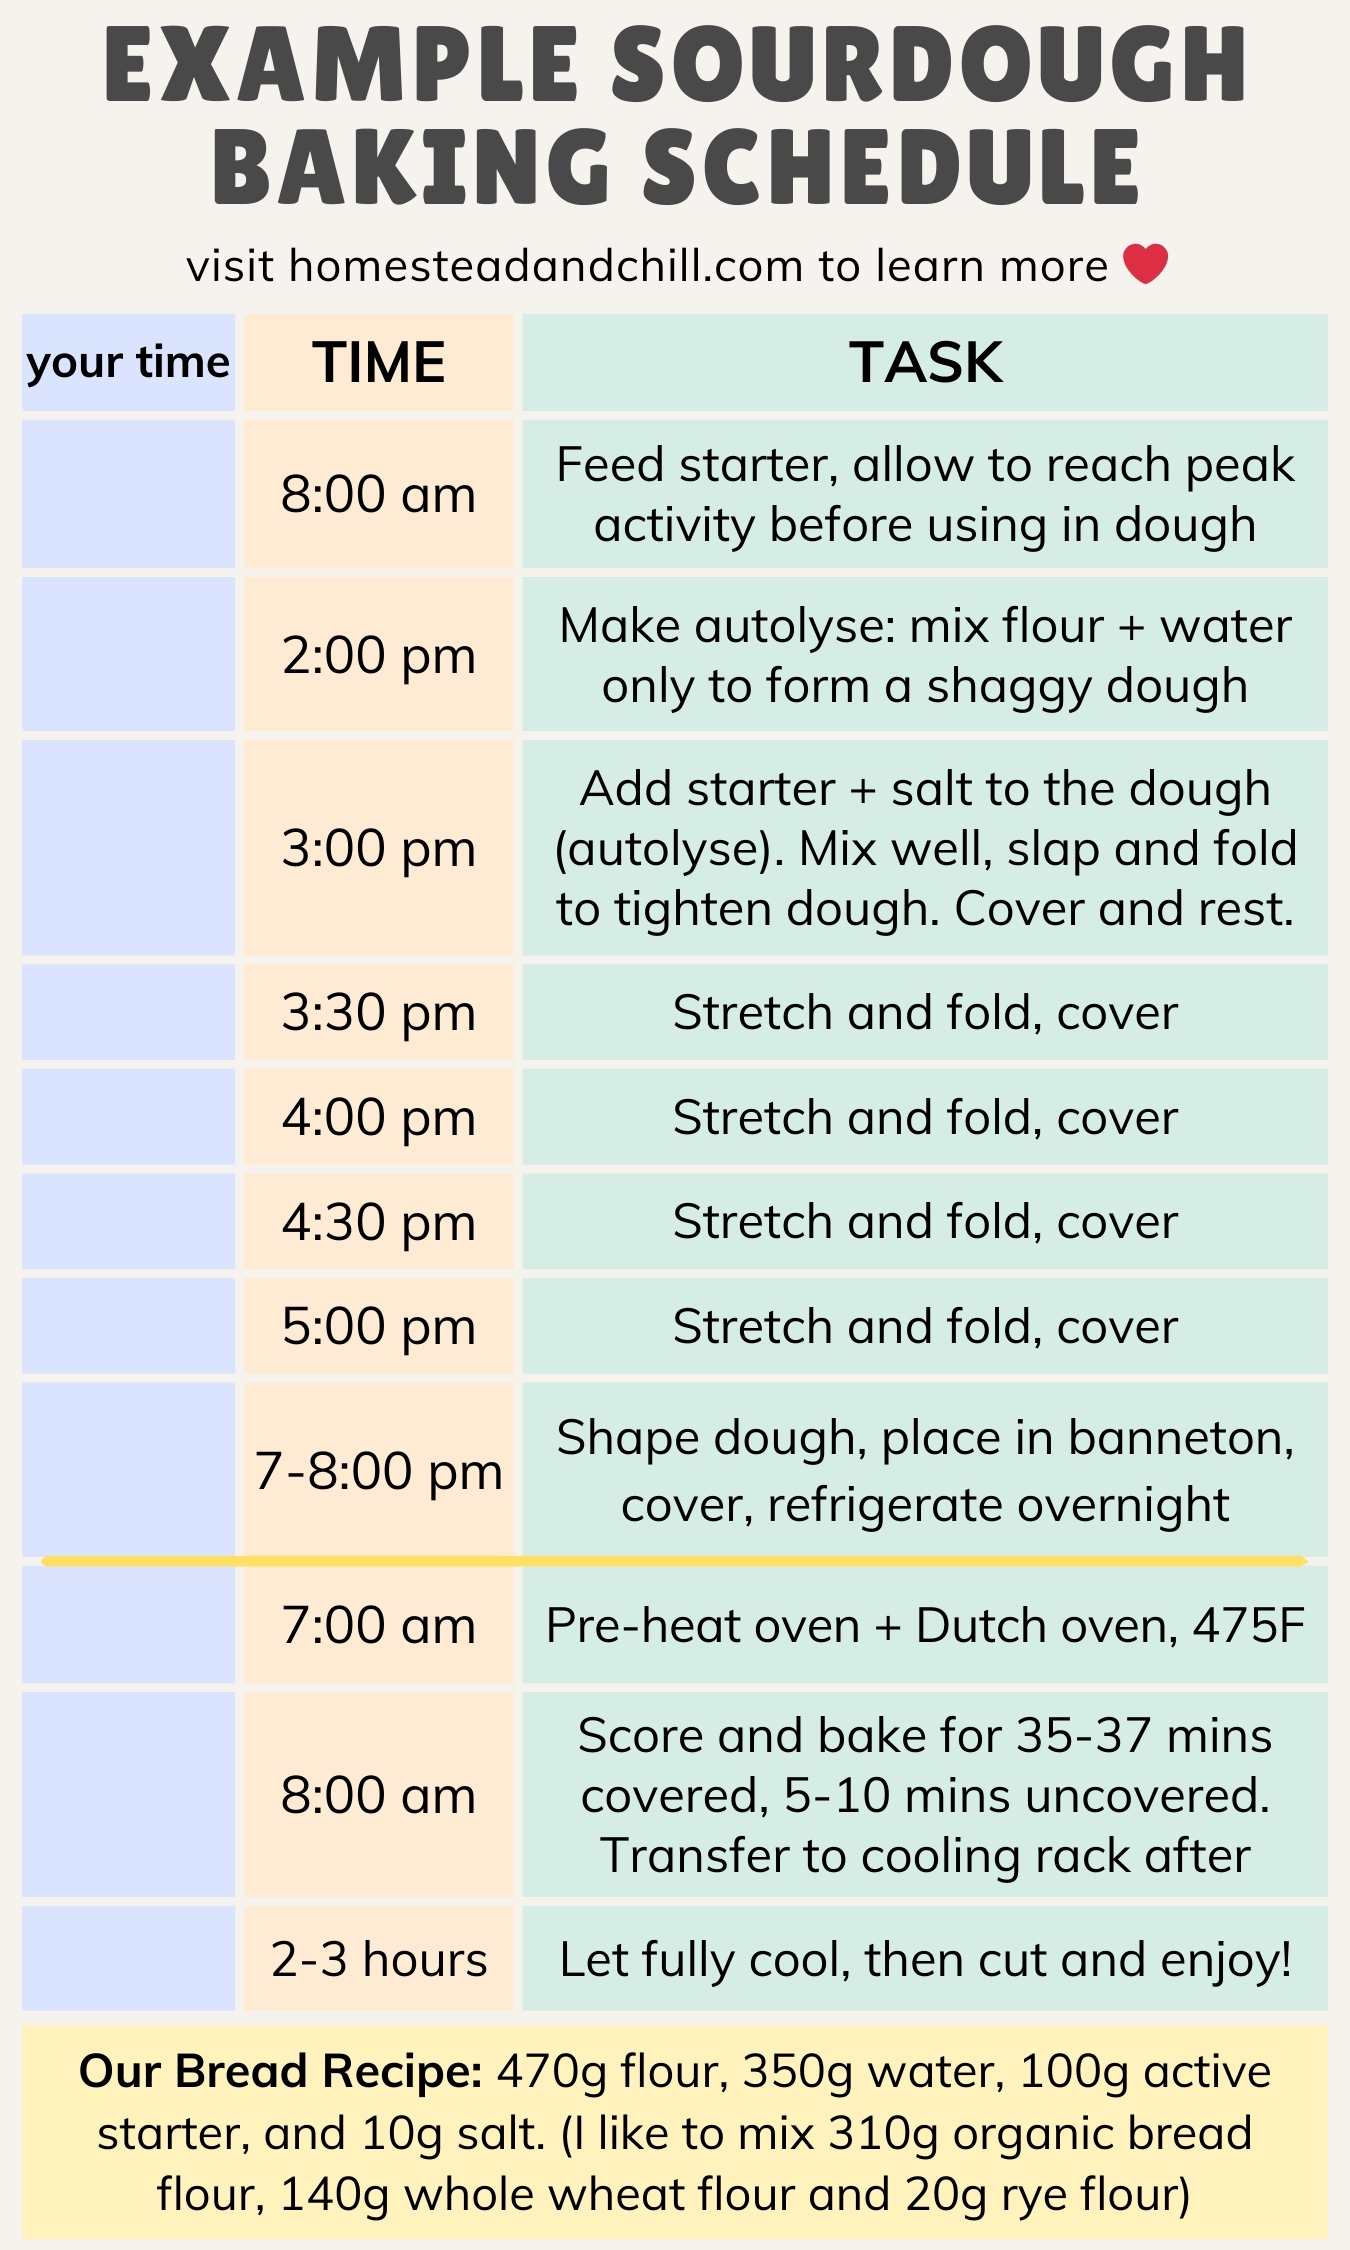
Here is my usual baking routine, assuming I want to bake a loaf of bread on Sunday morning:
- I take the starter out of the refrigerator on Friday evening and let it come to room temperature overnight. (If it hasn’t been fed in several weeks, I’ll feed it once Friday night as an initial “wake up” feeding too.)
- Feed the starter on Saturday morning, allowing it to come to peak activity (usually 5-6 hours)
- Make dough on Saturday afternoon or evening
- Let it sit for 4 to 5 hours at room temperature to bulk ferment, doing a few rounds of “stretch and folds” during the first 2 hours.
- Pre-shape the dough, transfer into a banneton, and put in the refrigerator to cold-proof overnight.
- Finally, I bake on Sunday morning
Don’t worry, this will all make sense once you do it a couple times! I hope this chart helps too.
Instructions
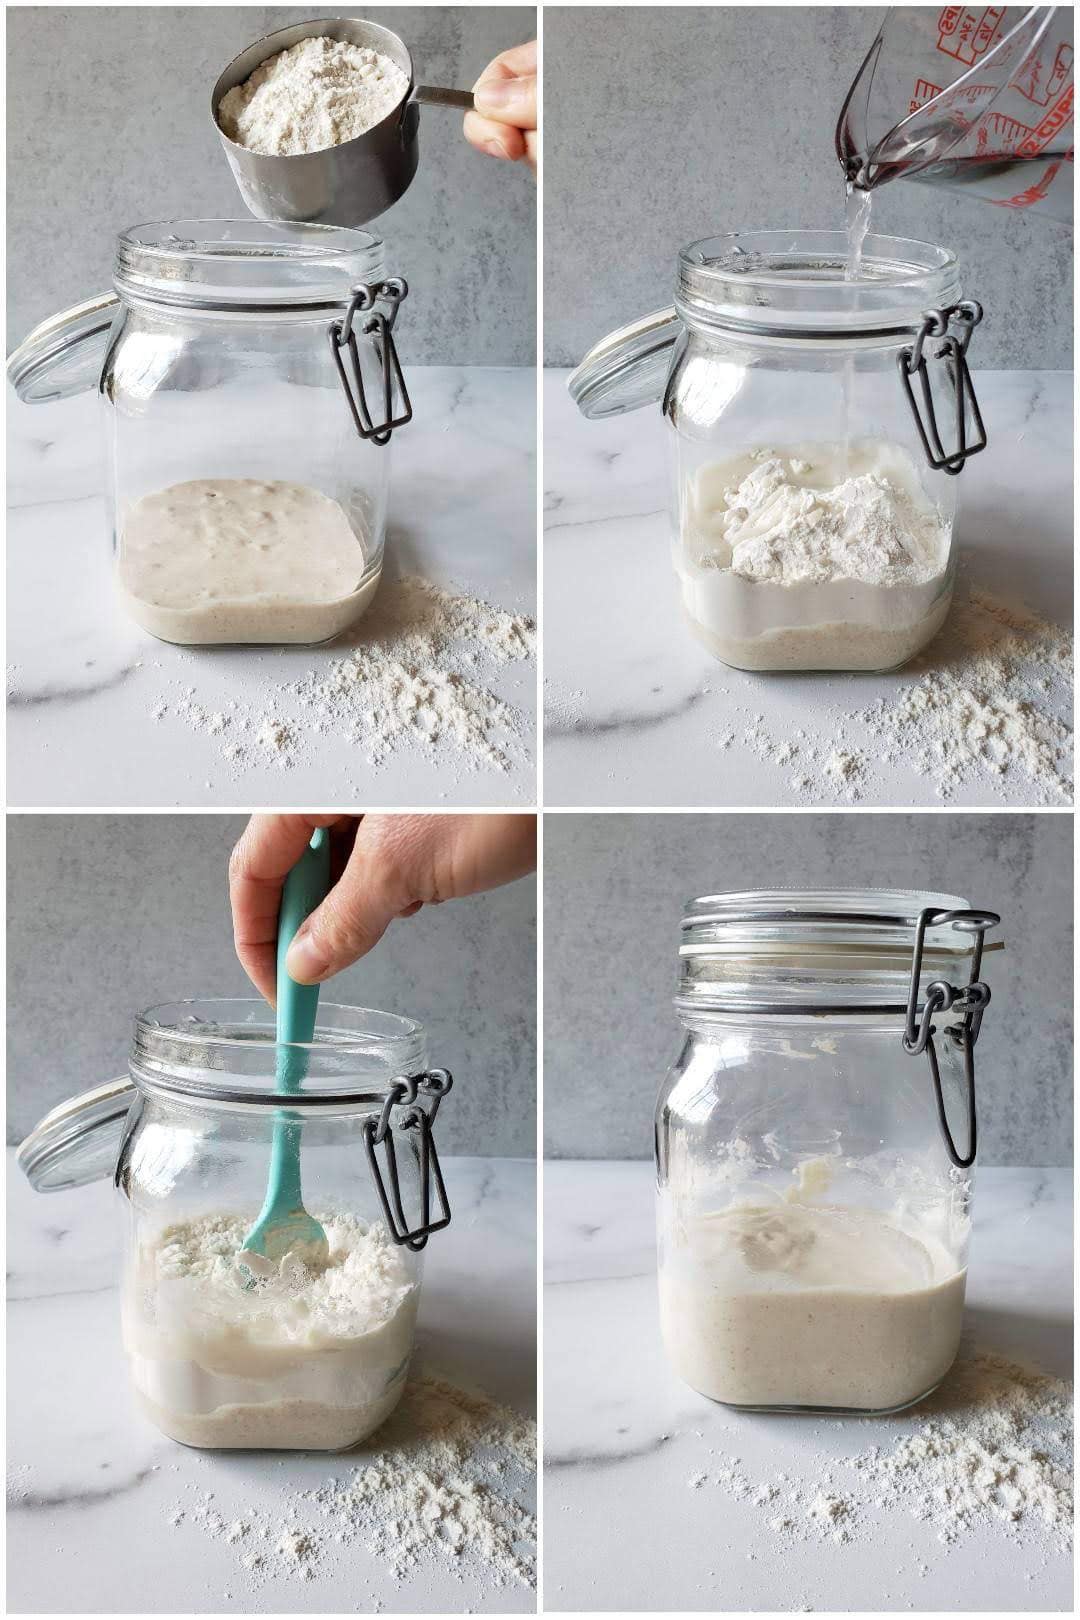
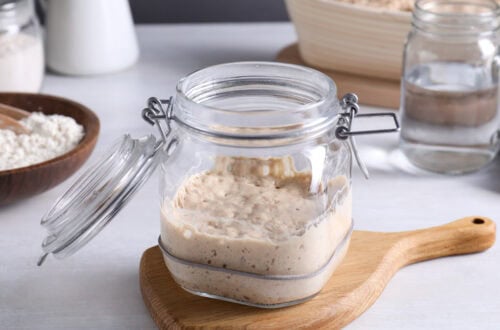
1) Feed Sourdough Starter
- Feed your sourdough starter about 4 to 8 hours before making dough. Leave it at room temperature (70 to 80°F is ideal) to rise and reach peak activity before mixing it into your bread recipe.
- To feed our starter, I typically mix 1/2 cup starter, 1/2 cup lukewarm water, and 1 scant cup flour – which is equal to a 1:1:1 ratio by weight.
- Peak activity is when the starter has at least doubled in size and is no longer rising, but before it starts to fall back down. Don’t rush it! It’s best to use starter once it has reached full peak activity or even just after (when it starts to fall back down, but hasn’t fully deflated yet) instead of mixing it into your dough too early.
- Note that it can take anywhere from 4 to 12 hours for a starter to fully rise and reach peak activity. The exact time depends on numerous factors including the age and strength of your starter, when it was last fed, ambient temperature, and how you store it. Warmer temperatures increase activity, and cooler temperatures slow it.
- A slow, sluggish starter that hasn’t been fed recently (e.g. after several weeks or more in the fridge) will benefit from being fed twice before baking with it – such as the day before. To do so, let it warm to room temperature, feed it, and then let it fully rise and begin to fall again before discarding and feeding it a second time.
RELATED: If any of this sounds foreign to you, please pop over to our guide on how to feed sourdough starter to learn more.
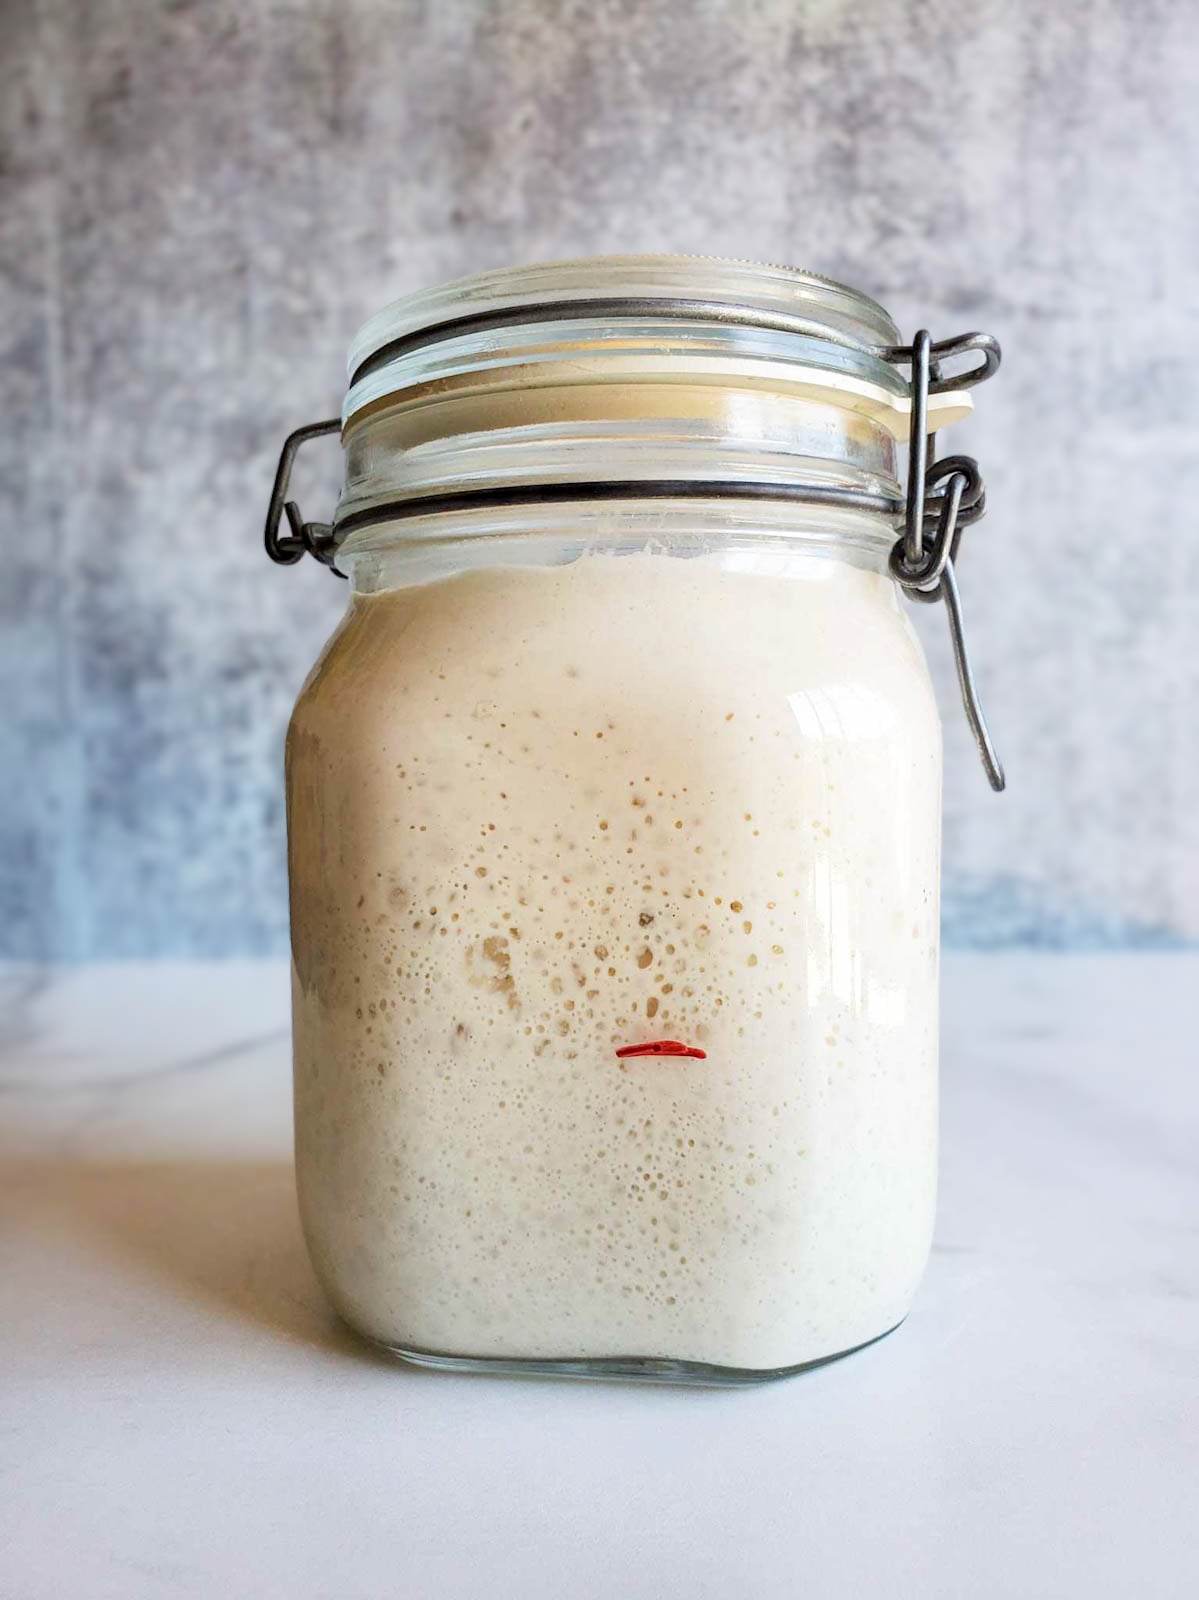
PRO TIP: If your starter has peaked but you aren’t quite ready to use it yet (life happens!), I’ve found that you can simply put it in the refrigerator at peak to halt activity, and then pull it back out when you want to use it (within 12 hours). It’s best to use the same day, but this adds some nice flexibility in your baking schedule!
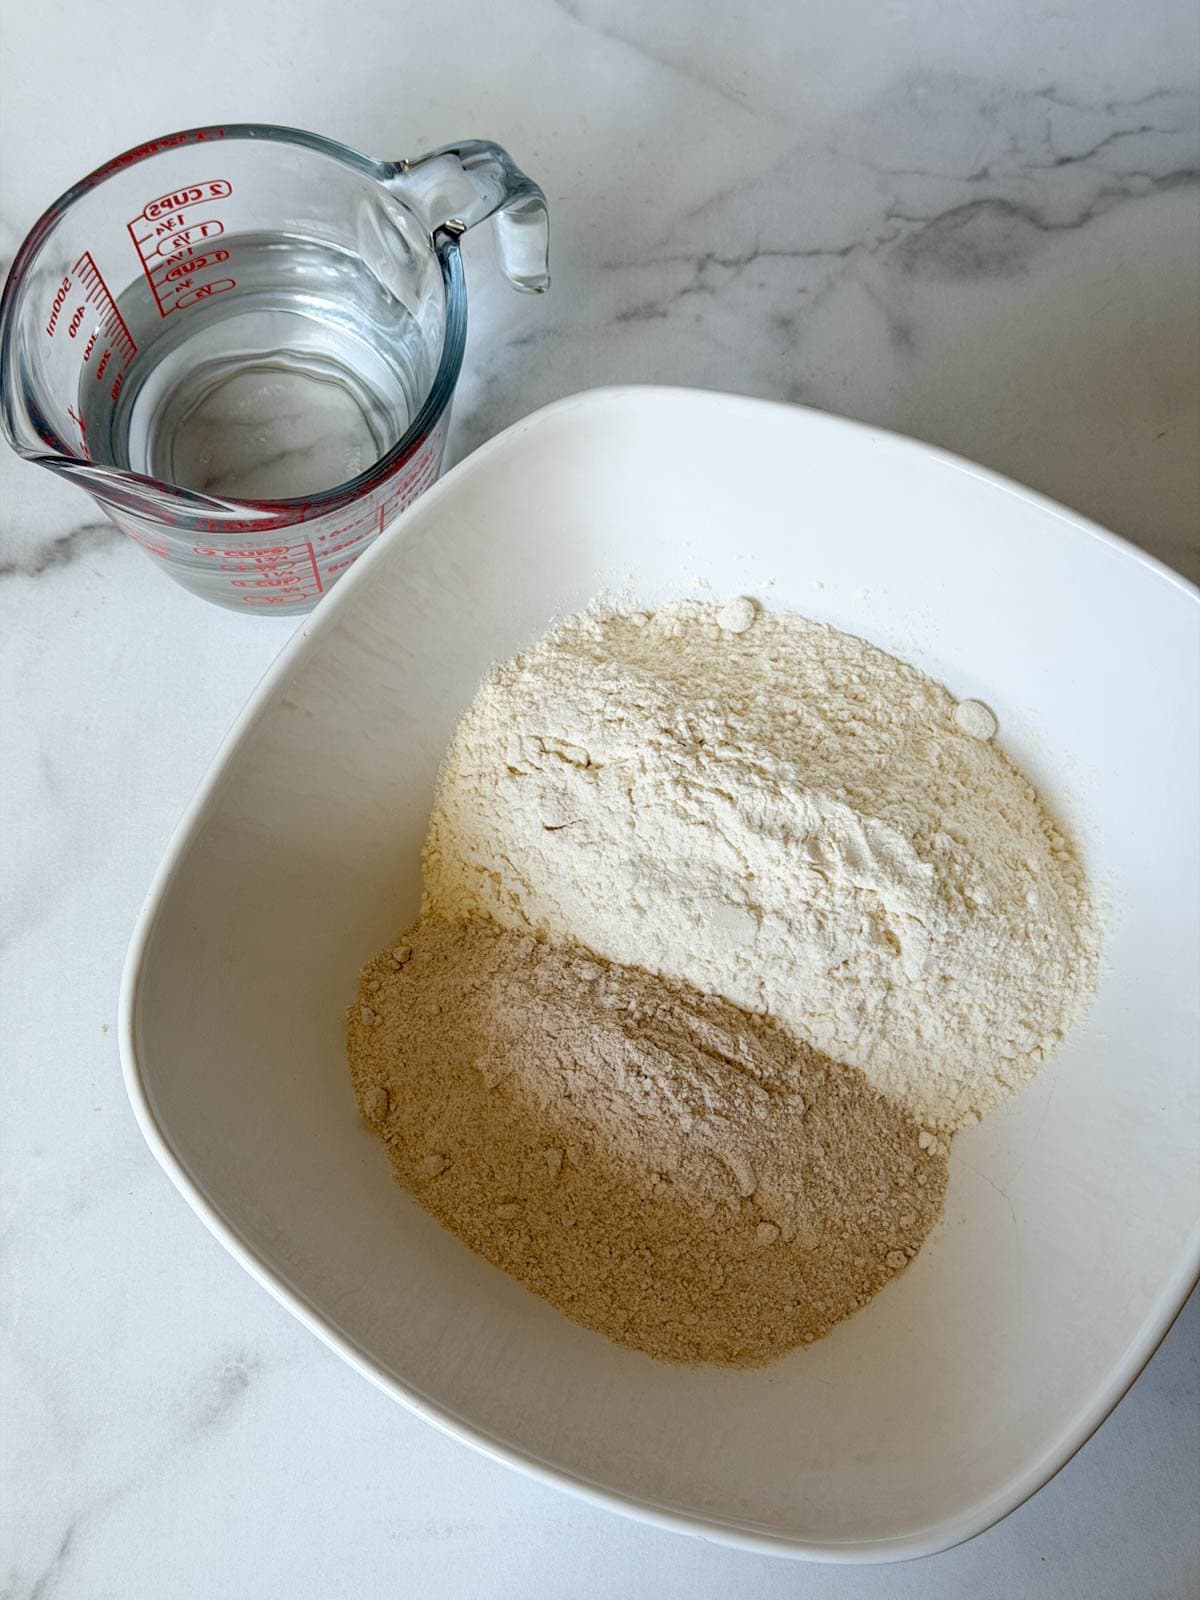
2) Make Autolyse (Flour and Water)
An “autolyse” is the term for a combination of flour and water only, which is mixed together to sit for about an hour before adding the salt and sourdough starter. During this time, the flour becomes hydrated and activates enzymes that jump start the fermentation process and gluten development.
- When your starter looks like it’s nearing peak activity (about 1 hour before), use a kitchen scale weigh out 470 grams of flour and 350 grams of warm filtered water. Don’t forget to tare or account for the bowl weight!
- Add the flour and MOST of the water to a mixing bowl. Pour in about 300-325 grams or 80-90% of the total water at this stage, reserving a small amount of water in the measuring cup to add later.
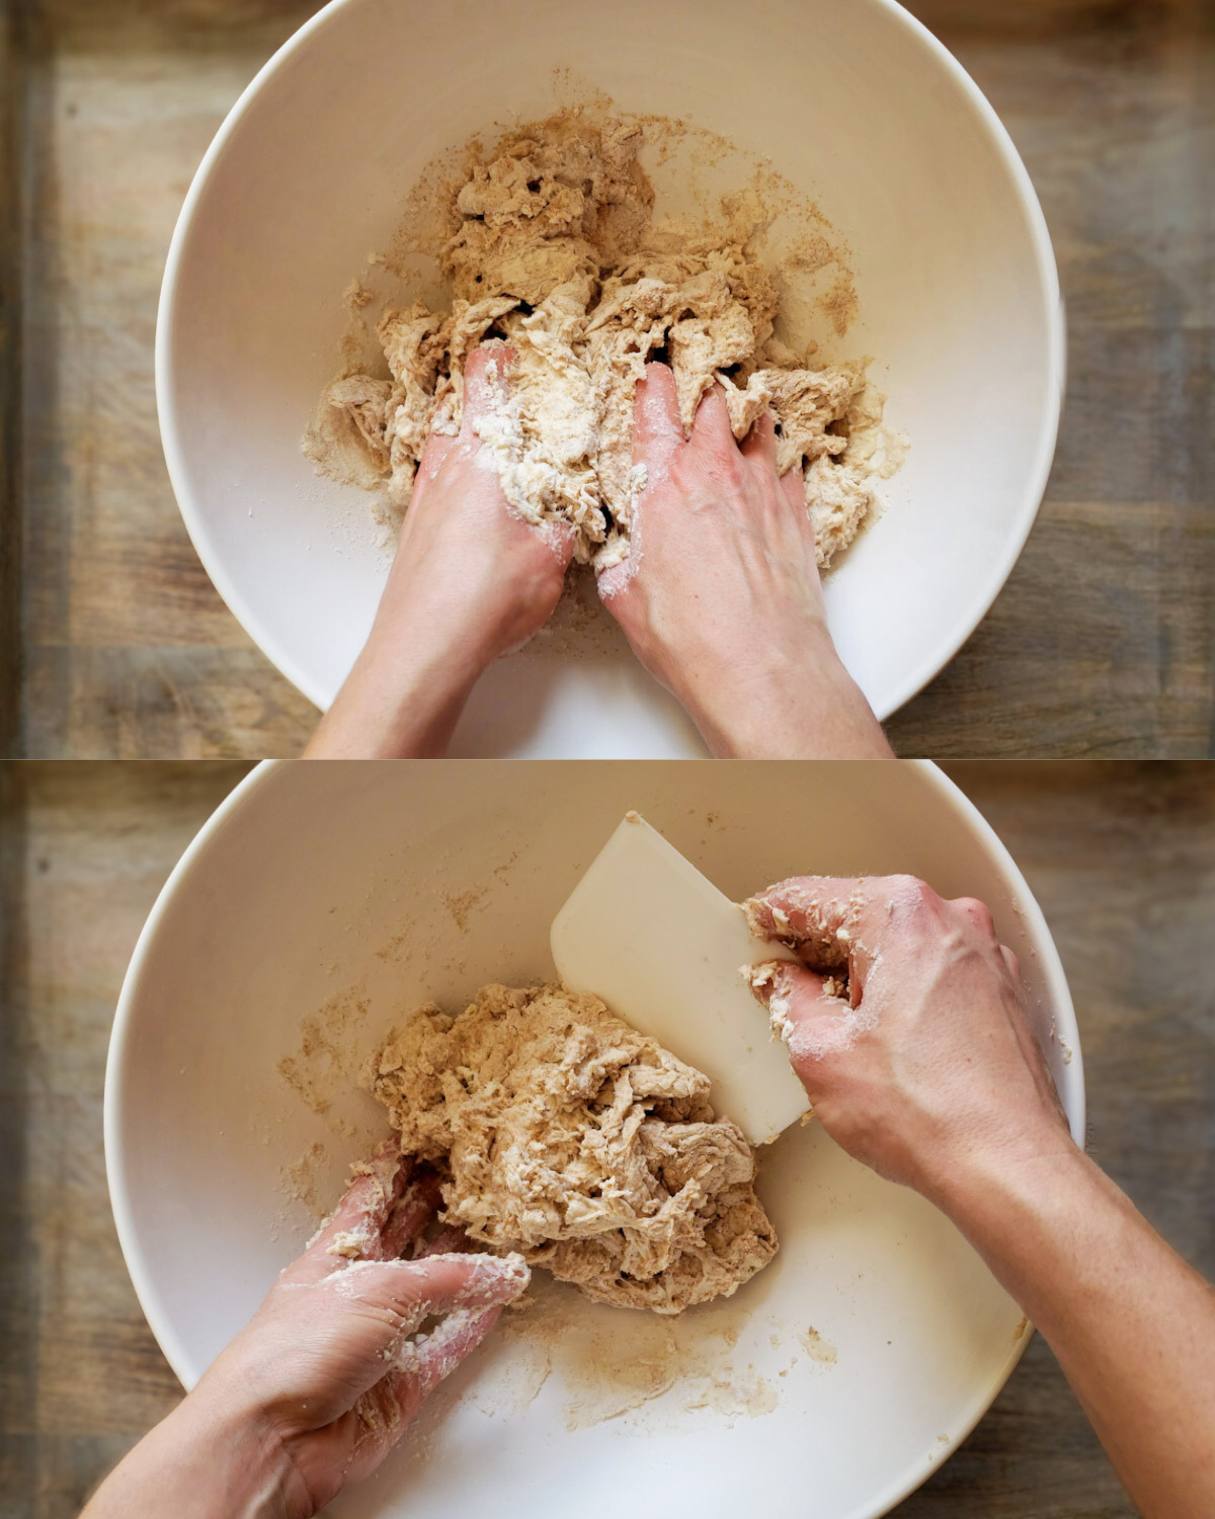
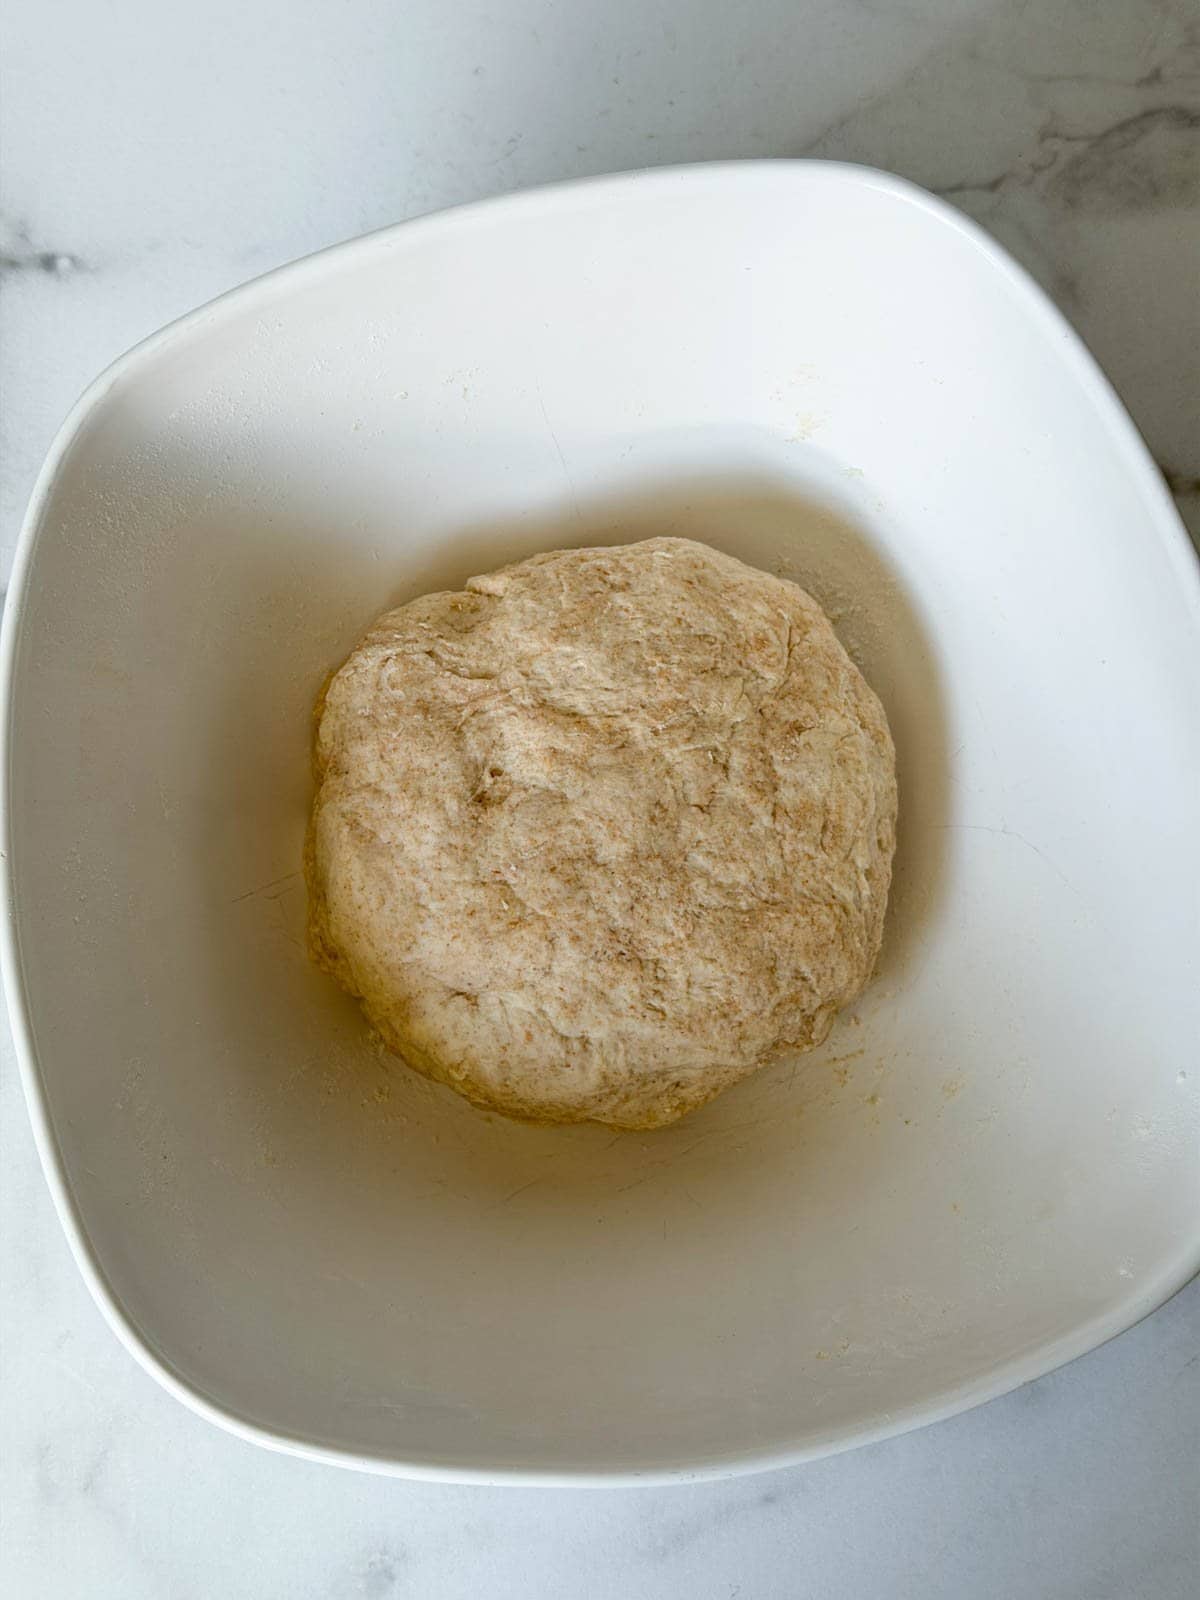
- Mix until it forms a loose, shaggy dough. Yes, it will be pretty dry and sticky at this stage! I usually start mixing with a utensil but finish mixing with clean wet hands, and then use a dough scraper to clean up the sides of the bowl.
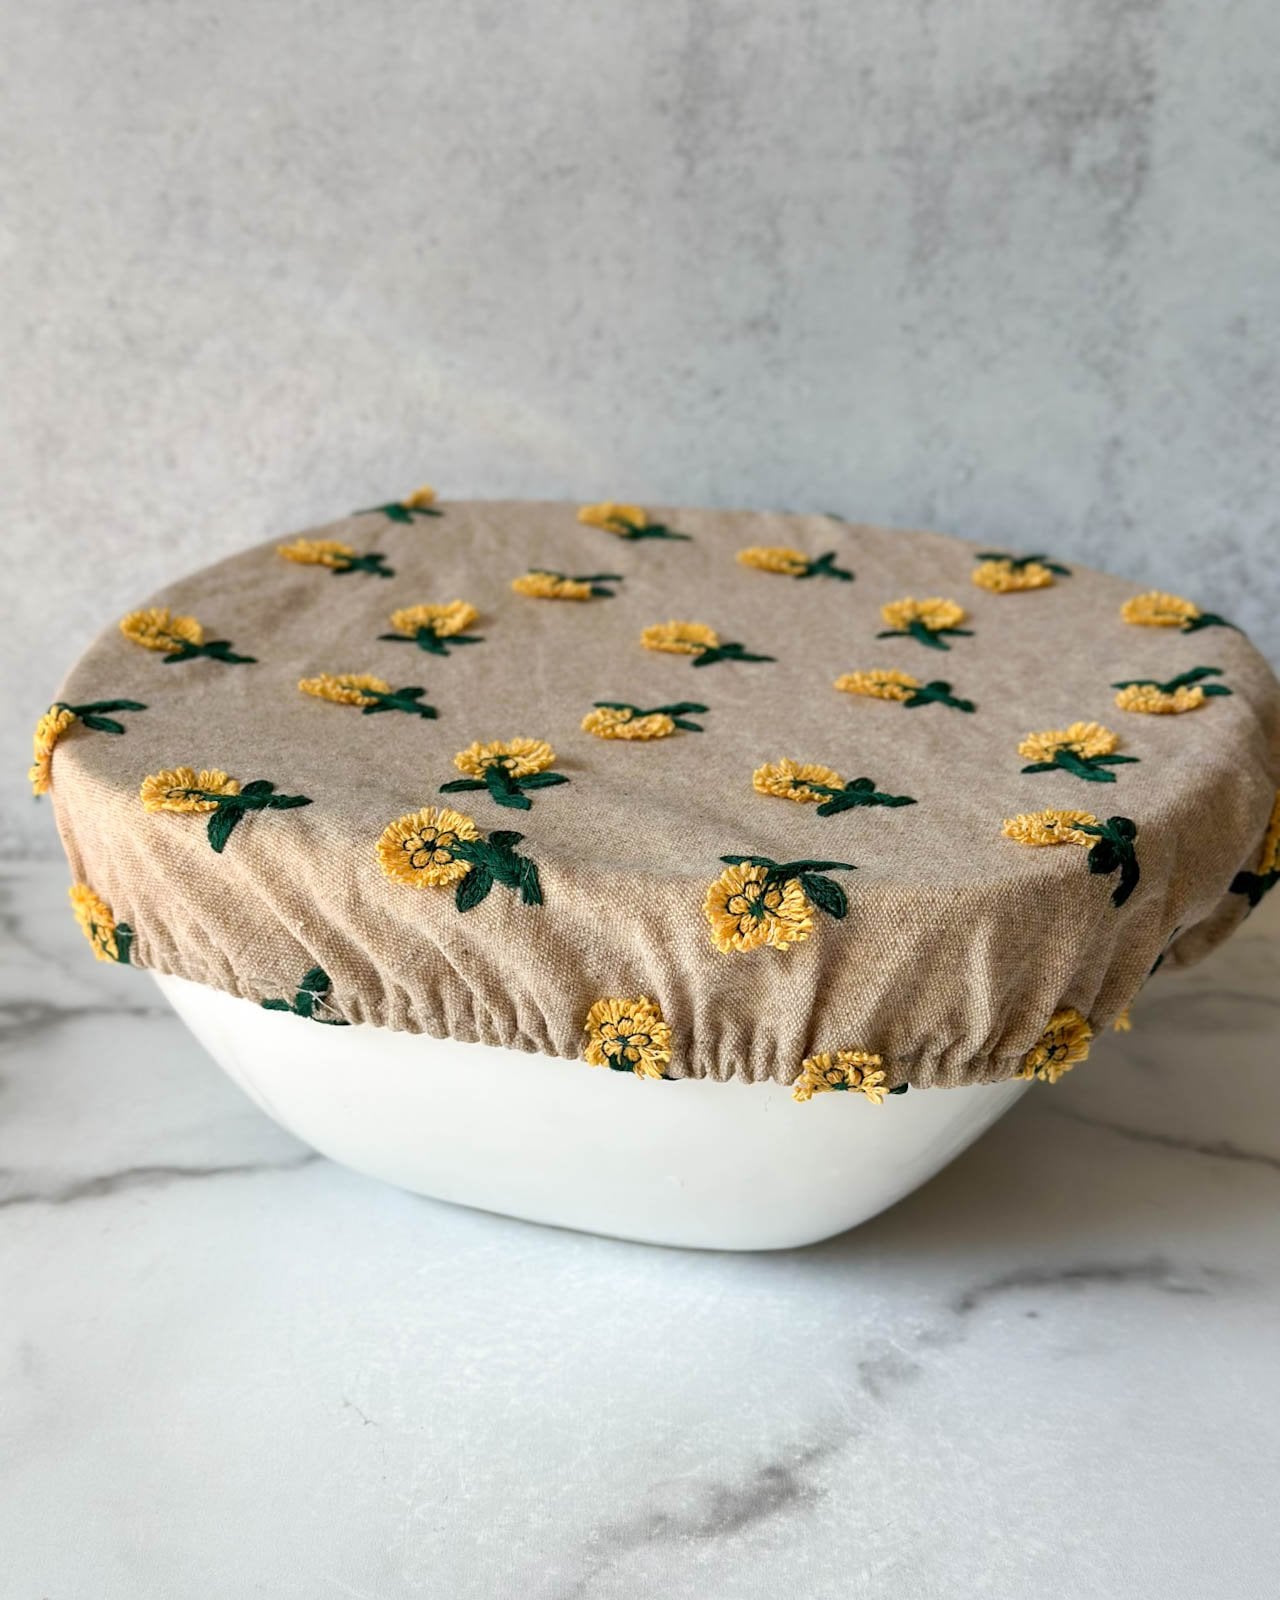
- Cover the bowl with a damp lint-free towel, beeswax wrap, dinner plate, shower cap, or other bowl cover to prevent the dough from drying out. If you are using a dough tub, set the lid loosely on top.
- Now let the autolyse mixture sit for an hour at about 75°F.
PRO TIP: I weighed our water and found 350 grams is almost exactly 1.5 cups (in our measuring cup at least, double-check yours) so now I don’t have to weigh it every time. If you live in a humid climate, start with slightly less water (1.25 cups) and add more later with the starter if the dough seems too dry.
3) Add Starter and Salt
- Once your starter has reached peak activity and the the autolyse (flour/water combo) has sat for about an hour, it’s time to combine them!
- Weigh and add 100 grams of active sourdough starter, 10 grams salt, and the remaining 25-50 grams of water into your autolyse now.
- Use clean, wet hands to thoroughly mix the dough. It should feel much more wet and sloppy than it did during the autolyse stage. I use the “slap and fold” technique to tighten up the dough – explained in the next step.
PRO TIP: Remember, never use ALL of your starter! Always leave at least a 1/4 to 1/2 cup behind to continue to feed and use in the future. Once I take what we need for a recipe, I usually put our starter back in the fridge without feeding it.


4) Slap and Fold
Now the fun really starts! The “slap and fold” is a technique used to help tighten up loose dough, introduce air, and jump start gluten development for the bread.
Do this right after you mix the starter and salt into the dough:
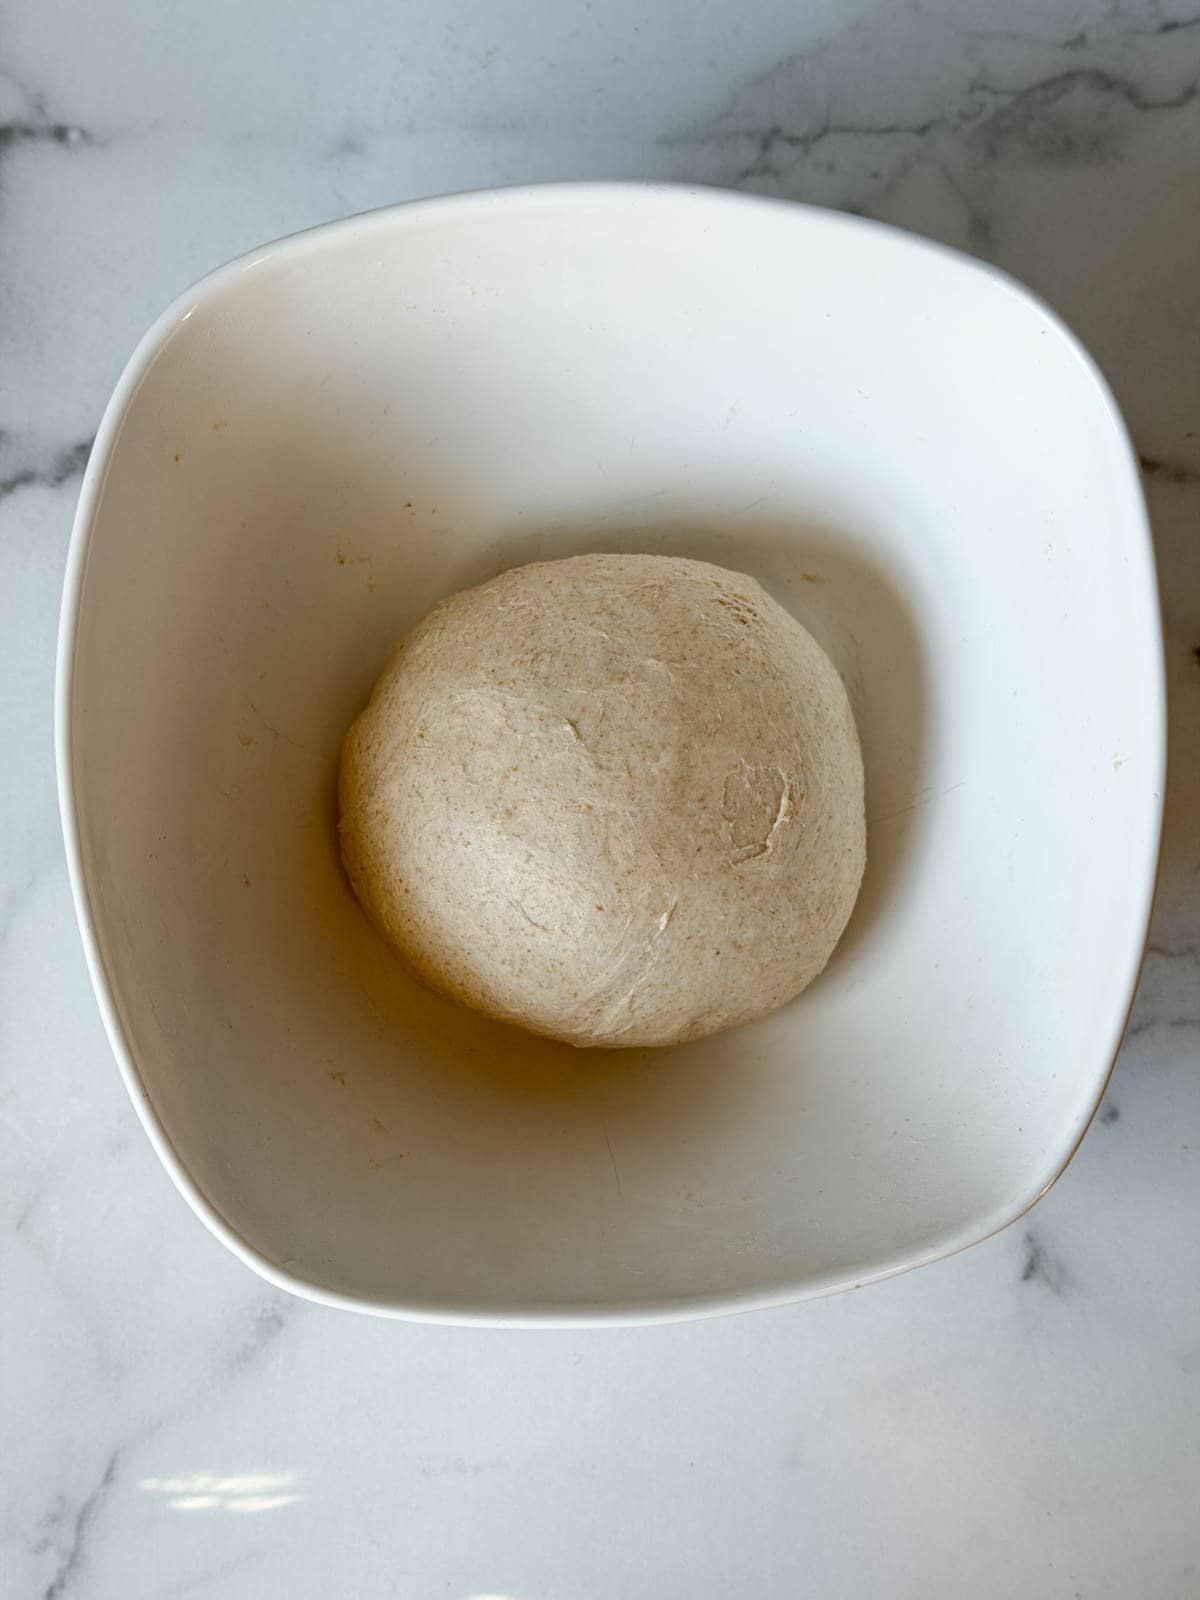
- Pick up the loose dough ball. I find this is easiest to do with wet hands, which reduces sticking.
- Working on a clean surface, flop or “slap” the dough down onto the counter, fold it over itself, pick it up, flop it down again, fold, and repeat. See the video demonstration below.
- Repeat the process until the dough ball is more smooth, tight, and formed – but stop once it starts to get extra sticky on the counter. If needed, use a dough scraper to ease it back into your bowl.
Here’s a quick video of me doing the slap and fold technique:
5) Bulk Ferment (Stretch and Fold)
Now it’s time to let the dough sit at room temperature for several hours, known as “bulk fermentation”. This is when your starter will start to naturally ferment the flour and dough, creating air bubbles and rise!
During this time, you’ll also do a few rounds of stretch and folds, explained more in the section to follow.
- Leave the dough in a bowl at room temperature (warm location is best) to bulk ferment for approximately 4 hours. I sometimes let my dough ferment for up to 4.5-5 hours when the house is extra cold.
- Cover the bowl again with a damp towel, loose-fitting lid, or other breathable cover.
- During the first 2 hours of bulk ferment, perform 3 to 4 sets of stretch and folds spaced 30 minutes apart. See more detailed instructions and photos below.
- If you’d like to add any optional inclusions like herbs, spices, grated cheese, nuts/seeds, etc, I usually do so during the first set of stretch and folds. Additions can change the texture of your dough (especially if they’re wet) so I suggest to use them sparingly until you gain more experience working with sourdough.
How to Stretch and Fold
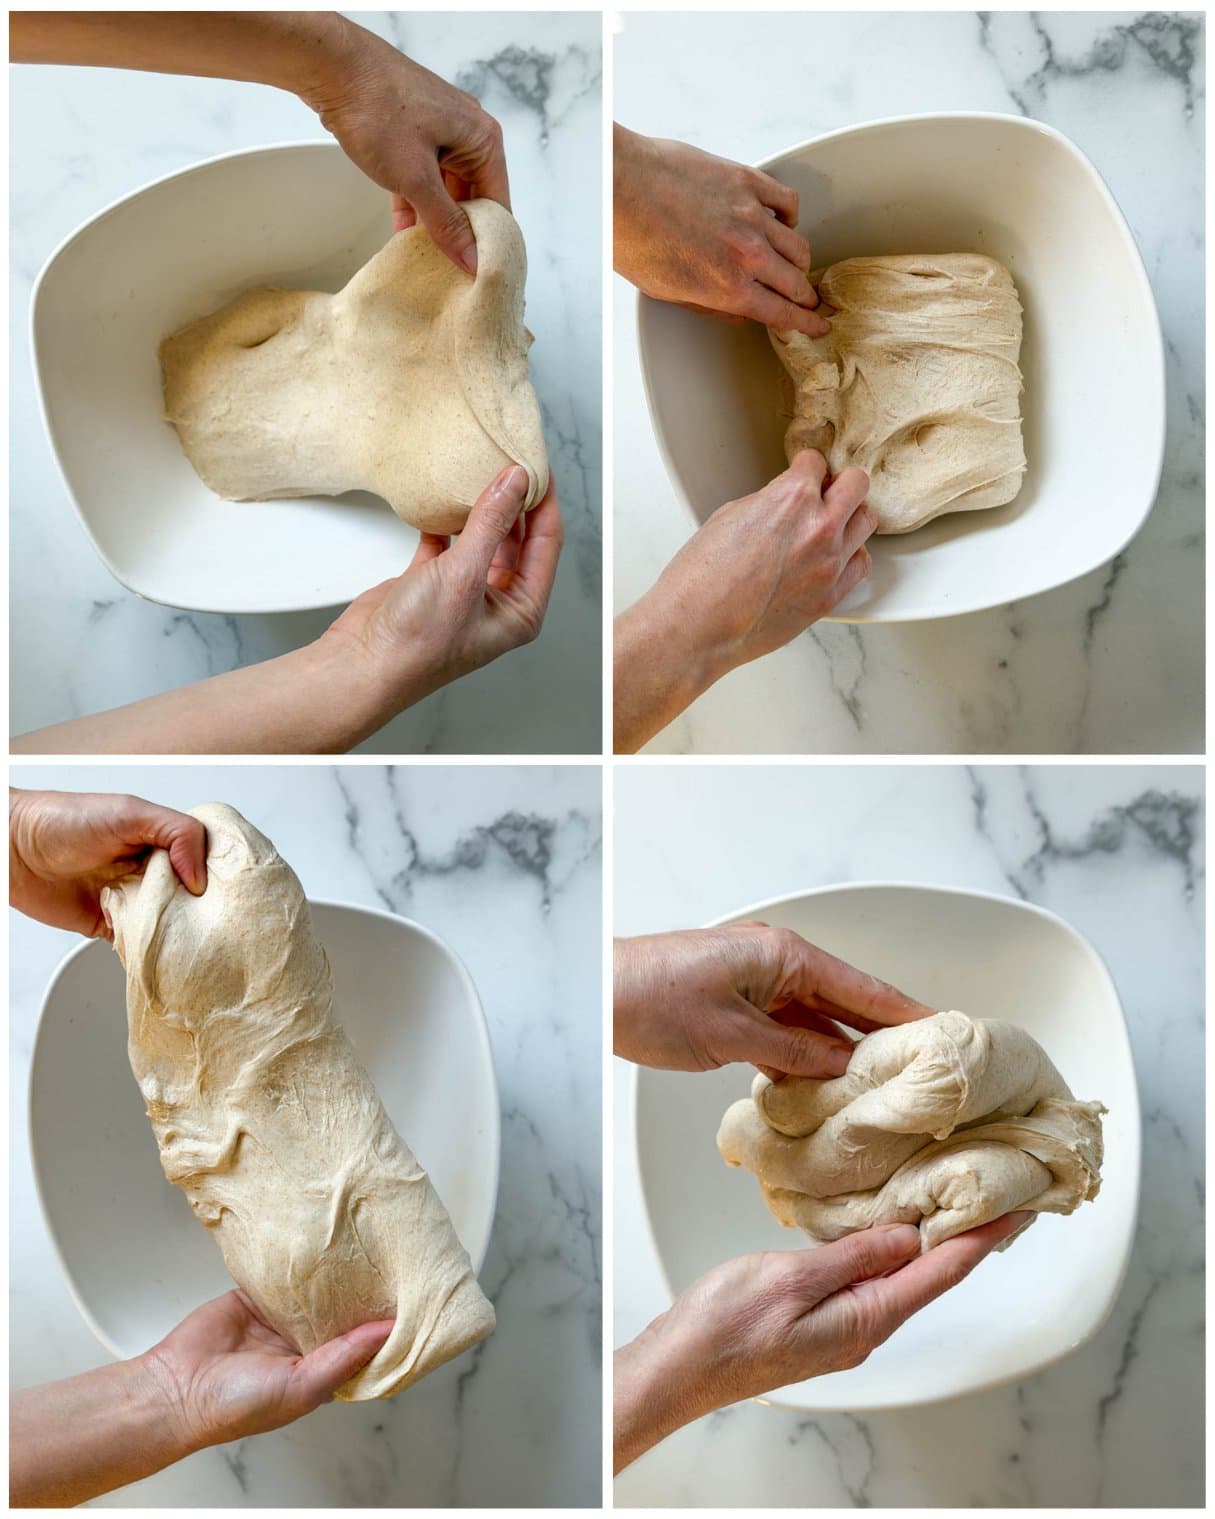
“Stretch and fold” is a sourdough technique used to introduce air, increase dough elasticity, and develop or strengthen gluten structure – which in turn improves the bread’s final shape, rise, and crumb (and replaces traditional kneading).
- Grasp the dough from one side, and gently pull or stretch it upwards until you meet resistance. Now lay it back down over itself, essentially folding it in half. (Again, I like to do this with wet hands.)
- Next, turn the bowl 90 degrees or one quarter (so you can grab the dough from a different angle) and repeat the same process – gently pulling up on the dough and folding it half.
- Continue the process of stretching, folding, and turning until you’ve made your way all the way around the bowl – back to the starting position. This is considered one set of stretch and folds.
- The dough will be noticeably looser during the first stretch and get more taught and during the subsequent ones. Don’t force it or rip the dough! If you stretch past the point of resistance, it will tear (and maybe ruin) some of the developed gluten strands that contribute to the bread’s structure and rise!
- Repeat this process to complete 2 or 3 more sets of stretch and folds, about half an hour apart.
Then cover the bowl again, and let the dough rest undisturbed for the remainder of bulk fermentation – about 2 hours after the last stretch and fold. The dough should be more loose, jiggly and have some air bubbles by then.
7) Shape the Loaf
After bulk fermentation, it’s time to form your dough into the shape of a loaf. If you doubled the recipe, separate the dough into two even sections first, and then proceed to form each loaf individually.
- Place or gently dump the dough onto a lightly floured surface. It’s probably quite loose at this point.
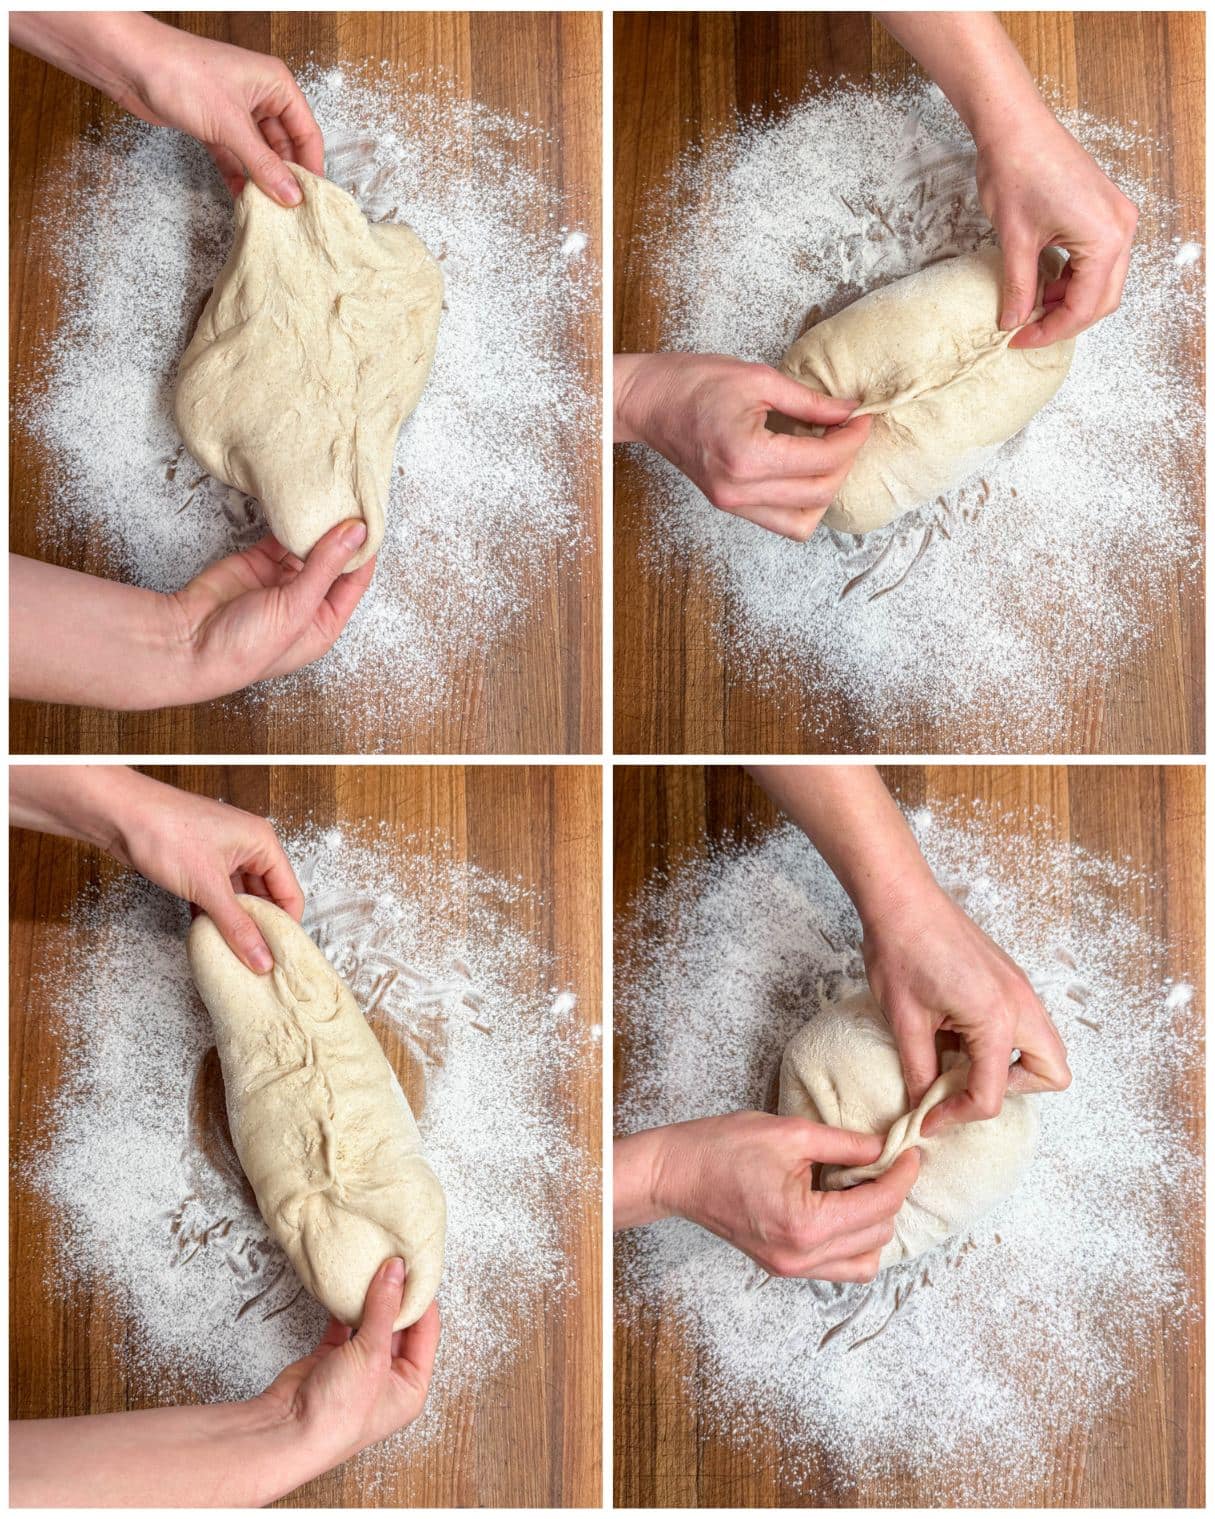
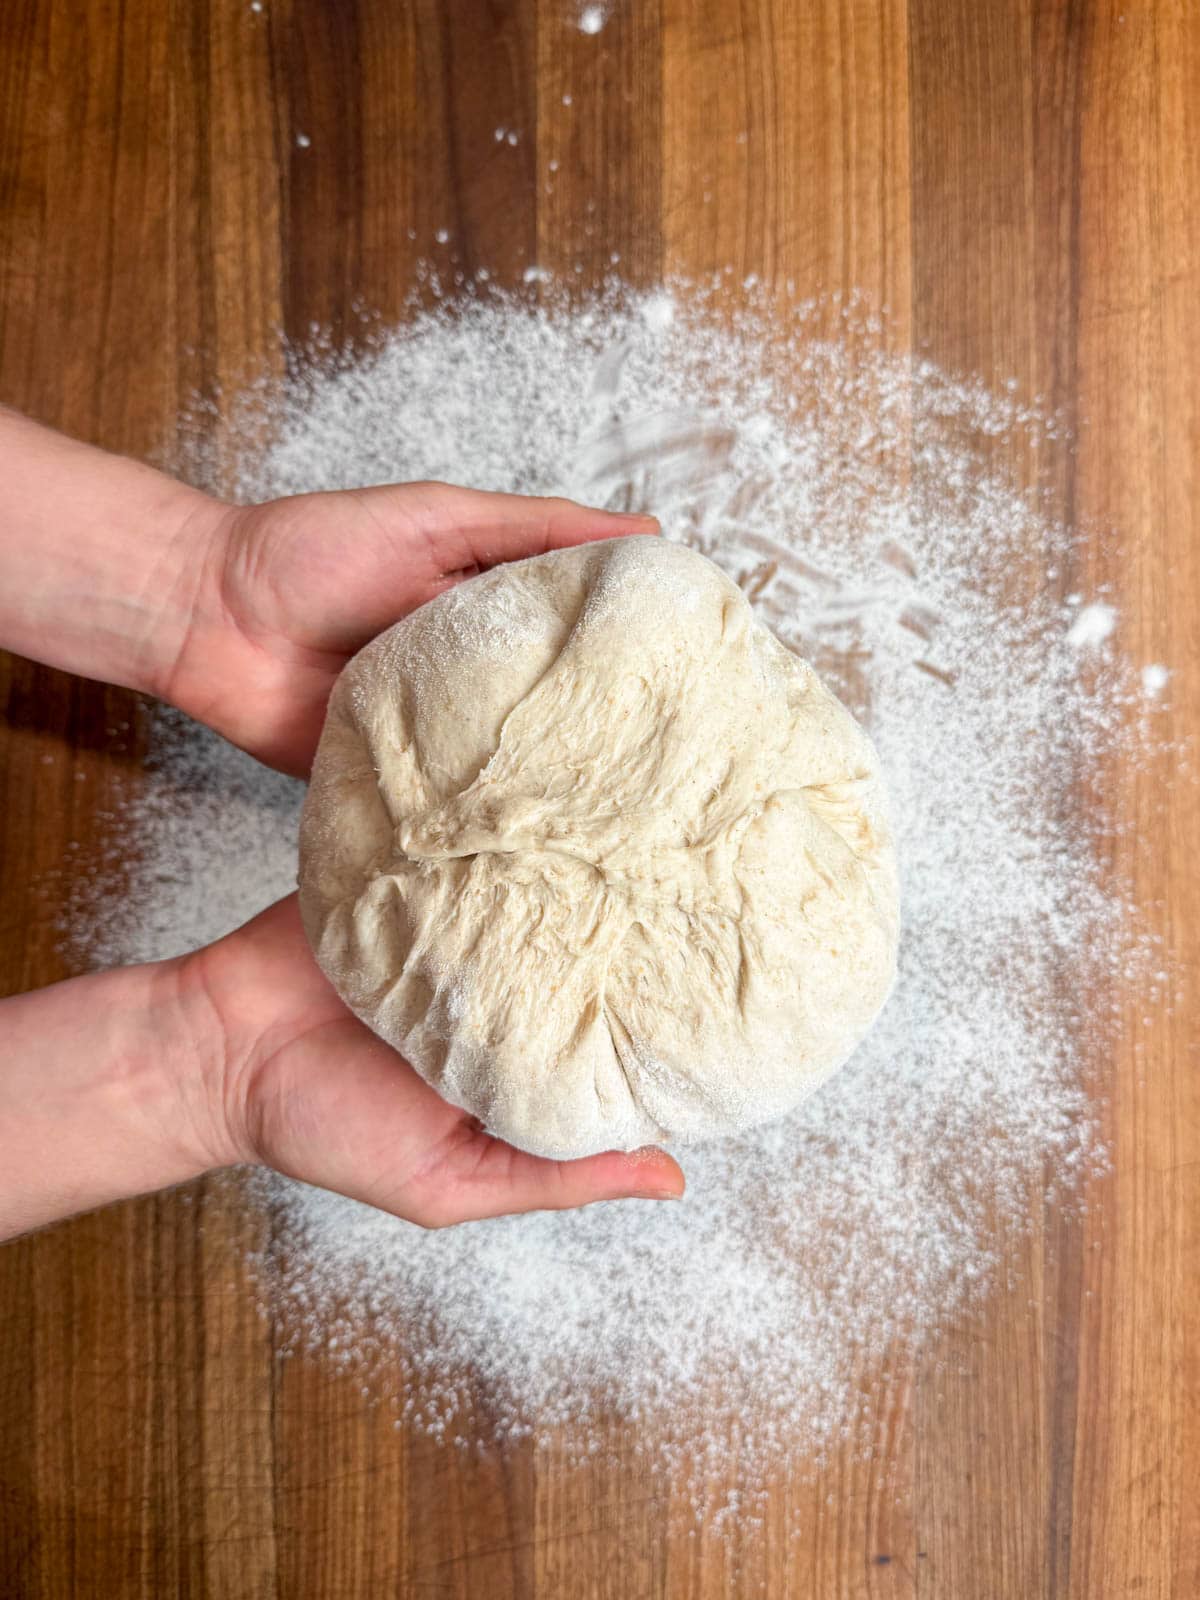
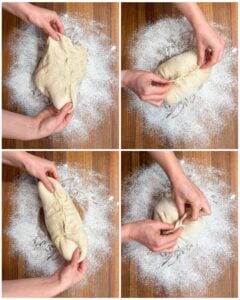
- To form a round (boule) loaf, I grab the sides of the dough from opposite ends, gently pull, fold, and pinch it together in the center as shown in the photos below. This is called “stitching” the dough. Rotate the dough and repeat the process from opposite sides a few times, working the dough into a round shape.
- For oval (batard) loaves, do a similar process but form the loaf into a longer shape, similar to folding and rolling it up like a burrito (and pinch the ends).
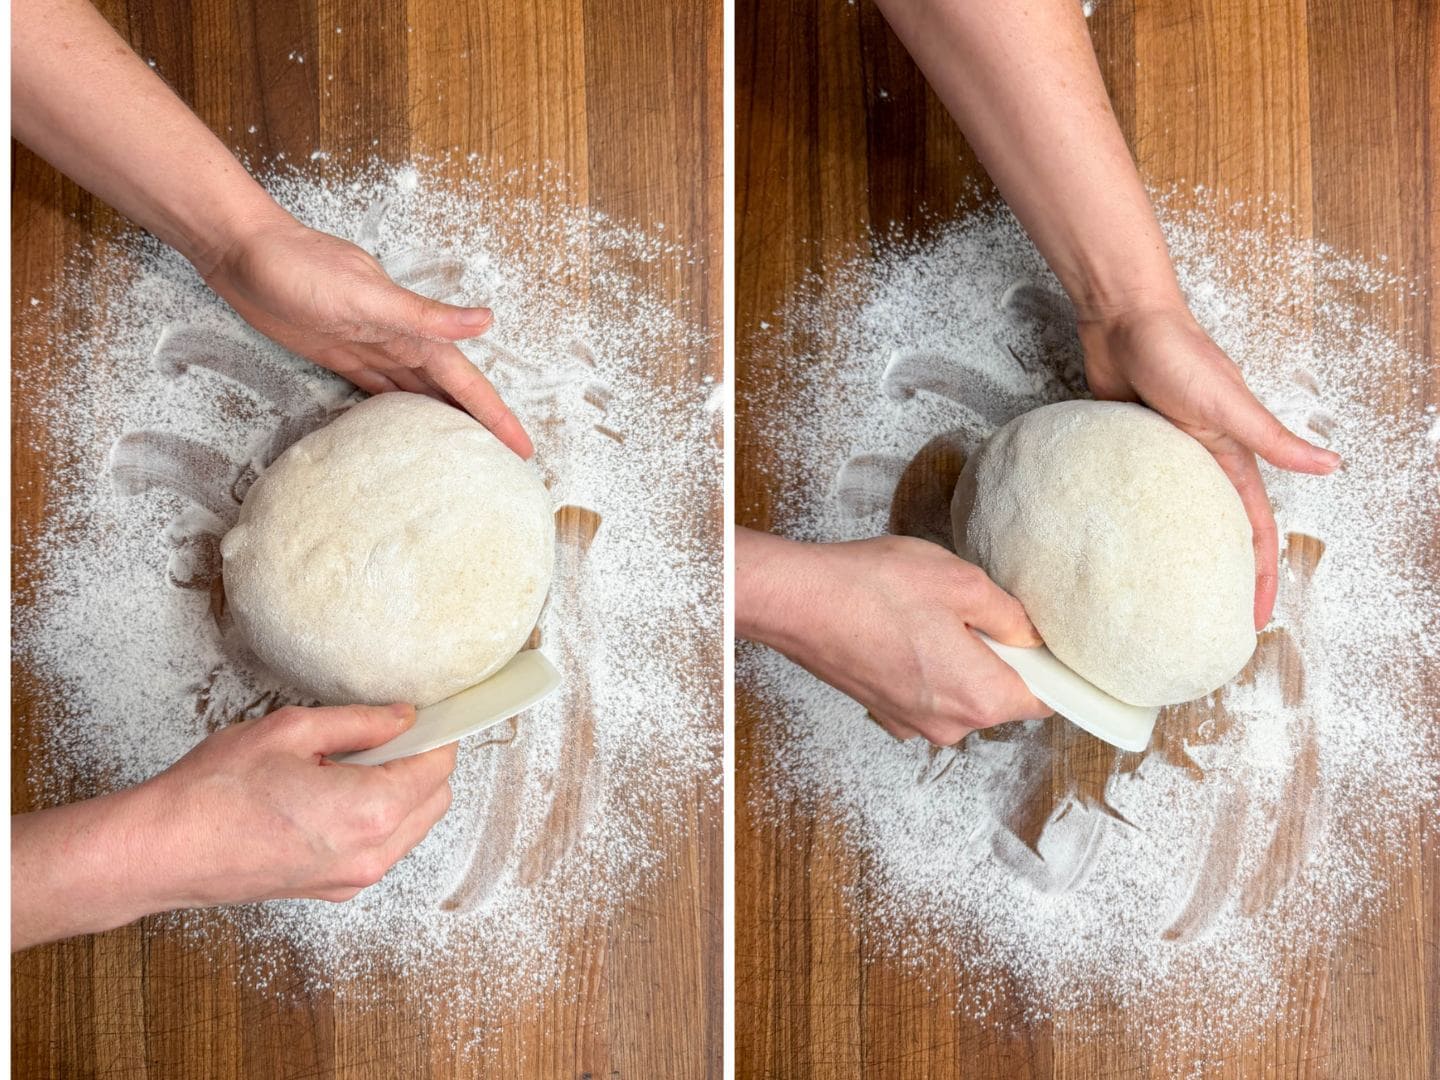
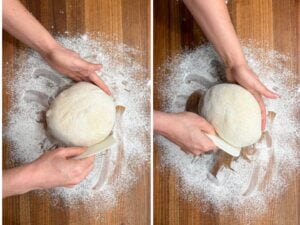
- Next, flip the dough ball over so it’s sitting on its pinched or seam side. Using your hands and/or dough scraper, pull and turn the dough ball towards you while pressing downwards slightly to create surface tension. Do this several times, turning the dough as you go.
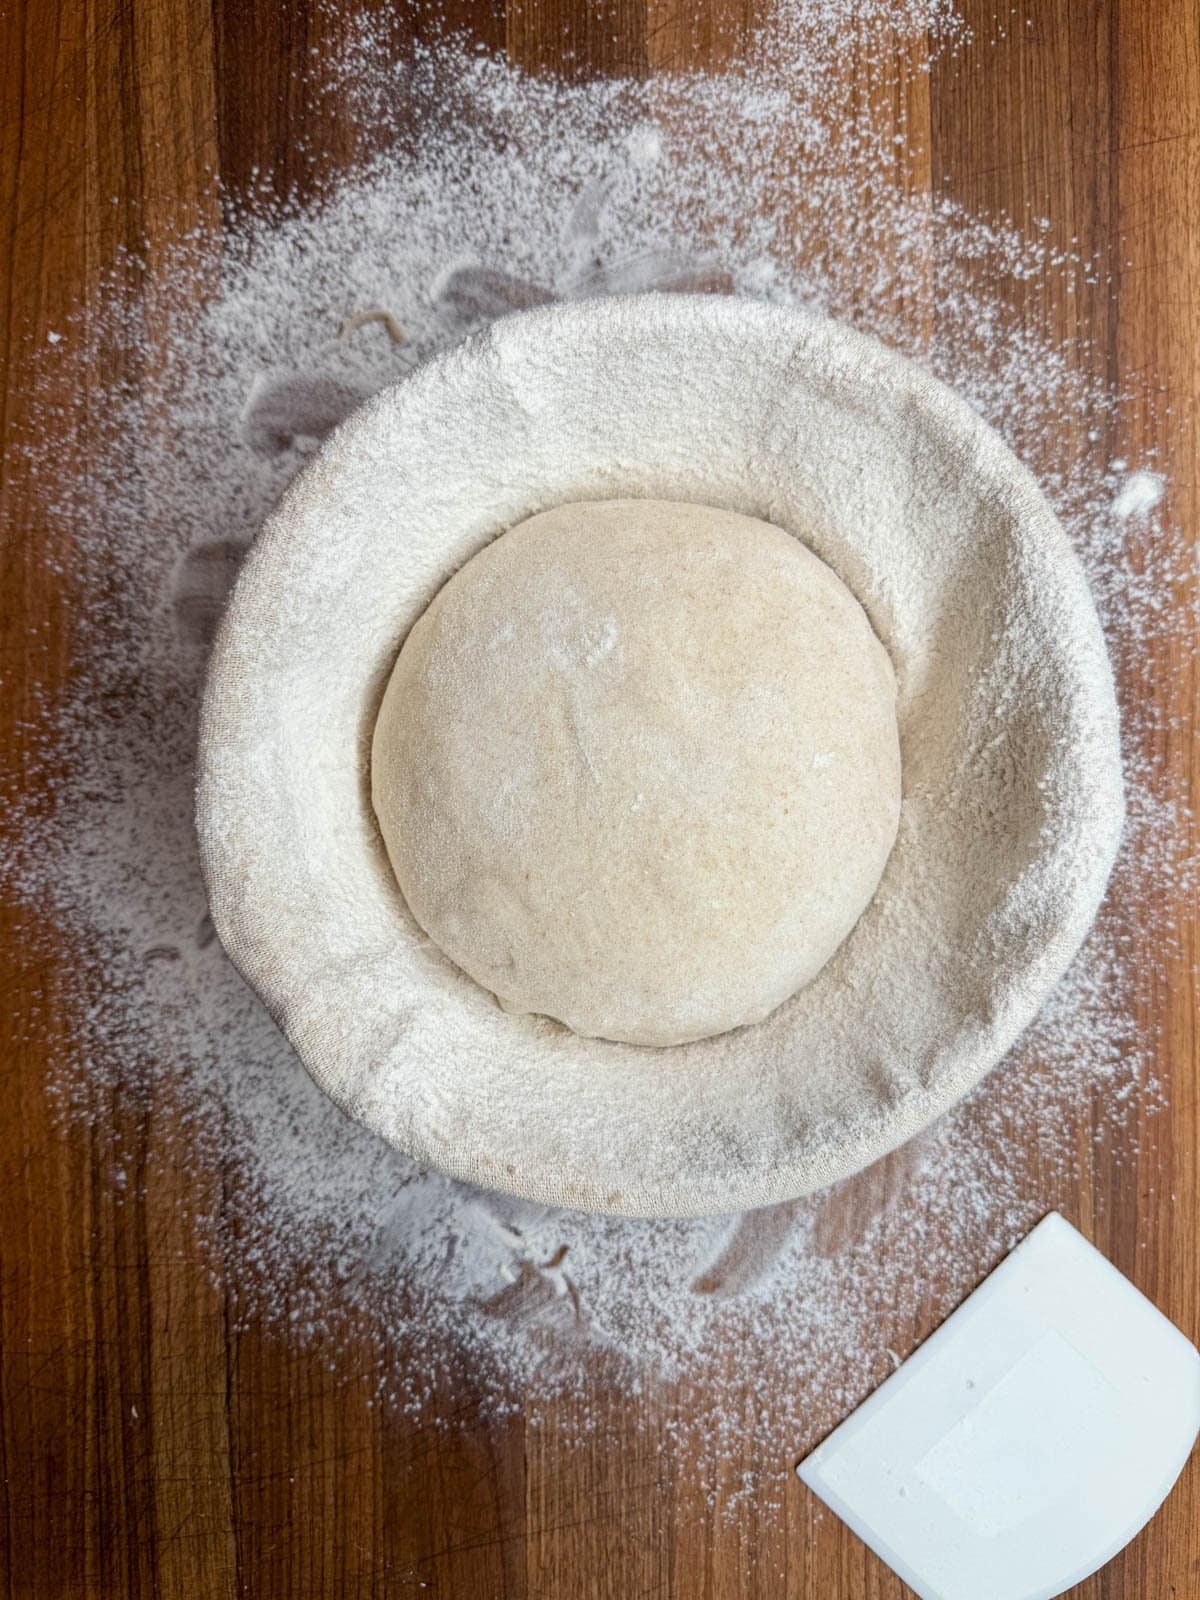
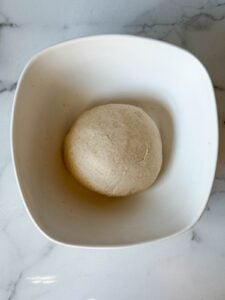
- Finally, transfer the formed dough ball into a lightly floured banneton (proofing basket). I’ve found that dusting the banneton with rice flour is the best to prevent sticking! Most sourdough experts suggest placing the dough ball seam side up in the banneton, though we’ve placed it seam side down without issue for years too.
Here is a video of someone forming sourdough loaves several different ways. There are many different methods and styles!
Bench Rest (Optional)
After pre-shaping the loaf, some bakers like to let the dough sit undisturbed to relax on the counter for about 10 to 20 minutes, referred to as “bench rest”. (I only do this when I have time to spare.) Then repeat the process of shaping and stitching the dough a final time before placing it in the banneton.
8) Cold Proof
Cold proofing is the final stage where the shaped dough is placed in the refrigerator for 8 to 24 hours to slowly ferment and rise. Cold proofing helps to enhance bread flavor and shape, improve digestibility, and create a beautiful blistered crust. It’s also easier to score dough when it’s more firm and cold, and adds nice flexibility to your baking schedule.
- Once you tuck your formed loaf into its banneton, cover the banneton with a damp tea towel, beeswax wrap, or other cover to help prevent the dough from drying out.
- Place your dough and banneton in the refrigerator overnight.
- Cold proofing time isn’t exact. Our dough generally stays in the fridge for about 10 to 14 hours, though some bakers let theirs sit for 24, 48, or even 72 hours! The longer the dough slowly ferments, the more tangy, complex, and sour it will taste. If you’re in a rush, I suggest cold proofing for at least 5 to 6 hours.
9) Preheat Dutch Oven
It’s the next morning, your dough has proofed overnight… it’s finally time to bake!
- Preheat the oven to 475-500°F for an hour before baking. (I usually bake on 475F because my convection oven runs hot, but experiment to see what works best in yours)
- Place your cast iron comber cooker or Dutch oven inside the oven while it’s preheating for the entire hour! Preheating your baking vessel helps the bread begin to bake as soon as it hits the pan (instead of having time to spread out), leading to a better rise and “oven spring”.
- Leave your dough in the refrigerator while the oven preheats. Sometimes I even pop my dough in the freezer for about 15 minutes before baking, making it even easier to score.
How to Bake Sourdough Bread without a Dutch Oven
If you don’t have a Dutch oven or combo cooker, you can bake sourdough bread on a regular baking pan or pizza stone – referred to as an “open bake”. Yet to create valuable steam, I highly recommend adding a separate heavy-duty baking pan (e.g. broiler pan or cast iron skillet) with water in the bottom of your oven while the bread bakes.
To do so, it’s best to pre-heat the pan inside the oven, and then add either boiling water OR ice to the hot pan at the same time the bread goes in. This releases a burst of steam that helps mimic the enclosed environment of a Dutch oven, and will help achieve a better rise and crust.
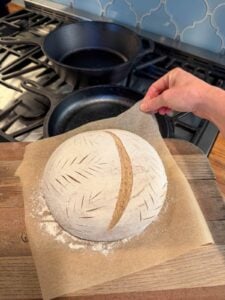
10) Score the Dough
- Once the oven is fully pre-heated, take your dough out of the refrigerator. Scoring is much easier when the dough is cold, so have your supplies ready and work quickly!
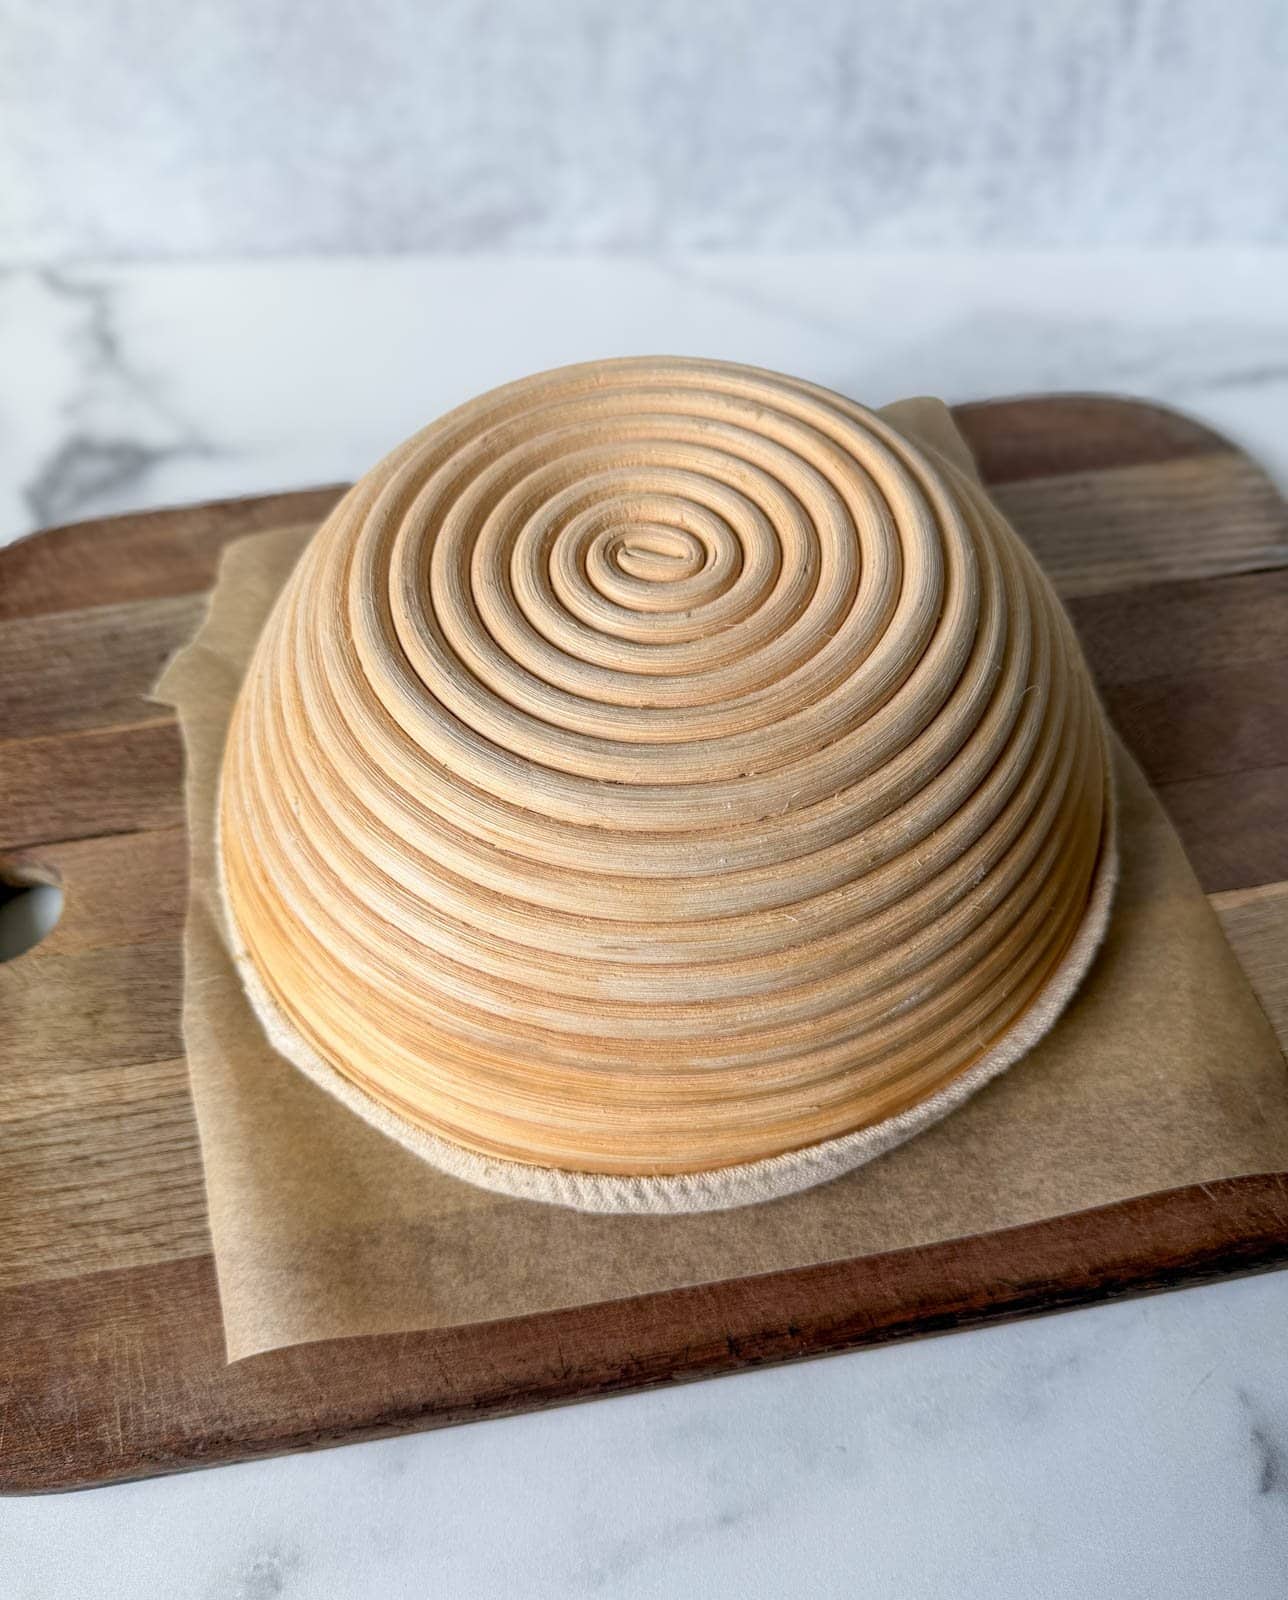
- To get the dough out of the proofing basket, place a piece of parchment paper (cut just larger than the basket) and a cutting board on top. Holding it all together, quickly flip the banneton and cutting board upside down. The dough should now be sitting on top of the cutting board and parchment paper. Gently lift the basket away.
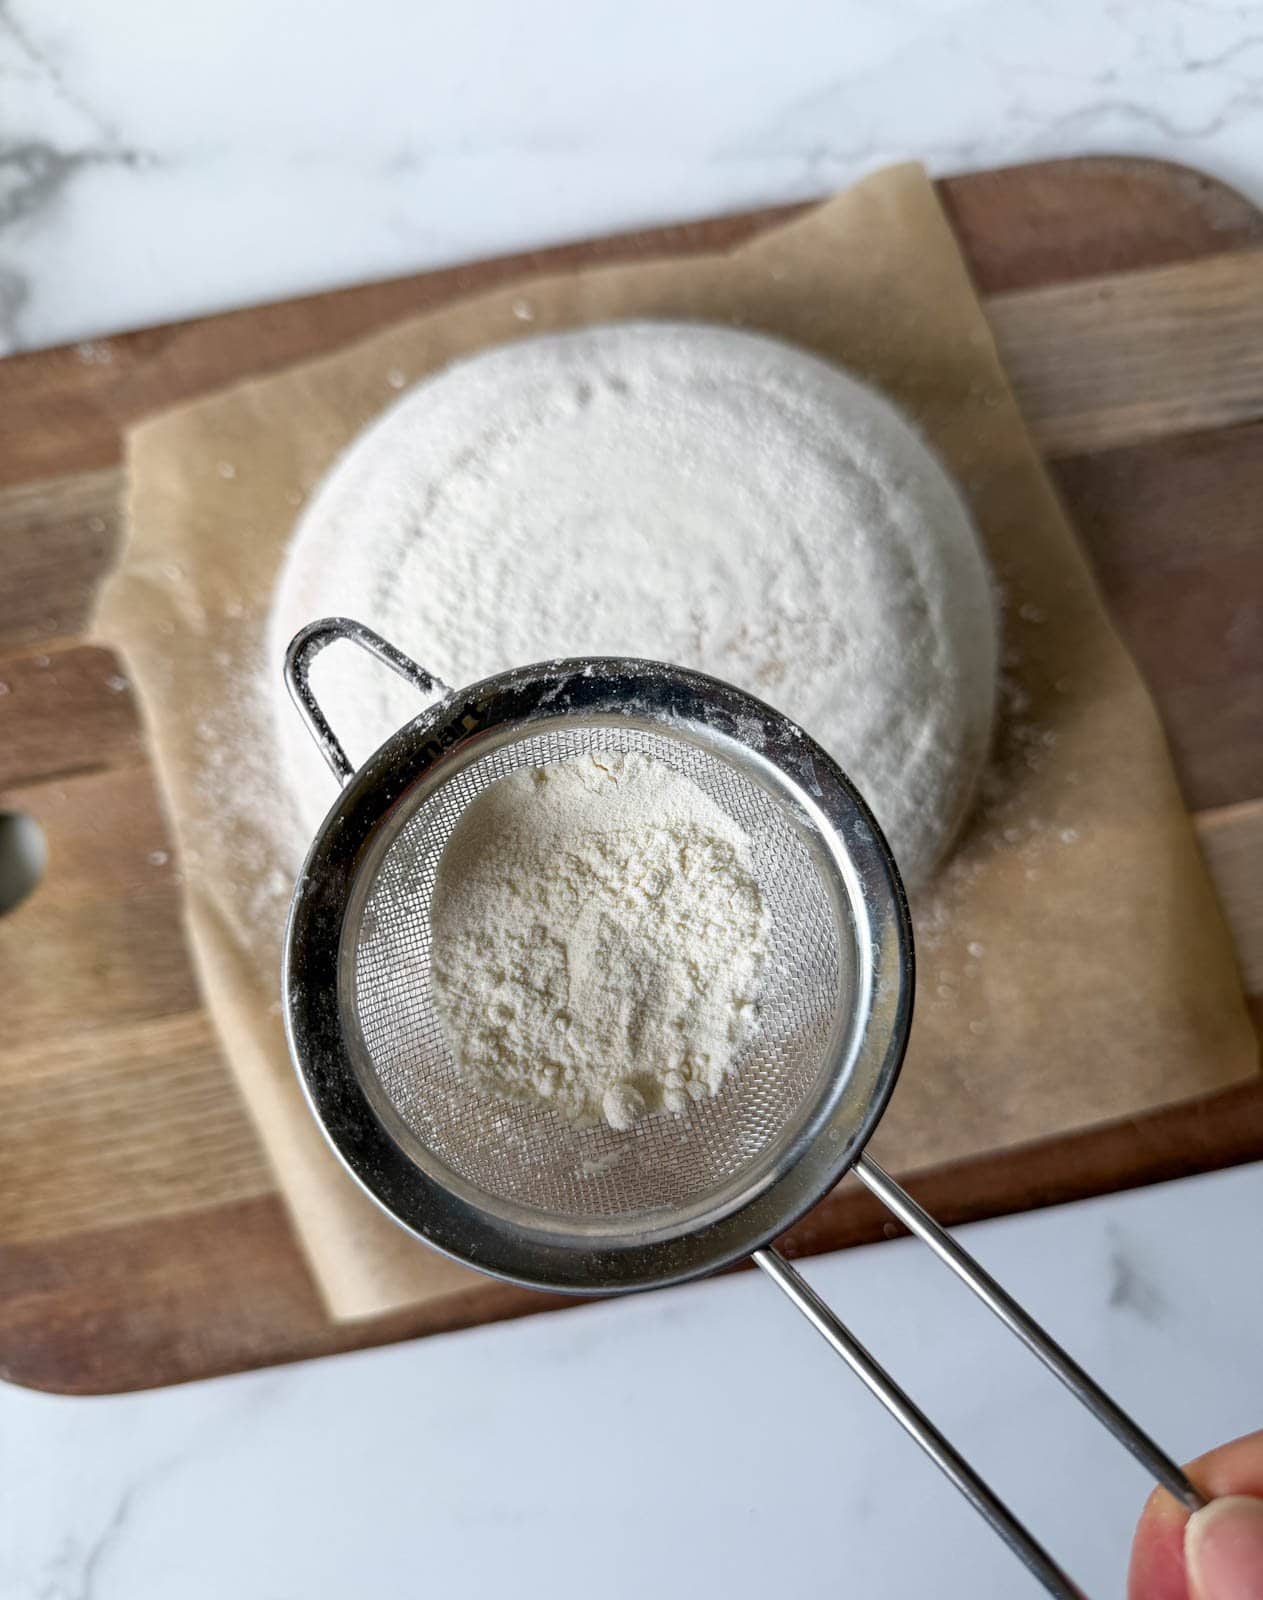
- Though not required, I usually use a small stainless steel sifter to lightly dust the top of the dough with flour, and then rub it smooth with my hand.
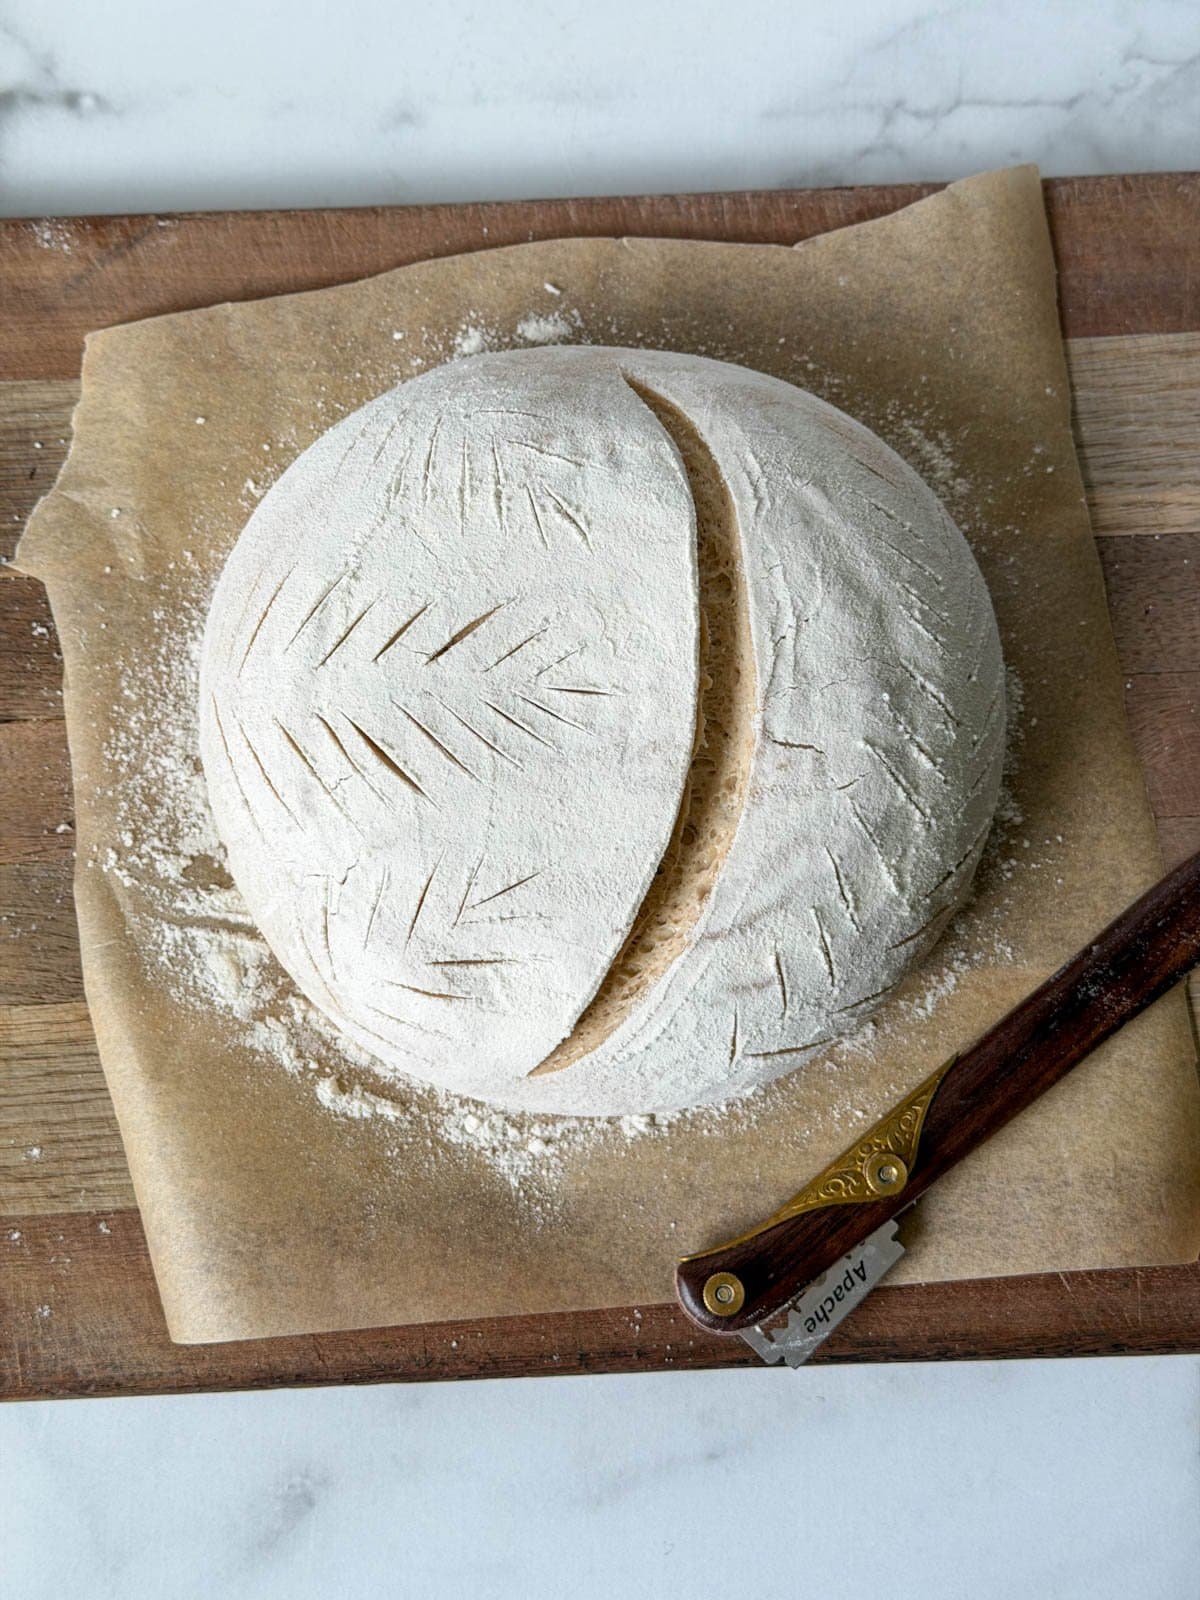
- Next, use a bread lame (razor blade) to score the bread. Most bakers add one long deep score across the top of the bread, which helps control the direction of expansion and create a nice lip or “ear” on the bread crust. Try to score at a 45 degree angle, and about 1/4 to 1/2 inch deep.
- You can also use your bread lame to make smaller, shallow cuts to create pretty designs. I usually like to score little leaves or wheat stalks into mine, but you can make all sorts of creative patterns, flowers, words, and more!
11) Bake
- After scoring, try to get the dough into the oven as quickly as possible so it doesn’t have time to spread!
- Use the parchment paper (or bread mat with handles) to carefully transfer the dough into your pre-heated (very hot!) Dutch oven/combo cooker. I like to poise my cutting board near the edge of the pan and then carefully slide the whole thing into the combo cooker.
- Add the lid to your baking vessel and put it in the oven.
- Bake covered for 35 to 37 minutes on 475-500°F, and then carefully remove the lid and bake uncovered for a final 5 to 10 minutes. (I’ve found that 37 minutes covered and 5 to 6 minutes uncovered works best in our current oven – you’ll learn what works best for yours!)
- Once it’s finished baking, immediately transfer the loaf on to a cooling rack.
- Wait at least 2 to 3 hours for the bread to fully cool before cutting into it! I know it’s hard, but it’s worth the wait! Cutting fresh sourdough bread while it’s still hot will release precious moisture (steam), make the texture more gummy, and make your bread dry out faster.
PRO TIP: To prevent burning the bottom of the loaf, I like to place an empty baking sheet on the empty oven rack or shelf below the bread pan. It absorbs and blocks extra heat from the bottom of the bread.


NOTE: In my video tutorial (below), I mention baking for 30 minutes covered and 15 uncovered. However, we started to find that our loaf was browning too much on top so we adjusted the timing. Experiment and see what works best for your oven, as long as you get about 45 minutes of baking time total.
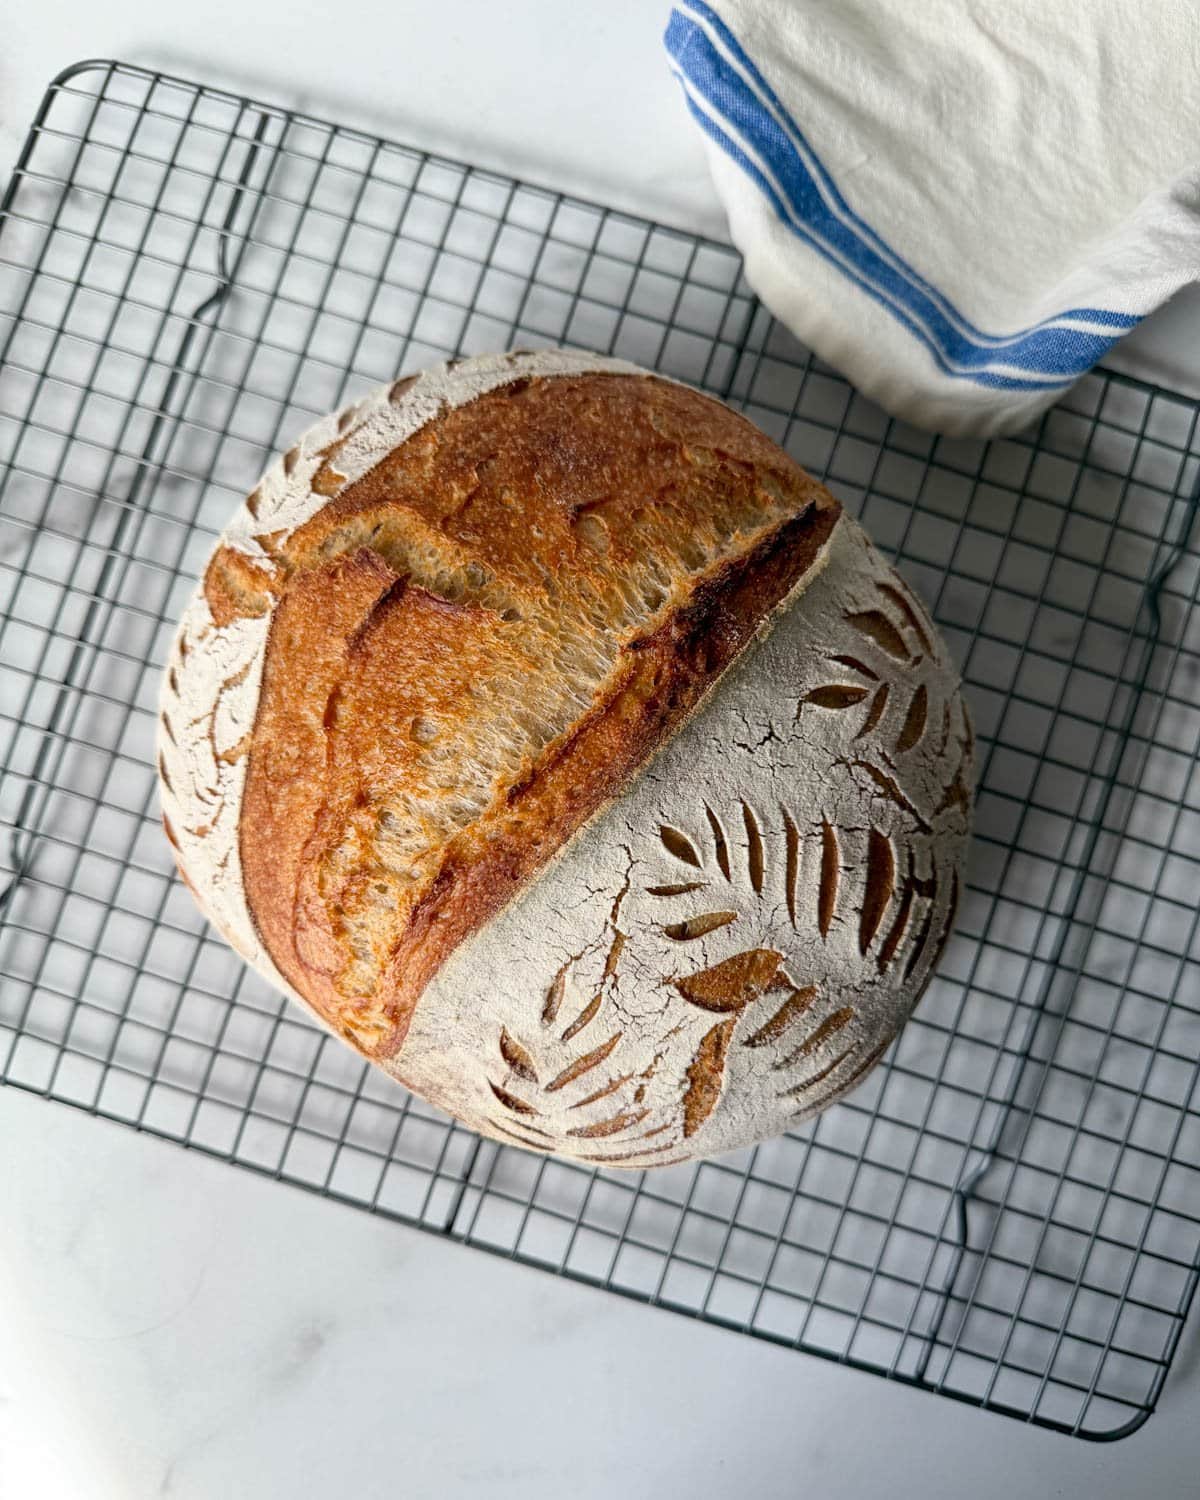
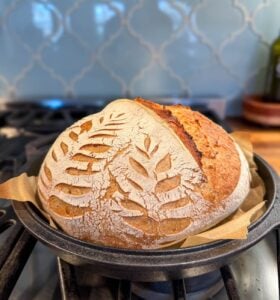
Enjoy!
Now it’s time to cut into your loaf and enjoy all that hard work! Get ready for the best bread of your life.
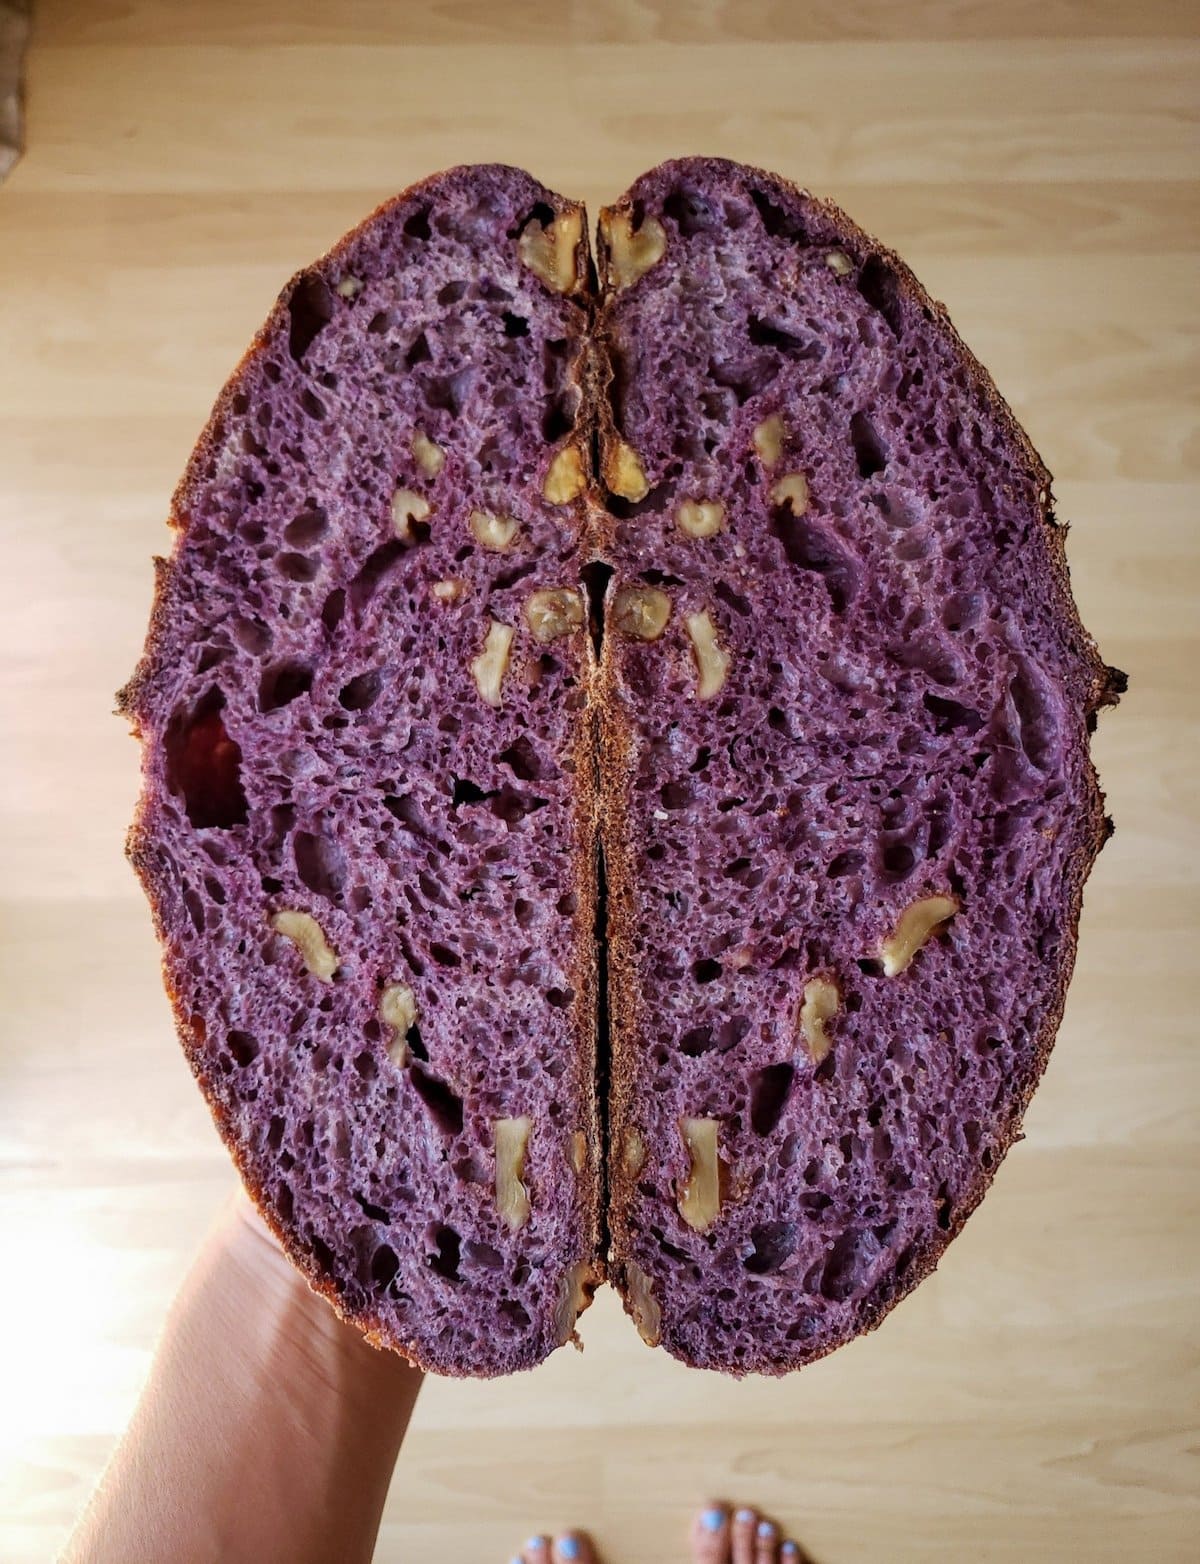
How does the inside of your bread look? The pattern, structure, and holes inside the loaf of bread is referred to as the “crumb”. Some bakers pride themselves on a very airy, open crumb structure. Personally, I don’t think that bigger holes means better bread though! Big holes makes it much harder to hold avocado, hummus, peanut butter, jam or other goodies.
I especially love to eat our homemade sourdough bread with butter and fresh eggs from our backyard chickens, homegrown apricot jam, avocado and garden tomatoes, dipped in homemade soup, and more.

Storage and Shelf Life
I’ve found the best way to store homemade sourdough bread is to wrap the loaf in a clean tea towel and then place that inside a brown paper bag. In a paper bag alone, the bread dries out quickly. In a sealed container or plastic bag, it tends to get soft, stale, and mold faster in my experience.
Fresh sourdough bread is best consumed within 3 to 4 days, though it can stay good for up to week. Since it doesn’t have any preservatives (yay!) homemade bread will inevitably get a bit stale after a few days. Simply toast it to get crisp and delicious again!
Yes! You can pre-slice and freeze your sourdough in an airtight freezer container, where it will stay good for several months. Adding a piece of parchment or wax paper between the slices makes it extra easy to pull out just a slice or two as needed. Toast to defrost and enjoy!
And that’s how to make a basic loaf of sourdough bread.
I realize this may not sound so simple at first… I was fairly confused and overwhelmed when we first started making sourdough years ago too. But just get in there, have fun, and give it your best shot! You’ll get the hang of it. And remember, perfection is not the goal.
Here is an older video tutorial that shows you everything we just went over:
I hope you found this helpful. If so, please leave a review below! And as always, feel free to ask questions.
Don’t miss these related recipes:
- Easy Sourdough Discard Crackers Recipe (Optional Cheese or Herbs)
- Simple Sourdough Focaccia Bread Recipe
- Healthy Sourdough Spiced Pumpkin Bread (or muffins)
- Easy Sourdough Pancakes Recipe (Discard or Active Starter)
- Delicious Sourdough Zucchini Bread (or muffins)
- Sourdough Chocolate Chip Cookies: Cinnamon Spiced & Salted
- Sourdough Ginger Molasses Cookies (Soft and Chewy)
Easy No-Knead Sourdough Bread (Beginner Friendly)
Equipment
- Large mixing bowl
- Lined banneton bread basket, for shaping and proofing dough
- Kitchen scale
- Cast iron combo cooker or dutch oven
- Bread lame for scoring (optional)
Ingredients
- 100 grams active sourdough starter
- 470 grams total flour. We use 310 grams of white bread flour, 140 grams of whole wheat, and 20 grams of rye flour – though you can use all bread flour or experiment with different ratios (though the more whole wheat you use, the more dense the loaf may become) EDIT: This recipe used to call for 455 grams of flour. We recently started using a tad more, but feel free to use the old recipe if you liked it better!
- 350 grams filtered water (about 1.5 cups) – in very humid climates, start with 1.25 cups of water and add more as needed
- 10 grams salt – sea salt, kosher salt, or Himalayan salt is preferred over iodized table salt
Instructions
Prep – Feed Starter
- Feed your sourdough starter 4 to 10 hours before making dough, and allow it to reach peak activity: when it's bubbly, has at least doubled in size, and is no longer rising (but before it starts to deflate again). The time it takes to reach peak activity depends on the strength, activity and temperature of your starter.
- If you haven't fed your starter in a few weeks, you may want to feed it twice before baking. I often feed once at night, and then again the next morning (the day I'm making dough)
Make Dough
- When your starter is close to peak, make an autolyse: combine the flour and almost all of the water (reserve about 10-20% of the water for later) in a bowl with wet hands until thoroughly mixed. It will be a loose, sticky, shaggy dough at this stage. Do not add the salt or starter yet.

- Let it sit covered at room temperature (70-75 degrees is optimal) for about an hour.
- After an hour, add the active sourdough starter, salt, and remaining water until thoroughly combined. Mix with wet clean hands.
- Recommended: Lift the dough ball (which may be quite loose) out of bowl and on a clean counter use the “slap and fold” technique to tighten the dough.


Bulk Ferment, Stretch and Folds
- After mixing, let the dough sit for about 4 hours at room temperature in "bulk fermentation". Cover the bowl with a damp tea towel, plate, beeswax wrap, or similar. During this time you will do 3 to 4 sets of "stretch and folds", spaced about 30 minutes apart.
- After 30 minutes, do the first stretch and fold: gently lift up on one side of the dough, stretch it out, and hen fold it back over itself. Give the bowl a quarter turn (90 degrees) and repeat two or three more times, working your way around the bowl until it is taught and resists pulling. This is considered one "set" or round of stretch and fold. Use wet hands to prevent sticking.
- Note: The dough will be looser during the first stretch of each set, and then get increasingly taught. It's okay to gently pull to stretch the dough but try not to tear it.
- Cover the bowl again, and let sit.
- Repeat the stretch and fold process every 30 minutes for a total of 3 or 4 rounds, then let the dough sit undisturbed (covered) for the last 2 hours of bulk ferment.

Shaping the Loaf
- After bulk ferment, set or gently dump the dough onto a lightly floured surface and pre-shape (fold, roll, and pinch) the loaf into a similar shape as your banneton, round or oval. *See shaping tips in Note 2 below.
- Next, flip the dough ball over so it’s sitting on its pinched or seam side. Using your hands and/or dough scraper, pull and turn the dough ball towards you while pressing downwards slightly to create surface tension. Do this several times, turning the dough as you go.

- Place the dough seam-side up in banneton proofing basket that has been lightly dusted with flour (rice flour is ideal to prevent sticking).
Bench Rest (optional)
- After pre-shaping the loaf, some bakers like to let the dough sit undisturbed to relax on the counter for about 10 to 20 minutes. (I only do this when I have time to spare.) After the rest, repeat the process of shaping and stitching the dough a final time before placing it in the banneton.
Cold Proof
- Cover the banneton with a damp towel (or other cover) and place it in the refrigerator to cold proof for 8 to 24 hours. We usually do this overnight for about 10-14 hours.

Preheat and Score
- After cold-proofing in the refrigerator, preheat the oven to 475-500 F. (I usually bake on 475F since my convection oven runs hot, experiment to see what works best for yours)
- Also place your dutch oven or combo cooker in the oven to preheat for one hour. Keep the dough in the refrigerator for now.
- Once the oven has preheated for an hour, it's time to quickly get the bread into the oven. To get the dough out of the banneton, place a piece of parchment paper and cutting board on top, and then flip it all over. Gently lift the banneton away from the dough.
- Lightly dust the dough with flour (optional) and use a bread lame to score the cold dough. We usually do 1 deep score across the top of the bread to direct expansion (at a 45 degree angle) along with more shallow decorative scoring.
- Use the parchment paper or reusable silicone bread mat to carefully transfer the cold dough into the hot (pre-heated) combo cooker or Dutch oven. Be careful not to burn yourself!
Bake and Cool
- Bake the loaf covered for 35 to 37 minutes, and then remove the lid and bake uncovered for 5 to 10 minutes. (See Note 3 below for tips to prevent the bottom from burning)
- Once done, immediately transfer finished sourdough loaf onto a wire cooling rack.

- Let the bread cool at room temperature for several hours before cutting. Cutting it while it's hot will release valuable steam/moisture, make the texture more gummy, and make the bread dry out faster!
Storage and Shelf Life
- I've found the best way to store homemade sourdough bread is to wrap the loaf in a clean tea towel and then place that inside a brown paper bag.
- Homemade sourdough is the best quality if enjoyed with 3-4 days, though it can last up to a week. Toasting helps a lot if it gets stale!
- You can also pre-slice and freeze sourdough, where it will stay good for several months. Toast to defrost and enjoy.
Notes
- To double this recipe, double all ingredients and follow the same steps until it is time to form the loaf and bench rest. At that time, split the larger dough into two equal balls. Form each loaf and allow each to bench rest, and then proceed with the instructions using two proofing baskets. Keep the spare loaf refrigerated while the other is baking, unless you have the ability to bake them at the same time.
- To form a round (boule) loaf, I gently pull the dough from opposite sides to fold inwards towards the middle, and then pinch them together. This is called “stitching” the dough. Rotate the dough and repeat the process from opposite sides a few times, working the dough into a round shape. For oval (batard) loaves, do a similar process but form loaf into a longer shape, similar to folding and rolling it up like a burrito (and pinch the ends).
- To prevent the bottom of the bread from burning or browning too much: put an empty cookie sheet on the empty oven rack directly below your combo cooker or dutch oven to deflect some of the heat.


329 Comments
Trish Dela Cruz
I tried baking my first sourdough loaf using this recipe 3 weeks ago and I’ve baked at least 8 more times since, with some modifications on the flours. I’ve finally found the my perfect ratio to get the flavor that my husband and kids prefer – 355g unbleached bread flour and 100g unbleached all purpose flour. Thank you so much, your post and recipe has made baking sourdough bread less intimidating! So glad I finally found the courage and motivation to try it out 🙂
Aaron (Mr. DeannaCat)
It’s great to hear you have found such joy and success in sourdough bread making, good luck and have fun baking!
Chris Berlin
Well I gave it 5 stars because of the instructions! Very clear and concise. A friend gave me some of her 33 year old starter and I am feeding it as I write. Cant wait to try your method. Thanks!
kimberly
Thank you for both the starter success (I purchased your starter after two failed attempts to make my own) and for the wonderful, detailed directions. I made my first loaf today and I’m bursting with pride and satisfaction at the results. Thanks for taking the time to spell out the steps.
For anyone who is making this for the first time, I used a Lodge 4.5 quart enameled cast iron Dutch oven and it worked just great!
One idea is to offer a printable version of the detailed instructions. I found them so helpful.
Again: thank you thank you thank you for sourdough success!!!
Aaron (Mr. DeannaCat)
Glad to hear you are successfully making sourdough bread now. Have fun baking!
Hannan
This is an awesome, easy to read, easy to follow recipe! Love all of the little videos as well.
I have tried this twice now and I’m having so much trouble with the rise of my bread! It seems to never rise at any point!! My starter is bubbling and seems active when I use it. However it is a new starter! Has been going on day 7 now.
Any tips?
Aaron (Mr. DeannaCat)
Hi Hannan, your starter is pretty young but if it is active and bubbly then you should be good to go as far as that goes. If you follow each of the steps listed in the article, the best thing you can do in addition to that is to try and keep your dough as close to 70 degrees Fahrenheit as possible during your bulk ferment period. We typically will keep the dough in our oven (turned off) with the oven light on. Another tip is when it comes time to bake, place your baking vessel (we us a cast iron combo cooker) in the oven during the preheat period for close to an hour. Once the oven is ready, pull your dough from the fridge, score the dough, then pull your baking vessel from the oven before placing the dough on the hot vessel before placing it in the oven. This can help with “oven spring”, hope those couple tips will help you achieve more rise in your bread which I think will come with time. Our first loaf of bread we made didn’t look nearly as good as many of the loaves that we see from our followers who are making sourdough for the first time. Hope that helps and happy baking!
Emma
Hi there, just wondering, I have both the small and large Emile Henry ceramic bakers (I don’t have the boule shape). Which one would be best for this recipe?
Aaron (Mr. DeannaCat)
Hi Emma, we use a Lodge cast iron combo cooker that is 3.2 quarts and this loaf fits perfectly in it. I am not sure of the exact sizes that you have but if you can get close to 3 quarts, you should be good to go! Happy baking and enjoy!
Jesse Thurston
I just wanted to say thank you for this recipe. I’ve been struggling with sourdough for the past few months and not quite getting it right. Your step-by-step with videos and tips really helped and I’ve had more success since I followed this recipe. For my latest one I thought I’d try swapping the ratio of whole-wheat and rye. It’s still in the oven so I’m not sure how it’ll turn out but the dough was close to perfect when I shaped it, and the loaf looked gorgeous when I took the lid off a few minutes ago. I’m curious if you have any thoughts on using more rye. I’d like to try to make a proper rye sourdough but I’m not sure where I should start. Do I create a rye starter? What’s the best kind of flour to use to get the flavor? (I’m using white rye so far, but am due to buy more so wondered what you thought.)
Thanks again
Aaron (Mr. DeannaCat)
Hi Jesse, we’re glad you found the recipe and article helpful and have since had more success baking. We have yet to experiment with adding more rye to the dough to get a loaf with more of that “rye” taste. I think doing what you did was a great first step and if it didn’t have as much rye flavor as you’d like you can always up the amount. It looks like most sourdough rye recipes don’t use much more than a 1/3rd rye of the total flour weight. You can also feed your starter with rye flour instead of regular bread or all purpose flour which usually leads to a more active starter that may contribute more flavor to your entire loaf. Hope that helps and let us know how it all works out for you.
Jesse Thurston
I just wanted to post that I finished the loaf and every bite was heaven. I’m making a double batch this weekend for Father’s Day. Next time I will try some medium rye to see if it makes it more flavorful. I think swapping the amounts of rye vs whole wheat in your recipe gives me 30% rye so I’m just going to stick with that. Why mess with it if it works? 🙂
Aaron (Mr. DeannaCat)
Sounds tasty and glad it is working out well for you, happy baking!
Margaret Matlock
I’ve been making this recipe at least once per week for the past year and it has always turned out great! I was curious– do you have any tips for making smaller loaves? I was thinking it might be fun to separate the dough into two sections so I can eat one and share one!
Aaron (Mr. DeannaCat)
That sounds like a great idea Margaret, although we have yet to separate any of our loaves into smaller ones. You could probably treat the dough the same and separate the dough into two loaves after you add the sourdough discard, before your “stretch and fold” sets. Good luck and let us know how it turns out.
Miranda
The bread tastes so amazing, and the instructions are easy! I love it 😻
Dena Weech
I love the taste of my bread and the step-by-step video. I’m having trouble with my dough being too wet and never really forming into a ball. 2nd try was even worse. When I take it out of the banneton and transfer it to my cast iron, it loses all shape. Could you make a suggestion on what I need to tweak? My starter is amazing!! Thank you.
Aaron (Mr. DeannaCat)
Hello Dena, you may need to add slightly more flour to it when you make your autolyse. If it is still too wet once you form it into a ball, dust more flour into the dough until it pulls together more. If you overdue it on the flour, add small amounts of water until you reach the right consistency. It should be a simple fix so let us know how it works out for you next time, good luck and happy baking!
Krista Rustin
I have attempted sourdough several times and I was despairing that I would be able to pull off a loaf without added yeast. I tried your recipe, because I felt like I understood the words you were saying and after watching the videos I had hope again that maybe I could make a successful loaf…….AND I DID!!! I seriously almost cried when I took the lid off the dutch oven. It looked so good!!! It tasted so good!!! This recipe will be a staple in our home now and I am so very grateful!! Cheers
Aaron (Mr. DeannaCat)
That is amazing to hear Krista, congratulations on your amazing loaf! It can sound overwhelming when you are just starting out but after a few times going through the process, it is actually quite simple. Enjoy the many loaves that are in your future and happy baking!