Easy No-Knead Sourdough Bread (Beginner Friendly)
Let's make delicious, nutritious homemade sourdough! My easy no-knead sourdough bread recipe is perfect for beginners or experienced bakers alike. It has a crisp crust and soft, chewy center. All you need is 4 ingredients and a little time!
Equipment
- Large mixing bowl
- Lined banneton bread basket, for shaping and proofing dough
- Kitchen scale
- Cast iron combo cooker or dutch oven
- Bread lame for scoring (optional)
Ingredients
- 100 grams active sourdough starter
- 470 grams total flour. We use 310 grams of white bread flour, 140 grams of whole wheat, and 20 grams of rye flour - though you can use all bread flour or experiment with different ratios (though the more whole wheat you use, the more dense the loaf may become) EDIT: This recipe used to call for 455 grams of flour. We recently started using a tad more, but feel free to use the old recipe if you liked it better!
- 350 grams filtered water (about 1.5 cups) - in very humid climates, start with 1.25 cups of water and add more as needed
- 10 grams salt - sea salt, kosher salt, or Himalayan salt is preferred over iodized table salt
Instructions
Prep - Feed Starter
- Feed your sourdough starter 4 to 10 hours before making dough, and allow it to reach peak activity: when it's bubbly, has at least doubled in size, and is no longer rising (but before it starts to deflate again). The time it takes to reach peak activity depends on the strength, activity and temperature of your starter.
- If you haven't fed your starter in a few weeks, you may want to feed it twice before baking. I often feed once at night, and then again the next morning (the day I'm making dough)
Make Dough
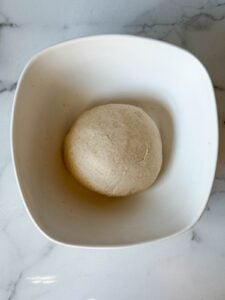
- When your starter is close to peak, make an autolyse: combine the flour and almost all of the water (reserve about 10-20% of the water for later) in a bowl with wet hands until thoroughly mixed. It will be a loose, sticky, shaggy dough at this stage. Do not add the salt or starter yet.
- Let it sit covered at room temperature (70-75 degrees is optimal) for about an hour.
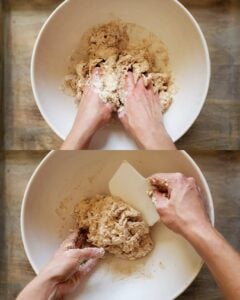
- After an hour, add the active sourdough starter, salt, and remaining water until thoroughly combined. Mix with wet clean hands.
- Recommended: Lift the dough ball (which may be quite loose) out of bowl and on a clean counter use the “slap and fold” technique to tighten the dough.
Bulk Ferment, Stretch and Folds
- After mixing, let the dough sit for about 4 hours at room temperature in "bulk fermentation". Cover the bowl with a damp tea towel, plate, beeswax wrap, or similar. During this time you will do 3 to 4 sets of "stretch and folds", spaced about 30 minutes apart.
- After 30 minutes, do the first stretch and fold: gently lift up on one side of the dough, stretch it out, and hen fold it back over itself. Give the bowl a quarter turn (90 degrees) and repeat two or three more times, working your way around the bowl until it is taught and resists pulling. This is considered one "set" or round of stretch and fold. Use wet hands to prevent sticking.
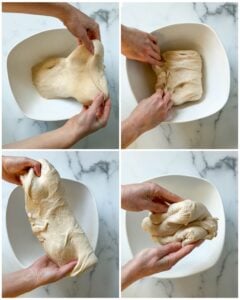
- Note: The dough will be looser during the first stretch of each set, and then get increasingly taught. It's okay to gently pull to stretch the dough but try not to tear it.
- Cover the bowl again, and let sit.
- Repeat the stretch and fold process every 30 minutes for a total of 3 or 4 rounds, then let the dough sit undisturbed (covered) for the last 2 hours of bulk ferment.
Shaping the Loaf
- After bulk ferment, set or gently dump the dough onto a lightly floured surface and pre-shape (fold, roll, and pinch) the loaf into a similar shape as your banneton, round or oval. *See shaping tips in Note 2 below.
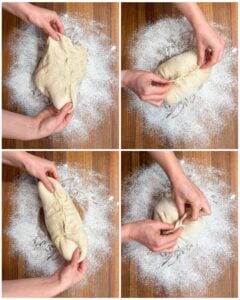
- Next, flip the dough ball over so it’s sitting on its pinched or seam side. Using your hands and/or dough scraper, pull and turn the dough ball towards you while pressing downwards slightly to create surface tension. Do this several times, turning the dough as you go.
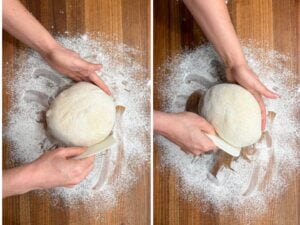
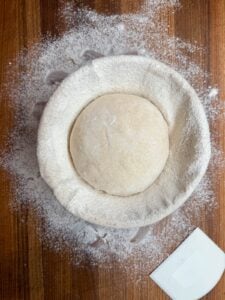
- Place the dough seam-side up in banneton proofing basket that has been lightly dusted with flour (rice flour is ideal to prevent sticking).
Bench Rest (optional)
- After pre-shaping the loaf, some bakers like to let the dough sit undisturbed to relax on the counter for about 10 to 20 minutes. (I only do this when I have time to spare.) After the rest, repeat the process of shaping and stitching the dough a final time before placing it in the banneton.
Cold Proof
- Cover the banneton with a damp towel (or other cover) and place it in the refrigerator to cold proof for 8 to 24 hours. We usually do this overnight for about 10-14 hours.
Preheat and Score
- After cold-proofing in the refrigerator, preheat the oven to 475-500 F. (I usually bake on 475F since my convection oven runs hot, experiment to see what works best for yours)
- Also place your dutch oven or combo cooker in the oven to preheat for one hour. Keep the dough in the refrigerator for now.
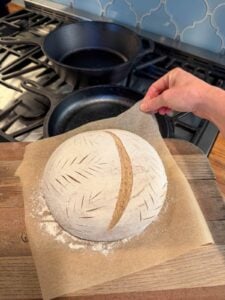
- Once the oven has preheated for an hour, it's time to quickly get the bread into the oven. To get the dough out of the banneton, place a piece of parchment paper and cutting board on top, and then flip it all over. Gently lift the banneton away from the dough.
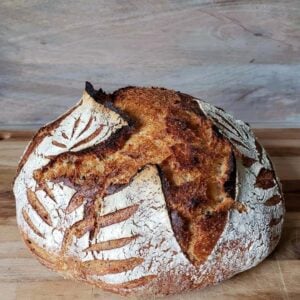
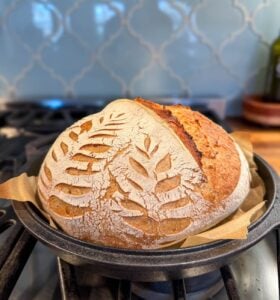
- Lightly dust the dough with flour (optional) and use a bread lame to score the cold dough. We usually do 1 deep score across the top of the bread to direct expansion (at a 45 degree angle) along with more shallow decorative scoring.
- Use the parchment paper or reusable silicone bread mat to carefully transfer the cold dough into the hot (pre-heated) combo cooker or Dutch oven. Be careful not to burn yourself!
Bake and Cool
- Bake the loaf covered for 35 to 37 minutes, and then remove the lid and bake uncovered for 5 to 10 minutes. (See Note 3 below for tips to prevent the bottom from burning)
- Once done, immediately transfer finished sourdough loaf onto a wire cooling rack.
- Let the bread cool at room temperature for several hours before cutting. Cutting it while it's hot will release valuable steam/moisture, make the texture more gummy, and make the bread dry out faster!
Storage and Shelf Life
- I've found the best way to store homemade sourdough bread is to wrap the loaf in a clean tea towel and then place that inside a brown paper bag.
- Homemade sourdough is the best quality if enjoyed with 3-4 days, though it can last up to a week. Toasting helps a lot if it gets stale!
- You can also pre-slice and freeze sourdough, where it will stay good for several months. Toast to defrost and enjoy.
Notes
- To double this recipe, double all ingredients and follow the same steps until it is time to form the loaf and bench rest. At that time, split the larger dough into two equal balls. Form each loaf and allow each to bench rest, and then proceed with the instructions using two proofing baskets. Keep the spare loaf refrigerated while the other is baking, unless you have the ability to bake them at the same time.
- To form a round (boule) loaf, I gently pull the dough from opposite sides to fold inwards towards the middle, and then pinch them together. This is called "stitching" the dough. Rotate the dough and repeat the process from opposite sides a few times, working the dough into a round shape. For oval (batard) loaves, do a similar process but form loaf into a longer shape, similar to folding and rolling it up like a burrito (and pinch the ends).
- To prevent the bottom of the bread from burning or browning too much: put an empty cookie sheet on the empty oven rack directly below your combo cooker or dutch oven to deflect some of the heat.
Tried this recipe?Let us know how it was!