

Rainwater Collection Systems 101: How to Harvest Rainwater at Home

Rainwater collection, also known as “rainwater harvesting”, is an excellent way to offset some of your irrigation water use from other sources. It is also an easy way to obtain and store desirable chlorine-free water for those of us otherwise reliant on chlorinated city tap water. Our seedlings, houseplants, and compost tea microbes love it!
This comprehensive guide will teach you the basics of rainwater harvesting, including how to set up and use a rainwater collection system at home. This article covers rainwater tank options and how to choose what type of system may best suit your climate or needs. We’ll go over frequently asked questions – such as rainwater collection laws, water contamination and bacteria concerns, mosquito breeding, how to keep rainwater tanks clean, and more!

Would you like to save this?
Disclosure: This post may contain affiliate links to products for your convenience, such as items on Amazon. Homestead and Chill gains a small commission from purchases made through those links, at no additional cost to you.
GETTING STARTED
Rainwater Harvesting Laws
Before you get started, make sure you can legally collect rainwater at all! As crazy as it sounds, capturing rainwater is illegal in some places. Therefore, check with your local and state laws before investing in rainwater tanks. Here is a list of rainwater-related laws by state in the US. Thankfully, rainwater harvesting is legal and encouraged in most locations.
What Size Rainwater Tank Should I Get?
The best rainwater tank size depends on what you intend to use the rainwater for, and perhaps most importantly: your climate. If you get frequent rain throughout the year, you can get by with fewer and smaller tanks – such as average 50-gallon drums. As you use the water, the tanks are able to refill more often with periodic rain.
In contrast, some places have a distinct “rainy season” with otherwise dry weather the rest of the year. For example, it only rains during the winter here on the Central Coast of CA. Therefore, we need enough tank capacity to catch and store as much rainwater as possible during our short 4-month rainy season – to last until next winter. One 50-gallon barrel would not last us long!
To take full advantage of our limited rain supply, we have one smaller 140-gallon rain barrel and two large 530-gallon “slimline” rain tanks – for a total of nearly 1300 gallons of rainwater storage capacity on this homestead! We’ll talk more about various tank options below.

Roof Surface Area vs Tank Size
Assuming that you’re planning to catch rainwater that falls on your roof, keep in mind that your rainwater tanks will fill up WAY quicker than you’d expect them too. A storm that dumps one inch of rain does NOT mean that you will collect one inch of rain in your rainwater tank. To figure out how much rain you could collect in a storm, consider the entire surface area that the rain falls on and is collected from.
Consider this example scenario:
- Say you have a 2,000 square foot house.
- Your roof has a pitch in the middle. If you hook up a rain barrel to a gutter downspout on one side of the house, you are capturing the rain that falls on that one half of the roof – maybe 1000 square feet. Let’s say the approximate size of the roof is 50’ x 20’.
- A nice little storm comes through with 1 inch of rainfall.
- If you convert your 50’ x 20’ roof area to inches, it is 600” x 240”. Multiply that by the 1” of rain to get the volume of rainwater in cubic inches. 600” x 240” x 1” = 144,000 cubic inches of rain.
- The standard conversion for water is 1 gallon = 231 cubic inches. Thus, if we divide 144,000 by 231, that means….
…it is possible to capture up to 623 gallons of water from a 1000 square-foot roof in just a single 1-inch rainstorm!
As you can see, a modest 50-gallon rain barrel is going to overflow very fast. Plus, right after a storm, you don’t need to water anything outside! So the barrel will sit full, and overflow with every subsequent storm. That is all precious rainwater you could otherwise be capturing.
Different Types of Rainwater Collection Barrels or Tanks
Rainwater collection tanks come in all shapes and sizes. Really! Some tanks have a classic cylinder shape, or some more angular, designed to fit into corners. Our 530-gallon slimline rain tanks look like giant Cheez-Its, with sections missing in the middle for structural support. Other rainwater collection systems are less rigid, such as giant bladder or bag-type containers designed to fit in the space under a house or deck. Some rain tank are available in BPA-free drinking-water grade plastic (further discussed in the contamination section to follow).
Sizes range from 50-gallon barrels to massive 5,000 gallon water tanks and beyond. Many folks daisy-chain multiple smaller containers together by either connecting them with pipes at the bottom, or allowing them to overflow into each other – cascading from one tank to the next. When our tanks are overflowing, we store excess rainwater in 5-gallon buckets and large trash cans too.
Truth be told, any type of sturdy water storage tank, barrel or container could be used for rainwater storage tank! Especially if you are handy and able to retrofit it to have the components described below.

Key Tank Elements
No matter the size or shape, a rainwater collection tank should ideally have all these common elements:
- An inlet or downspout to direct the rainwater into the tank, generally on top but covered with a screen.
- An outlet that allows you to dispense and use the collected rainwater, usually near the bottom. For large tanks, a hose bib that you can connect a hose to is ideal.
- Made of a non-transparent material that does not allow sunlight through, unless you can completely cover it with a tarp (or paint) to block the sunlight. Sunlight + Water = Algae.
- Have fine-mesh screens securely in place over all openings to prevent the entry of insects, pests, or debris.

Where To Buy Rainwater Barrels or Tanks
Check with your local water tank supply company. These businesses carry large water tanks primarily designed for drinking or irrigation water storage, such as for a rural home or farm. Again, you could convert most traditional water tanks for rainwater storage quite easily. Or, perhaps they’ll carry tanks specifically designed for rainwater harvesting systems too! If they don’t have what you’re looking for on hand, ask about the options and availability of special orders.
Both large and modest-sized rainwater tanks are available to purchase online too. However, it may be expensive to ship big tanks, so going local could save you a bundle! We were able to find our rainwater tanks at a water tank company, but later noticed they also carry many of the same tanks at our local Farm Supply store as well.
Is the Cost of a Rainwater Collection System “Worth It”?
That is ultimately a personal decision, determined by your situation and motives. Depending on the cost of your regular water supply versus the expense of setting up a water collection system, it may take several years to “pay off” or equal out. Yet for some, harvesting rainwater isn’t just about saving money.
Some people like to collect rainwater for environmental and ethical reasons – to feel good about offsetting at least a portion of their water use. Especially in areas where water is scarce and/or expensive. Others have a strong desire to have a supply of easily accessible chlorine-free water, like my friend with a serious orchid and air plant hobby. Additionally, some folks feel more self-sufficient and secure to have water stored at home in case of emergencies. Our motives are inline with all of the above. On the other hand, some places utilize rainwater as their primary source of household water!
SETTING UP A RAINWATER HARVESTING SYSTEM
Here are a few important factors to consider as you choose your rainwater tank and figure out your collection system design.
Location for a Rainwater Tank
Choose a location near a gutter downspout for easy filling. Yet depending on the size of your tank or layout of your property, that may not always be feasible. If needed, it’s possible to add downward-sloping runs of gutter or pipes to passively transfer the rainwater from the roof area to a tank in the general vicinity. We installed section of gutter that delivers our rainwater over our chicken run and into a tank inlet about 12 feet away. Another more complex option is to pump the water from a small collection area into a larger tank.
It also ideal to locate the tank somewhere convenient to access and use the rainwater, such as to fill up a watering can. That is, unless you intend to pump it to the point-of-use. The tank should be located on a sturdy and level foundation or base. Thankfully, most water tanks are so heavy once they are full that it would be very difficult for them to topple over. Support straps are recommended for those elevated on platforms.


Gravity and Head Pressure
If you look through images of rainwater collection systems, you may notice many smaller tanks are elevated on a sturdy, level platform. This serves two purposes:
One, most tanks have a tap or spigot at the bottom. In order to fill a watering can or bucket, you need some space below that tap to fit the container. Plan to elevate your tank at least slightly if you don’t intend to use a pump and have a fairly small tank.
Two, elevating a tank takes advantage of gravity. Water is heavy and exerts weight, pressing down on itself. This is referred to as “head pressure”. The larger the volume of water and the taller or higher the tank, the more head pressure it exerts. This means that a very large, tall tank will create enough head pressure to potentially connect a hose to – and have the water run through it at a decent rate. However, do not expect to connect a full-blown irrigation system to a rainwater tank without the assistance of a booster pump, unless perhaps it all runs downhill from the tank.
On the other hand, smaller and shorter tanks exude less head pressure. Thus, if a small rainwater tank sits directly on the ground, you likely would not be able to connect a hose to a tap at the bottom and get enough pressure to fill containers (let alone water with a hose directly from the tank) – as the hose would have to go upwards to get into a container. The weak water pressure will not be able to overcome the force of gravity, or will trickle very slowly.

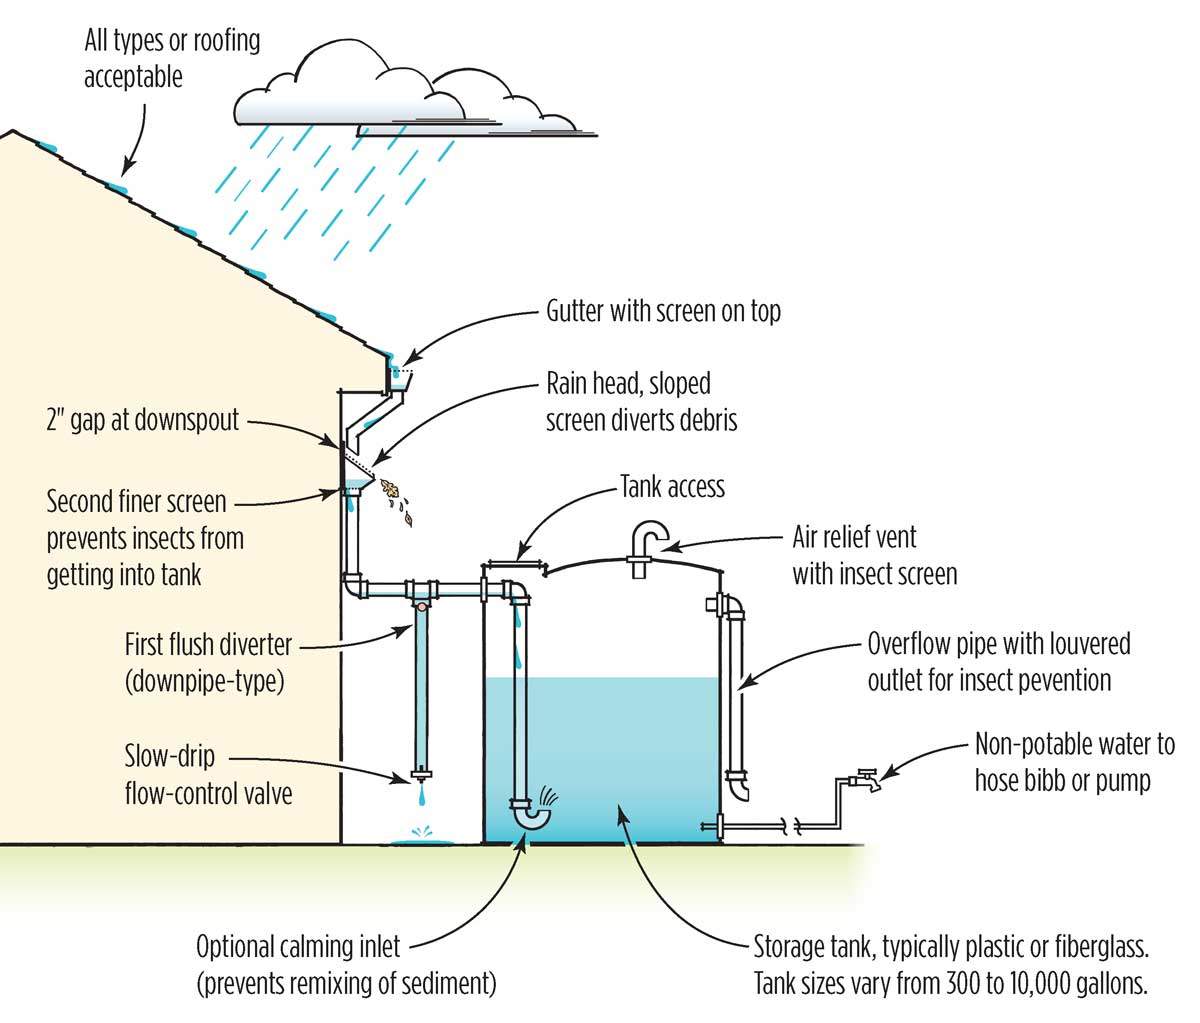
Keeping Your Rainwater Tank Clean with Screens
The best way to keep your rainwater tanks clean is to prevent the entry of debris in the first place! To prevent junk from getting in your rain tanks, it is important they have fine-mesh screens at the inlet. The screens should be fine enough to keep out leaves, sloughing from asphalt roof shingles, insects, or other small critters. One of the perks of using a tank designed especially for rainwater harvesting is that they typically come equipped with screens. See the photo of our rain tank screens below.
In addition to screens on the tank itself, you likely also want to add initial screens to the gutters or downspout to catch leaves, twigs, or other larger material before reaching the tank screen – which also helps keep that area more clean.
First Flush Diverters
A step beyond screens is to add a “first flush diverter” (aka roof washer) to your rainwater collection system. A first flush diverter is a contraption that redirects the first purge of water coming from the roof during a storm away from the rainwater tank. This essentially washes away and prevents capturing the sediment, dirt, and debris that has accumulated on the roof since the last rain.
We do not have first flush diverters. However, they’re highly recommend for folks who receive excessive roof debris, or anyone interested in potentially drinking their rainwater. We’ll talk about drinking rainwater in a moment, along with routine tank maintenance and cleaning.

How to Prevent Algae in Your Rainwater Tank
Algae is a common concern in any water storage tank. As we already briefly discussed, the best way to prevent algal growth in your rainwater tank is to always use an opaque tank that does not allow sunlight in. Even then, a small amount of algae may be introduced from roof runoff, but will not be able to flourish inside.
Other ways to combat algae include treating the water with chlorine or other algaecide additives. In my opinion, that sort of defeats the purpose of collecting pure water. Even after sitting in our tanks for nearly 9 months, our rainwater has only a very slight green tinge to it!
Can I Collect Rainwater If I Don’t Have Gutters?
Yes! You can totally set up a rainwater harvesting system even if you don’t have gutters. Our house doesn’t. All you need to do is find a location along your roof line (assuming it is sloped) where rainwater naturally collects and streams down most heavily. This will commonly be in a corner, or at the low point of a valley in the roof. Then, create your own little gutter or downspout!
In our front yard, we fashioned up an old copper funnel attached to the eaves. To that, we attached tubing that fit snugly over the funnel’s bottom hole and ran it to the top of our 140-gallon rainwater tank. On our side yard, we installed a small section of gutter below a valley with heavy runoff, including a section of downspout. We “glued” end cap pieces on each open end of the short 3-foot section of gutter with waterproof silicone. That way, all the water caught in the gutter is directed down the spout to our two 530-gallon rain tanks nearby.

RAINWATER QUALITY & CONTAMINATION CONCERNS
Risk of Bacteria Contamination in a Rainwater Harvesting System
Rainwater that falls directly from the sky is generally quite clean. Although, it does have the potential to pick up local airborne particulate matter or pollutants as it falls. Furthermore, rainwater will only stay as clean as the container it is stored in.
Rainwater collected from roof runoff can easily be contaminated in a number of ways. Dirt and debris on the roof can introduce bacteria. Better yet, wild animals who walk or poop on the roof can introduce nastier bacteria, viruses, or parasites such as E.Coli or Giardia.
Because of this, you do need to be cautious about how you use your rainwater. Don’t be too alarmed though! It’s not as scary as it sounds. See the “Using Captured Rainwater” section to follow.
Tank Material and BPA Contamination
Aside from bacteria growing in your tank, another common concern is chemicals leaching from the tank itself. As water sits in a tank in contact with plastic, there is a chance for some migration of chemicals from the plastic to the water. This is especially true when the plastic is exposed to heat, such as in direct hot sun, or when the water is stored for a prolonged period of time. However, does that contamination make it into the plants you water?
There have been fairly limited studies on plants abilities to uptake BPA, and most are done using unrealistically high concentrations of BPA. However, this study was performed with lower, more realistic concentrations of BPA (and other endocrine-disrupting compounds) found in waste water. The study found that lettuce and collard greens did uptake a significant quantity of BPA into their roots, but only a tiny bit into the above-ground stem and leaf tissues. Therefore, I would be particularly cautious using rainwater from a non BPA-free tank on root crops such as carrots, radishes, potatoes, beets, or turnips.
When we were shopping for rainwater collection tanks, I found that most small rainwater barrels were not listed as BPA-free. As you move into larger tanks, it is easier to find BPA-free plastic options since many are also designed for drinking water use. We were eventually able to find BPA-free options, though at a slightly higher cost. The classic blue barrels designed for emergency drinking-water storage are BPA-free, though they don’t usually come ready for rainwater collection with spigots, inlets, filters, and so on.
Do Asphalt Roof Shingles Contaminate Rainwater?
Our roof is made of asphalt shingles, and I will say this much: I don’t let that stop us from collecting rainwater! There is some risk for the less-than-ideal substances found in asphalt shingles to get into your rainwater. However, “what” and “how much” depends on the age and condition of the roof. Very old roofs (pre 1980-ish) may contain asbestos, which was later banned. Brand new roofs give off a higher concentration of dissolved organic carbon (DOC), yet that is only hazardous if it is combined with chlorine and creates dioxin. Other common shingle roof contaminants include zinc and iron. In some wet locations, asphalt shingles may be pre-treated with moss killer.
If your intention is to irrigate plants with the rainwater you collect, I wouldn’t worry too much about this. We’ll talk about what amazing natural toxin-buffers soil, worms, and compost can be in a moment. Yet if you hope to consume your rainwater, advanced treatment would be recommended.
How Do I Prevent Mosquitoes from Breeding in My Rainwater Tank?
You know those debris screens we talked about? That’s how. As you likely know, mosquitoes breed in standing water – and open rainwater tanks are a mosquito magnet!
In order to prevent mosquitoes from breeding in your rain tank, you must prevent them from accessing the inside of the tank altogether. Ensure that every opening on your tank is equipped with a tight-fitting, completely sealed, fine-mesh insect screens. This includes the inlet area, any overflow outlets, or vents.

USING COLLECTED RAINWATER IN THE GARDEN & BEYOND
Hand Watering versus Pumps
Most basic rainwater collection systems require the user to manually gather and distribute the rainwater to target plants, such as by filling watering cans or buckets directly from a spigot or valve near the bottom of the tank. This is how we utilize our rainwater at the moment. If the tank design creates enough head pressure (see gravity section above) then it may be possible to attach a hose and water nearby plants with it. Large elevated or uphill tanks could potentially have gravity-fed drip irrigation systems connected to them.
As an alternative to hand-watering, you could choose to outfit your rainwater collection system with a booster pump. Small pumps are used to create pressure to deliver the rainwater through larger irrigation distribution systems. We have our eye on this little affordable 1 HP pump that gets great reviews, and may invest in one soon!
The use of a booster pump is most advantageous if you have a large rainwater collection system (e.g. 500 stored gallons or more) or have frequent rainfall to refill smaller tanks. A pump and extensive watering will quickly empty a small rainwater tank.

Using Rainwater to Water the Garden (or Other Plants)
Rainwater can be used to water anything that needs it! If you have a petite garden, a decent rainwater collection system, and frequent enough rain to keep it full most of the time, it may be possible to water your garden primarily with collected rainwater. On the other hand, our garden is far too extensive (and our rainwater supply too modest) for us to water the vast majority of our plants with it. Furthermore, it would be too time consuming – since we water by hand with rainwater! Therefore, our garden beds, fruit trees, and perennials receive most of their water from automated drip irrigation, soaker hoses, and city water.
Rainwater is pretty dang precious, and plants LOVE it! Due to our limited supply, we use rainwater on our most spoiled and chlorine-sensitive plants. For example, to water our seedlings in the greenhouse, air plants, and house plants. We also use rainwater to make actively aerated compost tea, for big batches of fresh aloe vera water as a soil drench for newly transplanted trees, and other special projects. In a pinch, another way to provide chlorine-free water is to filter your tap water with carbon hose filter. (Click on any of the links in this paragraph to learn more about each of those subjects)

Is Rainwater Too Acidic for My Plants?
With an average pH of 5.0 to 5.6, rainwater is mildly acidic. It just so happens that the vast majority of plants prefer slightly acidic soil (6.0 to 6.5) over neutral or alkaline soil. Rainforests sure seem happy! Healthy soil and compost acts as a buffer to stabilize pH. However, soil exposed to frequent heavy acidic rain may become overly-acidified. If this is a concern, test the pH of your soil with a simple pH meter. Use limestone to naturally raise the pH of soil as needed. (Though we have never had this issue)
Will Rainwater Contaminate My Edible Crops?
Because of the potential for bacterial contamination, it is best to avoid direct contact between untreated collected rainwater and the edible portion of your crops. Especially leafy greens, or something you are not going to cook before consuming. However, it is safe to use rainwater to irrigate the soil that food crops are growing in! Soil, compost, and worms are excellent at buffering and purifying bacteria and even toxins.
Vegetable crops become tainted with bacteria when contaminated water is applied in heavy concentrations and bacteria adheres to the plant surface – not by bacteria being drawn up from the soil and into the plant tissue. Simply water close to the soil line around the perimeter of the plant, and avoid splashing and spraying it about.
Don’t let this freak you out! Watering soil with rainwater creates less potential risk than the damn birds, rodents and opossums running around your garden beds do! If you are extra nervous, use it to water trees, house plants, ornamentals, and or other non-edibles.

Can I Drink Collected Rainwater?
The answer to this question is: it depends! The safety of rainwater consumption varies wildly depending on how it was collected, stored, or treated. Rainwater that falls directly from the sky and hasn’t been in contact with a roof or other surfaces is relatively safe to drink as-is, untreated. That is, unless it is rain falling in a nuclear hot-spot like Chernobyl.
We’ve already discussed the various risks and sources of contamination that may impact the quality of rainwater collected from roof runoff: bacteria, algae/mold, viruses, parasites, or chemicals. That is to say, is not safe to consume roof-collected rainwater unless it is properly treated first.
Ways to Treat Rainwater
- Vigorously boil the rainwater for several minutes. This kills most pathogens. Pair this with a charcoal filter to remove impurities.
- Running the rainwater through a high-end filtration system like a Berkey filter or Life Straw may make it safe to drink. Both are rated to remove bacteria, parasites, viruses, and most chemical contaminants.
- Add non-scented NSF-approved household bleach (5.25% chlorine) in the tank. Mix 1 gallon of bleach for every 1,000 gallons of water, or 1 quart for every 250 gallons of water. You could pair this with a charcoal filter or reverse osmosis system to further purify and remove chlorine byproducts.
- All of these options will most likely prevent you from getting sick. Yet the low pH makes it less-than-ideal for long term consumption, unless the pH is adjusted.
Personally, drinking captured rainwater wouldn’t be my first choice. We simply don’t have the capacity or need to. In the case of a major local emergency, we are prepared to drink our rainwater if needed by boiling it and using a Life Straw. However, some places in the world rely on rainwater as their primary drinking water supply, including rural parts of Australia. Evaluate your situation, do further research, and make an informed personal decision.
RAINWATER COLLECTION SYSTEM MAINTENANCE
Routine Maintenance
The maintenance and cleaning of your rainwater collection system will vary depending on your unique set up, how grimy it gets, what you’re using it for, and so on. At minimum, routinely clean out the gutters and screens to clear debris. We do this once per year (because 80% of the year it isn’t raining at all), along with flushing the tanks.
To flush our rainwater tanks, we completely empty them every fall right before the rainy season starts. By then, we’ve likely used almost all the water inside. If there is a small amount left, we make an effort to use it up in the garden over a few week period instead of city water. Finally, we store any leftover bit of water in 5-gallon buckets or trash cans. Next, we open the bottom valves to set free any final standing water – effectively flushing it.
Rainwater Tank Disinfection
The final step in our annual routine is to spray down the inner walls with a very dilute bleach water solution to disinfect the tanks. We add just a couple tablespoons of household bleach to a 2-gallon pump sprayer of water. I spray down the inner walls and allow it to sit for a minute or two. Finally, I use a hose to wash that away with water.
It may not be necessary to disinfect your rainwater tanks. During your routine flush, take a peek inside (if you can). How does it look? The first year we had our tanks, they stayed fairly clean. By the second year of use, some grime and slight algae built up on the inner walls. Keep in mind you can’t see bacteria or parasites though!
Undiluted vinegar could potentially be used to wash down the inside of a rainwater tank, though it doesn’t have nearly the same disinfection strength as chlorine and also requires a much longer contact time (10 minutes). Remember, never mix vinegar and bleach! Another option is to use undiluted household-strength hydrogen peroxide. Peroxide also requires a constant contact time of around 10 minutes to be effective.

Preparing Your Rainwater Collection System for Winter
If you live in a location with freezing temperatures in the wintertime, be sure to completely empty your tanks of water before freezing weather sets in. Also, drain any system pipelines of water. Switch your gutter downspout to no longer feed into the collection tank. Protect any pumps by draining them of standing water, disconnecting, and consider wrapping them insulation. For year-round use, the addition of an aerator or heat pump can be implemented to prevent the water from freezing.
And that concludes your rainwater harvesting 101 crash course.
Just for fun, here is an old video of our rainwater collection systems during a light rain, before we had two of the slimline tanks.
I hope you found this article to be informative and helpful. Please feel free to ask questions or share this article! Good luck setting up your own rainwater harvesting system, and thanks for tuning in. Also check out 17 Ways to Save Water in the Garden, or How to Install Easy Drip Irrigation in Raised Beds.


40 Comments
JEFF S LABRACHE
I am trying to digest all the wonderful information you have given on harvesting rain water for my use in cooking and drinking in case of an emergency.
I am hoping you can point me to someone in the Seattle Tacoma Wa. area that might help me set a system up. I have found places to buy the parts, but am struggling with the idea of doing it myself.
Thanks in advance, Jeff LaBrache
Aaron (Mr. DeannaCat)
Hi Jeff, it looks like TLC Lawns in Tacoma helps install rain water catchment systems for people. Hope that helps and good luck!
Barry
Have you ever seen anyone pipe raineater from gutters directly into the house for indoor storage?
Aaron (Mr. DeannaCat)
Hello Barry, I have yet too see that although I have seen gutters that piped directly under a raised foundation house where a huge hot water ballon type reservoir resided that held thousands of gallons of water. Also, water is heavy so it is best to try and keep it as close as you can to the areas in which you plan to use it.
Health
It is a very helpful and informative blog post. I would like to thank to you for providing such information I have also have a website providing very good information.
Lois
I use colloidal Silver (which I make at home) in my dog water buckets to prevent algae growth. Think that might work in water storage tanks as well and it only takes a small amount in a 3 gallon bucket, like maybe a quarter cup once a week.
robyn
Hello, thanks for this very thorough article. Did you consider installing underground water tanks? I am planning a rainwater harvesting system for my home in burbank ca. I think an underground tank would be ideal for me (under the driveway) but wonder if the cost is prohibitive. curious to know if you investigated this possibility!
DeannaCat
Hi Robyn – No, we didn’t look into that since this isn’t our “forever home” (we actually plan to move soon). If you’re in a space long term and you can afford it, I think it could be a worthwhile investment so you don’t have to look at a big unsightly tank elsewhere and get the most “bang for you buck” gallons wise! Sorry I can’t provide more insight though. Best of luck!
Lydia C.
Great post! Thanks, Deanna. I’m curious if you’ve used your collected water for your chickens? I know they can handle a lot more bacteria/potential contaminants than we humans can, but wonder if it would still need to be treated… just wondering if you’ve explored this at your homestead.
DeannaCat
Hello Lydia, no we have not used our rainwater for our chickens, we only use it in our garden. I would advise to not use rainwater for your chickens.
Jesse Ford
Thanks for mentioning that your intended use and climate are some of the factors to consider when collecting rainwater. My brother is considering looking at stormwater pits because he’s thinking of saving the extra water from storms to use for his garden since it rains a lot where he lives. I think it’s wise for my brother to contemplate getting equipment from a reputable supplier that can properly hold the amount of water he needs from rain.
Mike Shusterman
Great articles.
I have a question regarding rain water collection. I was wondering whether you have found that the water collected can go uphill somewhat as it exits the barrel through a hose?
I would like to direct my water to my soon-to-be greenhouse, however it will be somewhat of an uphill run.
thx
Mike
DeannaCat
Hi Mike – From a basic barrel, you will not have enough head pressure. It even has a hard time filling to the height of a watering can through a hose if the barrel is low on water, or not raised up in elevation like suggested. To run water uphill, you’ll need a little booster pump. Good luck, and thanks for reading!
Abhay
Hi Mike, just yesterday I was reading some articles on internet about homestead water self-sufficiency and came across something called as “hydraulic ram pump” See if you can make use of the same.
Dereck McDoogle
It’s interesting how you collect rainwater without having raining gutters. My uncle likes to have a huge garden with many different types of plants, fruits, and vegetables but he says that it costs a lot when it comes to watering. It would be nice for him to find an air to water harvesting system so he can lower his water bills.
Courtney
Thank you for such an in-depth article! It answered so many questions I had.
DeannaCat
Hey Courtney! I am so glad to hear it. I hope this helps you figure out a system for your place? Happy holidays, and thanks for commenting!