


How to Dry Fresh Herbs: 4 Easy Ways + Storage Tips
Drying fresh herbs is easy to do! Come learn how to preserve and dry herbs four ways: air dry, in a dehydrator, oven, or microwave. We’ll explore the pros and cons of each method along with how to harvest and wash fresh herbs, and the best way to store them once you’re finished. Follow these tips to create the most vibrant, flavorful, long-lasting dried herbs possible!
In addition to freezing herbs in olive oil cubes, this is one of my favorite ways to preserve fresh herbs from the garden. It’s also a fantastic way to reduce waste when you have extra from the store. I love stocking our pantry with a variety of homegrown dried herbs to use all year long – to use for cooking, tinctures, tea, herb-infused oils, homemade salves, balms and more.
RELATED: Learn how to start your own herb garden here, including tips on the best herbs to grow in containers, indoors, in the shade, and more. This DIY herb planter is perfect for any size garden!

Would you like to save this?
Disclosure: Homestead and Chill is reader-supported. When you purchase through links on our site, we may earn an affiliate commission.
Choosing and Harvesting Herbs
- Some popular herbs to dry include basil, oregano, thyme, sage, rosemary, chamomile, mint, chives, lavender, calendula (my favorite), cilantro, parsley, dill, lemon balm, tarragon, yarrow, anise hyssop, lemon verbena, and more.
- It’s best to harvest fresh herbs first thing in the morning, before the sun and heat of the day reduces their essential oil content. This helps to better preserve their flavor, nutritional content, and other beneficial compounds.
- Harvest newer tender growth while avoiding super old woody sections.
- When harvesting flowering herbs like calendula or lavender, younger flower buds are generally more potent and therapeutic than older fading blooms.
- For the best-tasting culinary herbs (e.g. basil or oregano) try to choose herbs that haven’t yet begun to flower. Older flowering herbs may be more bitter, though we sometimes dry those too.
- See step-by-step tips and photos on how to harvest basil here.

Should I wash fresh herbs before drying them?
Yes, it’s a good idea to wash fresh herbs before drying them, especially those destined for edible use. A quick rinse will help remove dirt, dust, insects, or any other residue or potential contaminants they collected while growing outside. This is important since drying herbs doesn’t sterilize them as some other food preservations methods do.
However, the added moisture from washing herbs can slow the drying process, and also increase the chances of mold or spoilage. Therefore, it’s important to try to remove as much excess water as possible after washing them.
Some gardeners and herbalists choose not to wash their herbs to avoid the extra moisture and steps. For instance, we do not wash the calendula flowers that we use to make topical calendula salve. We pick the flowers within a day or two of blooming, so they don’t have much chance to get dirty anyway!

How to Wash Herbs
- Sort through your herbs to remove any bruised or battered leaves and erroneous twigs.
- To wash loose herbs and leaves, simply rinse them under cool water in a strainer and give it a gentle shake after.
- To wash herbs that are destined to hang-dry on the stem in bundles, you can gently dunk and swish the entire bundle of herbs in a clean bucket or bowl of water, and then gently shake or spin the bundle to remove excess water.
- To remove even more water, toss loose leaves or herbs in a salad spinner.
- Finally, spread out the herbs in a single layer on a counter or baking sheet lined with paper towels or a clean lint-free towel. Gently pat dry, and/or allow them to air dry for an hour or two to let the water evaporate before dehydrating.

1) How to Air Dry Herbs
Air drying herbs is one of the most simple, natural, and inexpensive ways to go! There are a number of ways to do it: hang herbs in bundles, lay them out on a screen (such as window screen) or in a loosely woven basket, or use a specialized drying rack.
No matter how you do it, it’s essential to place the herbs in a very dry location with good air circulation to ensure they dry thoroughly and fast enough to prevent mold. Therefore, this method can be more challenging in humid climates. Tender herbs like basil or parsley may also spoil before they can fully dry. Using a food dehydrator may be the best option in those cases.

- To dry herbs in bundles: collect a generous handful of herbs and use twine or string to tie them together near the base of the long stems. The overall bundle should be loose enough to allow airflow between the herbs. Create several modest bundles rather than one large one if needed. In some instances, it’s best to strip the bottom few inches of the stems clean so they can be tied without smashing a bunch of leaves tightly together (which could rot). This method works exceptionally well for herbs with long woody stems such as rosemary, oregano, thyme, lavender, lemon verbena, and yarrow.
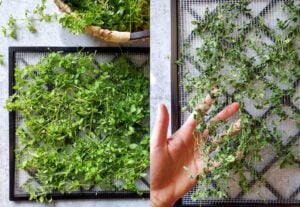
- To dry herbs on a screen or rack, spread them out in a single even layer to promote good air circulation. This method is ideal for herbs with short stems, loose leaves, or flowers such as calendula, chamomile and sage. Yet if you have a lot of herbs to preserve, laying them all out takes up more space than hanging them in bundles.
- Set or hang herbs in a dry location with good airflow, away from direct sunlight. Use a fan nearby if needed. If your herb bundles are hanging against a solid surface (like a wall or cabinet) try to rotate them every few days. Or, use a herb hanging rack for optimal circulation.
- Most herbs should be nicely dry within one to two weeks, though allowing them to hang for an additional week or two will help ensure they’re totally dried out. The herbs are done and ready for storage once they’re crunchy and brittle, with no bend or moisture left.


It’s best to dry herbs in a cool, dark place. Direct sunlight and hot temperatures can damage or reduce the volatile essential oils found in herbs, negatively impacting their flavor, potency, and color. Therefore, keeping herbs out of direct sunlight is best, though complete darkness isn’t required.
2) Drying Herbs in a Food Dehydrator
Preserving herbs in a food dehydrator is fast, effective, essentially foolproof, and yields high-quality results. It’s my preferred method!
Using a dehydrator is a great way to ensure your herbs are 100% dry and will not mold in storage, exponentially extending their shelf life. This is especially important if you plan to use the herbs to make oil infusions, tinctures or salves (like we do) since any leftover moisture can cause the final product to go rancid or spoil. Dehydrators also excel at preserving flavor, color, and nutrients.
Using a dehydrator is ideal for drying tender herbs, loose leaves and flowers, or those that aren’t easy to bundle and and hang – such as basil, parsley, cilantro, dill, chickweed, calendula, chamomile, and more. It’s also perfect for folks who live in humid climates. I love that you can just set it and forget it, and not have to worry about mold or fuss over a hot oven for hours.

- Spread out fresh herbs in single layer on your dehydrator trays. Touching side-to-side is okay, but they shouldn’t be piled on top of one another.
- Set your dehydrator to a low temperature setting (95-115°F). Drying herbs “low and slow” helps to retain the maximum nutritional value, color, flavor, and therapeutic compounds in the herbs. Yet using low heat will take longer to dry (up to a couple days), so you can increase to a medium heat (135°F) to expedite the process for thicker herbs like rosemary.
- The time is takes to dry herbs in a dehydrator will vary depending on your machine, temperature setting used, and the type of herb. Most should be dry within 8 to 12 hours, or up to a couple days.
- Once they’re 100% crisp and brittle, transfer to an air-tight storage container. See more tips below about storing dried herbs.

3) How to Dry Herbs in the Oven
The good news is: almost everyone has an oven. Yet drying herbs in the oven can be a bit tricky and unpredictable. It requires a watchful eye as it’s easy to accidentally burn your herbs. Even if not burnt, expect the herbs to be less bright in color and flavor compared to air drying or using a dehydrator. Some of the nutrients and therapeutic compounds may be also be cooked off.
- To dry fresh herbs in the oven, set the temperature to 150-180°F (65-82°C) or the lowest setting possible. Anything over 180°F will likely burn them!
- Spread the washed herbs out in a single layer on a baking sheet lined with parchment paper, or on a wire baking rack with solid pan below it.
- It will take anywhere from two to four hours (or longer) to dry herbs in the oven. Be sure to check on them often, and rotate the trays or turn the herbs as needed to promote even drying.
- If your oven seems too hot (especially if you don’t have a temperature setting below 200F) consider propping the oven door open slightly with a wooden spoon to prevent overheating and burning.

4) Drying Herbs in the Microwave
Yes, it is possible to dry herbs in the microwave! And it happens to be very quick and easy to do. Many folks believe that microwaving kills the nutrients in food, but studies show that it doesn’t reduce nutrient content any more than other forms of cooking (such as baking). Drying herbs in the microwave is also far less likely to burn them than the oven, and retains much brighter color and flavor!
- Start by spreading out clean herbs on a microwave-safe plate lined with a paper towel*, or on a 100% cotton lint-free clean kitchen towel. Lay another paper towel on top.
- Microwave the herbs for 30 to 60 seconds on high power one initial time. More thick, hearty herbs will need about 60 seconds for the first round, while thin tender herbs should be nuked for about 40 seconds.
- Continue to microwave the herbs in short bursts (20-30 seconds) until they’re completely dry, brittle, and easily crumble. Check and turn them in between each session.
*Avoid microwaving recycled paper towels, as they often contain fragments of metal that may combust.

How to Tell When Herbs Are Dry
Herbs are done drying once they’re completely brittle and crunchy. They should easily crumble or snap when you try to break them, rather than having any give or bend. If they are still bendy, that means they still contain moisture and can spoil in storage. Keep on drying until they’re 100% crisp! We often dehydrate our herbs longer than necessary, just to play it safe.

How to Store Dried Herbs
Store dry herbs in a cool dark location inside an air tight container with a lid, such as a glass mason jar or small spice jar in the pantry. There, dried herbs should last well over a year in storage.
If you dried your herbs on the stem, go ahead and strip the leaves off the woody stems before storage. Simply run your fingers down the stem and they’ll come right off. It’s best to do this over a piece of parchment paper, which is easy to fold up into a funnel to add them to a jar. Some extra fine stems may be harder to separate (such as thyme) but that’s okay. Just grind them up with the leaves too!
However, it’s best to wait to grind up dry herbs into finer bits until you’re about to use them. Store the leaves whole to better retain their essential oils and a fresher, stronger flavor over time. We often keep larger jars of whole dried herb leaves tucked in the back of the pantry, along with a smaller spice jar full of ready-to-use crushed herbs in the cabinet by the stove – grinding and refilling it from the larger stash as needed.
Use a coffee grinder, food processor, or old-fashion mortar and pestle to grind your dried herbs into a coarse powder when you’re ready to use them. Many herbs are also easy to crush by hand, including right over the pot.
PRO TIPS: Amber-tinted glass jars are great at protecting herbs from light degradation if you want to store them out on open shelves. If you live in a very humid climate, consider using natural food grade desiccant packets inside jars to help keep them dry.

Using Dried vs Fresh Herbs
The flavor of dried herbs is highly concentrated, so a little goes a long way! In any recipe that calls for fresh herbs, a simple swap is to use one-third of the amount dry. In reverse, that means you’d use three times the amount of fresh herbs than you would dried herbs in a dish.
We love to add dried herbs to a wide variety of meals, including in soups, sauces, sourdough, homemade salad dressing, seasoning salts, dry tea blends, herbal sun tea, and more. Beyond the kitchen, we use dried herbs to make herb-infused oils (for edible or topical use) which serve as the star ingredient in our DIY natural body care products like salves, homemade lip balm recipe, and more. Visit our flexible homemade salve recipe to learn how!

Now go have fun preserving your herbs!
All in all, dehydrating is an easy and effective way to preserve fresh herbs. I love how little space they take up in the pantry too! I hope you found these tips to be useful. If so, please consider leaving a review and/or comment below! Also let us know if you have any questions. Thank you so much for tuning in today!
Don’t miss these related posts:
- DIY Bath Salts Recipe: Beautiful Natural Herbal Bath Salts
- How to Make Medicinal Herb Infused Oil: Two Ways
- Growing Herbs 101: How to Start a Kitchen Herb Garden, Indoors or Out
- How to Freeze Basil in Ice Cube Trays (Olive Oil or Water)
- How to Safely Make Sun Tea With Fresh or Dry Herbs

How to Dry Fresh Herbs: Air Dry, Dehydrator, Oven or Microwave
Equipment
- fresh herbs
- your choice: dehydrator, oven, air dry (screen or twine for bundles) or a microwave
- strainer and/or salad spinner for washing herbs
Instructions
Prep
- Harvest fresh herbs in the morning. Try to collect the more fresh, tender parts of green herbs, or young just-bloomed flowers (for calendula, chamomile, lavender, etc).
- Sort to remove any battered/bruised leaves and erroneous sticks
- Wash and rinse herbs under cool water to remove dirt, insects and other debris (especially for edible herbs)
- Shake and/or gently pat dry, then spread washed herbs out on a clean towel on top of trays or the counter to air dry for a couple hours to remove excess moisture
Air Drying Herbs
- Hanging bundles: Collect a generous handful of herbs and tie the stems together at the base with twine or string. Keep the bundle loose/small enough to have good airflow between the herbs. Good for herbs with long woody stems, like rosemary, lavender, oregano, thyme, yarrow, and lemon verbena.

- Laying flat: Spread the herbs out in a single layer on a screen or herb drying rack. Ideal for loose leaves, flowers, or herbs that are more difficult to bundle like sage, calendula, chamomile, lavender buds,

- Air dry herbs in a temperate dry location with good air circulation, away from direct sunlight.
- Most herbs will air dry within one to two weeks, though a couple extra weeks will help ensure they're fully dry.


Dehydrator
- Spread washed herbs out in a single layer on food dehydrator trays.
- Set your dehydrator to a low temperature setting (95-115°F). Drying herbs “low and slow” helps to retain the maximum nutritional value, color, flavor, and therapeutic compounds in the herbs. Yet using low heat will take longer to dry (up to a couple days), so you can increase to a medium heat (135F) to expedite the process for thicker herbs like rosemary.

- The time is takes to dry herbs in a dehydrator will vary depending on your machine, temperature setting used, and the type of herb. Most should be dry within 8 to 12 hours, or up to a couple days.
Oven
- Spread herbs out in a single layer on a baking sheet lined with parchment paper, or on a wire baking rack with solid pan below it.
- Set the oven temperature to 150-180°F (65-82°C) or the lowest setting possible. Anything over 180°F will likely burn them! Prop the oven door open slightly if needed to prevent overheating.
- It will take anywhere from two to four hours (or longer) to dry herbs in the oven. Be sure to check on them often, and rotate the trays or turn the herbs as needed to promote even drying.
Microwave
- Spread clean herbs on a microwave-safe plate lined with a paper towel (but not recycled paper towels), or on a 100% cotton lint-free clean kitchen towel. Lay another paper towel on top.
- Microwave the herbs for 30 to 60 seconds on high power one initial time. More thick, hearty herbs will need about 60 seconds for the first round, while thin tender herbs should be nuked for about 40 seconds.
- Continue to microwave the herbs in short bursts (20-30 seconds) until they’re completely dry, brittle, and easily crumble. Check and turn them in between each session.
Herbs are Done Drying When….
- Herbs are done drying once they’re completely brittle and crunchy. They should easily crumble or snap when you try to break them, rather than having any give or bend. If they are still bendy, that means they still contain moisture and can spoil in storage. Keep on drying until they’re 100% crisp!
Storing Dried Herbs
- Strip the leaves from the stems. Do this over a piece of parchment paper, which is easy to fold and funnel into a jar.
- For the best long-lasting flavor and potency, keep and store leaves whole (wait to grind them) until close to the time of use.
- Store dried herbs in a cool dark location in air tight containers with a lid. There, they should last for well over a year.
- Use a food processor, coffee grinder, blender, or mortar and pestle to grind herbs into finer pieces before use. Some can easily crush by hand.
- TIPS: Amber-tinted glass jars are great at protecting herbs from light degradation if you want to store them out on open shelves. If you live in a very humid climate, consider using natural food grade desiccant packets inside jars to help keep them dry.


Deanna Talerico
Deanna Talerico (aka DeannaCat) is a garden educator and writer with over 15 years experience in organic gardening. She is a retired Senior Environmental Health Specialist, and holds a M.A. in Environmental Studies and B.S. in Sustainability and Natural Resources.


11 Comments
Stumpy
Great article. I once saw bagged oregano from Italy sold in a nice grocery store still on the stem tied up in a bundle (how it made it that far intact IDK) but ever since I just bundle long stems of oregano and hang it to dry in the kitchen. When I make a sauce or stew I just strip the stem straight over the pot and rehang the bundle. That’s how I imagine Italian Nona’s doing it in their kitchens.
Aaron (Mr. DeannaCat)
Thats a great visual and thanks for sharing!
gene
Hi there:-) Great post and you always do such a good job of laying out the process! I want to add an easy way to dry herbs that preserves vibrant color (somehow this way seems unknown to many people).
Dry your herbs in the refrigerator!
Really! The interior of the fridge has very low relative humidity.
Tie bunches of herbs and hang from a wire shelf, place bunches in paper bags and stuff into the bottom drawer, however works for you.
I especially love how parsley stays bright green. And when I preserve borage flowers, wow, the beautiful blue of a glass jar filled with borage flowers…so nice!
Thanks for all your wonderful posts! On our farm we intend to build your famous 3-bin composter this summer:-)
Aaron (Mr. DeannaCat)
So great to hear and thanks for sharing your tip on drying in the refrigerator! Also, good luck on constructing your 3 bin compost system, it should see a lot of work on your farm!
Candice Warren
Hi Mr & Mrs Deannacat
Thanks for the incredible, generous sharing of info ❤️
I’m in Sourh Africa, so a completely different hemisphere, but still devour your content and wisdom.
You guys are living the Millenial Dream 😉
Any advice for drying in an air fryer?
Also, I was avoiding drying lemon balm, as I thought it became ineffectual?
Thanks again for the awesome site.
PS – wish you had a book (actual paper book – ’cause we love a book) that it each of your growing guides. It would be my bible!
Aaron (Mr. DeannaCat)
Hi Candice, thank you so much for the kind words and support! Lemon balm still has medicinal value even when dried but it likely has more when used fresh. In regards to drying in your air fryer, I would just use the convection heat and turn the temperature down as low as it will go. We may eventually at the very least put together some e-books that contain different grow guides or other material but we just need the time to be able to put it all together. Thanks for reaching out from South Africa and have fun growing!
Mary
Great information!! First time drying herbs.. can’t wait to try it out! 😊
Aaron (Mr. DeannaCat)
Good luck Mary, you should do great!
Jenny
Great tip to store herbs whole to retain aroma and flavour, really works!
Dani
Loved this article! Been preserving herbs for weeks now and this info has been super helpful. Thank you, friend!
Aaron (Mr. DeannaCat)
So great to hear Dani, enjoy!