

How to Build a DIY Raised Garden Bed: Step-by-Step Guide

So you want to build a raised garden bed… or maybe a few? Right on! Raised beds, also known as planter boxes, are a excellent way to grow your own food at home. They’re a beautiful, functional addition to any yard space.
This guide will explore everything you need to know to build durable wood raised garden beds. First we’ll cover planning and prep, including the supplies needed, best wood types to use, location and layout considerations, and garden bed size options. Then we’ll go over the step-by-step instructions to build a raised garden bed plus tips for installation, gopher-proofing, and weed prevention.
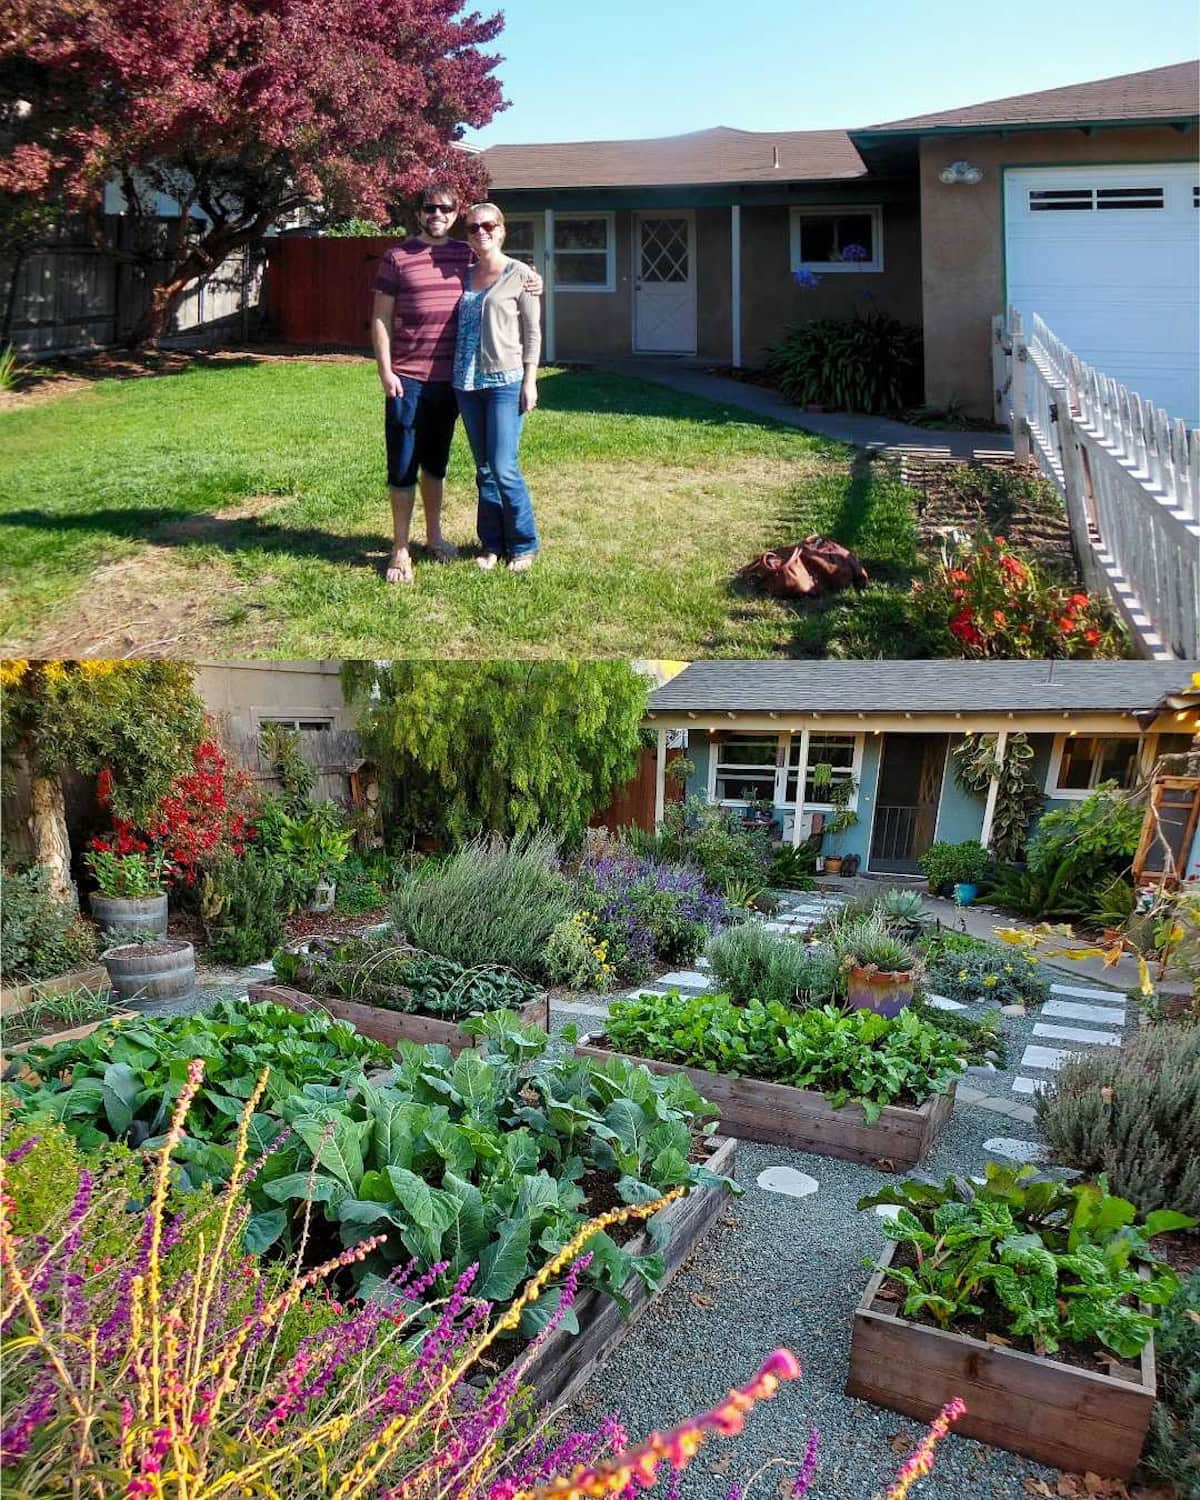
We’ve built more than 40 raised garden beds over the years, so I have plenty of tips and tricks to share – including ways to learn from our mistakes! I’ve included photos from our old urban homestead and new rural property so you can get ideas for any size garden space.
Don’t miss the tutorial video included at the end. Jump straight to the video here.
Note: This post was originally published in March 2019.
Would you like to save this?
Disclosure: Homestead and Chill is reader-supported. When you purchase through links on our site, we may earn an affiliate commission.
RELATED: Learn how to install automatic drip irrigation for raised beds here. We added irrigation risers inside every bed before filling them with soil, so it’s helpful to plan in advance.
Benefits of Raised Garden Beds
If you’re new to raised garden beds, you’re going to love it! While there is a little more upfront cost than planting straight in the ground, the numerous benefits make it worth it.
- With raised garden beds, you have way better control over the condition, quality, and texture of your soil. Raised beds can be filled with the ideal soil and compost to help your plants thrive.
- It’s easy to block off weeds and burrowing pests like gophers from below with hardware cloth and landscape fabric, protecting your plants.
- Not having to bend over so low, our bodies and backs really prefer the ergonomics of raised garden beds over planting in the ground.
- If your soil has poor drainage or your yard is prone to occasional flooding, raised garden beds are the answer.
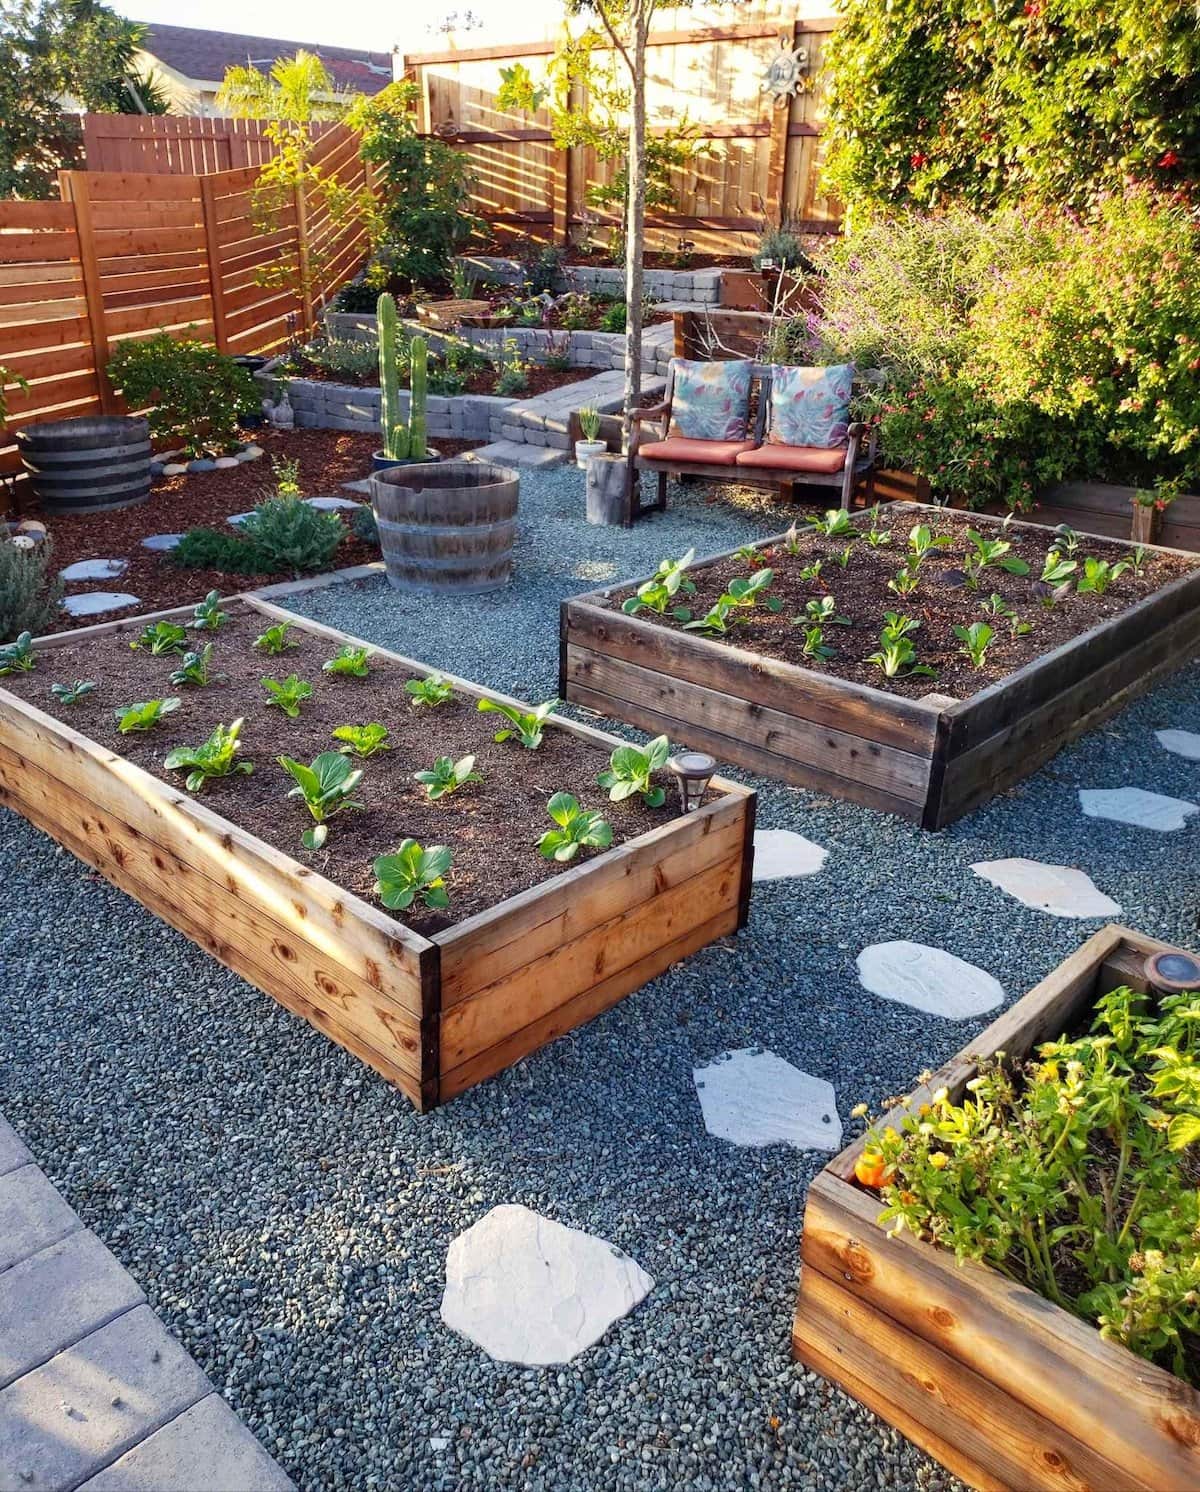
- Last but not least, I love how they look! Raised beds create dimension, interest, and defined spaces in the garden.
Supplies Needed
- Lumber – We’ll talk more about wood choices and size best practices. To make our DIY raised garden beds, we use 2 x 6″ redwood boards (stacked three high) along with 4 x 4″ redwood for corner supports. Our current beds are 4×8′ and 16.5″ high (since 2×6″ boards are really 5.5″ wide).
- Miter Saw or Circular Saw – or you could have the hardware store cut wood to your desired lengths
- 2.5 or 3-inch long Deck Screws – we use 8 gauge
- Power Drill
- Measuring Tape
Optional
- Heavy-duty weed blocking landscape fabric for under the beds
- Hardware cloth for gopher-proofing, plus wide-head cabinet screws and/or a staple gun to connect it. Chicken wire will not block gophers!
- Galvanized mending braces to stabilize the longest sides (two per bed)
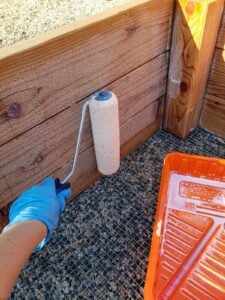
- Non-toxic food-grade wood sealer for added longevity
PLANNING AND PREP
How much does it cost to build a raised garden bed?
In my experience, the average cost per raised bed can range from $100 to $300 dollars, including lumber, screws, and optional hardware cloth. However, it all depends on your location, the year, materials used, and size of bed. Lumber prices have been highly variable lately!
You also have to account for soil and compost to fill your raised beds. Whether you use bagged or bulk soil greatly influences the cost since local bulk delivery is often more affordable, especially to fill several beds.
Where to locate raised garden beds: sun exposure
Most vegetables prefer to get as much sun as possible, with a few exceptions. So, choose a location in your yard that gets maximum sun exposure – or at least 6 to 8 hours of direct sunlight per day. Try to keep garden beds out in the open, away from trees, structures or fences that may cast shade (unless they’re south-facing, so they won’t block the light).
Also consider how the sun’s path and exposure will change with the seasons, especially if you hope to garden year-round. If you aren’t sure, it may be worthwhile to wait and observe the sun patterns in your garden space for a year before embarking on any major permanent projects. There are also a number of sun-tracking apps that can help you visualize and plan.
RELATED: Don’t have a big yard space? Come learn how to build and install raised garden beds on a hard surface – including concrete patio, deck, driveway, or other impervious surface.
Raised Garden Bed Layout: Orientation and Spacing
If you’re in the northern hemisphere, a south-facing garden is an ideal choice, or one that is oriented in a way to receive maximum sun exposure from the south in all seasons. If you live in the southern hemisphere the logic is the opposite; a north-facing garden would be best.
It’s also best to set your raised garden beds in a north-south orientation (with the shorter sides of the beds going east-west) so long rows of crops can be planted north to south without shading each other out.
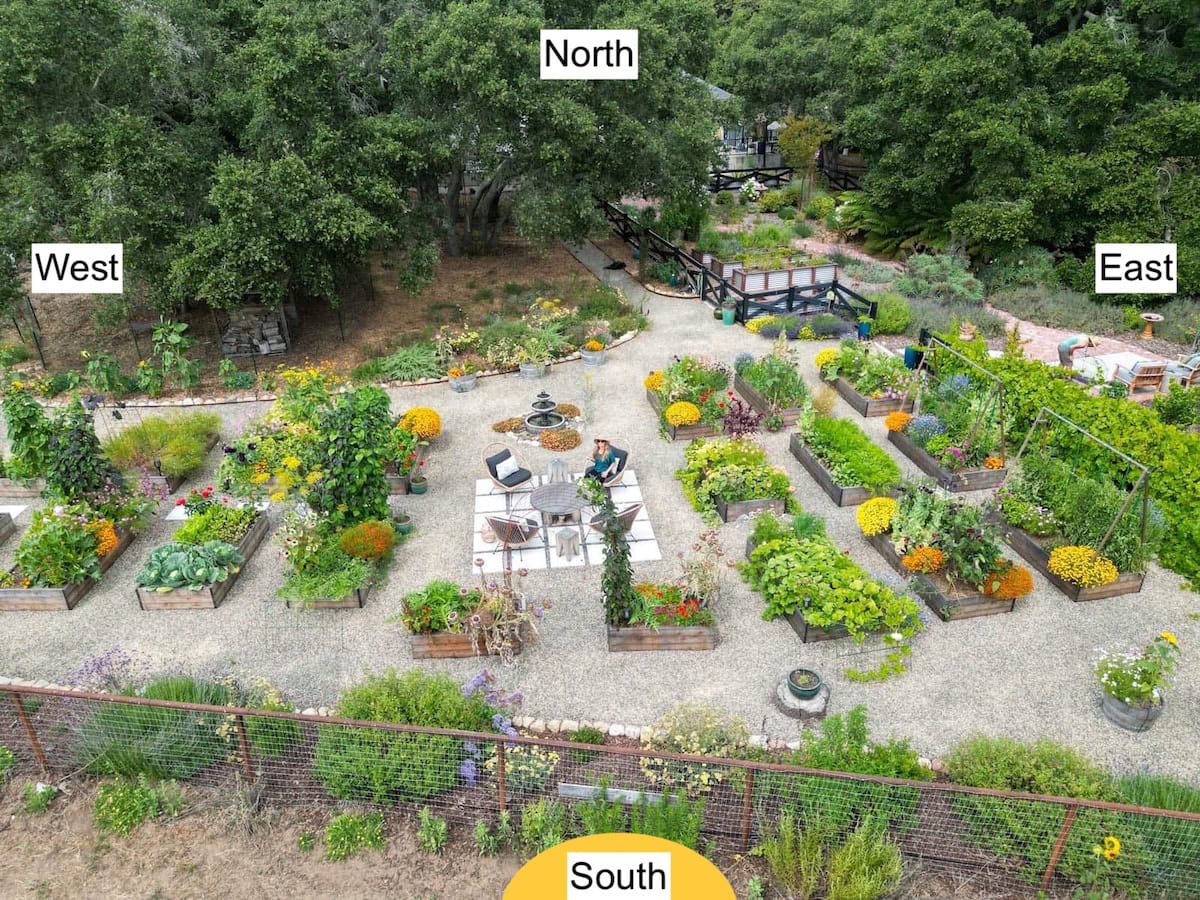
How far to space raised garden beds
I recommend spacing raised garden beds no closer than 28 inches apart. Most of our current garden beds now are spaced 36 to 48 inches apart – which allows room to move a wheelbarrow or our favorite garden cart up and down the aisles between beds as needed.
In addition to being able to easily work around the garden beds, good spacing also prevents neighboring beds and plants from shading one another out – especially tall crops or when using trellises. In the height of the summer jungle, our plants are ofter overflowing or bushing out into the pathways too!
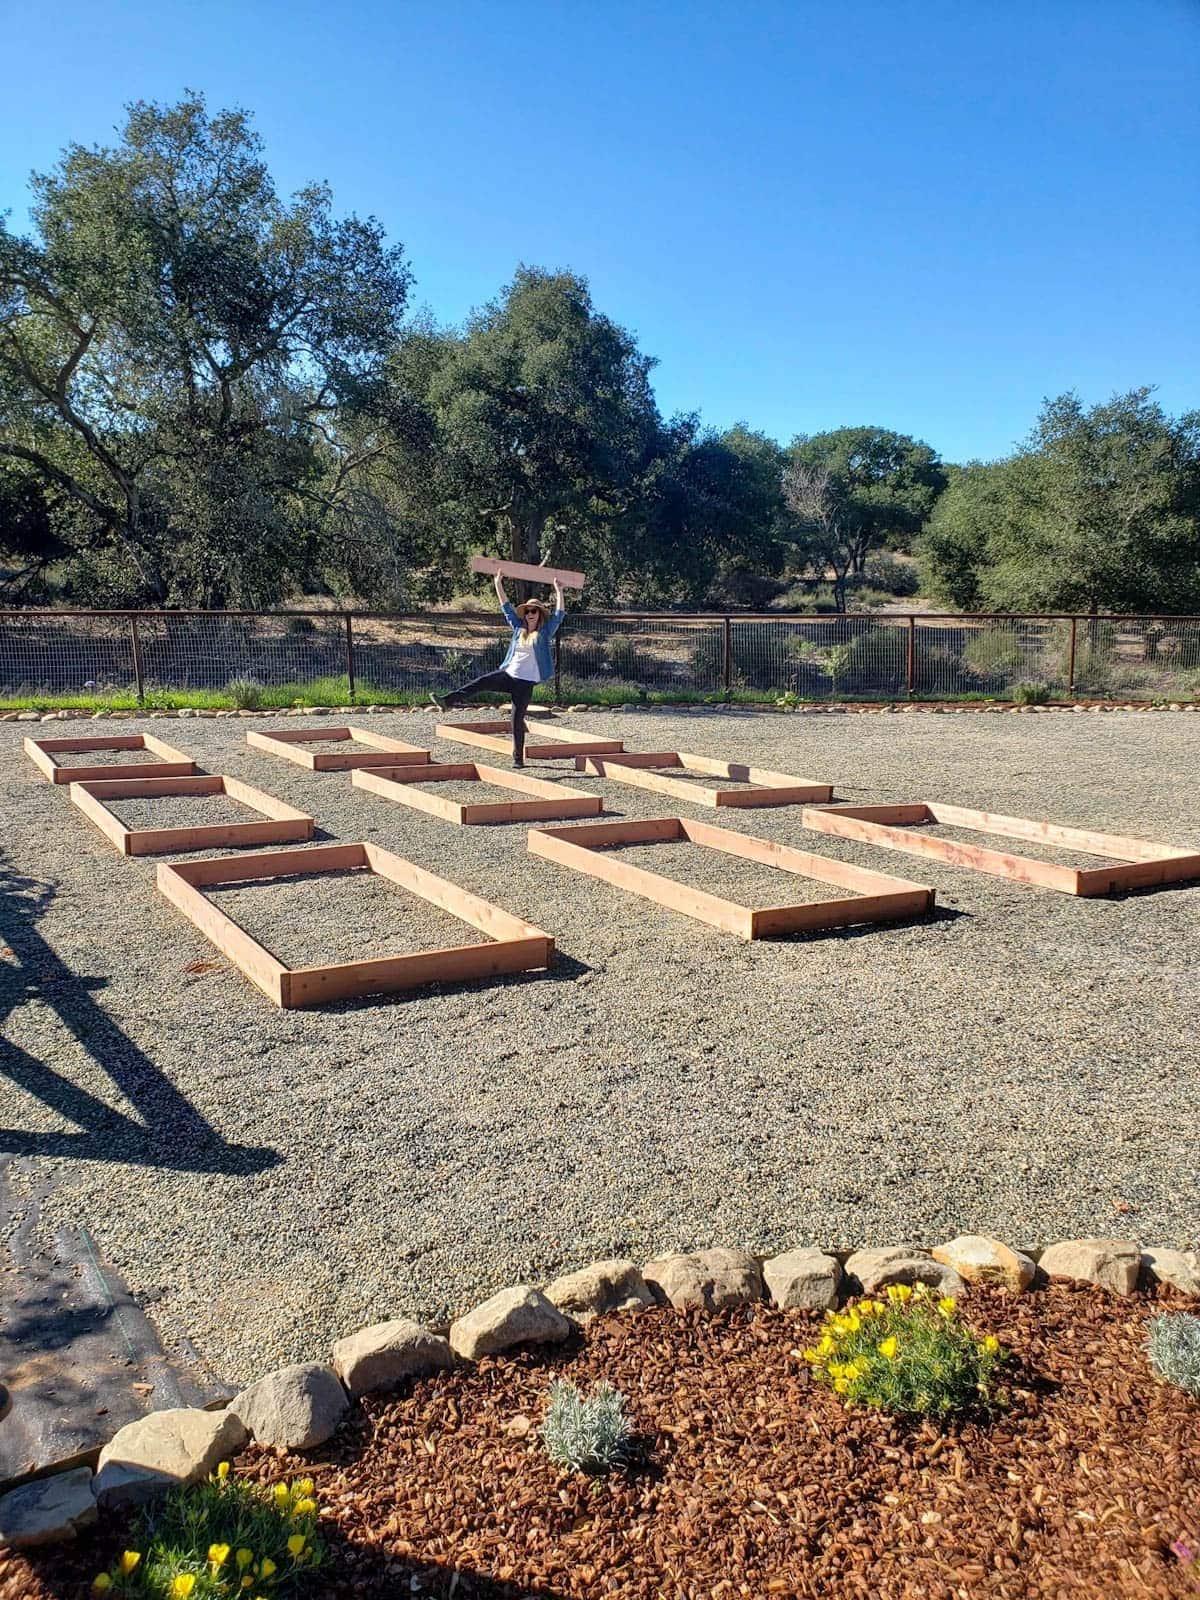
Before making any final decisions, test it out! Grab some rope, stakes, scrap wood, broom sticks, or whatever else you can find to lay on the ground in the approximate space and size you’re imagining. This will give you a better idea of what the space would actually look and feel like once it’s all in place.
Best Raised Bed Wood Options
You can build DIY raised garden beds out of a wide variety of wood, depending your personal preferences, budget, and what is available in your area. An ideal wood choice will be long-lasting, sustainable, and safe!
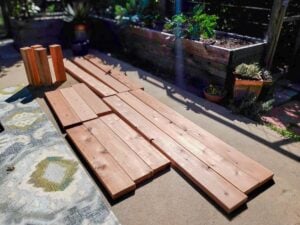
- Redwood and cedar are the most popular, high-quality wood options to build long-lasting raised beds. They’re both beautiful, durable, rot-resistant, and will last at least a decade or two on their own! Redwood is typically most available on the west coast, while cedar is more common in the eastern US. We usually use heart redwood to build our raised beds, which is even more dense and long-lasting than common construction redwood (but has gotten really pricey nowadays). Redwood is also naturally resistant to termites.
- Neither redwood nor cedar needs to be stained or sealed in any way. However, you could treat them with a non-toxic wood sealer to even further extend their life if you wish.
- Softer woods like pine or Douglas fir are good middle-of-the-road choices. They are more affordable, which makes them very appealing if you’re on a budget! However, expect raised garden beds made from pine or fir to last about 3 to 7 years on average, depending on climate.
- The thicker and larger the boards, the more durable your DIY garden beds will be! For instance, 2-inch thick boards will last much longer than thinner 1-inch cedar fence pickets, and 2×6” or 2×8” boards will outlast 2x4s. That’s also why we use hefty 4x4s for the inner corners to hold the bed together!
- I do not recommend building raised garden beds from treated lumber, unknown recycled, stained, or painted wood, or toxic railroad ties.
- For any wood selection, look for ones marked with “FSC” or Forest Stewardship Council. FSC certification ensures that products come from responsibly managed forests that provide environmental, social and economic benefits.
- When you’re out shopping for lumber, avoid bowed or cracked boards!
RELATED: See 7 ways to make wood raised beds last longer. Looking for other ideas, beyond wood? This guide on choosing the best materials for raised beds also explores the pros and cons of galvanized steel, concrete blocks, logs or other materials.

Raised Bed Sizes: Length, Width, Depth
One of the best things about building your own raised garden beds is that you can make them any size or shape that you desire to fit your space! 4×8’ is a very popular size, though we’ve built raised beds of almost every size over the years.
Here are a few best practices to keep in mind to make your raised beds as functional as possible:
- WIDTH: Plan to make raised garden beds no wider than 4 feet across the short side. Otherwise, it becomes very difficult to reach into the middle of the bed from either side for planting, harvesting, or other maintenance. You do not want to have to walk inside your raised beds, which compacts the soil! If your raised bed is up against a wall or fence (so you can only access it from three sides) then I suggest no wider than 3 feet.
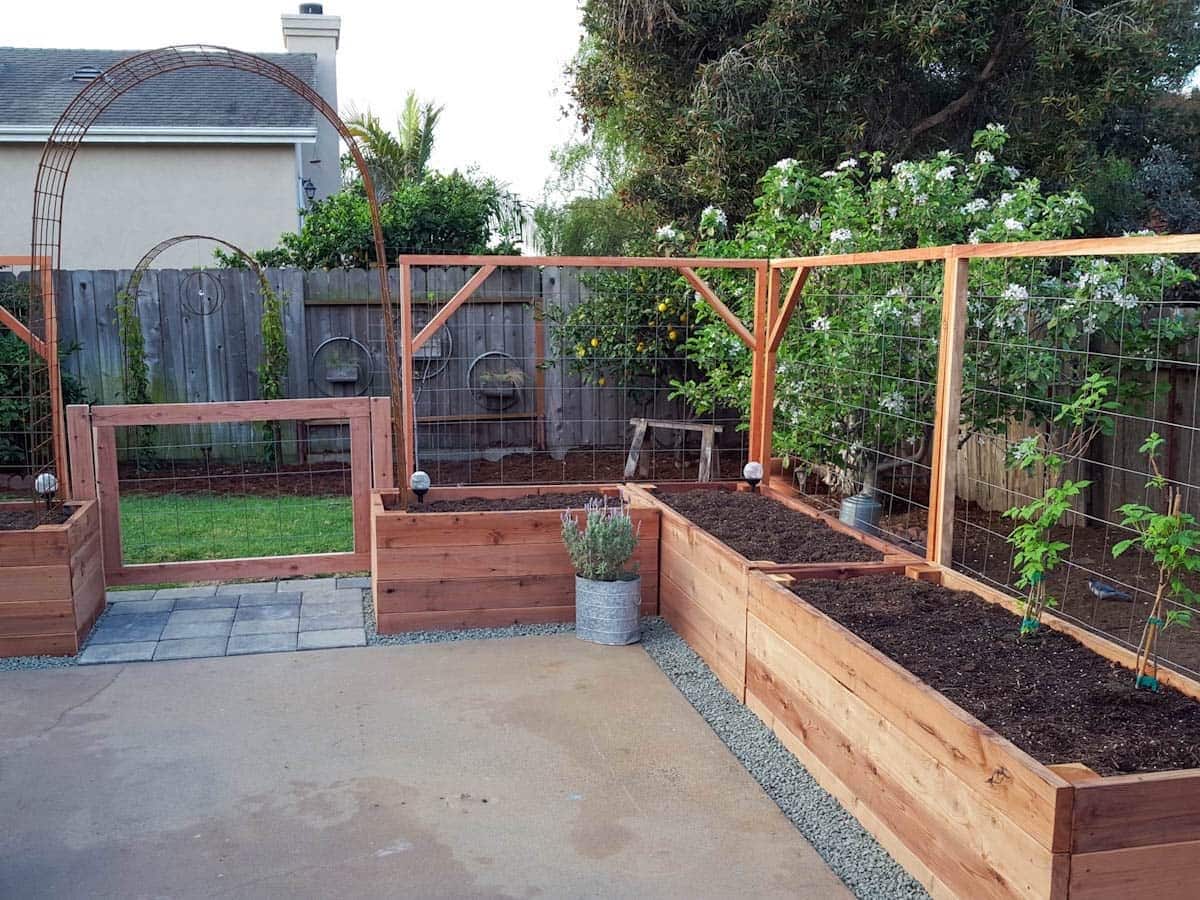
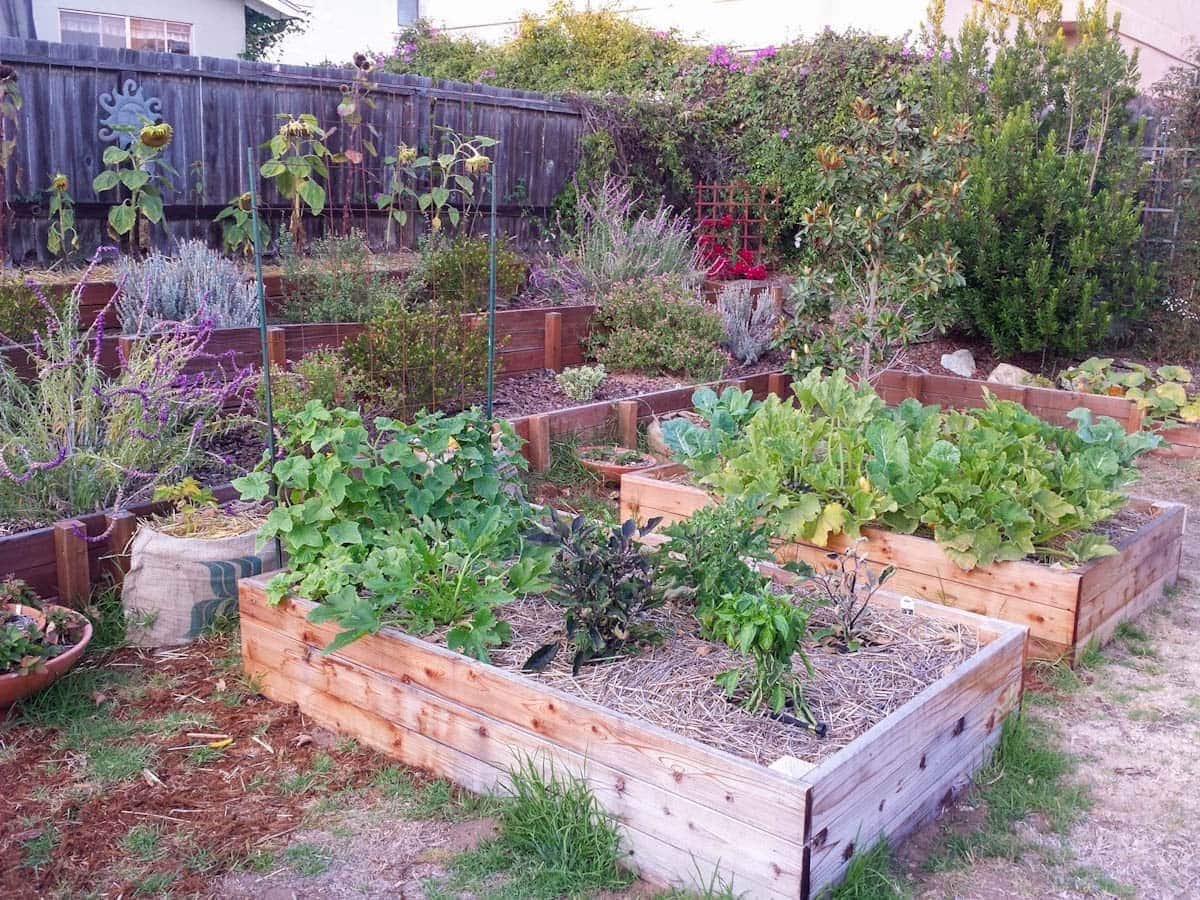
- LENGTH: It’s best to build raised garden beds no longer than 8 feet, perhaps 10 feet maximum. The bigger the bed, the heavier it will be to move (unless you build it in place). Plus, longer boards are more susceptible to stress and bowing out under the weight and pressure of the soil. If you really want an extra-long raised bed, consider placing several smaller beds end-to-end to create the illusion of one continuous one. (See examples below).
- DEPTH: Some plants will grow okay in 12 inches of soil, but many popular vegetable garden crops prefer deeper soil – including tomatoes, cucumber, peppers, and more. For optimal plant health, I recommend building beds at least 16 to 18 inches tall OR more shallow ones that are open to native soil without a barrier below (explored more to follow). Taller beds = less bending over and better moisture retention, though it also means more soil and compost needed to fill them.
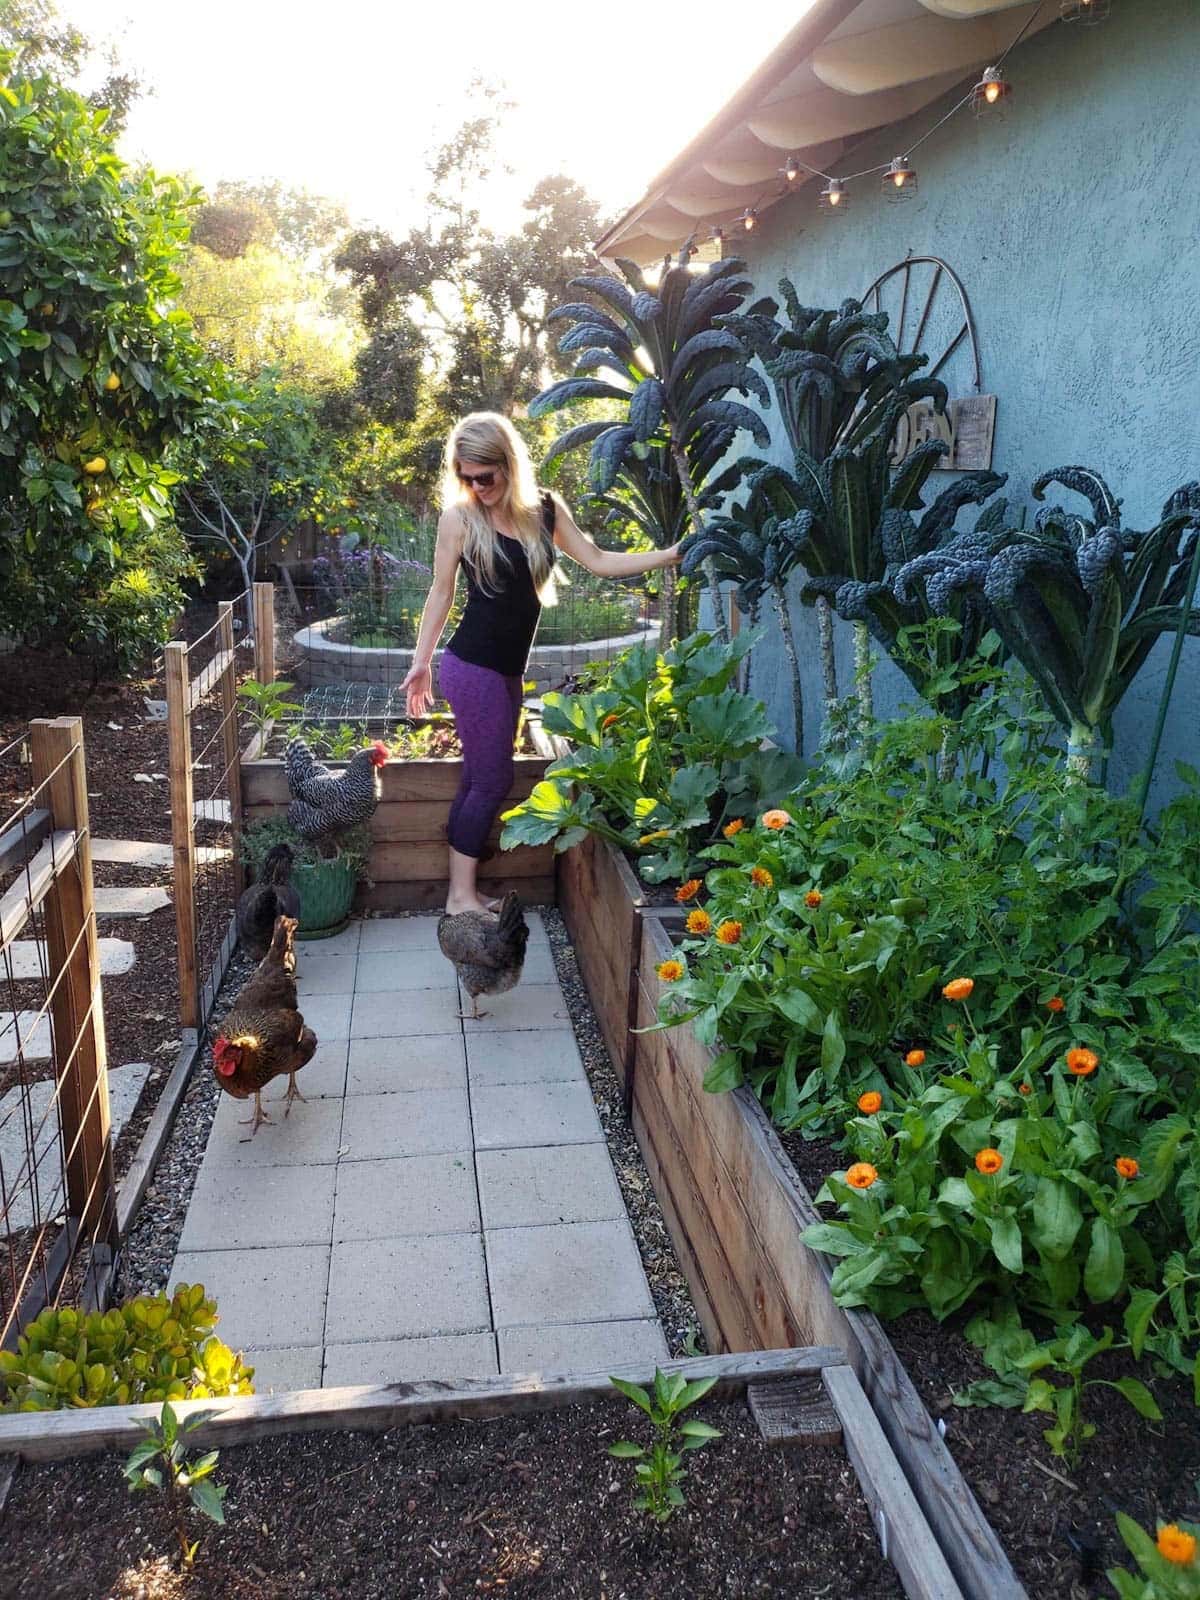
Looking for more small-space garden inspiration? You can tour our old urban homestead here including the chicken coop, greenhouse, rainwater system, and tons of before-and-after transformation photos!
INSTRUCTIONS TO BUILD A RAISED GARDEN BED
Step 1: Choose a Bed Size and Design
Once you know your desired bed size(s) and wood type, you can run some calculations of how much lumber you’ll need.
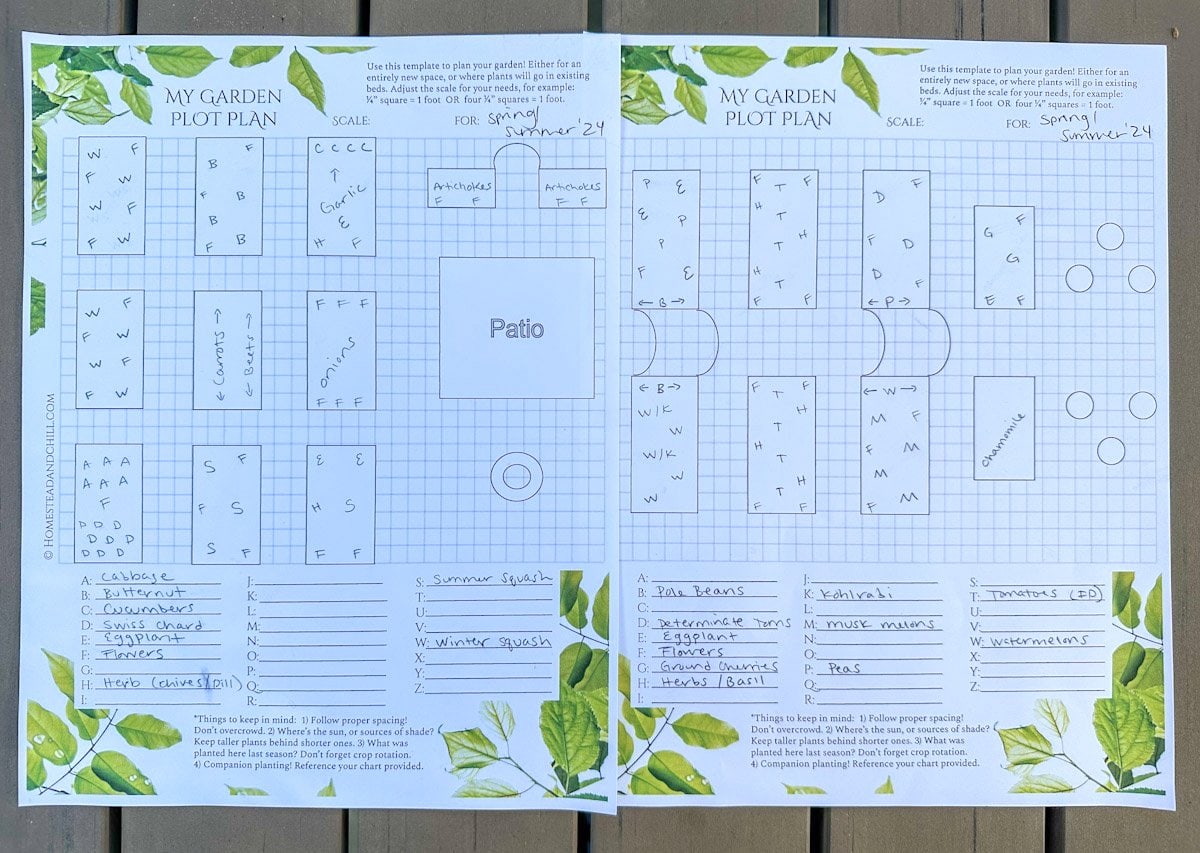
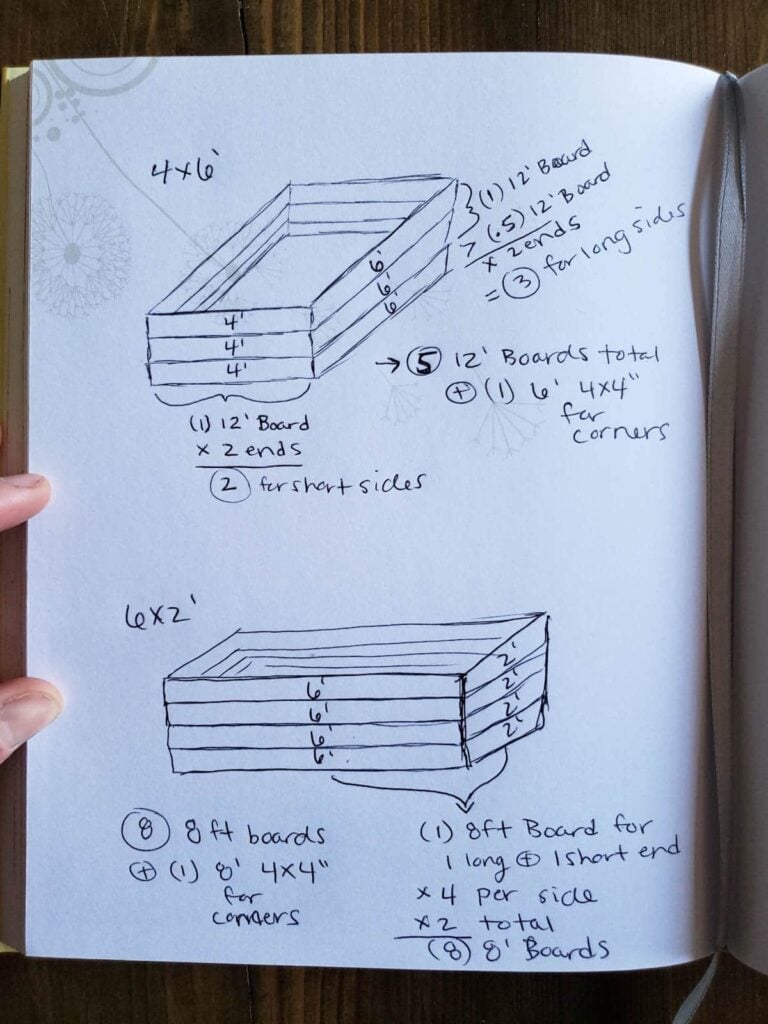
Drawing a design sketch of your bed is very helpful in the process. It makes it much easier to visualize and add up the total lengths of boards. See my examples below.
Note that you do not need one board for every piece of each side! You can often cut one long board to create multiple sides of the bed. Also, do some research in advance to see what length lumber is available to you locally. For instance, the heart redwood 2×6 boards we use are most commonly sold in either 8 or 12 foot lengths – but we’d choose different ones for different size beds.
To make 4×8′ x 16.5″ deep beds like our current garden, you’ll need either (9) 8-foot 2×6 boards per bed, or (6) 12-foot 2×6 boards. You’ll also need (1) 8-foot 4×4″ to create the corners of each bed.
EXAMPLE: Let’s pretend we are going to build a 6×4 foot bed. We’d want to buy 12-foot boards in that case, since could cut them in half to get two 6-foot pieces for the long sides of the bed, and then one 12-ft board can also be cut in thirds to create each short end of the bed. Yet if we were building 4×8′ beds, using either 12 or 8-foot boards would work well and create little-to-no waste.
Step 2: Seal Wood (Optional)
If you plan to seal your wood, it’s easiest to apply the sealer before cutting the wood – or at least before assembling the beds. We never used to seal our redwood raised beds in the past, but at our new “forever” homestead, we did apply two coats of this nontoxic sealer to both the inside and outside of the beds. You can see exactly how we did that process in this post.

Step 3: Measure, Mark, and Cut
Now that you got your lumber home, it is time to measure and cut it into the sizes you need! But before making any cuts, please read the important tips below.
Measuring width
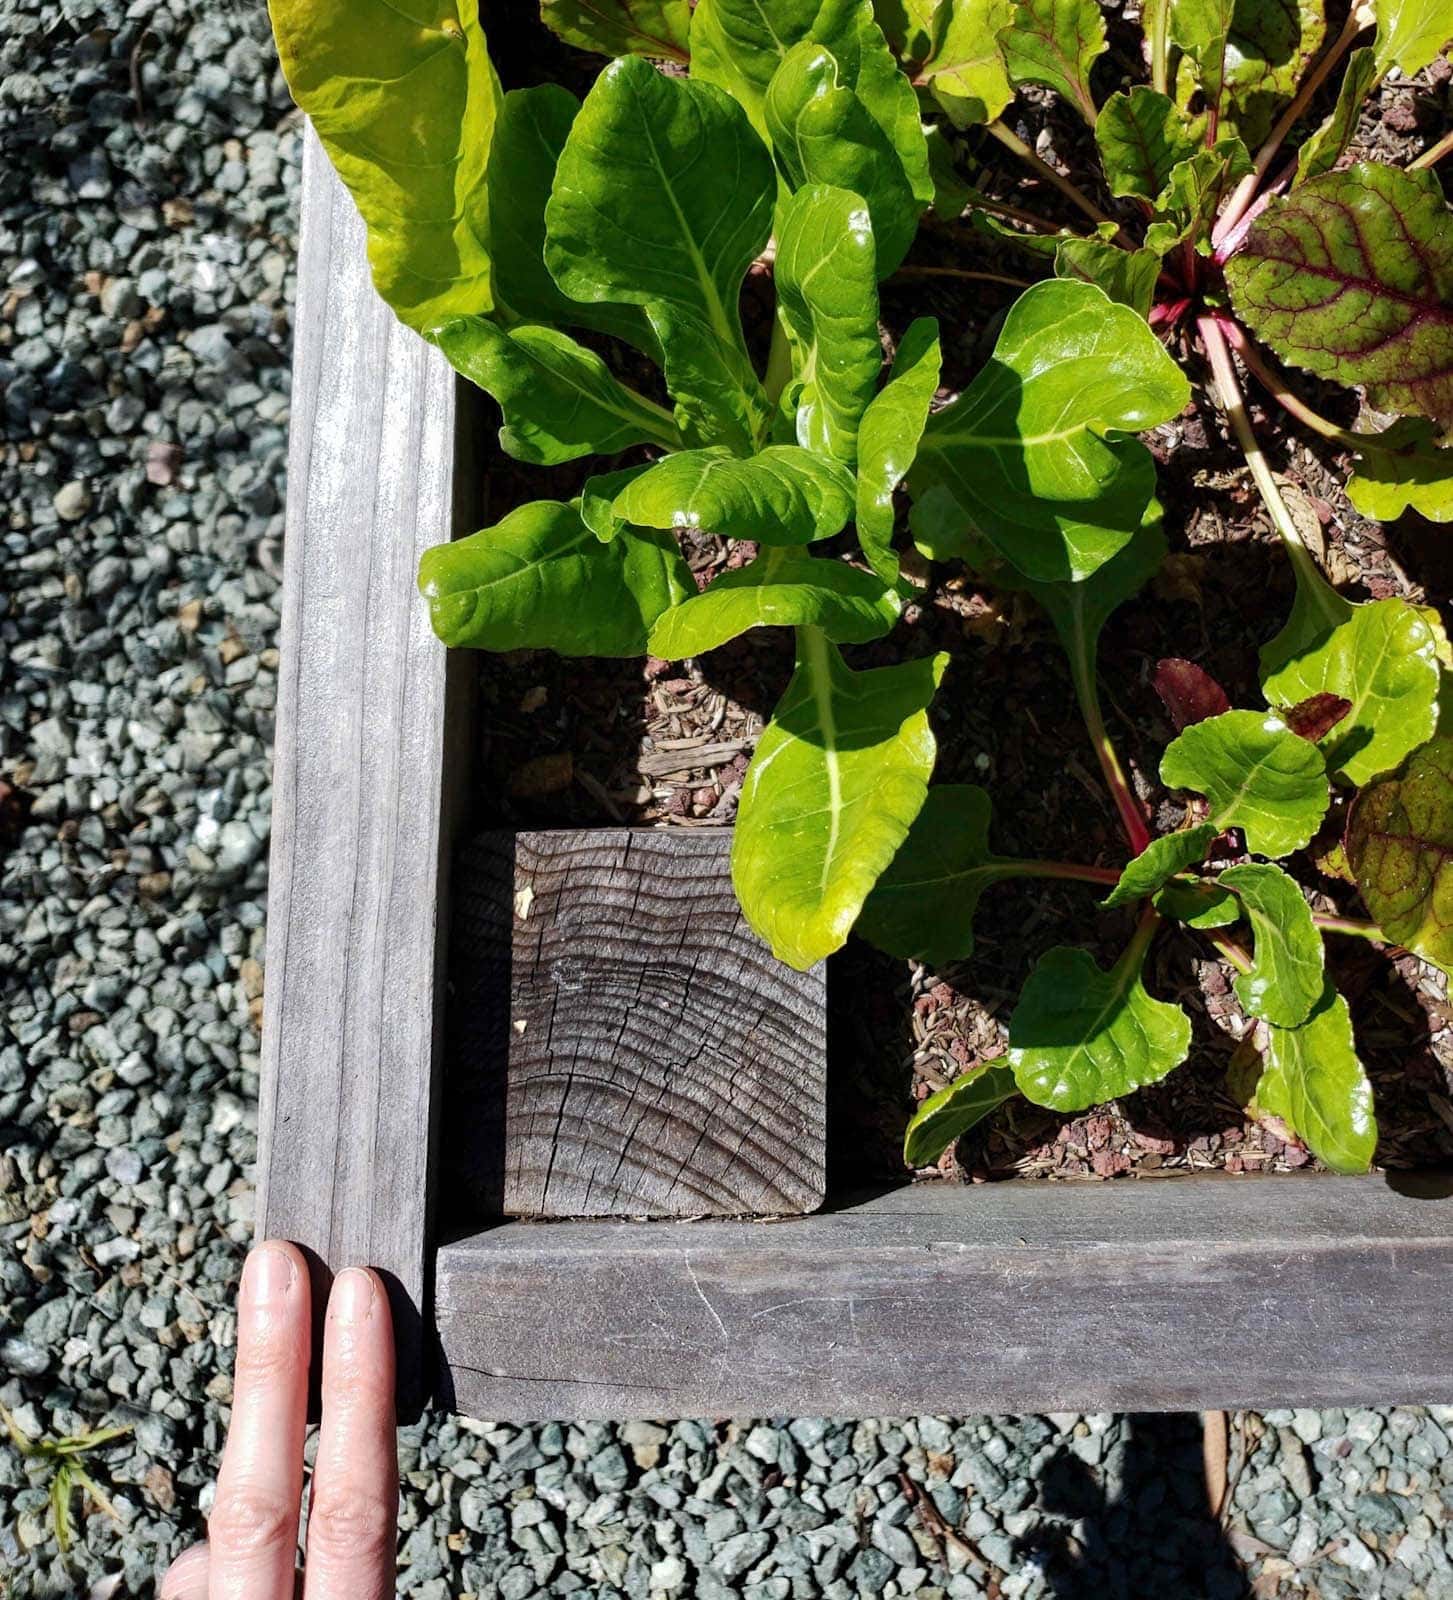
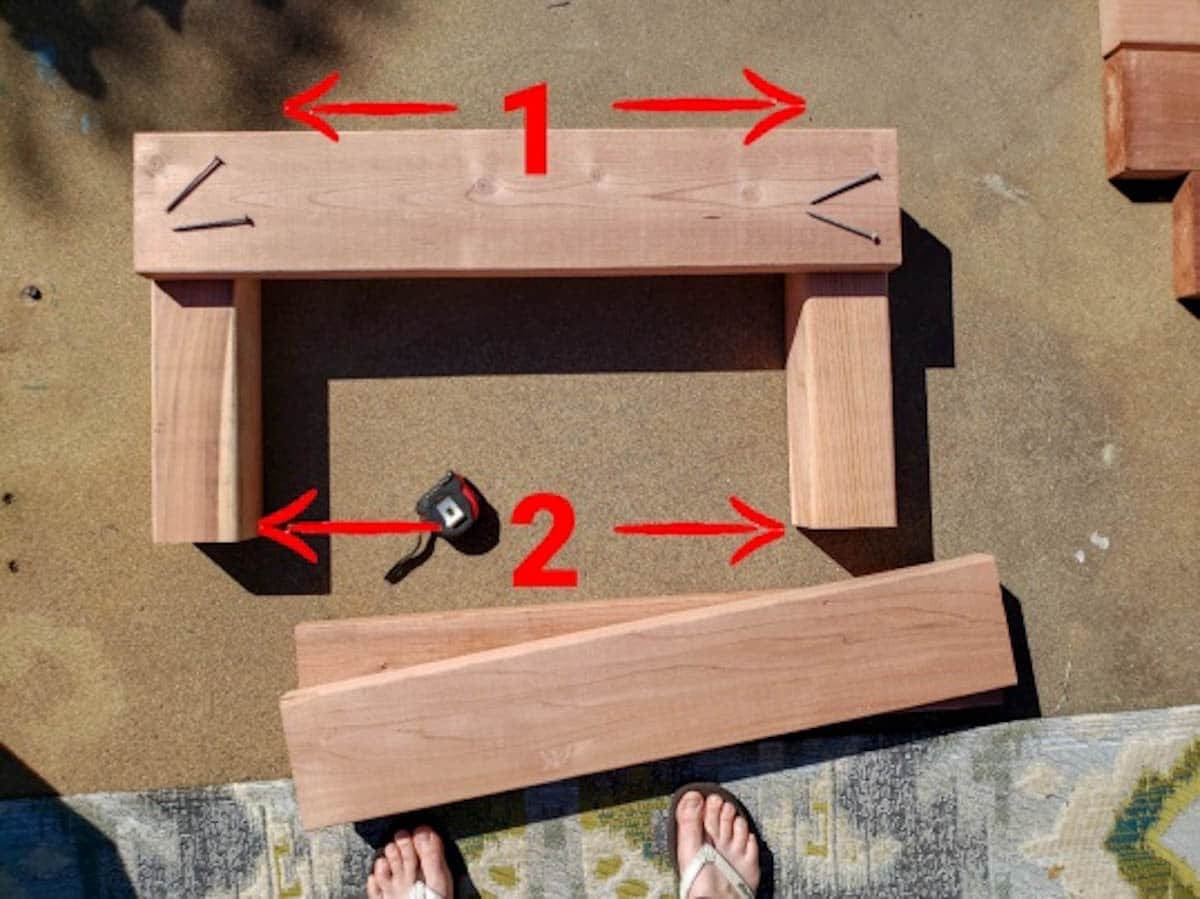
Using our raised bed garden design, your finished bed will end up being about 3 inches wider than you intended unless you cut the shorter sides three inches smaller in advance. For example, if you wish for your final outer dimensions of the bed to be 48”, cut the short end boards at 45 inches each.
This is because the shorter sides of the bed are going to be “sandwiched” between the longer sides, which adds an extra 1.5” inches on each side – or a total of 3 inches in width to the whole bed. See the photo below.
Maybe this doesn’t matter to you! However, it’s important to consider if you’re working with a limited amount of space, plan to add 4 foot wide hardware cloth to the bottom of the beds, or otherwise need your beds to be exactly the width you intended.
The long side boards can be measured and cut to the exact desired length of the bed.
Measuring 4×4 corner pieces
You’ll need four 4×4” pieces for the corners of each bed that are the same height as the bed. To calculate their length, keep in mind that 2×6” boards aren’t truly 6 inches tall – they’re 5.5”. So when you stack three high, your raised bed will really be 16.5 inches tall, NOT 18 inches. (Similarly, 2×4 boards are only 3.5” wide.) Cut the corner pieces to the true height of the bed accordingly.
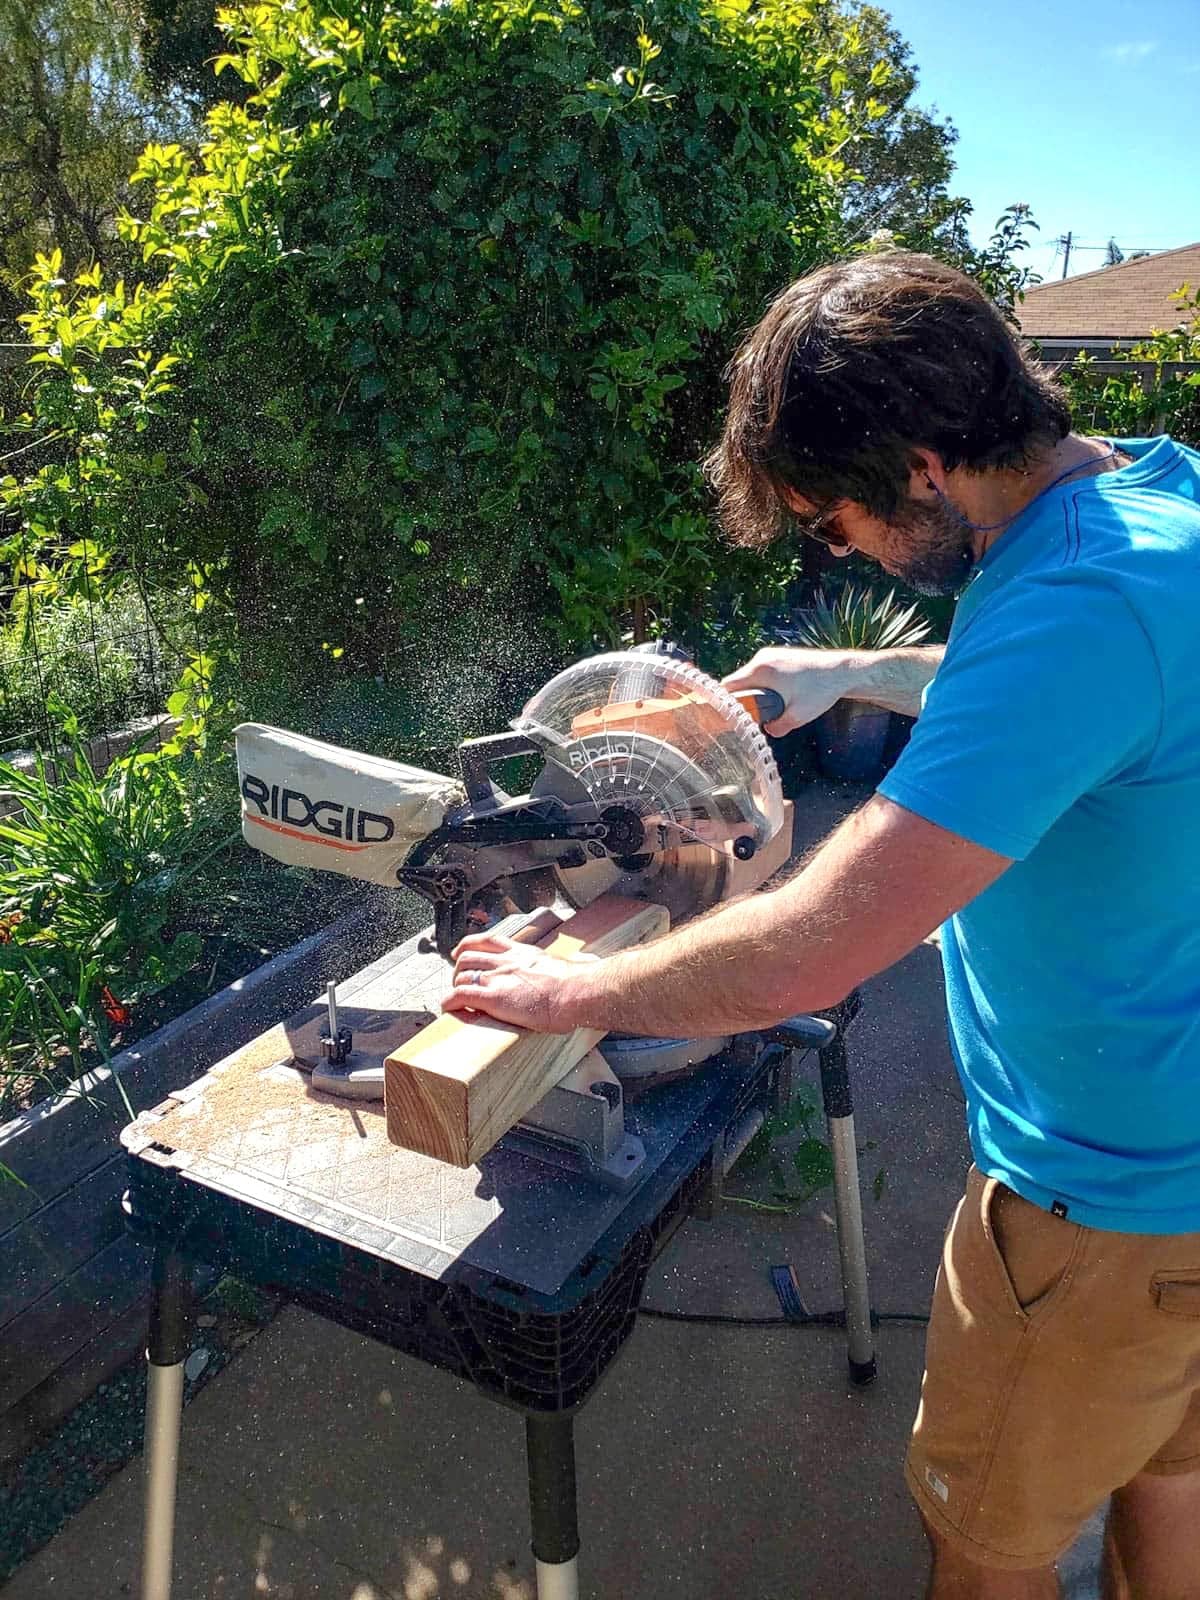
Cut the lumber
To cut lumber at home, we like to use this miter saw. We can mount it on a portable workbench, which makes the work surface very sturdy and safe, and our cuts accurate and straight. It’s also capable of cutting 4x4s! We used a basic circular saw in the past but had to rotate and make numerous cuts to get through a 4×4.

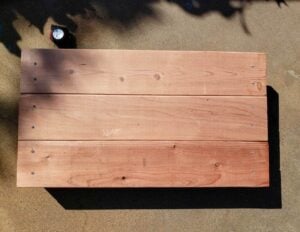
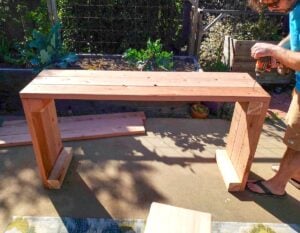
Step 4: Assemble The Shorter Sides First
When we build raised garden beds, we’ve learned it’s easiest to start with the short sides first.
- On a level surface like a garage floor, deck or patio, lay out two of the cut 4×4” corner pieces. Position them the same distance apart that your shortest side boards are.
- Place the short boards on top. Keep the ends of the 2×6” boards flush with the outer edge of the corner 4×4” piece. To make sure everything is nice and square, we measure the distance between 4×4’s at both ends.
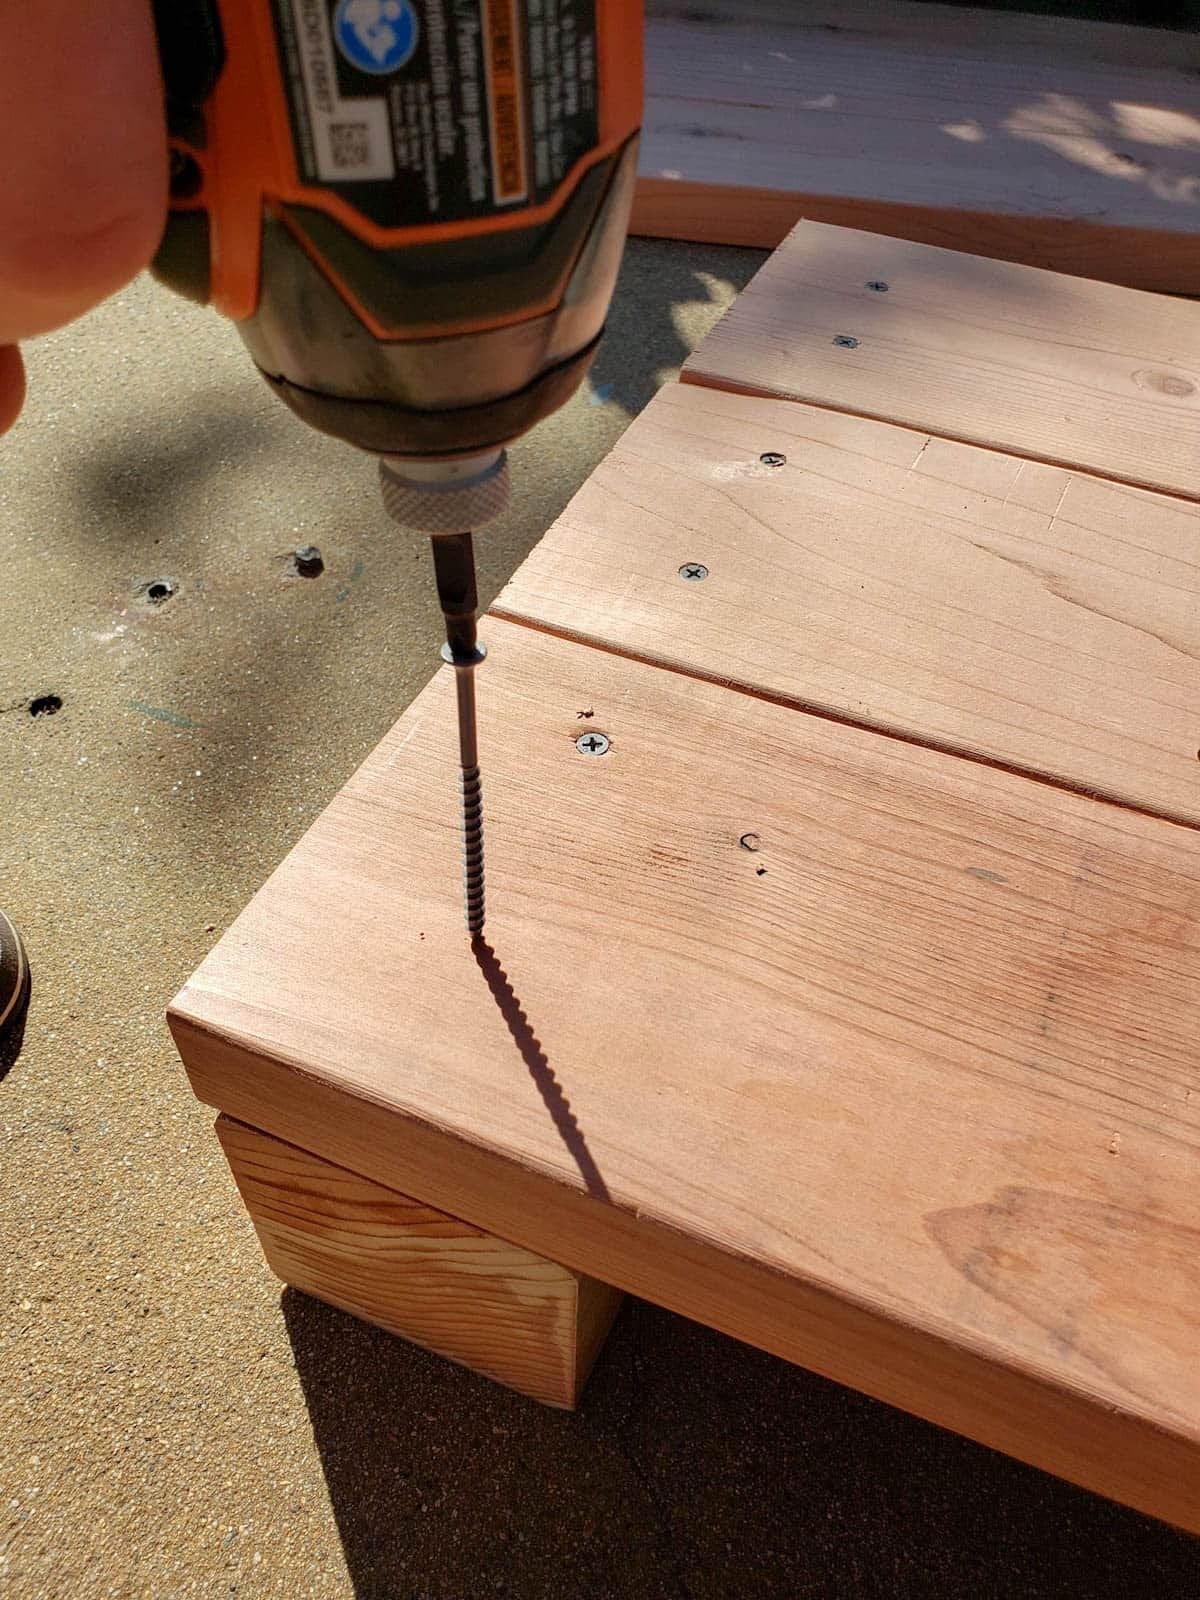
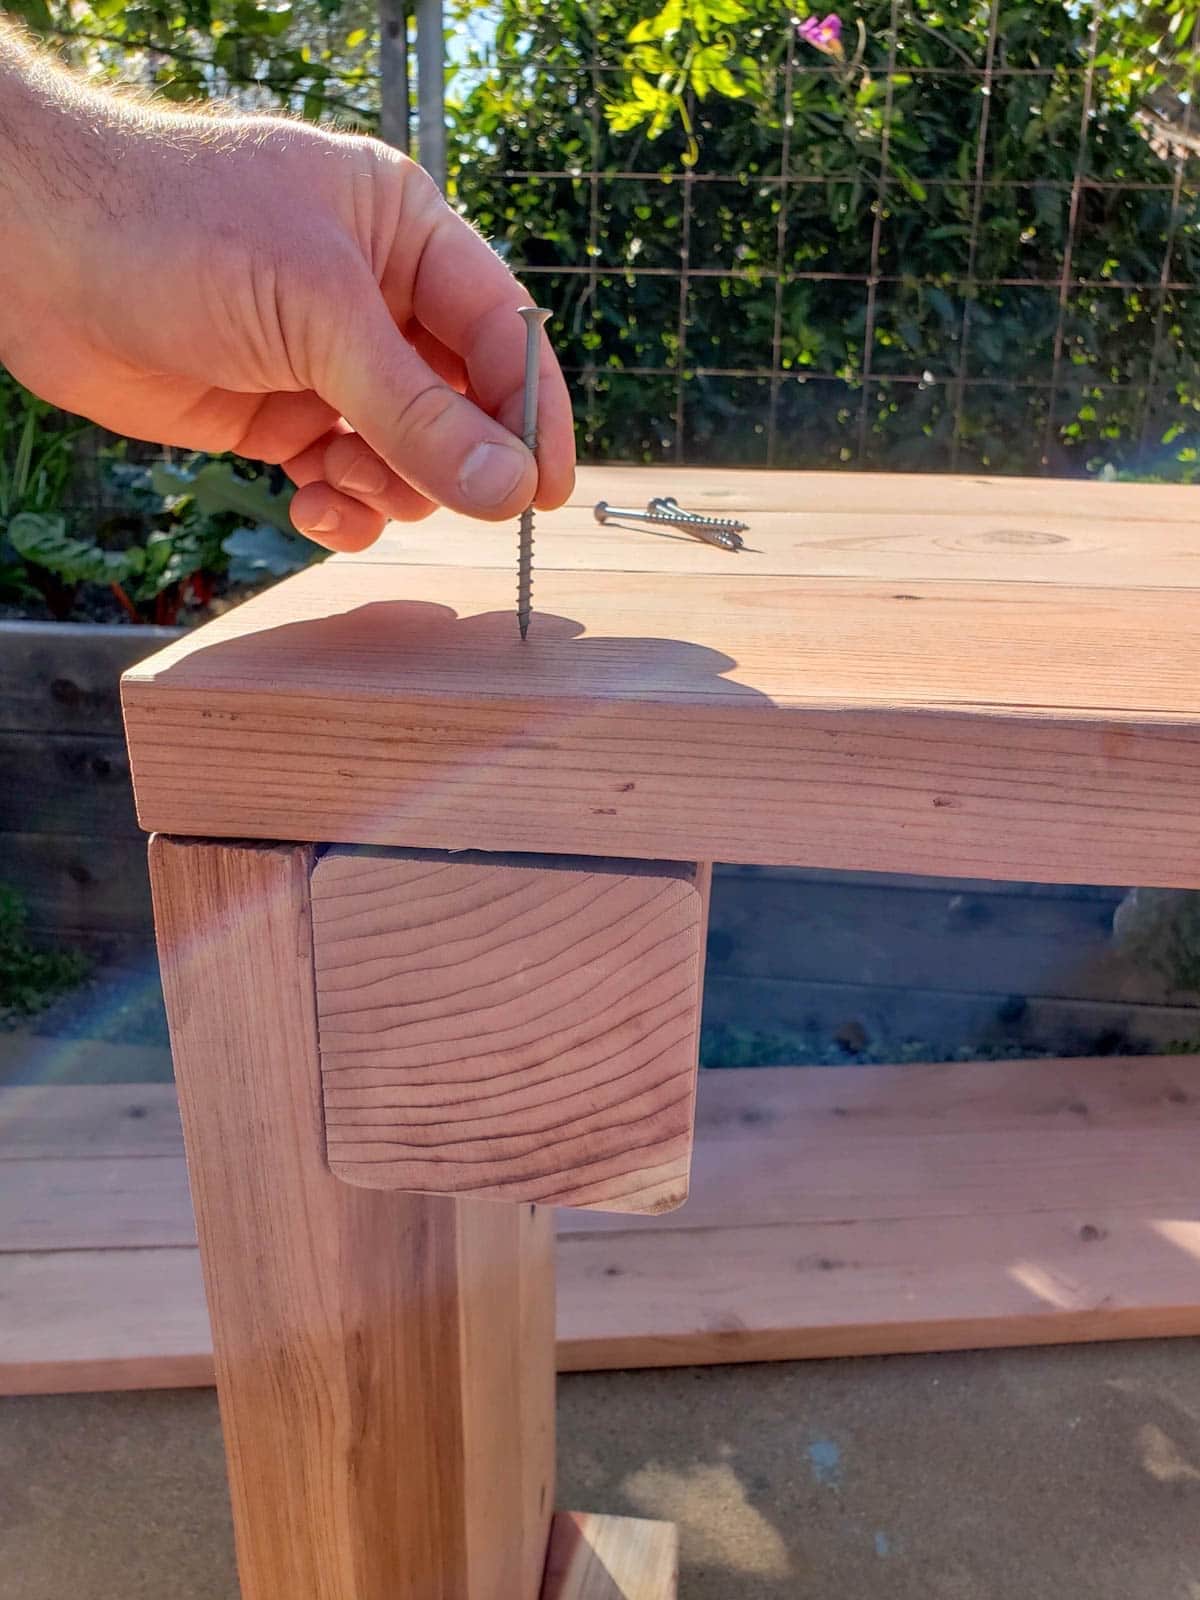
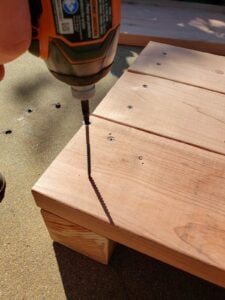
- Next, using 2.5 to 3-inch decking screws and a power drill, add two screws to the end of each 2×6” board, attaching them to the 4×4 below.
- To prevent the 2×6” from splitting, keep the screws at least 1” away from any edges of the board, preferably sinking it into the center of the 4×4”. We personally don’t find the need to drill pilot holes first. The decking screws are great in that regard! If loose boards shift around while you’re working, re-adjust to bring everything back to square.
Repeat this process for the second short side.
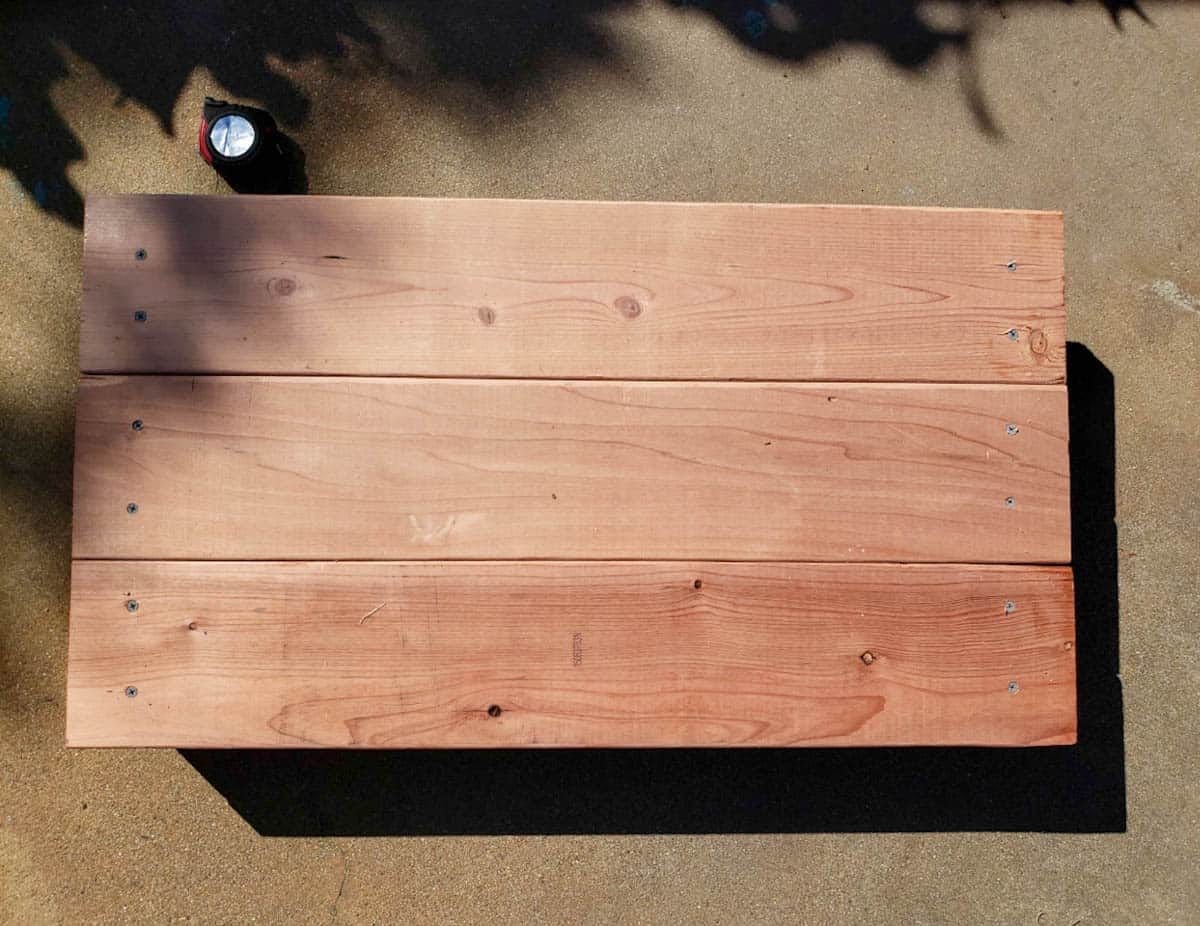
Step 5: Add Long Boards
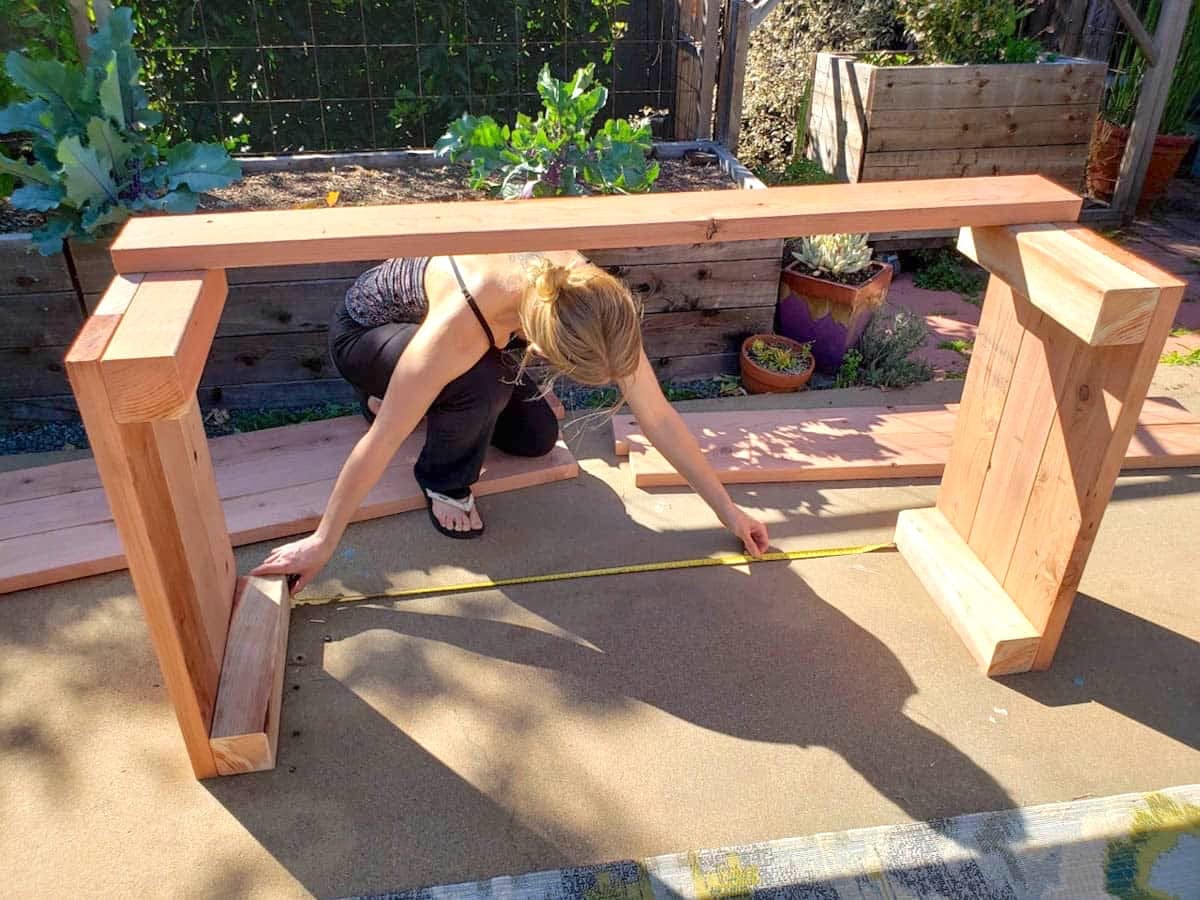
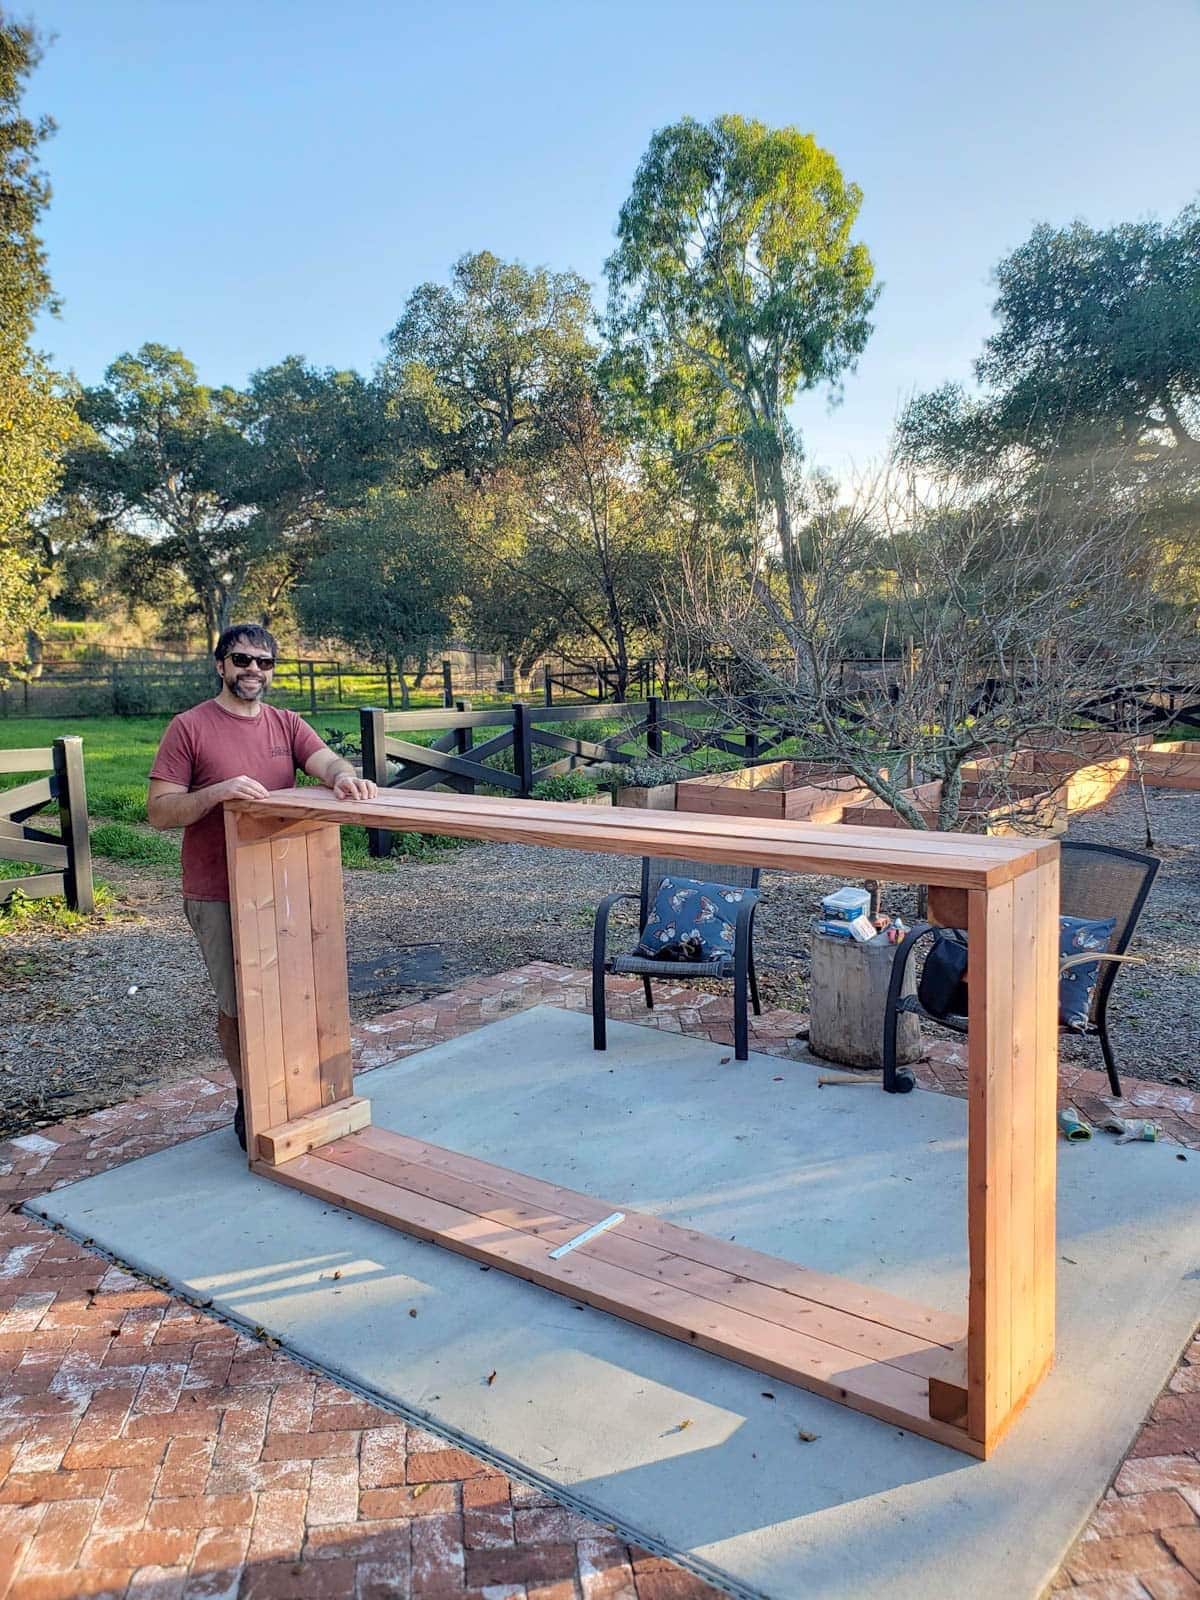
- Now that you have both short sides of the raised bed assembled, stand them up on their sides. Space them at the length the finished bed will be, with the corner 4×4’s facing inward towards each other.
- Next, set your long boards on top, creating a table of sorts. Line up the outermost edges of the long boards flush with the outer face of the short sides. Repeating a similar process as above, measure the distance between all the corners to make sure everything is even and square. See the photo below.
- Once everything is all square, attach the long boards with 2 screws on each end of each 2×6” board. Make sure you’re driving the screws into the center of the 4×4, not the short-side 2x6s. This means your holes are going to be a little further in on the board than they were on the short sides.
- After attaching all boards along one side, flip it all over and repeat the process on the final side of the bed.


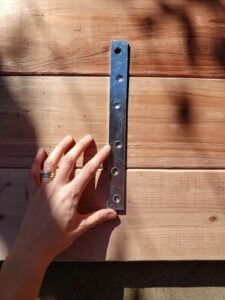
Step 6: Add Side Support
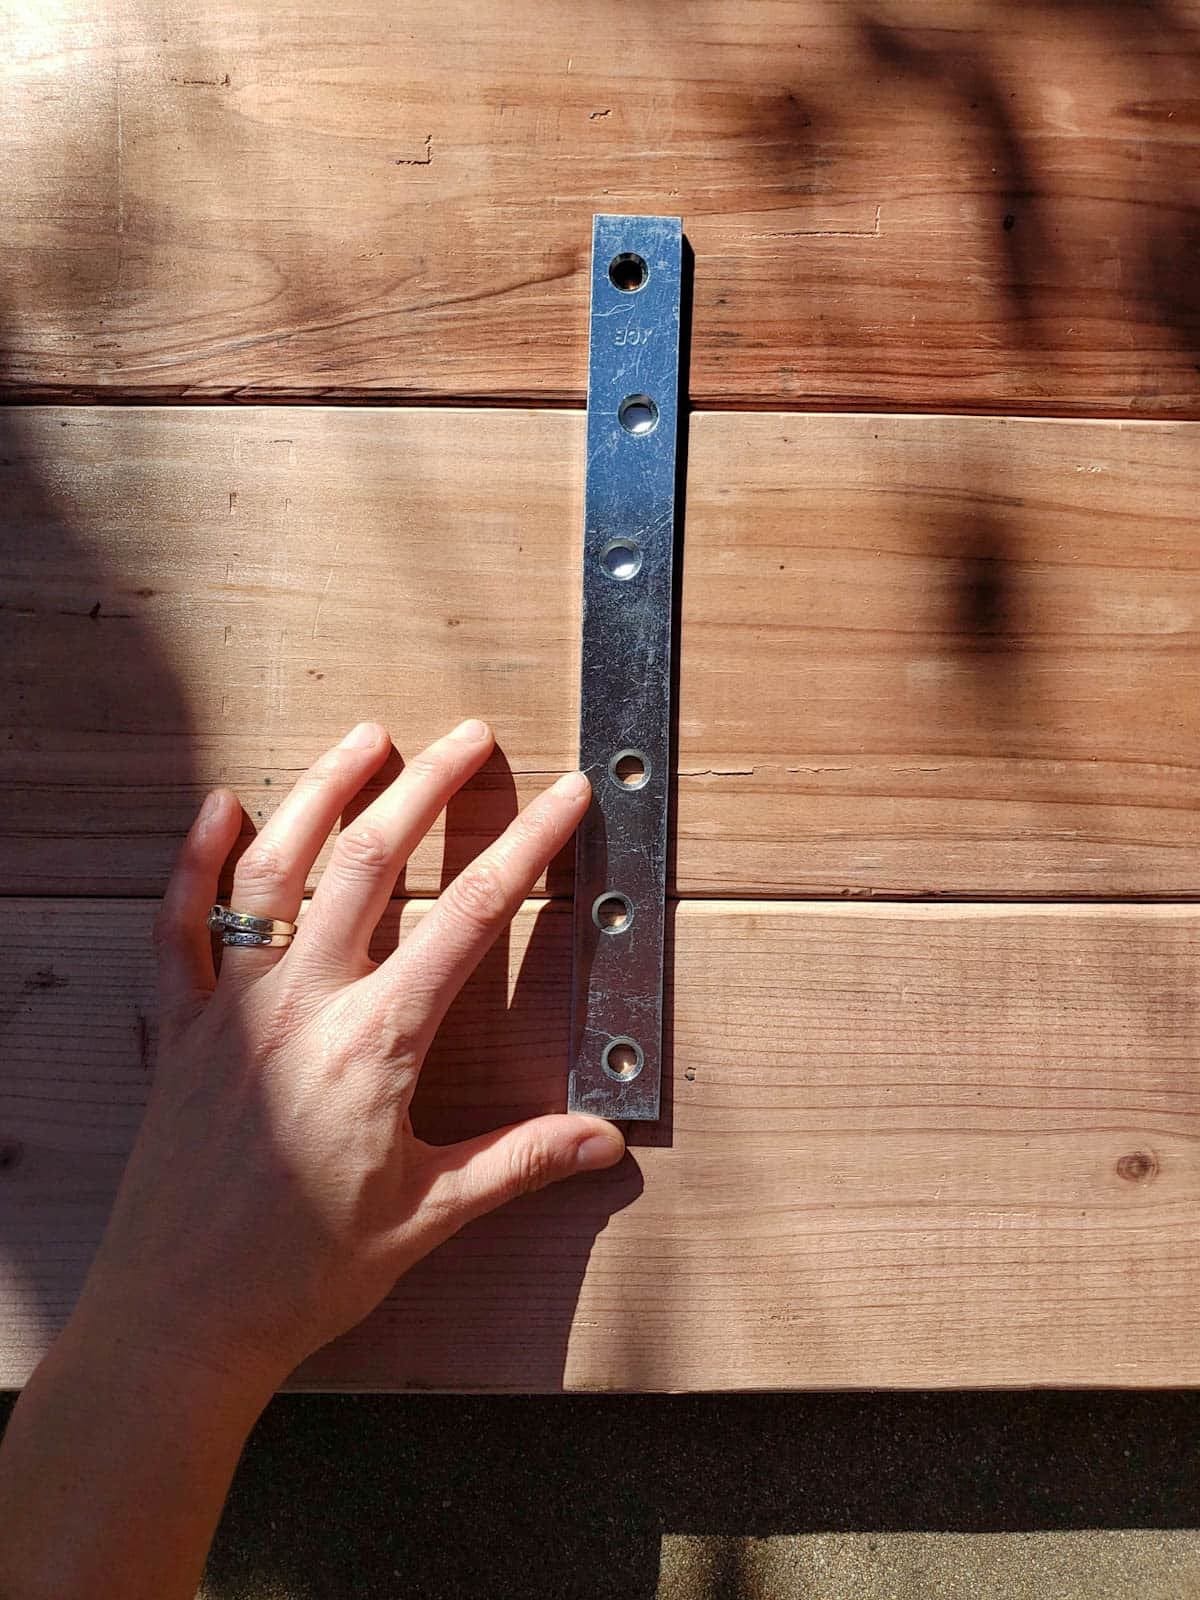
If your raised bed is longer than 6 feet, I suggest adding an additional support to the middle of the longest side – such as a galvanized steel mending brace (shown below). The brace will help prevent bowing, and also help to pull your boards into a tight straight line.
A 12” brace is long enough to span all three side boards on a 16.5” tall bed. If you can’t find a brace long enough, some folks add an additional 2×4” or 2×2” instead, though we prefer the light weight, slim profile and longevity of the metal brace.
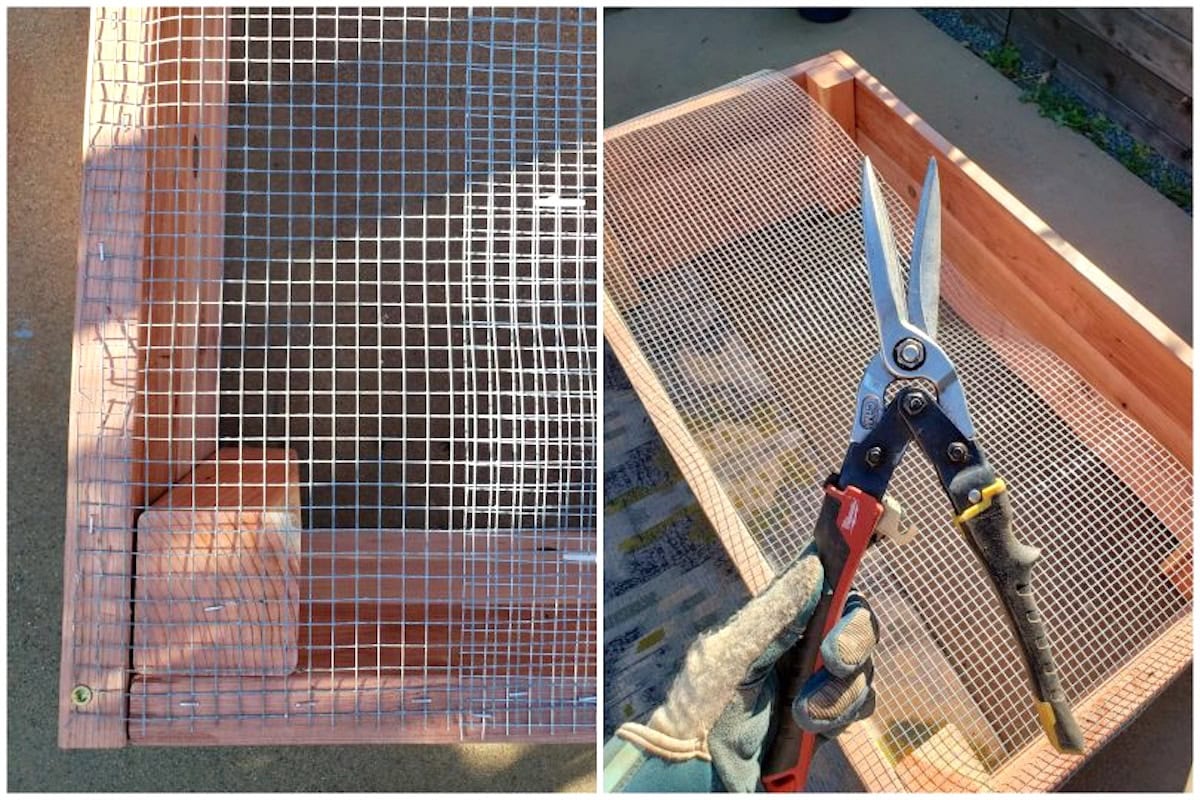
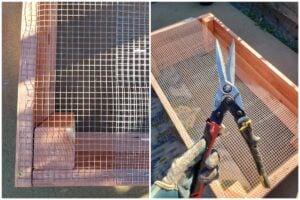
Step 7: Add Hardware Cloth (Optional)
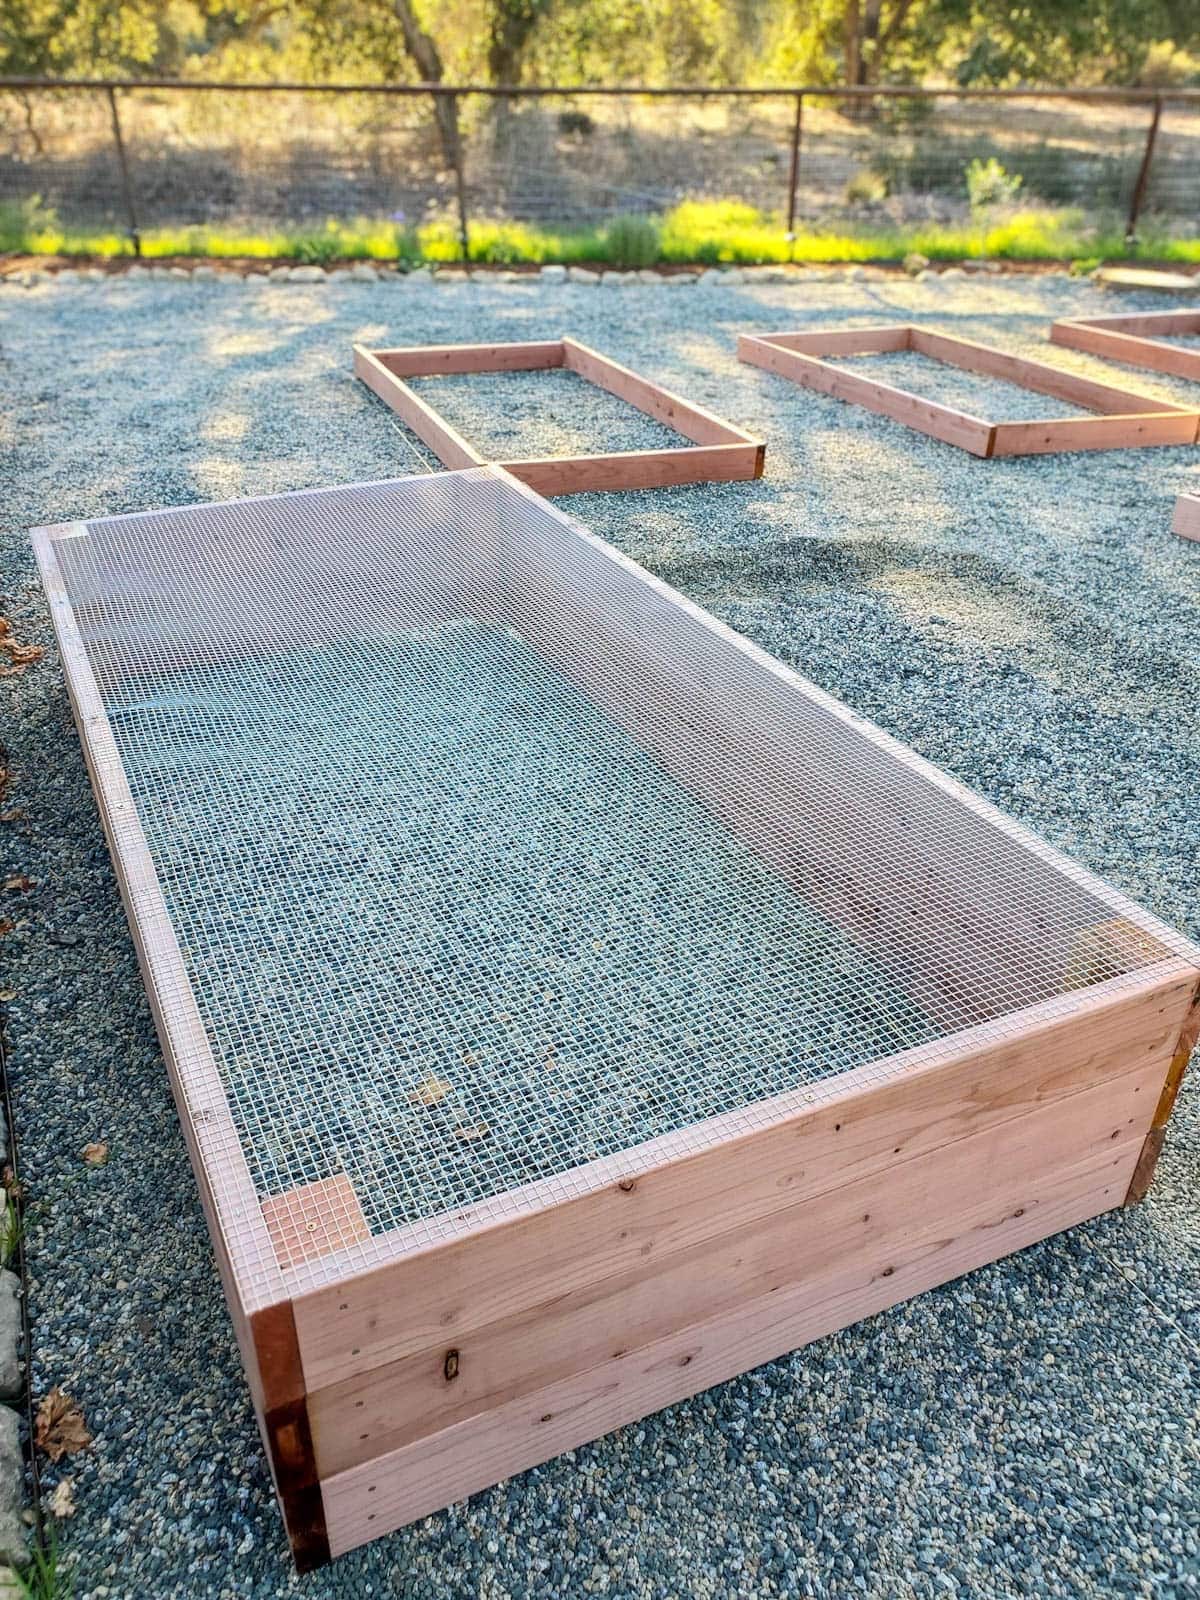
If you have burrowing pests like gophers, moles, or ground squirrels, definitely add hardware cloth to the bottom of your raised garden beds to keep them out! Gophers are so bad in our area, nothing would survive if we didn’t.
Hardware cloth is a mesh wire fencing material made from strong galvanized metal. Thus, it won’t rust and disintegrate with time as chicken wire does. It also can’t be chewed through by rodents like chicken wire can. This makes it the ideal material for lining garden beds, making gopher baskets for fruit trees, and predator-proofing chicken coops.
Hardware cloth is commonly sold in 2, 3 or 4-foot wide rolls of varying lengths. Ideally, choose a size that fits across the bottom of your bed frame. If the bed is too wide, you can combine two pieces, overlapping and attaching them in the middle with either heavy-duty zip ties or bits of galvanized wire.
We like to use wide-head cabinet screws to connect the hardware cloth directly to the bottom of the raised beds, which pinches the wire between the head and the wood. We’ve also used a staple gun though it’s not quite as secure as screws. Sometimes we do a little of both, such as screws in the corners or every couple of feet with staples in between.
It’s easiest to cut hardware cloth with aviation snips.
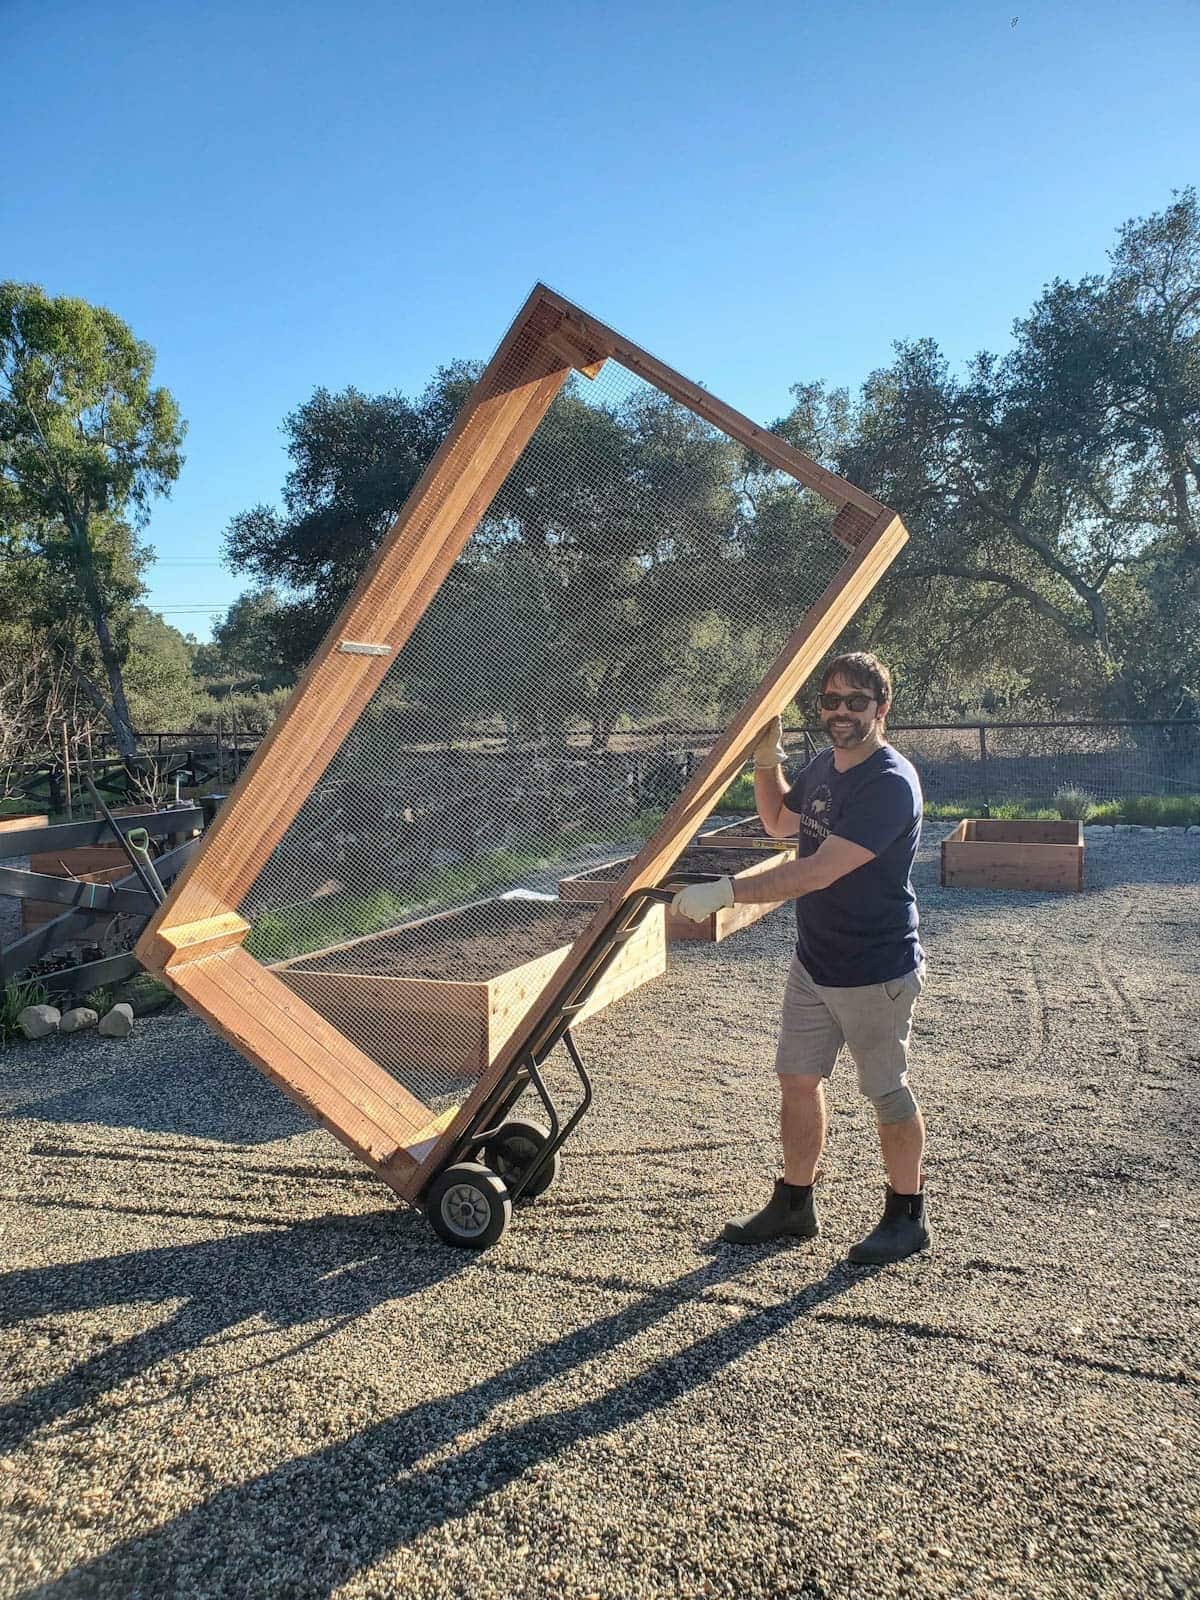
Step 8: Install Raised Bed
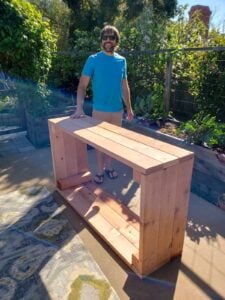
The raised bed is built, all the finishing touches are in place. It’s finally time to get it settled into its new home!
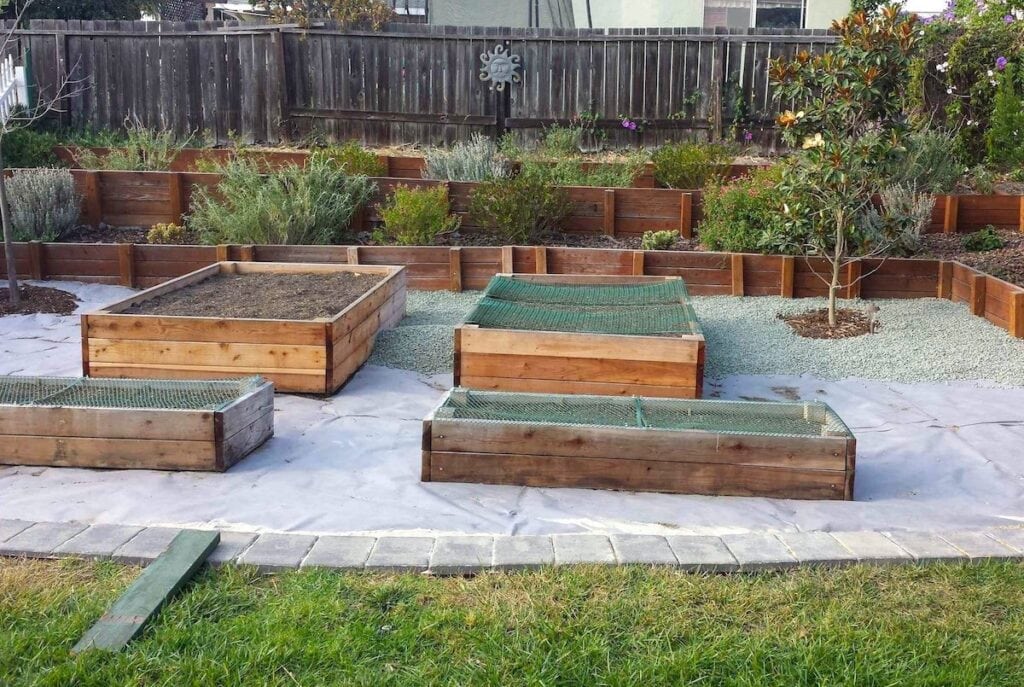
The ground below your raised garden beds should be flat, level, and free of excess rocks, weeds, or other debris. That way, your beds can sit as level as possible – which is important for good even water distribution. If the space is slightly sloped, do your best to dig out a fairly flat pad for each raised bed.
If you’re setting raised garden beds right on top of your native soil (without weed barrier below), you may want to amend and/or till the soil first. Particularly if your bed is 12” deep or less, or if your native soil is rocky, compact, clay, or otherwise less-than-ideal, loosen the soil and work in some aged compost before setting the bed down on top. Your plants and their roots will thank you!

What to Put Under Raised Beds for Weed Prevention
Next, you can decide if you want to put landscape fabric below your raised garden beds or not, depending on how noxious the weeds are in your yard. If you do, I highly recommend using a thick, quality fabric that will stand the test of time, not the stretchy flimsy kind that will quickly degrade and make a hot mess!
We have gnarly weeds, so we always put contractor-grade landscape fabric below our beds and pathways. It’s long-lasting, permeable to water (so it drains very well), but doesn’t allow weeds to grow up through it.
For less invasive weeds, a layer of cardboard or natural burlap in the bottom of the bed (and/or around the outside) will smother minor weeds quite well. However, keep in mind that it will biodegrade and disintegrate within a couple years.
Step 9: Fill Your Bed with Soil
After your new DIY raised garden bed is all situated in place, it’s time to fill it up! Come learn how we fill our raised beds with soil, including the blend of soil, compost, aeration additives, and natural amendments we use for optimal plant health. The guide explores options for both bagged or bulk soil. You can also learn about the pros and cons of filling raised beds with the hugelkultur method here.
Step 10: Get Growing
Now it’s time to enjoy the fruits of your labor. If you need any inspiration on what to plant in your new DIY raised garden bed, check out this list of our favorite summer crops or the best cool season vegetable varieties for a fall or winter garden. And don’t forget to plant some beautiful easy companion flowers for pollinators!
All our raised beds are watered via automatic drip irrigation (connected prior to adding soil). It saves us SO much time, energy, water, and the plants love it. See more gardening resources at the end of this post.
Please enjoy this video tutorial of everything we just went over together.

And that concludes this lesson.
Now you know everything you need to confidently site, design, and build a DIY raised garden bed. It is only a matter of time that you’ll be harvesting delicious and nutritious homegrown produce to feed your family!
I hope you found this helpful and informative. If so, please leave a review below! Feel free to ask questions in the comments as well.
You may also like:
- How to Install Drip Irrigation in Raised Garden Beds (Drip Tape)
- Easy Raised Bed Drip Irrigation (Connected to Faucet or Spigot)
- How to Build a Trellis: Inexpensive & Easy Designs
- A Beginner’s Guide to Using a Hobby Greenhouse
- Seed Starting 101: How to Sow Seeds Indoors
- When to Start Seeds Indoors: Planting Calendars for Every Zone
- How to Amend & Prepare a Raised Bed Soil: Before Planting or Between Seasons

How to Build a DIY Raised Garden Bed
Equipment
- Miter saw or skill saw
- Power Drill
- Measuring Tape
- Aviation snips (if using hardware cloth on the bottom)
Ingredients
- Lumber – amount various depending on the desired bed size. To make a very durable raised bed, I recommend using 2×6" redwood or cedar boards (or larger) over 2x4s or thinner 1"-thick boards.
- 4x4s for corner supports, 4 per bed, cut to the same height as the bed
Instructions
Prep
- Decide on bed size. It's best to make raised beds no wider than 4 feet across the short side, no longer than 8 to 10 feet total, and at least 12" deep (16-18" preferred for optimum plant health, especially if you plan to put a weed barrier below the beds). 4×8' is a popular raised garden bed size, but we've made a huge variety!
- Calculate lumber needs based on your chosen bed size. Draw a sketch to help, like the examples I've provided. To make 4×8' x 16.5" deep beds like our current garden, you'll need either (9) 8-foot 2×6 boards per bed, or (6) 12-foot 2×6 boards, plus one 8-foot 4×4".

- Seal Wood (Optional) – It’s easiest to apply sealer before cutting the wood, or at least before assembling the beds. We used this nontoxic sealer to both the inside and outside of the beds.
- Measure, mark, and cut your wood to desired size. Using our design and assembly method, measure and cut the shorter ends of the beds three inches shorter than you want the bed to be. For example, if you wish for your final outer dimensions of the bed to be 48”, cut the short end boards at 45 inches each. When cutting corner 4x4s, keep in mind that 2×6" boards aren't a true 6" wide – they're 5.5" wide. So, three stacked high will result in a 16.5" bed, NOT 18". Cut 4×4's to the finished bed height. The long sides can be cut exactly how long you want the final bed.


Assemble Short Ends First
- On a level surface like a garage floor, deck or patio, lay out two of the cut 4×4” corner pieces. Position them the same distance apart that your shortest side boards are.
- Place the short boards on top. Keep the ends of the 2×6” boards flush with the outer edge of the corner 4×4” piece. To make sure everything is nice and square, we measure the distance between 4×4's at both ends.
- Next, using 2.5 to 3-inch decking screws and a power drill, add two screws to the end of each 2×6” board, attaching them to the 4×4 below.
- To prevent the 2×6” from splitting, keep the screws at least 1” away from any edges of the board, preferably sinking it into the center of the 4×4”. We personally don’t find the need to drill pilot holes when using decking screws.

- Repeat this process for the second short side.

Add Long Sides
- Now that you have both short sides of the raised bed assembled, stand them up on their sides. Space them at the length the finished bed will be, with the corner 4×4’s facing inward towards each other.
- Next, set your long boards on top, creating a table of sorts. Line up the outermost edges of the long boards flush with the outer face of the short sides. Repeating a similar process as above, measure the distance between all the corners to make sure everything is even and square. See the photo below.
- Once everything is all square, attach the long boards with 2 screws on each end of each 2×6” board. Make sure you’re driving the screws into the center of the 4×4, not the short-side 2x6s.
- After attaching all boards along one side, flip it all over and repeat the process on the final side of the bed.

- If your raised bed is longer than 6 feet, I suggest adding an additional support to the middle of the longest side – such as a galvanized steel mending brace
- You've just built a DIY raised garden bed!


Adding Hardware Cloth for Gopher Proofing (Optional)
- Hardware cloth is commonly sold in 2, 3 or 4-foot wide rolls of varying lengths. Ideally, choose a size that fits across the bottom of your bed frame. If the bed is too wide, you can combine two pieces, overlapping and attaching them in the middle with either heavy-duty zip ties or bits of galvanized wire.
- We like to use wide-head cabinet screws to connect the hardware cloth directly to the bottom of the raised beds, which pinch the wire between their head and the wood. We’ve also used a staple gun though it’s not quite as secure as screws. Sometimes we do a little of both, such as screws in the corners or every couple of feet with staples in between.


Installing Raised Garden Bed
- Locate raised garden beds in an open, sunny area that receives at least 6 to 8 hours of direct sunlight per day. A south-facing location is ideal (if you live in the northern hemisphere), which could include against a south-facing wall or fence.
- The ground below your raised garden beds should be flat, level, and free of excess rocks, weeds, or other debris. That way, your beds can sit as level as possible – which is important for good even water distribution.
- Maintain at least 28 inches of space between beds at minimum, though we prefer 36-48 inches to allow easy access around the beds with a wheelbarrow and prevent beds/plants from shading one another.
- To prevent weeds, you can use commercial grade landscape fabric under the raised beds (if invasive, persistent weeds are present) or put cardboard or burlap below the beds to smother less noxious weeds, which will degrade within a couple years.


126 Comments
Laurie Gerber
What a thoroughly excellent tutorial!!! I’m heading out to measure my space. Thank you for the practical hints and inspiration.
Aaron (Mr. DeannaCat)
Hi Laurie, we are glad you found the tutorial so helpful! We have made raised beds of all shapes and sizes so it is really up to the space that you have and the design you are going for. Good luck!
Colin
Hi there,
Slightly off topic ish. But question about the garden seal product. I am putting in a fence around my raised bed garden. Would you use the garden seal as an in ground preservative for the fence posts or go another route? Unsure if typical in ground preservatives are a good idea being near the garden.
Thank you!
Aaron (Mr. DeannaCat)
Hi Colin, it looks like the same company offers a product called Fence-Seal which may be more in line with what you are looking for although I haven’t compared the two products side by side to see the exact differences between them, although it looks like all of their products are non-toxic. I guess it just depends on how big of a fence you plan on building, were you going to use 4×4 or metal fence posts to create a 5-7 foot fence? For in ground posts, whether they are metal or wood, most people would use concrete in the post holes and you wouldn’t worry about sealing the wood below ground. Reach out if you have any other questions and good luck with your project!
Laurelei Ballard
This is exactly what I was looking for and so well explained. I have wanted to surround my slab patio and you did what I envisioned. May I ask how you attached the fencing/trellis to those beds? Thanks.
Aaron (Mr. DeannaCat)
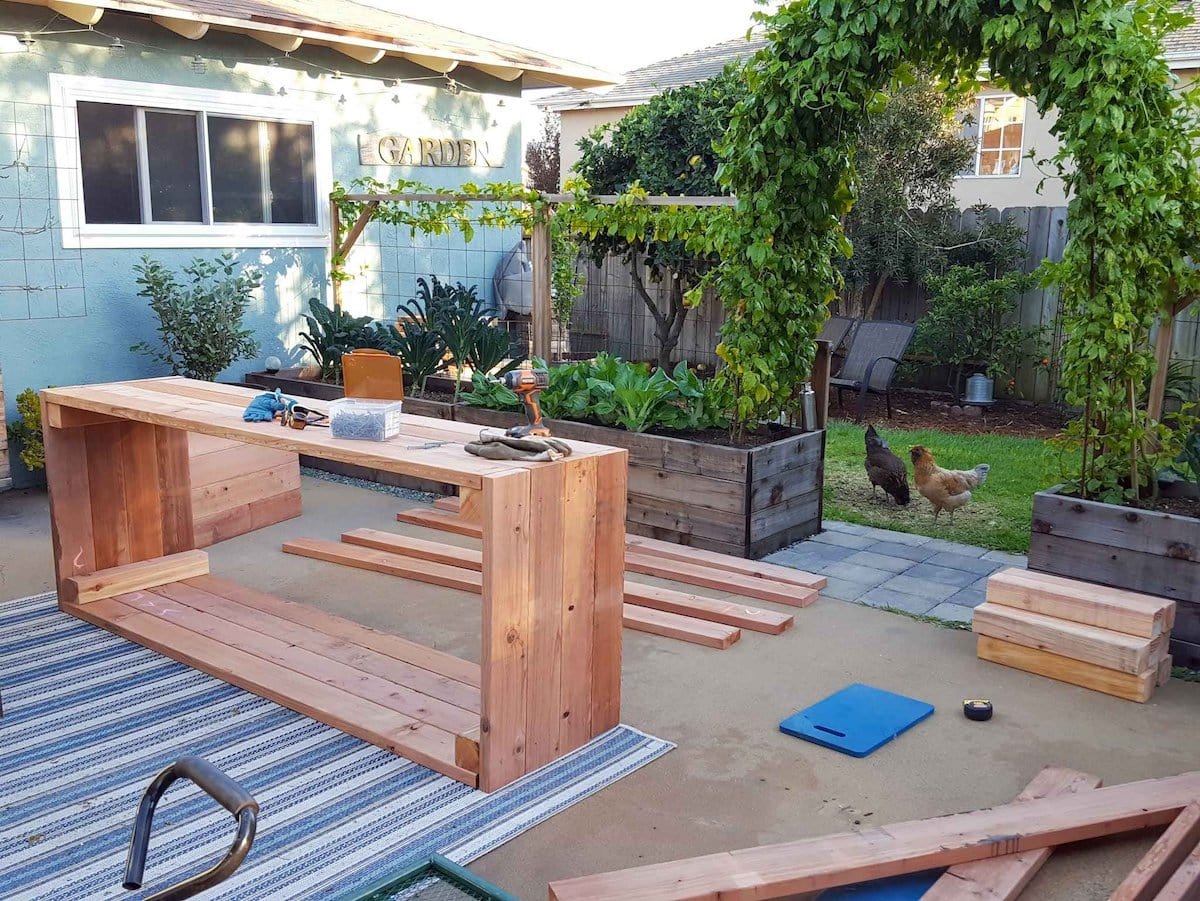
Hi Laurelei, we created the trellises with wooden frames by using 2×2 redwood and attaching sections of concrete remesh to the back and affixing the remesh to the wood with wide headed screws, from there you attach the side lengths (which you leave longer in length than the remesh screen) to the back of your raised beds with screws. We have an article all about how to make your own trellises here. We had this setup in our previous property because we had chickens that free ranged the backyard, this kept them off the patio and from eating our veggies in the raised beds. Hope that helps and good luck!
Hamid Sheikhi
Hello,
In order to minimize the cutting of hardware cloth, just curious which approach you’d recommend.
Would it be better to just lay down the hardware cloth in the area where the raised garden bed would be situated and place the raised garden bed on top of it, or would you instead recommend attaching the hardware cloth to the bed as you have done on these tutorials?
Thank you.
Aaron (Mr. DeannaCat)
Hi Hamid, we typically attach the hardware cloth to the beds themselves as to ensure that there aren’t any openings in between the cloth and the raised bed that gophers may be able to get into with time. We typically build our raised beds to be 4 feet wide from edge to edge which is the perfect size for 4 foot hardware cloth to attach to the edges, you just need to cut off the length of cloth to fit the lengths of your raised beds. If your raised beds are 2 or 3 foot wide, you can always get hardware cloth in a similar width so it will attach easiest to fit the width. Hope that helps and reach out if you have any other questions.
Hamid
That makes sense. Thank you so much for such a quick response!
Cathy
Hi,
Thank you so much for sharing this! I just want to be sure I understand the measurements in this plan. If I am trying to build a 4×8 raised bed, when I attach the 8 foot long boards onto the 4ft boards, I will lose the width of the 4′ boards (ex. lose 1.5″ on both sides if 1.5″ thick boards) so the internal growing length will not be 8′ but rather 7’9″? Is that correct? It looks like no matter how I attach the boards (assuming using 8′ and 4′ boards) the internal growing dimension will never be 8×4 unless I use longer boards?
Aaron (Mr. DeannaCat)
Hi Cathy, when we construct our 8×4 foot raised beds, we are aiming for an exterior dimension of 8×4 feet. We cut the shorter boards 45″ in length as opposed to 48″ to fit within this dimension, I just measured the inner diameter of our raised beds and they were 93″x 45″ or 7.75’x 3.75′. But you are correct, you need to use larger boards if you want the inner diameter of the beds to truly be 8×4 feet, however, there will most likely be an excess of wasted material (wood) if you try and make up for the 3 inches on each end as 10 foot boards would be the next size you would be able to use, wasting close to 2 feet of board that you couldn’t use unless you have another project in mind. Hope that helps and good luck!
Amy
Amazing job! I love all the information you have shared. It will save an inexperienced person like me a lot of time and frustration! Thank you so much.
I am sure you had this information written in your post somewhere, but I couldn’t find it. In the video you mentioned that you sealed the wood and used caulking between the boards to help keep moisture out. What did you use for this and did you do it both on the inside and outside walls of the raised garden bed?
Thank you again- Amy
Aaron (Mr. DeannaCat)
Hi Amy, we used premium exterior silicone to caulk the inside seams of the raised beds. Check out our article on 7 Ways To Make Wood Garden Beds Last: Nontoxic Sealer & More for a more in depth look at the process. Hope that helps and have fun growing!
Gabe Sanders
Wow! Thanks for all the great information. I think I will start on this project later this coming week.
Denise
Hi, What did you use to join the two pieces of hardware cloth together where they overlap? These boxes are so pretty an the garden looks beautiful. It will be so easy to work and grow in these! Thank you for the plans.
Aaron (Mr. DeannaCat)
Hello Denise, when we have had to use two pieces of hardware cloth, we used zip ties to connect the two pieces together at the middle. We have since started making our raised beds the same width or narrower than the hardware cloth we are working with as we can just roll out the hardware cloth and it fits edge to edge with the bed. Most of our current raised beds are 8×4 feet and the 4 foot hardware cloth fits great, you can do the same with a 2 or 3 foot bed as they make hardware cloth that width as well. Hope that helps and good luck with your raised bed construction!
Phil
Great article Really helpful thanks
Minor correction Redwood and Cedar are both softwoods.
Adrienne Ricker
Thank you so much for this! I just moved into a rental that has beds constructed by the previous tenants and wish to add some more. I went to move some of the beds around and discovered all the existing ones are termite infested. Is this normal? Is there a way to prevent it? Will it be bad for the plants? What is the concern that they will spread to the house? THANK YOU!
Aaron (Mr. DeannaCat)
Hi Adrienne, the raised beds that you inherited are likely quite old and that is somewhat normal for there to be termite activity in raised beds that have been in the ground for a number of years. The only way to prevent it is to use rot resistant wood such as redwood or cedar, you can also build a raised bed with corrugated steel with a wooden frame. I wouldn’t be too worried about the termites and their effects on your plants or house in regards to having raised beds. You can also check out our article on Choosing the Best Materials for Raised Garden Beds for more ideas. Hope that helps and good luck!