
How to Build a DIY Raised Garden Bed
Learn how to build a durable DIY raised garden bed with our step-by-step guide, including tips on the best wood options, bed sizes, location, layout and spacing, weed prevention, gopher-proofing, installation, and more!
Equipment
- Miter saw or skill saw
- Power Drill
- Measuring Tape
- Aviation snips (if using hardware cloth on the bottom)
Ingredients
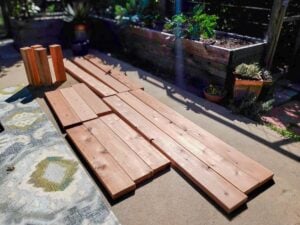
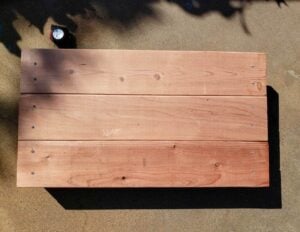
- Lumber - amount various depending on the desired bed size. To make a very durable raised bed, I recommend using 2x6" redwood or cedar boards (or larger) over 2x4s or thinner 1"-thick boards.
- 4x4s for corner supports, 4 per bed, cut to the same height as the bed
Instructions
Prep
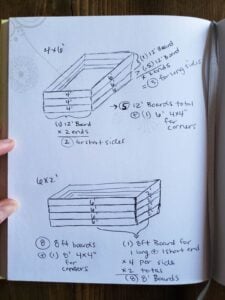
- Decide on bed size. It's best to make raised beds no wider than 4 feet across the short side, no longer than 8 to 10 feet total, and at least 12" deep (16-18" preferred for optimum plant health, especially if you plan to put a weed barrier below the beds). 4x8' is a popular raised garden bed size, but we've made a huge variety!
- Calculate lumber needs based on your chosen bed size. Draw a sketch to help, like the examples I've provided. To make 4x8' x 16.5" deep beds like our current garden, you'll need either (9) 8-foot 2x6 boards per bed, or (6) 12-foot 2x6 boards, plus one 8-foot 4x4".
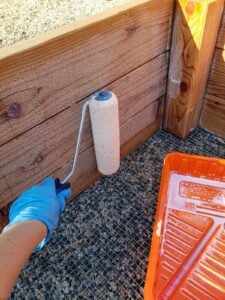
- Seal Wood (Optional) - It’s easiest to apply sealer before cutting the wood, or at least before assembling the beds. We used this nontoxic sealer to both the inside and outside of the beds.
- Measure, mark, and cut your wood to desired size. Using our design and assembly method, measure and cut the shorter ends of the beds three inches shorter than you want the bed to be. For example, if you wish for your final outer dimensions of the bed to be 48”, cut the short end boards at 45 inches each. When cutting corner 4x4s, keep in mind that 2x6" boards aren't a true 6" wide - they're 5.5" wide. So, three stacked high will result in a 16.5" bed, NOT 18". Cut 4x4's to the finished bed height. The long sides can be cut exactly how long you want the final bed.
Assemble Short Ends First
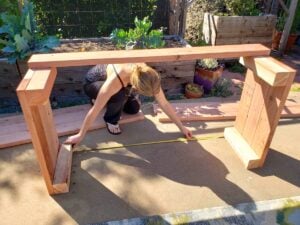
- On a level surface like a garage floor, deck or patio, lay out two of the cut 4x4” corner pieces. Position them the same distance apart that your shortest side boards are.
- Place the short boards on top. Keep the ends of the 2x6” boards flush with the outer edge of the corner 4x4” piece. To make sure everything is nice and square, we measure the distance between 4x4's at both ends.

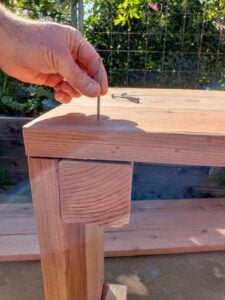
- Next, using 2.5 to 3-inch decking screws and a power drill, add two screws to the end of each 2x6” board, attaching them to the 4x4 below.
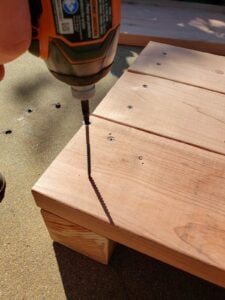
- To prevent the 2x6” from splitting, keep the screws at least 1” away from any edges of the board, preferably sinking it into the center of the 4x4”. We personally don’t find the need to drill pilot holes when using decking screws.
- Repeat this process for the second short side.
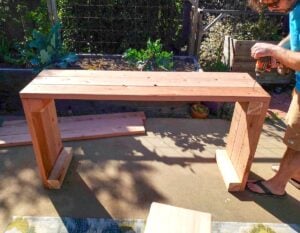
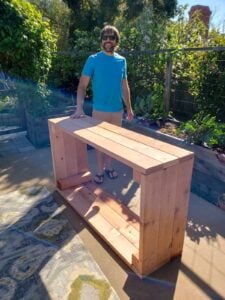
Add Long Sides
- Now that you have both short sides of the raised bed assembled, stand them up on their sides. Space them at the length the finished bed will be, with the corner 4x4’s facing inward towards each other.
- Next, set your long boards on top, creating a table of sorts. Line up the outermost edges of the long boards flush with the outer face of the short sides. Repeating a similar process as above, measure the distance between all the corners to make sure everything is even and square. See the photo below.
- Once everything is all square, attach the long boards with 2 screws on each end of each 2x6” board. Make sure you’re driving the screws into the center of the 4x4, not the short-side 2x6s.
- After attaching all boards along one side, flip it all over and repeat the process on the final side of the bed.
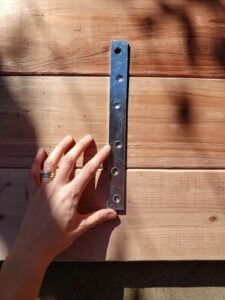
- If your raised bed is longer than 6 feet, I suggest adding an additional support to the middle of the longest side - such as a galvanized steel mending brace
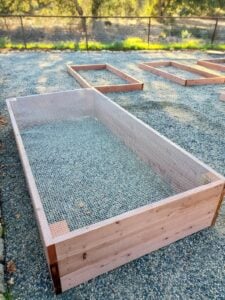
- You've just built a DIY raised garden bed!
Adding Hardware Cloth for Gopher Proofing (Optional)
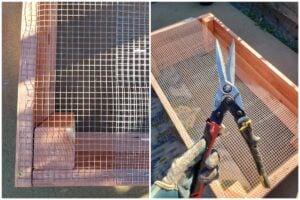
- Hardware cloth is commonly sold in 2, 3 or 4-foot wide rolls of varying lengths. Ideally, choose a size that fits across the bottom of your bed frame. If the bed is too wide, you can combine two pieces, overlapping and attaching them in the middle with either heavy-duty zip ties or bits of galvanized wire.
- We like to use wide-head cabinet screws to connect the hardware cloth directly to the bottom of the raised beds, which pinch the wire between their head and the wood. We’ve also used a staple gun though it’s not quite as secure as screws. Sometimes we do a little of both, such as screws in the corners or every couple of feet with staples in between.
Installing Raised Garden Bed
- Locate raised garden beds in an open, sunny area that receives at least 6 to 8 hours of direct sunlight per day. A south-facing location is ideal (if you live in the northern hemisphere), which could include against a south-facing wall or fence.
- The ground below your raised garden beds should be flat, level, and free of excess rocks, weeds, or other debris. That way, your beds can sit as level as possible - which is important for good even water distribution.
- Maintain at least 28 inches of space between beds at minimum, though we prefer 36-48 inches to allow easy access around the beds with a wheelbarrow and prevent beds/plants from shading one another.
- To prevent weeds, you can use commercial grade landscape fabric under the raised beds (if invasive, persistent weeds are present) or put cardboard or burlap below the beds to smother less noxious weeds, which will degrade within a couple years.
Tried this recipe?Let us know how it was!