

How to Make a Gluten-Free Sourdough Starter from Scratch

Do you dream of baking loaves of fresh homemade sourdough bread… but can’t eat gluten? I’m here to tell you that dreams can come true! Get started on your gluten-free sourdough journey by following these easy step-by-step instructions on how to make your own gluten-free sourdough starter from scratch – using only three ingredients! Keep in mind that the process does take about a week, but is well worth the wait. At the end, you’ll have a living and active homemade gluten-free sourdough starter, ready to use in any gluten-free sourdough recipe you desire.
Before we dive into the process, let’s go over a few fun facts and frequently asked questions. Then at the end of the article, you can tune into a video demonstration if you please! The video shows the process of making our wheat sourdough starter, but the process is essentially the same.
What is Sourdough?
Did you know that homemade “sourdough” isn’t necessarily sour in flavor? Unlike store-bought or quintessential San Francisco sourdough, most homemade sourdough is usually not very sour at all! It is simply called sourdough because of the process it is made – through natural fermentation.
Rather than adding commercial dry yeast, artisan and homemade sourdough bread rely on a sourdough starter culture to provide loftiness and rise. And that is exactly what we’re going to create today! If allowed to ferment for a very long time, your sourdough can become more sour-tasting if that is what you desire.
Why Make Sourdough at Home?
Because it is fun! Duh.
Also, there are many health benefits of making homemade sourdough bread. The fermentation process helps our bodies maximize nutrient absorption, and also makes the bread easier to digest. So much so, that many people with gluten sensitivities can tolerate homemade (gluten) sourdough with no issues!* I am one of those people. I regularly eat home-baked sourdough made with wheat flour, but cannot stomach other “normal” bread without extreme bloating and discomfort.
*Note: I do not encourage those with celiac disease or extreme gluten allergies to try wheat-based sourdough bread. Yet, if you only have mild sensitivities like myself, you may be interested in trying our classic sourdough starter tutorial and simple sourdough bread recipe. I personally prefer them to gluten-free options, but do what is best for you.
Additionally, homemade sourdough is far less processed than store-bought bread. Especially gluten-free bread, which usually contains a long list of additives. By making your own gluten-free sourdough starter and bread, you have ultimate control over the quality and choice of ingredients.
What is a Sourdough Starter Exactly?
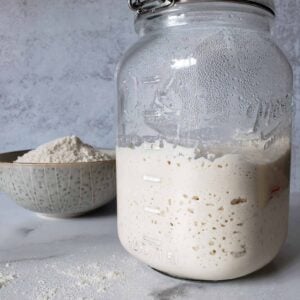
A sourdough starter culture is a living thing. The right combination of water, flour, and warmth creates the perfect environment for yeast and beneficial bacteria (lactobacillus) to live and grow. You’ll see that this gluten-free sourdough starter recipe also calls for one organic apple, which helps inoculate the mixture with beneficial bacteria and wild yeasts. Once established, the colony of yeast and bacteria need to be nurtured with routine “feedings” to keep them alive.
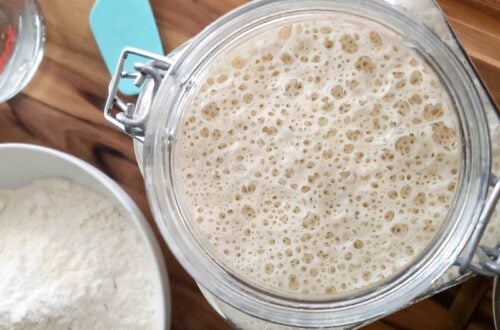
As the yeast and bacteria feed on fresh flour, they convert sugars and starches into acetic acid (which is what makes sourdough slightly sour, healthier, and easier to digest) and also produce carbon dioxide gas. Inside a container, a happily-fed sourdough starter will create air bubbles and grow in size. Then when an active starter is added to the dough of sourdough bread, the starter culture continues to feed and ferment the dough – adding air pockets and rise.

Would you like to save this?
Gluten-Free Sourdough Flour Options
When it comes to baking gluten-free sourdough bread, there are dozens of GF flour types to choose from! Millet, potato, rice, buckwheat, tapioca, sorghum… the list goes on. Most gluten-free sourdough bread recipes call for a combination of several types of GF flours, along with the addition of psyllium husk and/or xanthan gum to help everything bind well in the absence of gluten.
On the other hand, we’re going to keep it really simple for the starter portion! To make a gluten-free sourdough starter, we have found it is best to simply use brown rice flour or buckwheat flour. Or, you can do half and half if you wish! The flavor of buckwheat flour is definitely more pronounced than mild brown rice. We used brown rice for this tutorial.
Another option is white rice flour. However, whole-grain brown rice flour and buckwheat are more nutritious and wholesome than white rice flour. Once your gluten-free sourdough starter is established, you can play with feeding it a variety of these flours, or even sweet rice flour. Sweet rice flour is less gritty and more sticky than other rice flour, which can help act as a binding agent. Feel free to give any combination of those flours a try, using the same process you’ll learn below!
Finally, I do not suggest using an all-purpose 1-1 GF flour for this recipe. We tried to make a gluten-free sourdough starter with a 1-1 replacement flour recently. It technically worked – it rose and got active – but the smell was gnarly! I think all the extra additives in 1-1 flour made something “off”, because it smelled like fermenting vomit.
And now, on with the show!

GLUTEN-FREE SOURDOUGH STARTER INGREDIENTS & SUPPLIES
- Brown rice flour or buckwheat flour (or a combo of both). It is best to use organic if possible. Throughout the entire process of making your gluten-free sourdough starter, you’ll use about 750 grams of flour (1.7 pounds) – so keep that in mind when you’re choosing a bag of flour. We like the organic brown rice flour from Arrowhead Mills. This 6-pack of 24-ounce bags on Amazon is a great deal. It will keep your sourdough starter happy and fed for many months! Our sourdough bread recipe (see the recipe for a rustic GF sourdough boule loaf here) also uses a good amount of brown rice flour, so you can use it there as well.
- One organic apple. Yes, it is essential to get organic! Non-organic produce may not only lack desirable good bacteria, but may have harmful additives that will ruin your starter. We always use a Fuji, Pink Lady, or Gala apple.
- Un-chlorinated or filtered water. Avoiding chlorinated water is important when it comes to any fermentation process, including making sourdough. We use filtered water. A basic carbon filter is enough to remove most of the chlorine from city tap water. In a pinch, bottled water could be used – though I am not a fan of bottled water for environmental reasons.
- A large air-tight glass container. We use this 2-liter flip-top container (about a half-gallon). Using too small of a container will limit the space your starter has to rise. The container should be large enough to allow for the flour/water mixture inside to double in size.
- A kitchen scale. The sourdough world is riddled with recipes that call for flour by weight (including this one), rather than traditional cup measurements. This is because all flours have slightly different weights. For example, this recipe calls for 500 grams of flour to start. 500 grams of Arrowhead Mills brown rice flour equates to 3.25 cups, yet 500 grams of their buckwheat requires a full 4 cups!
- A mixing bowl
- Liquid measuring cup
- A moderately warm location
- Recommended: an ambient thermometer or sticky strip thermometer
INSTRUCTIONS TO MAKE GLUTEN-FREE SOURDOUGH STARTER
Step 1: Mix Flour, Water, and Grated Apple (Day One)
In a large clean mixing bowl, combine 500 grams of brown rice or buckwheat flour, one grated organic apple, and 360 mL of lukewarm filtered water (about 1.5 cups). Mix thoroughly. The texture should be like thick sloppy dough. Not dry and crumbly, but not soupy wet.
Quick tips:
- When you weigh your flour in a bowl, don’t forget to either tare the scale or subtract the weight of the bowl!
- Wash the apple with water before grating it, but do not use soap or other vegetable wash. We grate the apple with a box-style cheese grater. Add the apple skins along with the flesh, but avoid the core and stem.
- If your water is really cold, either allow it to sit out and come to room temperature, or stick it in the microwave (in a glass measuring cup) for 15-30 seconds. Cold water will slow the growth of the beneficial microbes.
- Throughout this process, if your starter ever seems too dry or far too wet, feel free to add a splash more water or flour until the desired consistency is reached as described. The amounts I am providing are a general guide. Again, different flour types and brands will have slightly varying weights.
Once the apple, flour, and water are thoroughly combined, transfer the mixture into a large glass fermentation vessel. The vessel should be clean. I suggest washing it with hot water and vinegar, but avoid using old sponges and/or soap. Mash down the wet dough to remove any air pockets. If possible, try to avoid getting gunk all over the sides of your container. That stuff may be more likely to mold. Use a silicone spatula to clean up the sides if needed. No need to be perfect however.
Now, either wrap a large rubber band around the container or use a glass pen to mark the level of the mixture on the side of the container. This provides a starting point and allows you to easily monitor your starters’ growth.
Finally, tuck the container in a moderately warm location and let it sit for 72 HOURS. The ideal fermentation temperature is around 70-75°F, or 23 degrees Celsius. Colder temperatures reduce beneficial bacteria growth and also increase the chances of mold.

Ways to keep your sourdough starter warm:
If you’re making a gluten-free sourdough starter during the summertime, you’ll likely have no issue keeping it happy by simply leaving the starter out on the countertop. However, if you attempt to create a starter during the winter (or if your house is otherwise on the cool side) it can be a bit more tricky. If you aren’t exactly sure what the ambient temperature is within microclimates in your house (e.g. in particular rooms, on the counter, etc) it is best to use a thermometer to assess the exact temperature where your starter is stored.
A couple options to provide warmth to a sourdough starter are to keep it near a warm appliance, use an electric heating pad or seedling heat mat nearby, or to wrap the container in classic holiday lights. I emphasize classic lights because newer LED lights do not get warm. These are all tricks we use and suggest for keeping homemade kombucha warm and active too!
Last but not least, our favorite easy way to keep both sourdough starter and the proofing dough warm is to keep it inside the oven – with the oven OFF, but oven light on! It creates the perfect cozy home. It if gets too warm in the oven, keep the door cracked open slightly.

Step 2: First Discard & Feed (Day Four)
During the last three days, your starter should have started to get active, bubbly, and rise. It may have even risen and then fell back down again. That’s okay, but means it is getting hungry! The starter will also start to smell a little funky, malty, and semi-sweet – reminiscent of apple cider vinegar.
After 72 hours (about three full days later, but it doesn’t need to be exact) it is time to feed your starter for the first time. The process of feeding a sourdough starter involves first discarding a portion of it, and then adding fresh flour and water. So, any time you hear a reference to “feed” the starter, keep in mind that also means removing some and not simply adding to it.
Feeding the Starter:
- First, open the lid and stir the starter with a clean utensil. This will knock out the air and bring it back down to its original volume.
- Next, remove and discard about half of the volume of starter in the container. I usually just eyeball it, using the mark or rubber band line on the container as a guide. Discarded sourdough starter can be composted, fed to chickens, or used to make other sourdough goodies – like gluten-free sourdough crackers with herbs and cheese!
- Now add an additional 250 grams of fresh brown rice or buckwheat flour and about 180 mL (about 3/4 cup) of lukewarm water to the mix. Stir thoroughly to combine. We simply add them to the starter container and mix it all up. If your container is tall or difficult to stir in, you can also do this in a separate bowl and then put it back into the container. It should be a slightly thinner consistency than the original mix.
- Clean up the sides of the container as needed so you can monitor the rise again (and possible fall).
Now, put the container back into a warm location and let it sit for 48 HOURS this time.

Troubleshooting notes:
If your starter did not rise at all during these 48 hours, allow it to sit for another day before moving on to the next step. Yet if it rose and fell back down (look for smears on the container) then it is time to feed again. If it is acting particularly lethargic, try feeding with half brown rice flour and half buckwheat.
Keep in mind that it is common for the first bout of activity to be more vigorous and obvious than the following few. That is because different short-lived bacteria quickly ferment the starter at first. Yet these are not the same type of bacteria and yeast we desire long-term in our starter, who are slower to develop.
Step 3: Discard & Feed Again (Day Six)
This step is easy! Simply repeat the same discard and feed process that you did previously. Stir it first, discard half, and add more fresh flour and water like we did in the previous step. Yet this time you want to make it a splash more wet than before – like a wet, sloppy dough. Use 250 grams of flour and about 220 mL (just under a cup) of lukewarm water this time.
Now, let your almost-ready gluten-free sourdough starter sit for 24 HOURS If all goes well, it should rise and fall within this time period. The apples should be pretty much be disintegrated by now too.
Step 4: Is It Ready? (Day Seven)
The day has come! If your starter has gone through the phases of rising and falling after each feed, you now have a bonafide active gluten-free sourdough starter on your hands! She is ready for baking. But first, you better give your new friend a name. In fact, it is considered bad luck to not name your sourdough starter!
So… What do I do with it now?
Well, you bake with it! Try our rustic gluten-free sourdough boule loaf recipe here. Another couple awesome options are to make gluten-free sourdough crackers (we love ours with fresh herbs!), or to make fry bread. One of my intsa-friends turned me on to this: heat a non-stick skillet on the stove, add a cooking oil of choice (she uses coconut oil) and then pour in a few big scoops of plain sourdough starter – like pancakes! Spread it fairly thin, allow to cook on each side for several minutes and continue flipping it as needed until cooked through. She likes to serve it with eggs and sausage, but I think the options are pretty endless there!
Ongoing Storage & Care
Your new starter needs ongoing care, but thankfully not as intensive as when you are first getting it established. We find it most simple to store our starter in the refrigerator (which makes it go semi-dormant) and pull it out just on weekends to feed and/or bake with.
To help you learn how to take care of your starter, I put together this guide all about ongoing sourdough starter care. I originally wrote it for classic wheat sourdough starter, but edited it to include special notes for gluten-free sourdough starters as well! The process is essentially the same.
That article covers:
- How to routinely feed your sourdough starter – which is a little different than the feeding process we did here to create it.
- How frequently to feed your sourdough starter.
- Where to store your starter: in the refrigerator or at room temperature?
- How to “ready” your sourdough starter for baking, and more!

FAQ: What is that dark liquid on the top of my sourdough starter?
When the yeast in a sourdough starter has eaten up all of its available food and is hungry for more, it produces a thin dark layer of liquid on top. This is an indication that your starter is more active than you’re feeding it. It is a naturally-occurring alcohol created by the yeast, called hooch. This is totally normal! Do not freak out.
If your starter does develop hooch, you can either pour it off the top or simply mix it back in, then discard and feed as usual. Ours almost always has a thin layer of hooch developed when we take it out of the fridge for our weekly baking.
However, I have noticed that water has a tendency to separate out from brown rice flour even more readily than wheat flour. For example, sometimes a thin layer of water appears immediately after feeding the gluten-free sourdough starter. That isn’t hooch… That is just water, and you can leave it be.

And that is how you make a gluten-free sourdough starter.
So, how’d it go? I hope this article got you one step closer to making all your sourdough dreams come true. Please feel free to ask questions, leave a review, share this article, or just say hi. Thanks for tuning in, and happy baking!
For all you visual learners, here is a quick video showing the process of making our classic wheat sourdough starter. The flour is different and the water amount varies slightly, but otherwise it is essentially the same process! Our gluten-free sourdough starter never gets quite as bubbly as the wheat one.
How to Make a Gluten-Free Sourdough Starter From Scratch
Equipment
- Large air-tight glass container (2 liter or half-gallon)
- Kitchen scale
- Mixing bowl
Ingredients
- 750 grams organic brown rice flour (and/or buckwheat flour)
- 360 mL filtered water, room-temperature
- 1 large organic apple
Instructions
- Wash your apple, but avoid using soaps or produce wash. Using a cheese grater, grate the organic apple into semi-fine shreds. Use the skins, but discard the core.
- Add 500 grams of brown rice or buckwheat flour, the grated apple, and 360 mL of lukewarm un-chlorinated water (about 1.5 cups) to a mixing bowl and thoroughly combine.
- Transfer the mixture into a large glass airtight container that has enough room for it to at least double in size, minimum. (Ours usually quadruples while fermenting) Pack the mixture down into the bottom of the container. Close the lid.
- To monitor growth, mark the side of your container with a washable marker or rubber band at the top level of the mixture.
- Let the mixture sit for 3 days (72 hours) at a temperature of 70-75 degrees F. It should bubble and rise during this time.
- After approximately 72 hours, thoroughly stir the mixture and then discard half of the amount. Then, thoroughly mix in another 250 grams of flour and 180 mL of tepid filtered water (about 3/4 cup) to the remaining starter mixture. This is called "feeding" the sourdough starter. You can do this either in a separate bowl, and put it back into a now-clean ferment vessel, or like we do, mix it in place.
- Re-mark the container to note the height of the mixture. Let sit at 70-75 degrees, for 2 days or 48 hours this time.
- After 48 hours, repeat the same discard and feed process as done previously. Discard half, feed, mix, mark the level, and cover again. This time, make it slightly more wet – using 250 grams of flour and about 220 mL of water.
- Allow the sourdough starter mixture to sit for a final 24 hours.
- Once complete, you now have a happy and active gluten-free sourdough starter! Store it in the refrigerator when not in use, taking it out to warm up and be fed weekly. OR if stored at room temperature, feed it daily to keep it alive.
Notes
- If there is no activity, let it sit another day or two.
- If your starter has risen and fallen, or, if seems to not rise after the first discard and feed, and instead it has a dark liquid formed on top (called hooch), it may actually be overly active and hungry! Stir in a little more flour (and warm water as needed, if it becomes too thick and dry) and let it sit again. Wait a day or two to see if it perks up and begins to rise and bubble.
- If your home is cold, try to find a warmer spot if possible! We’ve found keeping our starter (and proofing dough) inside the oven with the oven OFF but oven light ON creates a nice warm environment during cooler days.
- If the starter doesn’t rise at all after the first discard and feed, try opening the lid of your jar. Cover it with a coffee filter or something else that will prevent fruit flies or other debris from getting inside inside.
- Ensure that you use an organic apple.
- Throughout this process, if your starter ever seems too dry or far too wet, feel free to add a splash more water or flour until the desired consistency is reached as described. The amounts I am providing are a general guide. Different flour types and brands will have slightly varying weights.


209 Comments
Theresa
Hi! I am in day 2 of my starter and I noticed 2 black mold spots on the top. Does this mean that my starter is bad? Any advice?
Thank you!
DeannaCat
Hi Theresa – No, mold is not normal or good… Things that could lead to mold: the container wasn’t fully clean/closed, the apple not washed well, possibly the use of non-organic ingredients, or too low of a temperature. Sorry for your struggles!
Chantale
HI! I am so excited to find your recipes and make my own GF sourdough bread.
I began the journey and to my delight it took off! We had some warm weather and did some baking ( I keep my started next to the stove) which I’m sure helped with the first 2 steps. Then it cooled down and rained while in my final step. Did the final feed and waited excitedly for the 24 hrs to be done and start my bread. To my disappointment my starter only rose 1/4 of what it did previously and stopped. I used oven to help warm up the area and then left starter in oven over night to help keep her warm. It has now been 50 hrs with no activity. 🙁
I have put her back in the oven with light on to see if that would get her going. Oven temp is showing about 75-80F (not really exact below 100)
Any suggestions? Do I still have hope or should I start over?
DeannaCat
Hi Chantale – If a starter does a small rise and fall, it won’t continue to rise again without being fed again. An established starter actually needs to be fed daily (if left out at room temperature) because they self-limit and consume all their “food” then become stagnant and hungry. Try discarding half and doing another fresh feeding, and see if that perks it up again!
Chantale
I will try that right away..wish me luck 🙂
Thanks for getting back with me so quickly
chantale
Hi
first starter didn’t work. On to second batch. I’ve started in a large container to help with feedings and placed in oven to keep temp more even. Had a good rise in first 24hrs then it fell and at 48hrs it looks hungry…no more rise.
Should I go ahead and feed it?
Mary Sue
Getting ready to make the GF sourdough bread. In the article you said you’d put directions for baking in a loaf pan out ASAP. I haven’t seen them. Did I miss them somewhere?
DeannaCat
Hi Mary Sue – Sorry about that! I haven’t had time to write that up as I’ve been working on spring garden content. We tried a loaf using basically the same process but put it in a bread pan, and it turned out pretty good – but a tad more dense than the open boule method used in this recipe. I want to experiment with it more before releasing new instructions, hence the delay. I hope you can still enjoy it anyways!
MaryAnn
Morning
I posted a comment last night but don’t see it. Perhaps I did not hit, “post comment” button. On the 2nd step, no rise at all, but some hooch. I took it out, added more flour and warm water. Still nothing after 24 hours. Can a complete failure happen? Do I need to discard and start over?
Thank you
Mary Ann
DeannaCat
Hi Mary Ann – any progress? Is it cold at your house? Did you see the warm oven trick by chance?
Rebecca
Hello! your gluten free bread looks AMAZING! do you know if you can feed a gluten free starter with gluten free flours to transition it to a gluten free starter instead of starting again from scratch?
Thank you!
DeannaCat
I have never thought of that or tried it. From what I understand, you can definitely change the types of wheat flour in a gluten starter (e.g. sometimes we feed it bread flour, AP flour, whole wheat, rye)… but I am not 100% about switching from GF to wheat. You could give it a try! I would suggest a gradual change however, maybe feeding with 3/4 of its original flour and 1/4 wheat, then half and half, then slightly more more wheat than GF, and so on. I think a drastic switch could make it freak out. Haha!
mary Ann
Nothing…flat, no rise or fall. Been in the oven, light on and then off if it got too warm. I took the lid off, put a tea towel over it with a rubber band over the rim, still nothing. I set it in the laundry room which is dark and warm. I am in AZ. We are at 5000 ft elevation. Our house inside is about 73-77 degrees. I think I will feed the composter……start over. Thanks for getting back with me…appreciated
DeannaCat
Hi Mary Ann – Last suggestion! Did you try adding just a little more flour only? Does your starter seem watery/runny? Sometimes if it is too thin (like pancake batter) the bubbles can rise up and out of the mixture rather than being trapped inside the starter, making it poof up and become spongy.
mary ann
Hi
No I have not added anymore flour…..there is a tad bit of liquid on top. I guess I can add a bit more flour and see what happens.
Thanks
Nicole Gavrilov
Hey girl! So I am a little confused. Can I use the first discard to make the GF sourdough crackers or do I have to wait to use a discard until I get all the way through the entire set of instructions? I read through all of the comments I could before asking! Thank you!
DeannaCat
Hey there! You technically could use the first discard, but I personally wouldn’t. It will still have a bit of apple remnants (not a bad thing, just a little odd for crackers) and won’t really be developed in terms of strength and flavor. Sorry that wasn’t clear in the article! Happy baking!
Mary Ann
Morning
I started the sourdough last night and wow it is going crazy! Hopefully it will knock down. When I do take half out can I use that to start another starter? I apologize if this question has be asked and answered. I would like to give my neighbor some. In addition I am waiting for some more flour from online but do have white rice flour on hand. Would this be ok to use and mix with the brown rice flour. Love your website!
DeannaCat
Hi Mary Ann – Sure you can use the discarded half, put it in another clean suitable container, and feed both – and thus create two starters! We have experimenting with mixing rice flours in the past and it wasn’t quite as active as just brown, but worked fairly well! Good luck!
Mary Ann
Thank you for your quick reply. So far so good. I did name it….Melba, as in the apples! Something I did was use a wide mouth canning funnel to help with not getting the starter on the sides of the jar while getting into the jar. Worked perfect!
Laura
Hi, I just did the first feeding after 72 hours. The starter smells really gross. I used all brown rice flour. Did yours stink as well? Will the smell improve or did something go wrong? It did rise and fall. Thanks!
DeannaCat
Hi Laura – Our started with organic brown rice flour didn’t smell bad. Fermented flour can smell a bit sour, and more off-putting at first than later once it is more developed. Later it will be more established lactobacillus and should smell sweet and tangy. Keep going, it will get better! When we tried this recipe using a GF “all purpose” flour blend, it did smell worse – but it still made a good loaf of bread in the end!
Burcu
Hello Deanna,
Thank you very much for the recipe. I am trying it out , fingers crossed. I prepared it last night, putted it in the oven, and tonight it has risen quite a bit (nearly doubled) I thought it would take 3 days… So I don’t know what it means but I have a problem. There is not space left in my container!! What happens if it keeps rising? What should I do now??? Should I just stir it and try to get rid of the bubbles, and bring the level down? Should I just divide the dough into two containers and wait to feed it until 72 hours ends. Or should I just go ahead and discard the half of it and start feeding it right away, after 24h? Thank you in advance 🙂
DeannaCat
Hi there! Just put the container on a plate and let it overflow if needed. Try not to stir or disturb it until it has fallen all the way back down. The initial burst of activity is always more vigorous than the rest, as a different type of bacteria is initially active. We need that bacteria to do its thing but then die off for the good lactobacillus and yeast we want long term to take over. If it is moving too quickly or overly active, you can keep it in a slightly cooler spot than inside the oven (but not COLD) and it will slow down a bit. The oven trick is best for the second stage, after the first feeding. You COULD feed it a day or half a day early, but I wouldn’t do it after 24 hours.
Burcu
Great! Thanks for taking the time to respond 🙂
Alyssa
Hi! I usually like to keep smaller starters on hand and build them up when I’m ready to bake, I hate wasting discard. Is it okay to cut all weights in half for this to keep ratios the same? Really intrigued and excited to try this!
DeannaCat
Hi Alyssa – we haven’t tried it that way, but it sounds reasonable! Let us know how it goes, so we can also share that option with others! Thanks
VALERIA
Hi Alyssa,
I was wondering exactly the same, too… how did it go? 🙂
I am looking forward to trying your GF sourdough recipe, Deanna, thank you both!
Valeria