

Cast Iron Whole Wheat & Herb Sourdough Pizza Crust Recipe

Pizza has always been a bit of a guilty pleasure for us. I’m sure we aren’t alone here, right?! But it is something we have very, very rarely. We prefer not to eat out, plus most bread products hurt my belly. If you feel the same, I have breaking news for you – You don’t have to feel guilty anymore! Enter: sourdough pizza.
This homemade sourdough pizza crust is not only soft, chewy, and delicious – it’s also hearty and nutritious, made with half whole wheat flour! Like other classic sourdough, the pizza dough is naturally-leavened and fermented to perfection, making it more comfortable on your gut and far easier to digest. And then when you top this bad boy off with some organic or homegrown sauce and veggies to boot? It really can’t get much better.
Before we get started, a few notes:
If you are an avid sourdough baker, the steps in this recipe will not be all that foreign for you. However, if you aren’t yet actively working with sourdough, you may need to take a step back for a moment. The recipe calls for active sourdough starter. If that isn’t something you have on hand – don’t worry! I have an easy-to-follow tutorial on how to make your own, using just three ingredients. Or, if you aren’t up for making a starter from scratch, feel free to pick up a dry (but alive!) organic sourdough starter the Homestead and Chill shop. All it needs a little water, flour, and few days to get active again.
You’ve probably already gleaned by the title that we bake our sourdough pizza crust in cast iron. To be precise, we use our favorite large 14-15″ Lodge cast iron skillet. Yeah, it looks neat – but it also provides an extra oomph of heat! Lodge also makes a pretty badass cast iron griddle/pizza pan. We have not tried this recipe using a classic pizza stone, but I imagine it would work out just fine. Be sure to preheat it, and report back to let us know how it goes!
Finally, please note that we suggest allowing your pizza dough to proof (meaning, sit out at room temperature) for several hours after mixing, before rolling out and baking. You could rush this step and do a shorter proof time, but it may result in a less fluffy (and less nutritious) crust. Just giving you a heads up so you can plan your day accordingly!
Okay, are you ready to make some killer pizza?
INGREDIENTS
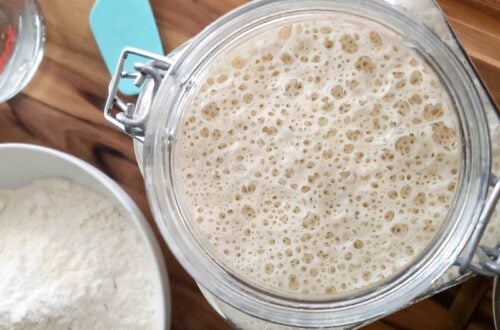
- 1.5 cups sourdough starter – it should be at peak activity (recently fed and at least doubled in size) – in a similar state you’d add it to your bread recipes.
- 1.5 cups flour – we use 3/4 cup bread flour (or white all purpose) and 3/4 cup whole wheat. For an extra hearty sourdough pizza crust, you can increase the whole wheat ratio, though it will likely be more dense. For a super fluffy crust, go lighter on the whole wheat and heavier on the white.
- 2 Tbsp extra virgin olive oil
- 1 tsp salt
- 1 Tbsp honey – this isn’t absolutely essential, though it helps feed the yeast for a nicer rise, and also adds a welcome tiny touch of sweetness. Did you know that most pizza shops add cane sugar to their dough?
- Up to a 1/4 cup of warm water
- Optional, but delectable – 1/2 tsp onion, 1/2 tsp garlic powder*, and 2 heaping Tbsp of chopped fresh oregano. Substitute fresh oregano for 1 Tbsp dried.
- Your choice of sauce and toppings
*Check out our tutorials on how to make your own garlic powder, and also how to make onion powder! These fresh homemade seasonings are so versatile, and have unbeatable flavor!

Would you like to save this?
INSTRUCTIONS
1) Mix Dough
In a large mixing bowl, combine the called-for flour, active sourdough starter, olive oil, honey, salt, chopped herbs and seasonings. Lightly mix.
Next, slowly add up to a quarter cup of warm water – you may not need all of it! Pour in small amounts of water at a time, mixing and assessing the consistency of the dough as you go. I typically mix my sourdough with clean bare hands. It doesn’t need to be heavily kneaded. Form the finished pizza dough into a ball, and leave it in the bottom of your mixing bowl.
If you’re accustomed to making sourdough bread, keep in mind this dough shouldn’t be quite as wet or gooey. However, it shouldn’t be crumbly and dry, like when you make sourdough crackers either! The amount of water needed will vary depending on the hydration and consistency of your sourdough starter. The last time we made this, I added the whole ¼ cup of water but found I needed to add just a pinch more flour afterwards to get it how I like it.

2) Let It Proof
After mixing, cover the bowl and dough with a tea towel. A damp tea towel will help it maintain even more moisture. Allow the pizza dough to proof for at least 30 minutes, up to several hours. We opt for a longer proof (about 3 hours) for a better rise! You can go beyond this if you wish. The more fermentation time, the healthier it is and easier to digest too.
3) Preheat
Once your dough has proofed for the desired amount of time, go ahead and preheat the oven to 450°F. Place your cast iron skillet inside the oven, preheating it as well. Again, a pizza stone could be used here instead.
Cast iron cooking brings the heat! While this is desirable for the most part, it also means things can accidentally get a bit crispy sometimes. We recently learned a trick to help prevent burning the bottom of our bread loaves or pizza: Place a spare baking sheet on the empty oven rack below the one your cast iron is sitting on. This helps absorb some of the heat before it gets to your pan. No more burnt bottoms!
4) Roll & Rest
Lightly flour a piece of parchment paper, cut to a size that is a tad larger than the bottom of your pan. I suggest doing this on a cutting board for added mobility – making it easier to transfer your pizza dough into the hot cast iron later. Also very lightly dust the top of the dough ball and rolling pin with flour. Gently roll out the pizza dough into a circle to your desired size and thickness with a rolling pin. Avoid over-rolling or smushing too hard.
Using a fork, lightly poke the top of the pizza dough evenly across the surface in about a dozen places.
Next, let the rolled-out pizza crust sit at room temperature for a final 15 minutes – not yet in the hot cast iron. This will allow it to fluff back up. Ours usually form nice air bubbles during this time!
Note: If you only have a petite cast iron skillet on hand, you’ll either end up with a really thick crust, or may want to split your dough into two smaller pies.

5) Par-Bake
After the pizza dough has its final period of rest, remove the cast iron skillet from the oven. Carefully slide the parchment paper and pizza crust into the center of the hot pan.
Bake the naked pizza crust for 8 minutes with no toppings.
6) Dress It Up & Bake Again
Remove the crust from the oven, and smear on a layer of your favorite pizza sauce. We personally love making sourdough pizza with our homemade garden “besto pesto” as the sauce! You can find that recipe here. That, or our simple roasted tomato sauce we make every summer. They both make for a killer pizza! In lieu of sauce, you could brush on a very light coating of olive oil instead.
Next, add your toppings of choice. Our toppings shown here include thinly sliced garden zucchini, various tomatoes, pieces of colorful swiss chard stalks, a combination of organic sharp cheddar and parmesan cheese, and a sprinkle of salt and pepper. Bits of fresh homegrown basil were added once it was finished cooking.
Finally, bake your dressed pizza for another 12-15 minutes, until the cheese melts and the crust turns golden brown.
You may find it best to rotate your pan halfway through to promote even browning. We do!

7) Enjoy!
Pat yourself on the back, slice up your pie, and stuff your face. You did great! Okay, maybe skip the last part…. Or don’t. I won’t judge.
I hope you enjoy this healthy, scrumptious sourdough pizza crust as much as we do! Please come back and let us know, and share this recipe with all your friends!


Are you drooling yet?
If you love this recipe, you may be interested in checking out some of our other sourdough, pesto, and garden-to-table vegetarian recipes:
- Simple No-Knead Sourdough Bread Recipe
- Sourdough Discard Herb Crackers Recipe
- Baked Sourdough Tortilla Corn Chips
- Simple Sourdough Focaccia Bread
- Pesto Zoodles (Zucchini Noodles)
- Fiesta-Style Wild Rice & Veggie Stuffed Summer Squash
- Creamy Vegan Roasted Carrot & Sweet Potato Soup

Cast Iron Whole Wheat & Herb Sourdough Pizza Crust
Equipment
- Large cast iron skillet (14-15") or Pizza Stone – otherwise, split dough into two smaller pies
- Rolling pin
Ingredients
- 1.5 cups Sourdough starter – it should be at peak activity (recently fed and at least doubled in size) – in a similar state you’d add it to your bread recipes.
- 1.5 cups Flour of choice. We use 3/4 cup bread flour (or white all purpose) and 3/4 cup whole wheat.
- 2 tbsp extra virgin olive oil
- 1 tsp sea salt
- 1 tbsp honey
- 1/4 cup warm water (maximum)
- 1/2 tsp onion powder, optional
- 1/2 tsp garlic powder, optional
- 2 tbsp chopped fresh oregano, or 1 tbsp dry
- choice of sauce, cheese, and toppings
Instructions
- Thoroughly combine the flour, active sourdough starter, olive oil, honey, salt, chopped herbs and seasonings as well as up to ¼ cup warm water. Start with half the water, mix, and slowly add more as needed to get a thoroughly mixed, soft dough – but not gooey and wet. The amount can vary based on how wet your sourdough starter is.
- Once combined allow the dough to proof from 30 minutes to 3 hours (or longer). Keep the dough in a mixing bowl covered with a tea towel. The longer the proof time, the more light and airy the crust will be!
- When your chosen proofing time is nearing an end, place your cast iron skillet or pizza stone in the oven and preheat at 450 degrees.
- Lightly flour the parchment paper, top of the dough ball, and rolling pin and roll out the dough to your desired size and thickness.
- Once rolled out, use a fork to poke the surface of the dough evenly in about a dozen places and allow the dough to rest at room temperature for another 15 minutes.
- Once the dough has finished resting, place it on your skillet or pizza stone and par bake the naked crust for 8 minutes.
- After 8 minutes, remove the crust from the oven and dress your pizza any way you desire. Once your pizza is dressed to your liking, put it back into the oven for a final 12 to 15 minute bake.
- Once finished baking, slice your sourdough pizza and enjoy!
Notes


57 Comments
Emily Kelly
Do you think you could make a bunch, par bake and then freeze for future use? It breaks my heart to discard happy bubbly starter. I would love to pre make a bunch of pizza crusts for busy nights that I could just defrost, load with toppings and bake for a quick dinner!
Aaron (Mr. DeannaCat)
Hi Emily, we have yet to freeze any of our bread recipes. Sourdough starter can be frozen but I am not sure how well the bread products will rise or bake after being frozen. Please experiment with it and let us know how it works out! Thanks for reading and good luck!
Barb
Do I need to par bake? Thank you
DeannaCat
Yes, that step is explained in the instructions. Good luck!
Katie
We’re now making this once a week – usually with whatever we have around – and every time it’s amazing!
Question – if I am doing the thinner crust and making two pizzas – do you think there’s a way to save half the dough for another time (like freeze or fridge)? Or could I halve the recipe?
Thank you for all these amazing recipes!
Stacy M
I’ve made this several times and love it.
I divide the dough in 2 after the proof and make 2 thin crust pizzas.
Wondering – can you freeze this dough?
If so, at what what stage and how long can it be frozen?
If thawing, are there any further instructions or additional steps?
Thank you!
Aaron (Mr. DeannaCat)
Hey Stacy, glad you like the recipe! We have yet to freeze the dough but if were to try, I would freeze it once the dough is mixed and after allowed to rise for a few hours. At this point, wrap the dough ball tightly in plastic wrap and freeze for a couple months at most. When it comes time to use the dough, remove from the freezer and refrigerate until completed thawed. Thanks for your interest and good luck!
Amanda Brazil
Oh my goodness. This pizza crust was so good. I’ve never made my own pizza crust and am still fairly new to sourdough, but I’m never buying pizza crust again. Thanks Deanna for making this recipe so easy to follow!
I ended up making two pizzas as my cast iron skillet is only 10”. Turned out great that way!
Parrish in Alabama
This pizza looks amazing! Thank your for sharing. I would love to make it but I am not a bread maker. This seems like an intimidating recipe to start with…..
Katie
Hello! When you say active, unfed, and hungry – do you mean discard? I don’t consider what is used in bread to be discard, so I’m confused! Thanks! 🙂
DeannaCat
Hi Katie! Sorry for the confusion. I will need to update that to make it more clear… Yes, in the state you’d use active starter in bread, several hours after feeding and when it is at peak activity. I guess I meant not JUST fed when I said “unfed”. Enjoy the pizza!
Ellen
I’ve made lots of homemade pizza dough, this is the easiest to eat. Flavorful and the texture is perfect. I am already thinking of what to put on it next time. Delicious!
DeannaCat
Aww, that is so awesome to hear! Thank you for the feedback and review!
Laura
For those who have halved the dough to make two thinner crusted pizza, did that change the cooking time?
Mshah
Do you do the proofing step in the fridge or at room temperature?
Thanks!!
DeannaCat
Hey there! We usually just leave it out at room temperature. If it will be out for an extended period of time (e.g. overnight) then I would put it in the fridge. Happy baking!
Molly
Can o make this and refrigerate over night to use the next day? Or will it overproof?
Dawn
I’ve only just started down the sourdough path (thanks to the COVID-19 lockdown), so really don’t know what I’m doing. But I *do* know pizza crust… and this recipe made phenomenal crust. My whole family enjoyed it and there are no slices left from dinner. This has been bookmarked and printed, and I’m sharing it with other ladies who also started sourdough recently. Thank you!
Reem
I love it .its an amazing dough
I will definitely share it
Thank you