

How to Install Solar Powered Drip Irrigation, Controller and Valves
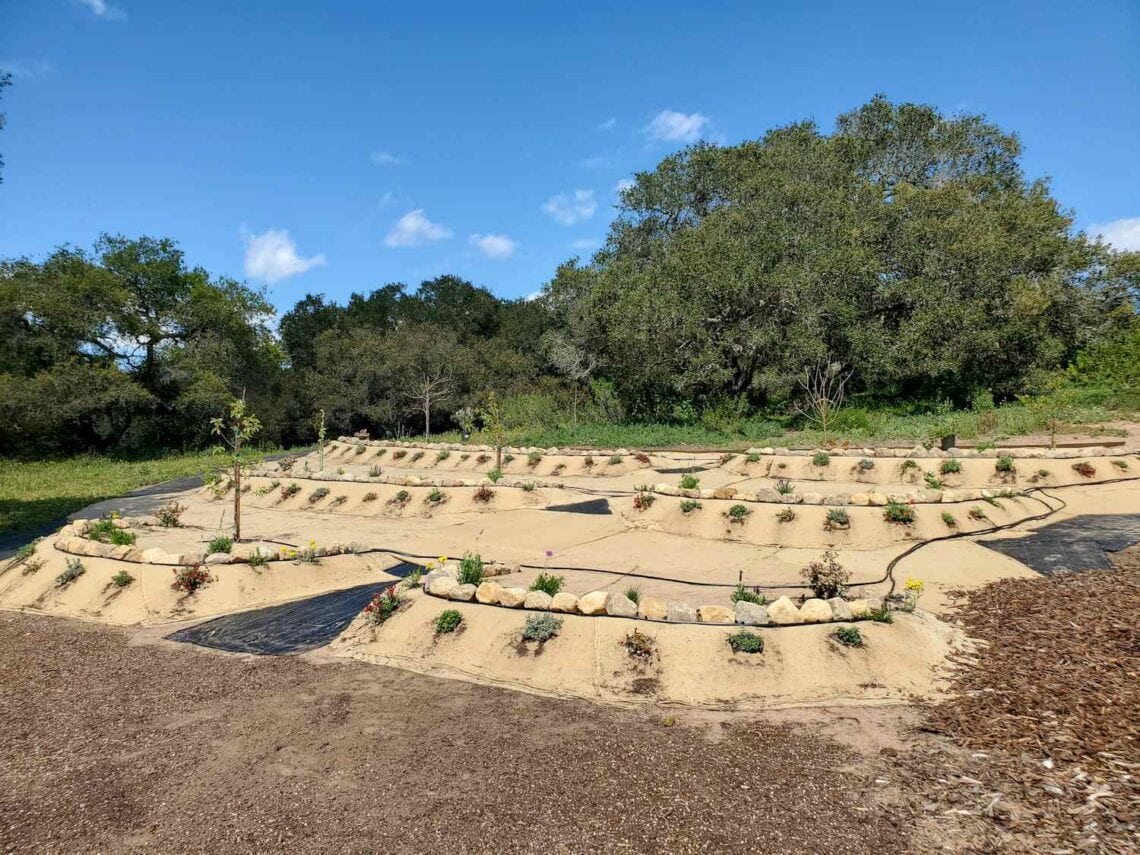
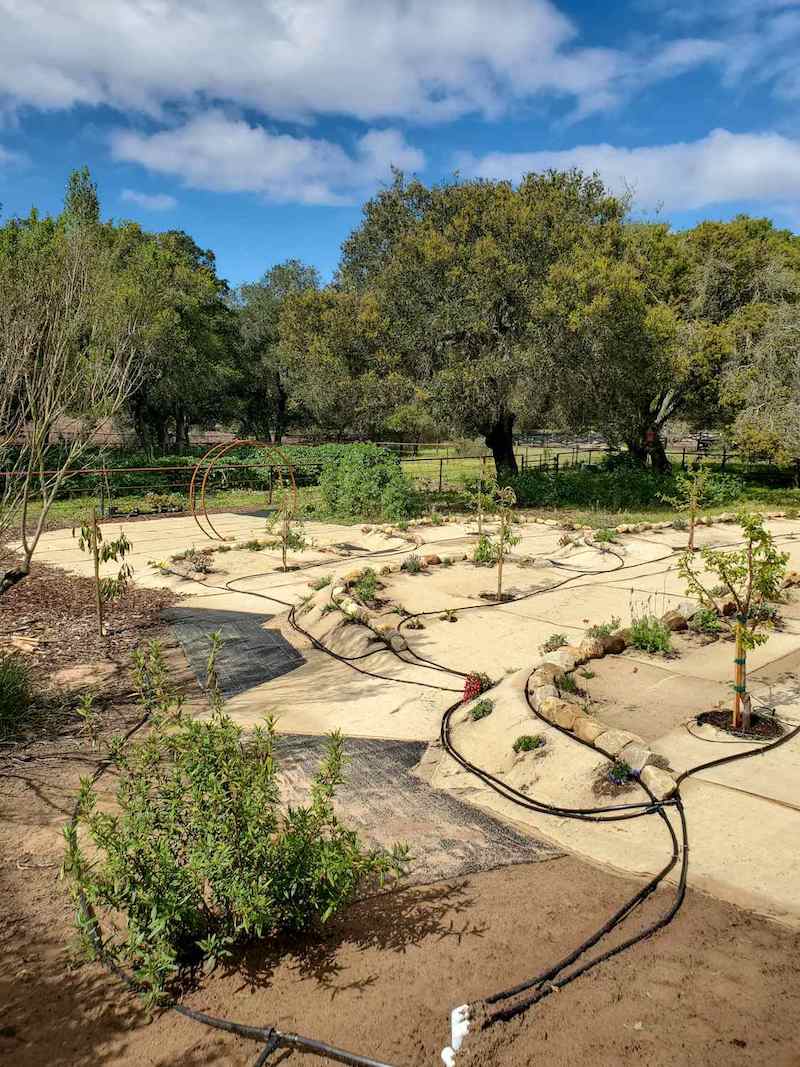
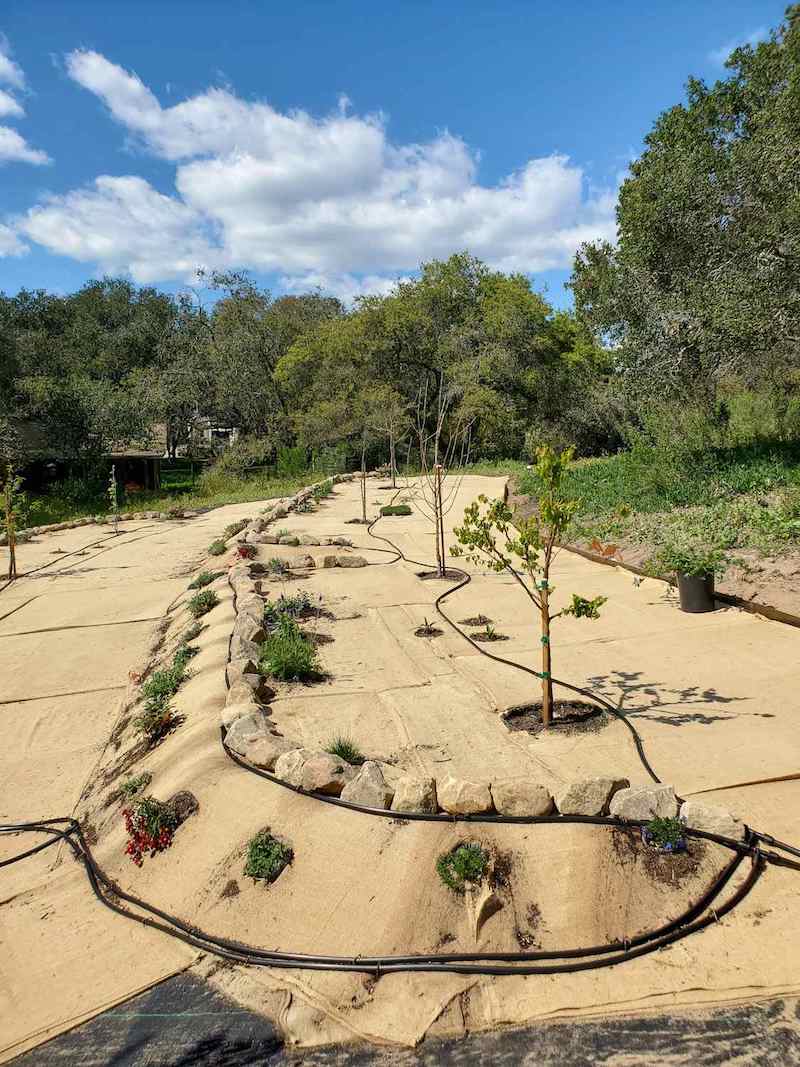
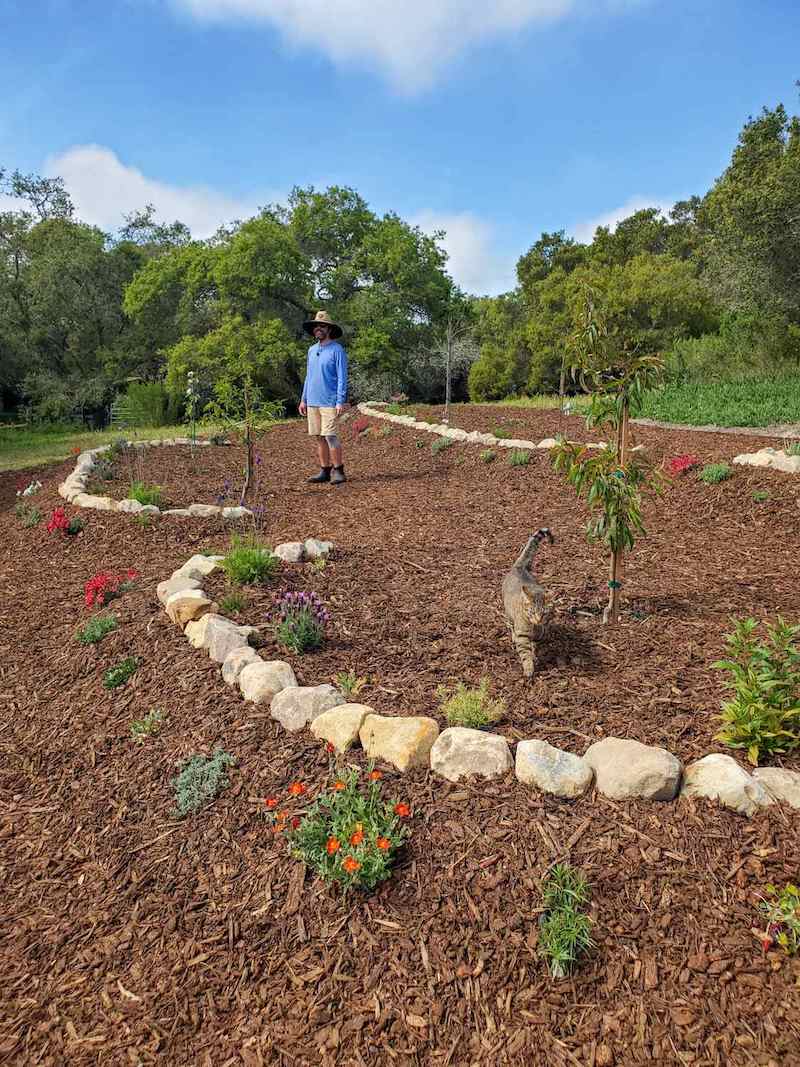
Welcome to our new orchard space! We just finished installing a DIY drip irrigation system for fruit trees, shrubs, and native pollinator plants – so let’s check it out! This guide will teach you how to install a drip irrigation system with automatic valves, multiple zones, several types of adjustable drip emitters, and more. The coolest part is that this drip irrigation system is powered by an automatic controller with a solar panel.
If any of that sounds complicated, don’t worry. I’ll walk you through everything you need to know with a step-by-step video tutorial, photos, and a detailed parts list.
Though the system shown in this guide is being used to water fruit trees and shrubs, you could also use a similar solar powered drip irrigation system for raised garden beds, flower beds, or traditional sprinkler system. Or, install the solar controller on an existing irrigation system. See our other drip irrigation tutorials here, including how to install drip irrigation to raised beds or a hose faucet.
UPDATE: You can now find a full tour and tutorial of how we created the new orchard space using natural terraces and permaculture-style berms here. Full plant list included!
Would you like to save this?
Disclosure: Homestead and Chill is reader-supported. When you purchase through links on our site, we may earn an affiliate commission.
Benefits of Drip Irrigation
Automated drip systems are one the best parts of any garden project, in my humble opinion. Installing drip irrigation isn’t all that difficult, and the payback is well worth the effort! Drip systems save substantial water, time, and energy compared to hand-watering or conventional overhead watering systems.
Drip irrigation also provides plants with slow, targeted, consistent, and deep water – which they prefer for ideal root development and growth! This leads to healthier plants that are more tolerant to stress from drought, freezing, heat and more.
Even better, solar powered drip irrigation systems allow you to automate your irrigation even if there isn’t a power source nearby. Harnessing the power of the sun, rechargeable solar batteries outlast regular batteries by many, many years.

Drip System Zones and Pressure
Most large drip irrigation systems must be divvied up into several distinct zones (stations) that will run at different times. This offers a number of benefits, and is easy to achieve with a simple irrigation manifold and controller.
First, using separate zones enables you to tailor your irrigation schedule to meet the unique and varying water needs for different plants. For instance, fruit trees or raised garden beds will require more water (in frequency and/or amount) than drought-tolerant shrubs.
Second, the use of many zones helps reduce demand on any one line, and maintains better water pressure throughout the system. Drip irrigation components are designed to operate under 20 to 30 PSI, while normal household water pressure can be as high as 80 PSI. Higher pressure will cause the sensitive parts to “blow out”, so a pressure regulator is typically added at the beginning of the drip line near the valve. Yet the water pressure will continue to drop as it travels through long lengths of drip tubing, so it’s best to not surpass 100 to 200 feet of solid ½” irrigation tubing in a single zone.
PARTS AND SUPPLIES
Below is a list of all the supplies we used to set up our solar powered drip irrigation system. For anything that involves a PVC/threaded connection, note that I linked parts compatible with ¾ inch PVC. However, you should be able to toggle and choose different sizes if you’re working with a different pipe diameter, male vs female threaded parts, etc.
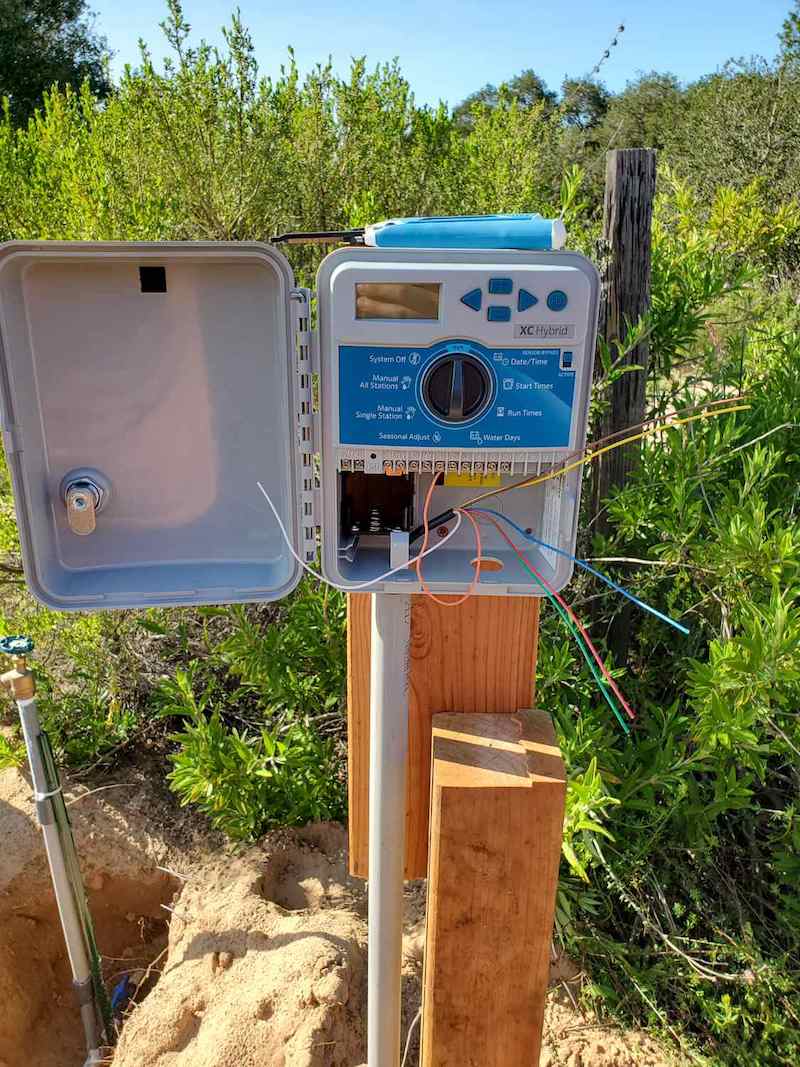
Solar powered irrigation controller
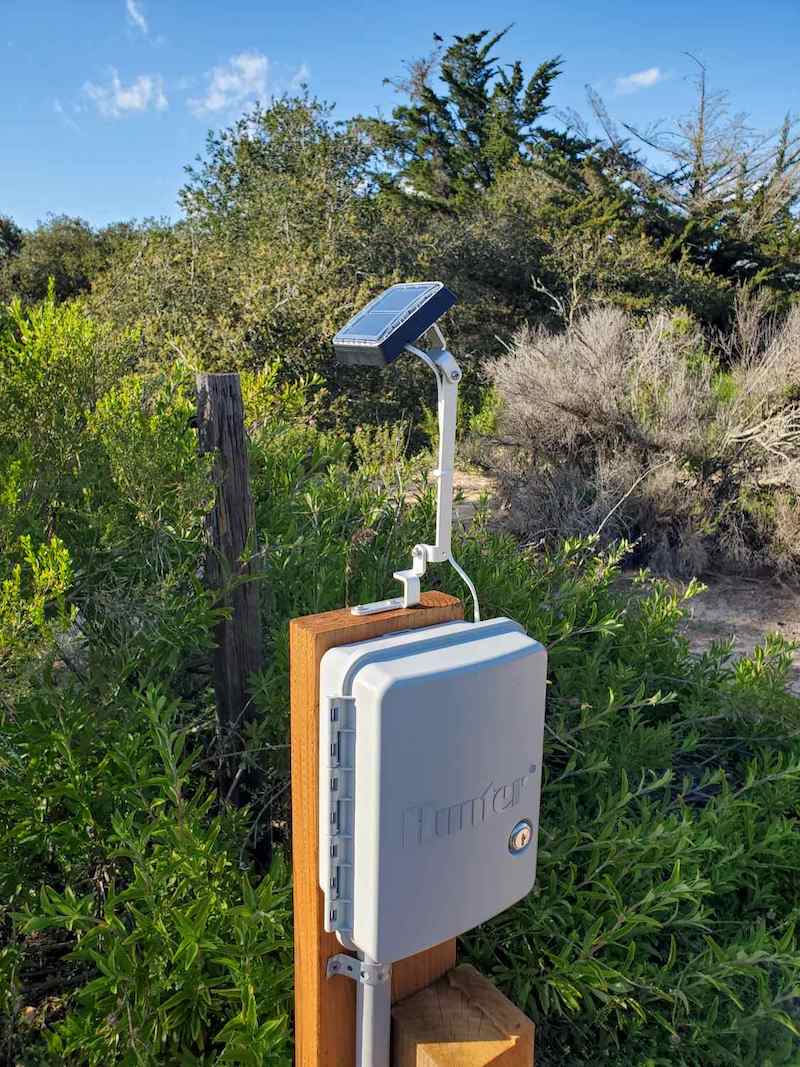
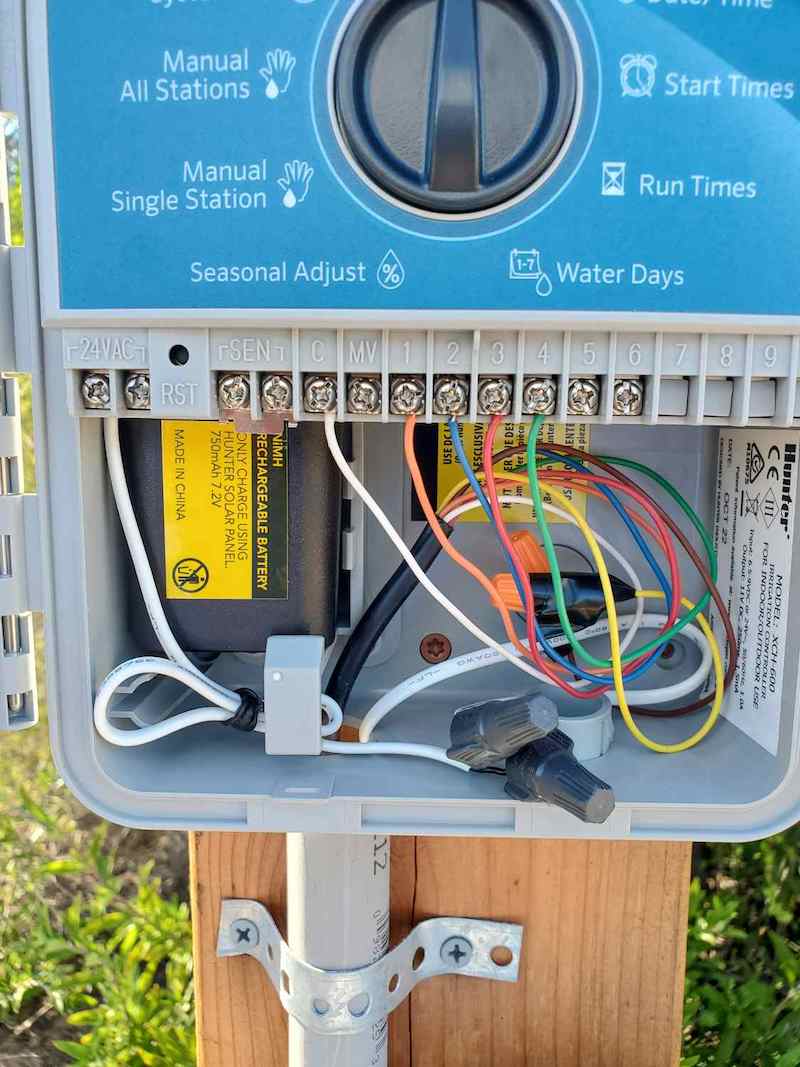
- Hunter XC-Hybrid Controller – This hybrid controller operates with traditional batteries OR is converted to 100% solar power with the addition of a solar panel kit (below) – which is what we did. We have the 6 station controller, though it’s also available with 12 stations.
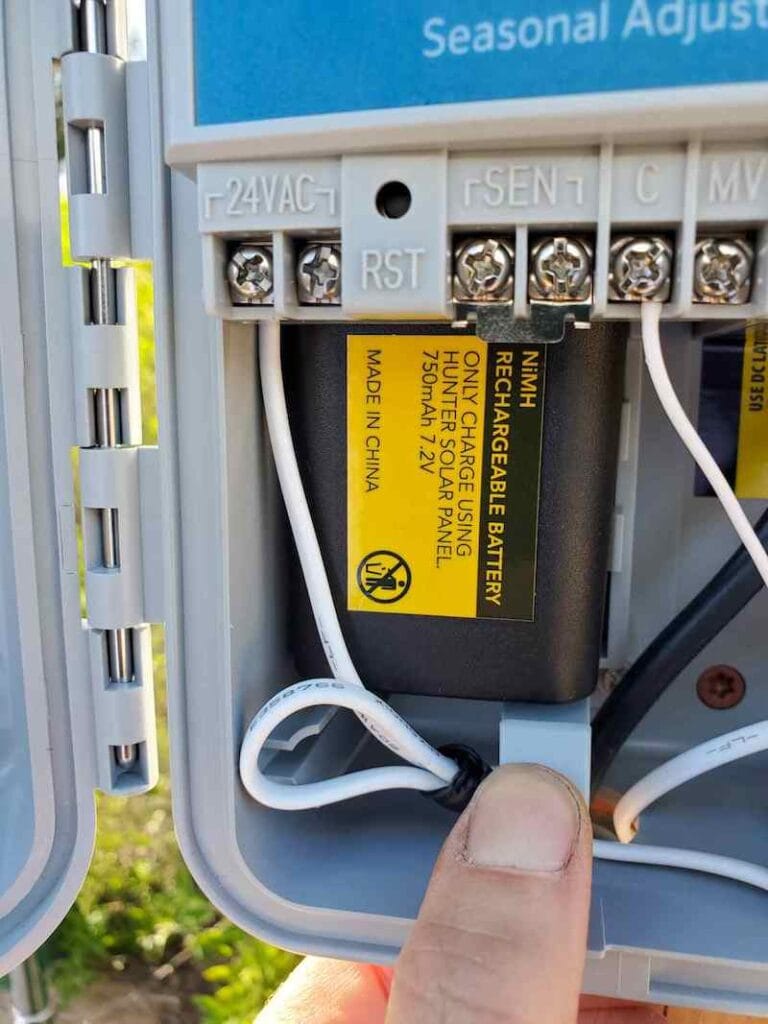
- Hunter Solar Panel Kit – Use this kit to make the Hunter XC hybrid into a solar powered irrigation controller. It comes with a solar panel and rechargeable solar battery, which replaces the standard battery pack that comes with the controller.
Valve head assembly parts
- Anti-siphon valves (ASV) – one per station. ASV valves serve several purposes: they control the on/off action of each valve, connect to the controller to automate the system, and provide backflow protection to the water system. We use these Hunter PGV-ASV valves.
- DC Latching Solenoids – one per station. Standard ASV valves come with AC solenoids, but need to be swapped out for DC solenoids in order to be compatible with the solar controller. (The solenoid is the part on top that turns the valve on and off, either manually by turning it, or through the wired control panel. They’re easy to unscrew and replace.)
- Canister filters – one per station, installed after the ASV valve. The filter prevents dirt or other debris from entering the drip lines and clogging emitters. We use these durable canister filters with a fine mesh stainless steel screen inside. They come apart for routine maintenance (wash or replace filter).
- Pressure regulators – one per station. 20 to 40 PSI is ideal to operate drip irrigation systems. We like these Senninger pressure regulators, and chose the 25 PSI option since we also have gravity working in our favor in this system.
- Multi-strand irrigation or sprinkler wire, with enough wires for every station in your system – plus one. For instance, a 7 strand wire for a system with 6 zones. We used 7 strand wire for our four-zone system and simply capped the two extra wires. You can usually find it in shorter sections at your local hardware store if you only need a few feet.

Drip line, couplers, and adapters
- PVC to irrigation tubing adapters. If you add PVC after your valves/head assembly, you’ll need to eventually convert the PVC to drip tubing. We use these adapters, which have male pipe thread on one end and a coupler to connect ½” drip tubing on the other.
- Standard ½ inch irrigation tubing, which is commonly available in 100 foot rolls. For larger projects, consider 250 foot rolls or a 500 foot roll if necessary. This tubing will create the bulk of your drip irrigation system.
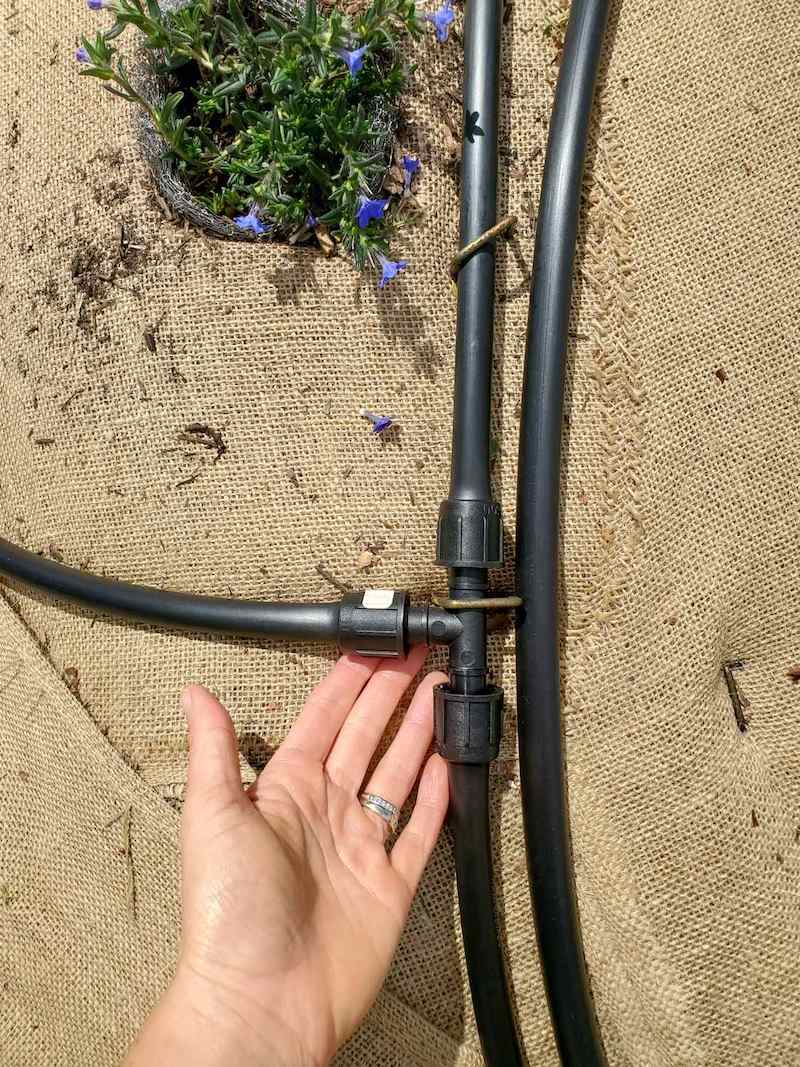
- Various ½” couplers (including tees or elbows), used to run ½” tubing throughout your landscape where needed. This varies depending on your system layout. I suggest drawing out your system to determine how many couplers you’ll need. We prefer to use PermaLoc couplers over compression fittings. They’re durable and reusable, making it easy to make adjustments or repairs! On the other hand, compression fittings are more permanent and tubing must be cut to make changes.
Other drip emitter parts
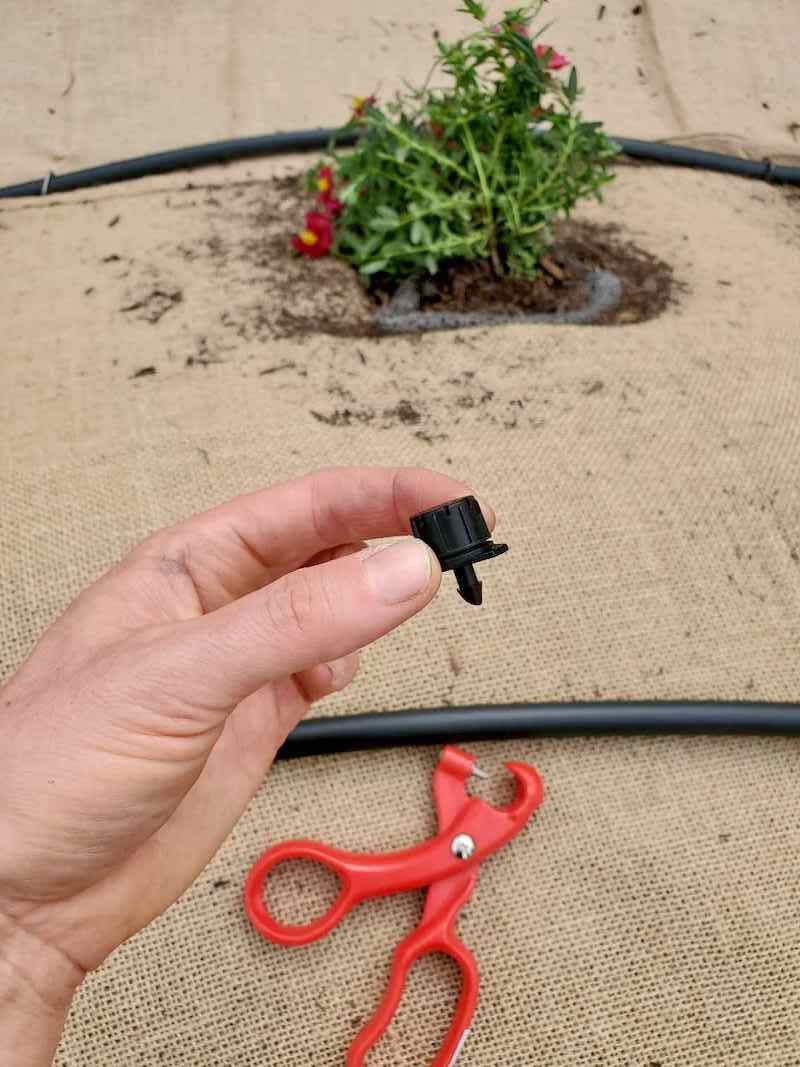
- Various drip emitters of choice, such as adjustable bubbler emitters, bubblers on stakes, standard barbed 1 GPH emitters and more.
- Solid ¼” microtubing, if you’d like to run drip emitters anywhere that isn’t directly adjacent to your main ½” tubing.
- ¼” barbed couplers to connect the ¼” drip tubing to the ½” main line tubing headers.
- A hole punch tool, used to add holes and add emitters along the ½” main line.
- Figure 8 clamps to end the main ½” lines.
- Goof plugs are handy to plug any mistakes or unwanted holes in the 1/2″ tubing.
- Galvanized landscape staples to hold the drip line in place.
INSTALLATION INSTRUCTIONS
Main Water Supply Connection
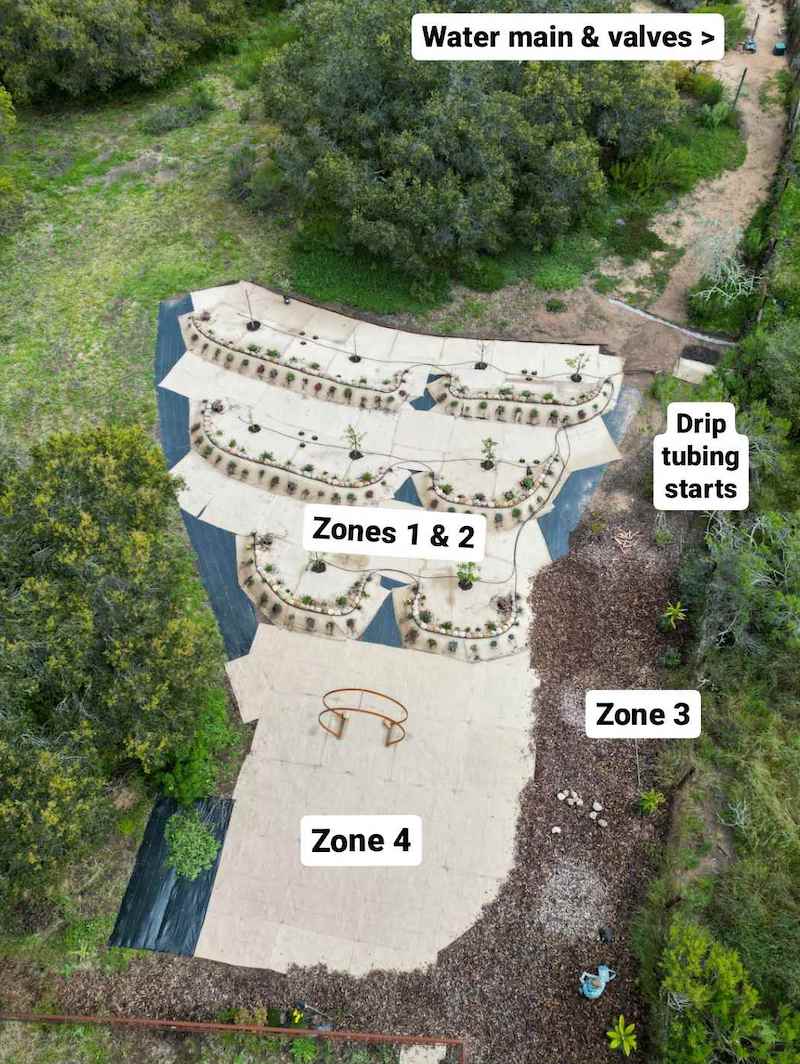
First you’ll need a nearby water supply or main line. For this particular project, we chose an existing tap uphill of the new orchard space – which is also ideal for gravity flow to help the system maintain pressure.
To connect to the main water line, we first turned off water to the property and turned on the tap to drain the lines. Next, we cut into the PVC line with good pipe cutters and glued on a simple ball valve shutoff valve. This way, we’re able to close the valve and turn the main water supply back on (after the pipe glue dried) while we continued to work on the irrigation system over the following weeks. Isolating the drip system with its own valve will also allow us to easily make repairs in the future without shutting water off to the entire property.
The location of our drip manifold and valves happened to be at the end of a waterline. If yours is not, install a tee in your main water line to connect the drip manifold to instead.


Valve Manifold and Head Assembly
A valve manifold is a collection of irrigation valves assembled together and connected to a common supply line. I chose to assemble the entire manifold and then connect it to the main line (rather than piecing together all the parts in place). That way, I didn’t have to bend over and work in a trench the whole time, or get a bunch of dirt in the lines.
My manifold is made from ¾” PVC with four tees and risers (one for each zone) plus a capped dead end that I can cut and connect more zones to in the future.
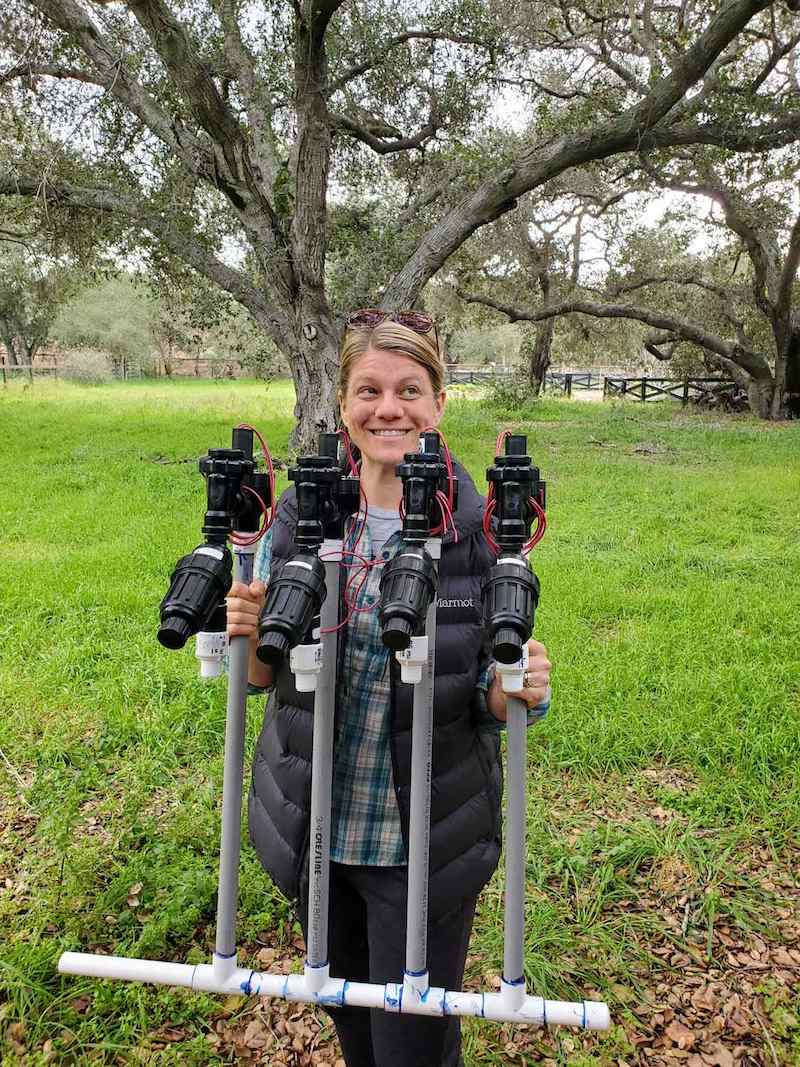
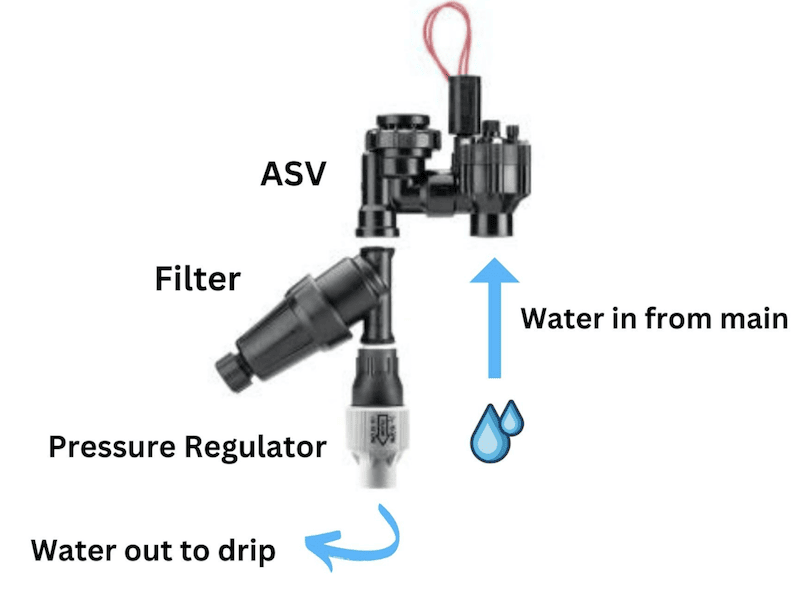
The valve head assembly flows as follows:
- From the main water line, add a “riser” or connection for each station – a length of pipe where each ASV valve will attach. Space the valve connections about 5 to 7 inches apart in small spaces, or up to 10 to 12” apart for more room for repairs. The length or height of the connection will depend on your system and climate. In places with harsh winters, valve manifolds are often buried underground or otherwise insulated to protect against freezing. Follow irrigation depth and installation best practices for your area. We’re able to keep our valves above ground for easy and convenient maintenance.
- Next connect the ASV valve to each riser, followed by the filter, and then the pressure regulator. Canister filters aren’t designed to be under constant pressure, so it is important that they’re installed after the valve. However, the filter may also cause a slight pressure loss, maye 2 to 8 PSI, so it’s also best to put it before your pressure reducer. That way, the flow coming out of the pressure reducer is true to specs.
- To piece this all together, we used plumbing tape at each threaded component, and regular PVC pipe glue and primer for the slip PVC potions.

Valve/Controller Wiring and Solar Panel Add-On
If using the solar panel add-on kit, replace the AC solenoids that came with the ASV valves to DC solenoids before continuing with wiring. With the water turned off, simply unscrew the AC solenoids and screw on the DC.
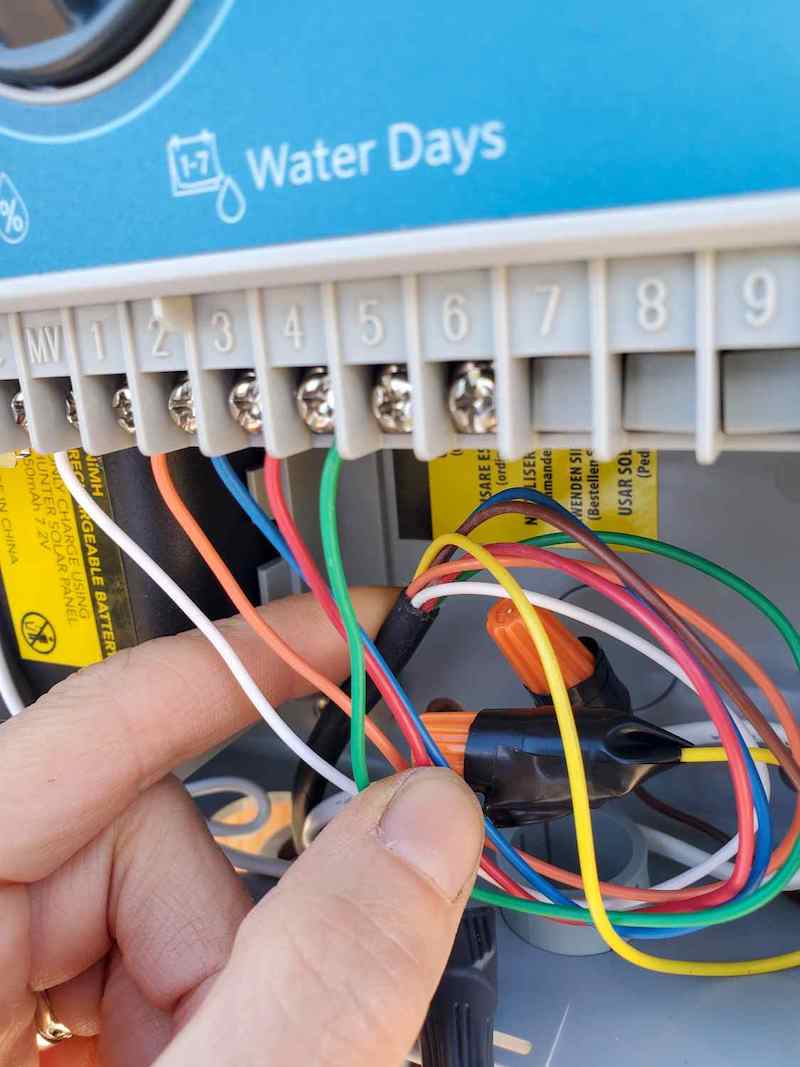
- Using multi-strand irrigation wire, connect one colored strand from the multi-strand to each RED wire coming from the ASV solenoid. Carefully strip the tip of each wire, screw on a wire connector cap, and secure with electrical tape (optional).
- Gather and connect ALL of the black wires from the ASV solenoids to a single common wire from the multi-strand (we chose white). You may need a larger connector cap to fit them all inside.
- Cap any unused wires from the multi-strand irrigation wire.
- Run the multi-strand wire up inside the bottom of your irrigation control box. We ran ours inside schedule 80 PVC (UV resistant) to protect the wire.
- Inside the irrigation control box, connect each colored wire to a corresponding numbered station. Carefully strip the coating from the end of the wire, loosen the screw, tuck the exposed wire behind the screw, and tighten it back down.
- To convert the irrigation controller to solar power, remove the traditional battery pack it came with. Insert the rechargeable solar battery from the solar add-on kit instead.
- Install the solar panel in a location that receives good direct sunlight. Run the wire from the solar panel into the bottom of the controller box, and connect the two wires to those attached to the rechargeable solar battery with a cap. Voila! Now you have a solar powered irrigation system!


Distribution System and Drip Emitters
Once the solar irrigation controller and valves are set up, it’s time to get water to your plants!
You can either connect solid ½” drip irrigation tubing right off the end of your valves, or extend your hard pipe further before converting to drip – like we did. Since our valves are a good distance from the landscaped area we want to water, we ran PVC down the hill first since it’s more durable, less likely to get chewed on by gophers, and the larger diameter allows for better water flow (and less pressure loss) than ½” tubing.
- Before connecting any drip components, I recommend turning on the water to flush all lines and clear debris first.
- Convert from PVC or other threaded parts (e.g. from the pressure reducer) to drip tubing using one of these adapters.
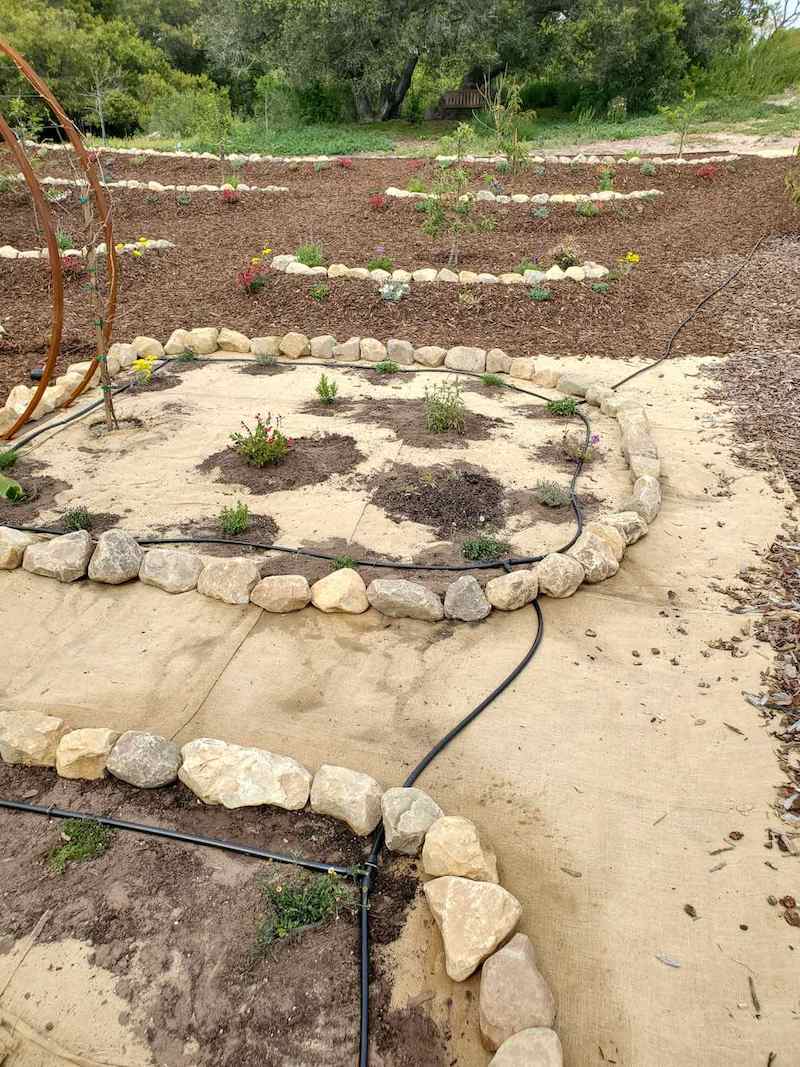
- From there, run ½” irrigation tubing around your landscape, using tees or other couplers as needed. Secure the lines in place with landscape staples. It’s best to keep the tubing near the base of plants if possible.
- Use a figure 8 clamp or other end cap to end the lines where needed.
- Use a hole punch tool to add drip emitters, bubblers, ¼” micro-tubing, and other drip components to your system. We like to use classic barbed emitters at the base of shrubs, bubblers to irrigate a slightly wider diameter, or these stake bubblers to irrigate trees.
- Finally, turn on your system and give it a test run!
- Drip irrigation lines can be covered in several inches of soil or mulch including bark, wood chips, straw, or even gravel.


How long to run drip irrigation systems?
It depends! Every garden has different water demands based on the unique climate, soil, season, temperatures and rainfall patterns. It also depends on your mulching practices, and what type of plants you’re growing. Soil protected with a nice 2 to 4″ layer of mulch will stay damp much longer than bare soil, greatly reducing water needs.
In general, it’s best to provide less frequent, deep, long watering as opposed to short shallow bouts of water every day. This will encourage deep healthy roots and stronger, more resilient plants. In our climate, we typically set our solar irrigation controllers to run for about 45 minutes to an hour, twice per week (and turn them completely off during the rainy winter season).
The time you run your irrigation system will also vary depending on the type of emitters used. For instance, systems using adjustable bubbler emitters with a higher flow rate (often 10 to 30 GPH) will emit a lot more water and faster than a system using single 1 GPH drip emitters.

And that’s how to install a solar powered drip irrigation system.
Well folks, I hope this tutorial helps you feel empowered and prepared to install your own automatic solar powered drip irrigation system too! Let me know if you have any questions in the comments below. Also please consider pinning or sharing this article if you found it useful. Stay tuned for an upcoming post about how we created our orchard area too. Best of luck, and happy irrigating!
You may also like:
- How to Install Drip Irrigation in Raised Garden Beds (Drip Tape)
- Easy Raised Bed Drip Irrigation Connected to a Faucet or Spigot
- Mulch Options: Pros and Cons of 8 Popular Types of Garden Mulch
- Top 23 Plants for Pollinators: Attract Bees, Butterflies, Hummingbirds and More
- 50+ Gopher-Resistant Plants for California and Beyond


6 Comments
Whitney
Ahh thank you for this! I have been researching how to set up drip irrigation from the main water line and have not found anything that has provided as much information and detail as your post. This is exactly what I have been looking for. Thank you for documenting this.
Aaron (Mr. DeannaCat)
So great to hear Whitney and good luck on your project!
Chris Chandler
…amazing detail with all aspects of a multi-station installation presented so that most of us who have less than journeyman status can pull off a project like this. You guys are great. Thank you. Carry on. 🙂
Aaron (Mr. DeannaCat)
So glad you found it helpful Chris, have fun growing!
Bryan Rodger
Hi,
I came across you wonderful website. My question is, you are using a hessian type material as a ground cover, is this to prevent the weeds? Did you prep the ground underneath, firt remiving the grass? Is there anything else underneath, the plasctic fabrick you nmention earlier to prevent grass and weeds?
Thank you
Bryan
Aaron (Mr. DeannaCat)
Hi Bryan, so glad you found our website! We go into further detail on the transformation of the orchard space in this article, New Pollinator Orchard Garden on a Hill (Permaculture Berms Terraces) which goes over the steps and all of the details if you want to look further into it. The space was first weeded by hand, the burlap (hessian material) was used for short term weed prevention (it will break down within a year or two) and to hold in the soil on our berms until the plant and tree roots grow in to stabilize it. The pathways that we made using traditional landscape fabric have nothing below them except earth, if you get high quality landscape fabric, weeds typically won’t grow through it and it will last for 20 or so years. Hope that helps and reach out if you have any other questions.