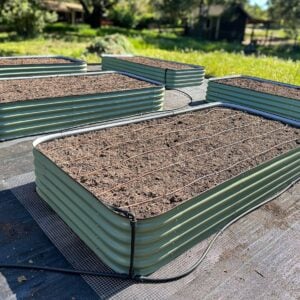
Easy Raised Bed Drip Irrigation System (to Faucet or Spigot)
A simple, effective DIY drip irrigation system for raised garden beds that doesn’t require any plumbing skills, and connects right to a nearby spigot or faucet. It’s easy to automate with an optional hose timer too. (Please see more detailed instructions, photos, and tips in the body of this article).
Equipment
- a nearby hose tap (spigot or faucet)
- heavy duty scissors
- drip irrigation hole punch tool
- needle nose pliers
Ingredients
- 1 roll Standard ½ inch irrigation tubing (solid)- you'll need enough length to go from your hose tap to your beds, including between and up the side of each bed, plus to make a "header" along the short side of each bed
- 1 roll ¼” dripline tubing (with pre-installed emitters) -enough to run several lines down the length (longest side) of each raised bed. For example, one 4×8’ raised bed with 4 rows of dripline will require about 32 feet of dripline tubing.
- 1 4-in-1 faucet adapter which includes a pressure regulator (mandatory), filter, backflow preventer, and adapter to connect the drip tubing to
- ¼” barbed couplers to connect the ¼” drip tubing to the ½” main line tubing headers
- Figure 8 clamps to end the main ½” lines. You’ll need one for each header, and possibly more to end other lines in your system – depending on the layout
- Goof plugs, to end/cap each of the ¼” drip tubing lines. These can also be used to plug unwanted holes in the 1/2″ tubing.
- Various ½” couplers (including tees and elbows), used to run ½” tubing line between and up the sides of your raised beds. This varies depending on your system layout. I suggest drawing out your system to determine how many couplers you’ll need.
- Galvanized landscape staples to hold the drip line in place.
Optional Supplies
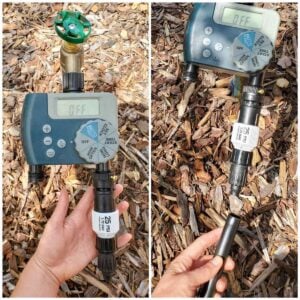
- 1 A battery-operated faucet timer to easily automate your raised bed drip irrigation system. In this particular project, we used a 2-outlet hose timer (what we already had on hand) that can be used to connect two drip lines to a single tap. Or, you can use asingle outlet hose timer.
- Shut-off valves for each bed. Install one of these simple on/off valves in the header or riser of each raised bed for the utmost control!
- A hose splitter or Y-valve. With this, you can connect the drip irrigation system to a faucet (on one side of the splitter) while also still maintaining a free outlet to use a garden hose, fill watering cans, etc.
Instructions
Assemble Headers and Drip Lines
- Each raised garden bed or planter needs a “header” made of ½” solid tubing that sits inside one of the short ends of the bed, where the smaller dripline tubing connects to.
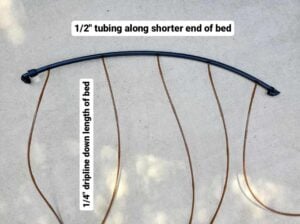
- I like to assemble my headers in a clean easy workspace away from the garden, such as a patio or table (especially if making several). Make and measure one header fit to the beds as a guide and then repeat.
- Measure and cut the solid 1/2″ solid tubing to fit inside one short end of your raised bed. Leave a few extra inches at the end to fold over and use a figure 8 end clamp to end the line.
- Measure and cut ¼” drip tubing lines - long enough to run the length of the bed and connect into the header.
- Measure and/or mark where each row of drip emitter tubing will attach to the ½” header, spaced evenly across the bed 6 to 12 inches apart. (The drip tubing looks short in the photo because it was made for a large round grow bag in this example, but will be much longer in a traditional raised bed.)
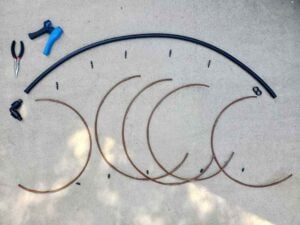
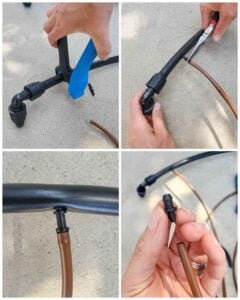
- Use a punch tool to create holes in the main header tubing. Be sure the holes are all facing the same direction so the drip tubing will lay flat on the soil surface.
- Attach drip tubing to the header. Insert a ¼” barbed coupler into one end of the ¼” drip tubing. Then push the other end of the barb into the header tubing.
- Finally, cap/end each ¼” drip tubing line with a goof plug.
Connect Drip Line to Tap
- Optional: To easily automate the raised bed drip irrigation system, add a simple faucet timer to the tap first. You can also add a hose splitter before the timer, leaving one side of the tap free for other things.
- Next, screw on the 4-in-1 faucet to drip adapter.
- Connect the ½” drip tubing to the coupler at the end of the adapter.
Run Drip Line Between Beds
- Run the ½” main line from the hose tap or faucet to the raised garden beds. Use tees, elbows or other couplers to create rows between beds as needed.
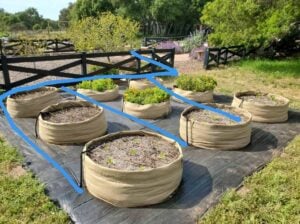
- Each bed will need a point of connection and riser. Cut into the main line near the bed, insert a tee or elbow (depending on the layout of your lines), and add another piece of ½” tubing up the side of the raised bed. Another option is to hide the riser by running it under and inside the garden bed.
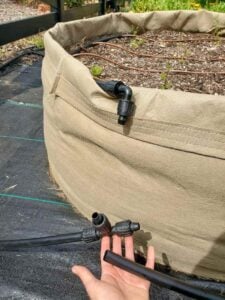
- Optional: Add a shut-off valve for each bed, explained in the supplies section above. The valve can be installed along the riser, or as part of your header.
- It’s okay to cover or bury the ½” mainline drip tubing in several inches of mulch, bark, soil, gravel, or other cover.
- Leave the very ends of the lines open for now (not capped) so you can flush the lines before adding the drip components.
Install and Connect Headers
- Before adding the headers to your raised beds, flush the main lines to remove any potential debris that could clog emitters. Simply turn the water on and let it run freely out of the end of the lines for a minute or so.
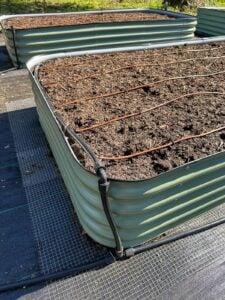
- Connect the headers to the risers you’ve added to each raised bed. Tuck the header inside the short end of the bed and attach it to the riser. Secure it in place with landscape staples or pins.
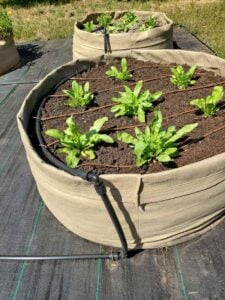
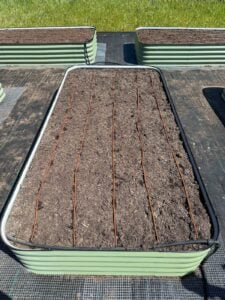
- Next, position the drip tubing lines evenly down the length of the bed and pin them in place too.
Using the System
- When you’re ready to use your new raised bed drip irrigation system, simply turn on the tap! If you’re using a hose timer, leave the main faucet ON at all times, set the timer, and it will let water into the lines per the schedule you specify.
Tried this recipe?Let us know how it was!