

Homemade Seasoned Crispy Kale Chips Recipe (Food Dehydrator or Oven-Baked)

Homemade kale chips are one of my favorite snacks from the garden! They’re absolutely delicious, super healthy, and easy to make. As much as I love eating and cooking with fresh kale in other ways, making homemade kale chips is a great way to change things up when we’re harvesting more kale than we can otherwise keep up with. It’s also the perfect use for that end-of-season kale that has become a bit tough. Even if you aren’t growing your own kale, making fresh homemade kale chips is an awesome way to add more greens to your diet – and “trick” your kids into eating more too!
I hope you enjoy our highly-addictive homemade crispy kale chips recipe. The easy step-by-step instructions will result in perfectly seasoned, crunchy, tasty kale chips – that also hold up well in storage! I’ll share our favorite seasoning combinations, but this kale chip recipe is highly customizable. Feel free to add as many or as few seasonings as you prefer, or use whatever you have available at home. You can make these kale chips using either a food dehydrator or in the oven.
Disclosure: This post may contain affiliate links to products for your convenience, such as to items on Amazon. Homestead and Chill gains a small commission from purchases made through those links, at no additional cost to you.

Would you like to save this?
Supplies & Ingredients Needed to Make Kale Chips
- 1 large bunch of kale, or about a dozen leaves. I doubled the recipe in the photos, using about the equivalent of two large bunches of kale fresh from the garden.
- Extra virgin olive oil for drizzling, approximately 1/2 to 1 tablespoon of oil per bunch of kale. The higher quality olive oil, the better the kale chips will taste!
- Sea salt – the minimum seasoning I suggest. You could also use a simple seasoned salt, like garlic salt.
- Other seasonings of choice. We love to make homemade kale chips with a variety of seasonings – sometimes using just one or two, and other times mixing several! Some of our favorites include garlic powder, onion powder, curry or turmeric powder, black pepper, cumin, lemon powder, chili powder, everything-but-the-bagel seasoning, and more. (We make most of these seasonings from homegrown ingredients. Click on any of the linked seasonings to learn how to make your own!) Nutritional yeast is another wonderful addition that we add to almost every batch of kale chips. It gives them a cheese-like tang! For a fun twist, you could even sprinkle in some fresh chopped herbs.
- A strainer and mixing bowl, or a salad spinner
- A food dehydrator, or oven and baking sheet(s). Either option works! We personally prefer to use our food dehydrator and find that it results in slightly more dry, crispy kale chips that stay crunchy longer in storage.
- Recommended: Tongs for tossing

Step 1: De-Stem & Tear the Kale
We need to get our kale washed, dried, de-stemmed, and broken up into chip-size pieces. The order that you accomplish these steps is up to you!
I have found it easiest to de-stem the unwashed kale, tear it into pieces, and toss those into a salad spinner. Shoot for around 2 inch pieces, keeping in mind that they will shrink as they dry. Then, I use the basket portion of the salad spinner as a strainer to rinse the kale in the sink. Next, I put the basket into the spinner bowl and give it whirl! I like to spin the rinsed pieces once, discard the collected water, toss the kale, then spin it once more to get them extra dry.
Alternatively (if you don’t have a salad spinner), I suggest washing your kale as intact large leaves first. Shake or pat them dry, and then proceed with de-stemming and tearing.

How to quickly de-stem kale
It is really quick and easy to de-stem kale by hand! There is no need to fuss with a knife (unless you prefer to of course). Hold the leaf near the bottom thick stem portion, pinch and grab the leafy bits on each side, and slide your fingers down the stem. The leafy portion will peel right off, leaving behind the toughest section of stem. The more tender skinny stem in the top third of the leaf will usually stay connected to the greens, which is totally okay! From there, I tear the leaves into chip-size pieces.
I should note that you don’t absolutely have to de-stem the kale, though it is highly recommended. Including the thick portion of the stem in your kale chips can lead to varying drying times, tougher kale chips, and also reduced storage life. It is far more dense (and therefore has more moisture) than the thin leaves and skinny stem bit.

Step 2: Add Oil & Seasoning
Once the raw kale chip pieces are prepped and fairly dry, transfer them into a mixing bowl. I simply dump mine from the basket into the bowl portion of the salad spinner, after getting rid of the collected water of course. That means I only use one bowl for the whole process!
Next, drizzle the kale with a small amount of extra virgin olive oil. We usually just “eyeball it”, though I’d say about ½ to 1 tbsp of oil is good for the average grocery store bunch of kale. We used about 2 tablespoons of olive oil for this large double-batch. When in doubt, go light at first. You can always add more! The goal is to evenly coat every piece with a small amount of oil, but not have any excess dripping off or pooling in the bowl. Toss everything well with tongs (or similar) until all of the pieces are evenly and lightly coated with oil.
Once the kale is tossed with oil, it is time to add your other seasonings of choice. I like to sprinkle a small amount of seasoning over the kale in two or three rounds, tossing them in between. That way, the seasonings get evenly distributed over all of the kale chips rather than stuck to only the top layer.
The amount of seasonings is up to you! At minimum, sprinkle on sea salt to taste (as you would when seasoning other vegetables with salt). We typically go fairly light with stronger seasonings like turmeric and lemon powder, adding only a light dusting. In this large double-batch, I added about one tablespoon of nutritional yeast total. Have fun experimenting with various combinations!


Step 3: Dry the Kale Chips
Now, transfer the oiled and seasoned kale chips to their final drying destination. If you’re using a food dehydrator, lay out the kale pieces on your dehydrator trays. To dry them in the oven, place the kale pieces on a baking sheet. The use of parchment paper will reduce the chances of sticking to the baking sheet, though the oil helps with that as well. Either way, arrange the kale chips next to each other but not overlapping. They need space and air flow between them to properly dry.

Kale Chip Drying Time & Temperature
Dry your homemade kale chips in a food dehydrator on 125°F for about 2 hours, or until they are completely crispy dry. If your food dehydrator doesn’t have a precise temperature setting, choose the “vegetable” setting or other medium-low heat option. By the end, they should crunch and crumble and no longer bend, signaling they are done.
In the oven, bake the kale chips on 225°F for about 25 to 30 minutes – or until the chips are crispy, but not burnt. Low and slow is the key when making kale chips in the oven!


Step 4: Enjoy or Store
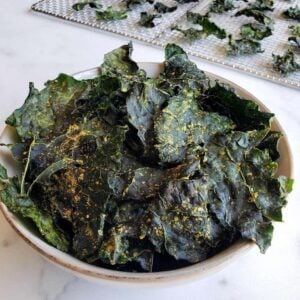
Are they ready yet? Yum! Now it is time to chow down on your homemade crispy kale chips. Store any leftovers in an air-tight container, such as a glass food storage container with snap-on sealing lid. For maximum crunch, enjoy within 4 or 5 days. Depending on the size batch made, it wouldn’t be unheard of to consume all of your kale chips in one sitting! And there is no shame in that.

Are kale chips good for you?
Heck yes they are! Kale chips are made from kale after all. Kale is incredibly nutrient-dense and loaded with vitamins, minerals, and antioxidants. Plus, dehydrated or baked kale chips are not fried like most other chips are. Fresh homemade kale chips are the most healthy, as you have the ultimate control over the quality of ingredients and process used to dry them.
The small amount of olive oil (a healthy unsaturated fat) used to help them crisp by no means makes kale chips “bad for you”. One of my personal vices is organic kettle chips… and these do a dang good job at satiating the craving for something salty, crunchy, and flavorful – at a fraction of the calories!

And that is how you make healthy, crispy, awesomely delicious homemade kale chips!
I can’t wait for you to try these bad boys yourself! Enjoy experimenting with seasonings of your own, and come back for a review to let us know how it went. Please let me know if you have any questions, and feel free to spread the love by sharing or pinning this post. Now excuse me while I go munch on some kale chips and write your next article.
If you love dehydrating things as much as we do, you’ll probably dig these tutorials too:
- How to Make Herb “Sun Dried” Tomatoes
- Preserving Onions: Make Homemade Onion Powder
- How to Make Homemade Garlic Powder
- Save Those Lemon Peels! Make Delicious Citrus Powder
Homemade Seasoned Crispy Kale Chips Recipe (Dehydrator or Oven-Baked)
Equipment
- A strainer and mixing bowl, or a salad spinner
- A food dehydrator, or oven and baking sheet(s) lined with parchment paper
- Recommended: tongs, for tossing
Ingredients
- 1 bunch fresh kale (about 12 leaves)
- 1 tbsp extra virgin olive oil
- sea salt (or seasoned salt), to taste
- other optional seasonings, sprinkled over to taste (recommendations include garlic powder, onion powder, nutritional yeast, chili powder, turmeric or curry powder, cumin, lemon powder, everything-but-the-bagel seasoning, and/or black pepper)
Instructions
- Wash, dry (pat dry or use a salad spinner) and de-stem the kale.
- Tear or cut the kale up into chip-size pieces, about 2 by 2 inches.
- Add the kale pieces to a mixing bowl. Drizzle over about 1/2 to 1 tbsp of olive oil per average bunch of kale. The goal is to evenly coat every piece with a small amount of oil, but not have any excess dripping off or pooling in the bowl.
- Toss everything well with tongs (or similar) until all of the kale pieces are evenly and lightly coated with oil.
- Sprinkle over sea salt and other seasonings of choice, to taste. (I like to lightly dust the kale with a small amount of seasonings first, toss well, dust again, toss, repeat. That way, the seasonings get evenly distributed over all of the kale chips, rather than stuck to only the top layer.)
- If you’re using a food dehydrator, lay out the kale pieces on your dehydrator trays. To dry them in the oven, place the kale pieces on a baking sheet (parchment paper recommended). Either way, arrange the kale chips next to each other but not overlapping.
- Dry your homemade kale chips in a food dehydrator on 125°F for about 2 hours, or until they are completely crispy dry. If your food dehydrator doesn’t have a precise temperature setting, choose the “vegetable” setting or other medium-low heat option. By the end, they should crunch and crumble and no longer bend, signaling they are done.
- In the oven, bake the kale chips on 225°F for about 25 to 30 minutes – or until the chips are crispy, but not burnt. Low and slow is the key when making kale chips in the oven!
- Enjoy your homemade crispy kale chips! Store any leftovers in an air-tight container. For maximum crunch, enjoy within 4 or 5 days.


24 Comments
Regina Noreen Bishop
Hi hello I’m so excited I had purchase two bunches of kale that I had to go in the hospital but they still good and today it’s 2:56 in the morning I’m making my kale. I imagine I’ll have to do two batches in the dehydrator cuz one batch took up four trays I tasted it and I put salt pepper and he’s done I used a tablespoon of yeast pinches all in a little bit of pepper and boy is it delicious that’s before I even cooked it I can’t wait till it gets done I’ve tried them in the store before I do love them but this time I’m making them thanks to your recipe I’m very happy God bless you for all your help amen
Heather Jamieson
Making my first kale chips today and obviously went straight to the source for advice on how to do it – thanks Deanna!
Heather
Anyone know why my dehydrated kale would have a splotchy white film all over it?
Aaron (Mr. DeannaCat)
I don’t know what that could be aside from water spots?
Sarah
Have made these twice and they came out perfectly! The nutritional yeast was delicious along with some Penzey’s onion and garlic powders. My very skeptical husband tried to eat all of them when he realized how delicious they were. Thank you!!!
Laura
This makes perfect kale chips. Listen when Momma Deanna tells you to NOT use too much oil (this is where I’ve failed in the past). I used the oven method and needed 26 minutes to really crisp-ify my two sheets of kale, with no over-browning. I used some kosher salt and Mrs Dash seasoning, and they were very satisfying!
Courtney
These are FANTASTIC! My boyfriend has always hated kale, but will eat them if they’re Deanna’s chip recipe. I brought them to a BBQ this weekend and they were the first gone – out of 6 hour smoked ribs, corn, pasta salad and greens. Will be making again ASAP.
Carol Rogan
Thank you so much for this great recipe!! We made these and they were so good and the crunch was amazing! We baked them in the oven and used sea salt and chili- lime seasoning. I really appreciate all the little details you put into the recipe, for someone like me that needs every detail I can get when trying something new, your directions were perfect and so were our chips, we ate them all pretty quickly 🙂
We are looking forward to making them again this week and trying the nutritional yeast on them.
Thanks again
DeannaCat
Oooh, chili-lime seasoning sounds DIVINE! Thank you for the idea, and I’m so glad to hear you and your family loved them!
Gina Pompei
First time making kale chips and I am so pleasantly surprised! Great recipe! So simple and really takes no time at all. Highly recommend!
Courtney
Everything but the bagel + nutritional yeast = amazing!!
Tony Altobello
I love this recipe for kale chips. I used a mix of curly Bates kale and lacinato kale to make mine and I also used nutritional yeast because I love that cheezy taste😋
DeannaCat
Awesome Tony! Thank you so much for the review!
Nicole Novak
Well, wowee zowee I decided to use the dehydrator method this time instead of the oven because it dawned on my pea brain that I could stack a lot more kale on 9 trays and just set it and forget it. I wasn’t concerned about the 2 hour time recommendation so I went to bed at about 1 and woke up at 8. It’s perfect! Not only that but it’s prettier—maintains the collard green much better than the oven. Cleanup is easy too. Just shake off the excess salt and away you go! My collard tree is huge and gives me tons of leaves so it’s nice to have a recipe like this!