

Easy Crispy Kale Chips Recipe (Food Dehydrator or Oven-Baked)

Come follow my easy step-by-step recipe to make crispy homemade kale chips – a delicious and healthy snack! They’re easy to make in either a food dehydrator or the oven; I’ve included instructions for both methods.
I’ll also share my best tips to keep kale chips crunchy (including in storage) along with some of my favorite seasonings to use. This recipe is super flexible and easy to customize, so free to use whatever seasonings as you prefer.

Want to save this?
Disclosure: Homestead and Chill is reader-supported. When you purchase through links on our site, we may earn an affiliate commission.
I love to make kale chips when I have an abundance of homegrown kale in the garden, but even if you aren’t growing your own, this is an awesome way to add more greens to your diet – and maybe even “trick” your kids into eating more too!
Supplies Needed
- A food dehydrator OR oven and baking sheet(s). Either option works! I personally prefer to use a food dehydrator because I can just set it and forget it, and not worry about accidentally burning them. If you bake them in the oven, I recommend using a slotted baking sheet over a solid pan.
- A strainer and mixing bowl, or a salad spinner
- Recommended: tongs for tossing
Ingredients
- 1 large bunch of kale, or about a dozen leaves. I doubled the recipe in the photos, using about the equivalent of two large bunches of kale fresh from the garden.
- Extra virgin olive oil for drizzling, approximately 1/2 to 1 tablespoon of oil per bunch of kale. Pro tip: the higher quality olive oil, the better the kale chips will taste.
- Sea salt is the minimum seasoning I suggest. You could also use a simple seasoned salt, like garlic salt.
- Other seasonings of choice (optional). I love to make homemade kale chips with a variety of seasonings – sometimes just one or two, or mixing several. Some of my favorites include garlic powder, onion powder, curry or turmeric powder, taco seasoning, cumin, lemon powder, chili powder, everything-but-the-bagel seasoning, and more. (We make a lot of these seasoning ourselves, use the links for related tutorials!) Nutritional yeast is another wonderful addition that offers a savory, cheese-like flavor. For a fun twist, you could even sprinkle in some fresh chopped herbs.

Tips to Make Kale Chips Crispy
- I’ve found that drying kale chips in a food dehydrator is the best way to make them extra dry and crispy (and stay crunchy in storage).
- In the oven, I suggest drying them on a perforated baking rack (set on top of a solid baking sheet) for the best results. The added airflow around the kale chips helps get them nice and crunchy.
- After washing your kale leaves, gently dry them as much as possible to remove leftover water before oiling and seasoning.
- Add some oil, but not too much! A thin even coating of oil helps the kale chips crisp up nicely. Yet they can get soggy if you overdo it…
Instructions
1) De-Stem and Tear Kale
- To prepare the kale, it needs to be washed, dried, de-stemmed, and broken up into chip-size pieces. I like to wash the kale, de-stem and tear it into pieces, and toss those into a salad spinner to remove excess moisture.
- When cutting or tearing the kale into pieces, aim for around 2-inch pieces, keeping in mind that they will shrink a bit as they dry.
- Alternatively (if you don’t have a salad spinner), I suggest washing your kale leaves, shake or pat them dry with a clean towel or paper towels, and then proceed with de-stemming and tearing.
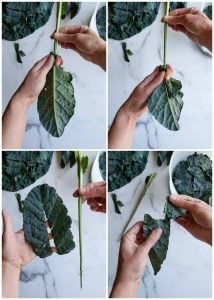
PRO TIP: I’ve found that the quickest, easiest way to de-stem kale is to hold the thick bottom portion of stem in one hand while you pinch and slide the leaf portion off with the other. See example photos below.


2) Oil and Season
- Once the kale pieces are prepped and fairly dry, transfer them into a mixing bowl.
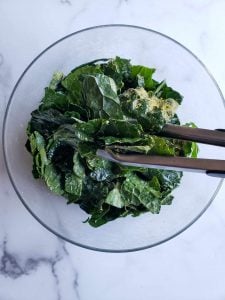
- Next, drizzle the kale with a small amount of extra virgin olive oil. I don’t always measure but use about ½ to 1 tbsp of oil per bunch of kale. When in doubt, go light at first. You can always add more! The goal is to evenly coat every piece with a small amount of oil, but not have any excess dripping off or pooling in the bowl. Toss everything well with tongs (or similar) until all of the pieces are evenly and lightly coated with oil.
- Now add seasonings of choice and toss well to evenly coat the chips. At minimum, sprinkle on sea salt to taste (as you would when salting vegetables while cooking). In this large double-batch, I added about one tablespoon of nutritional yeast, but I typically go fairly light with stronger seasonings like curry or garlic powder, adding only a light dusting. Have fun experimenting with various combinations!
PRO TIP: I like to add small amounts of seasoning over the kale in two or three rounds, tossing them in between. That way, the seasonings get evenly distributed over all of the kale chips rather than stuck to only the top layer.


3) Dry the Kale Chips
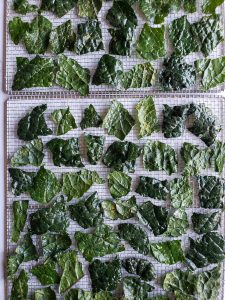
- Now, transfer the oiled and seasoned kale chips onto dehydrator trays, or baking sheets (either perforated or lined with parchment paper). Arrange them in a single layer, not overlapping. They need space and air flow between them to properly dry!
- Dry kale chips in a food dehydrator on 125°F for about 2 hours, or until they are completely crispy and dry. If your food dehydrator doesn’t have a precise temperature setting, choose the “vegetable” setting or other medium-low heat option. By the end, they should crunch and crumble and no longer bend, signaling they are done.
- In the oven, bake kale chips on 225°F for about 25 to 30 minutes – or until the chips are crispy, but not burnt. “Low and slow” is the key when making kale chips in the oven! Rotate or turn the tray halfway through to promote even drying.


4) Enjoy or Store
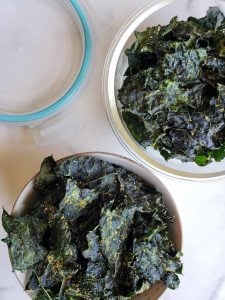
Now it is time to try your homemade crispy kale chips, which are best enjoyed soon after they’re done drying.
Store leftovers in an air-tight container, such as a glass food storage container with snap-on sealing lid. For maximum crunch, it’s best to eat them within 3 or 4 days. If they lose their crunch, pop them back in the oven on 300°F for 3 to 5 minutes or an air fryer for 1 to 2 minutes.

Are kale chips good for you?
Absolutely! Kale is considered a superfood after all! It’s nutrient-dense and loaded with vitamins, minerals, and antioxidants. Plus, dehydrated or baked kale chips are not deep-fried like most other chips are. Fresh homemade kale chips are the most healthy, as you have the ultimate control over the quality of ingredients and process used to dry them.
One of my personal vices is organic kettle chips, and homemade kale chips do a pretty good job at satiating my craving for something salty, crunchy, and flavorful – at a fraction of the calories or carbs!

And that’s how to make healthy, crispy homemade kale chips!
Enjoy! I hope you have fun experimenting with seasonings of your own, and come back to leave a review once you give them a try. Please let me know if you have any questions in the comments below.
If you love dehydrating things as much as we do, you’ll probably dig these tutorials too:
- How to Make Homemade Sun-Dried Tomatoes
- How to Dry Fresh Herbs: 4 Easy Ways + Storage Tips
- Preserving Onions: Make Homemade Onion Powder
- How to Make Homemade Garlic Powder
- Easy Homemade Fruit Leather Recipe (Dehydrator or Oven)
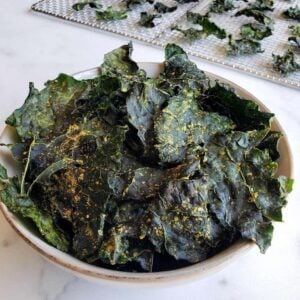
Easy Crispy Kale Chips (Dehydrator or Oven-Baked)
Want to save this?
Equipment
- A strainer and mixing bowl, or a salad spinner
- A food dehydrator, or oven baking sheet(s) lined with parchment paper (using a slotted or perforated baking rack will provide even better drying/airflow)
- Recommended: tongs, for tossing
Ingredients
- 1 bunch fresh kale (about 12 leaves)
- 1 tbsp extra virgin olive oil
- sea salt (or seasoned salt), to taste
- other optional seasonings, sprinkled over to taste (recommendations include garlic powder, onion powder, nutritional yeast, chili powder, turmeric or curry powder, cumin, lemon powder, everything-but-the-bagel seasoning, and/or black pepper)
Instructions
- Wash, thoroughly dry (pat dry or use a salad spinner) and de-stem the kale.
- Tear or cut the kale up into chip-size pieces, about 2 by 2 inches. (They'll shrink as they dry.)

- Add the kale pieces to a mixing bowl. Drizzle over about 1/2 to 1 tbsp of olive oil per average bunch of kale. The goal is to evenly coat every piece with a small amount of oil, but not have any excess dripping off or pooling in the bowl.
- Toss everything well with tongs (or similar) until all of the kale pieces are evenly and lightly coated with oil.
- Sprinkle over sea salt and other seasonings of choice, to taste. (I like to lightly dust the kale with a small amount of seasonings first, toss well, dust again, toss, repeat. That way, the seasonings get evenly distributed over all of the kale chips, rather than stuck to only the top layer.)

- Spread the kale chips in a single layer (not overlapping) on food dehydrator trays, or on oven baking sheets lined with parchment paper (or perforated baking sheet).
- Dry homemade kale chips in a food dehydrator on 125°F for about 2 hours, or until they are completely crispy dry. If your food dehydrator doesn’t have a precise temperature setting, choose the “vegetable” setting or other medium-low heat option. By the end, they should crunch and crumble and no longer bend, signaling they are done.
- In the oven, bake the kale chips on 225°F for about 25 to 30 minutes – or until the chips are crispy, but not burnt. Low and slow is the key when making kale chips in the oven!
- Enjoy your homemade crispy kale chips! Store any leftovers in an air-tight container. For maximum crunch, enjoy within 4 or 5 days.




24 Comments
Maggie
I made kale chips for the first time using this recipe! We bought an air fryer that also has a dehydrating mode, and we have a farm produce subscription that gets delivered every other week. I wanted to make use of all the kale I was receiving, and this has been a very tasty way of doing that. I seasoned it with nutritional yeast, salt, garlic powder and cumin. The nutritional yeast is really the power player here.
Thank you for a new favorite homemade snack! I’ve now made it four times and it’s a big hit with my husband.
Aaron (Mr. DeannaCat)
That is amazing to hear Maggie and we are so glad you and your husband have a new favorite snack. Thank you so much for sharing!
Kate
I’m no newbie when it comes to making kale chips, but I usually just wing it and end up with them being either soggy or charred into carbon. I figured perhaps that was a sign to, you know, actually follow a recipe, and after a preliminary Google search, I realized I should see if my favorite blog (hint – that’s Homestead and Chill) had a recipe for these, and sure enough!
Okay – that was enough of a preamble. These are incredible. I used my oven, and they are perfect – crispy but not burnt, packed with flavor (I used nutritional yeast, garlic power, turmeric, and black pepper). I’m glad I have plenty of kale growing right now as this current batch will be gone fast!
Aaron (Mr. DeannaCat)
Hi Kate, thank you so much for the kind words and we are so glad your kale chips turned out so well, the seasonings you added sound delicious! It’s so great to hear you will be harvesting plenty of kale and have another way to use up your greens.
Christine
I’ll say I was skeptical when starting to make these, but I have a TON of kale in my garden that I hate to see wasted, so had nothing to loose. I used a Harissa olive oil, which is spicy, then seasoned with wood fired garlic powder, salt and an adobo Mexican seasoning. Dried in my dehydrator for just over 2 hrs. Darn, these are tasty! Will be making more with my harvest for sure.
Aaron (Mr. DeannaCat)
So glad you enjoyed the kale chips Christine, your flavor combinations sound delicious! Enjoy your kale chips and continued kale harvests!
Courtney
Super simple and super tasty way to use up all the extra kale from the garden or the CSA box. I love any excuse to use the dehydrator!
Aaron (Mr. DeannaCat)
That’s great to hear Courtney, enjoy!
Latestmodapks
These are the best kale chips I’ve ever had! I made them in the oven and they turned out great. I will definitely be making these again.
Regina Bishop
Hello again. Well my second batch of kale I seasoned with cumin and turmeric and pink salt. They both taste pretty good but I think I’m going to like the 1st one better. I’m sorry about those typos in the first message please go ahead and fix them if you can thank you God bless you you look beautiful thanks to your gardening and your wonderful food I know,I know that’s why. I’ve been striving to get well from nutrition for a long time. I just decided to do the keto diet I have about 25 lb to lose so hopefully that will help me I’m going to use the kale because I’m in dialysis and you get real sick after they drain all your nutrients out of you so I’m going to take the kale with me. We’ll see if that helps.
be blessed