
How to Install Drip Irrigation in Raised Garden Beds (Drip Tape)
Learn how to set up an automated drip irrigation system for raised garden beds using drip tape with these step-by-step instructions. Please see the full post above for even more details, photos, tips, and video. We also have this easy DIY drip irrigation tutorial that is even more beginner-friendly.
Equipment
- A main water supply. We ran 3/4" PVC to each raised bed, and then converted to drip tubing within each bed. However, you can install a similar drip system using 1/2" irrigation tubing instead of PVC too. This article and video will show you how to attach drip to a hose faucet or spigot with an automated timer.
- heavy duty scissors
- drip irrigation hole punch tool
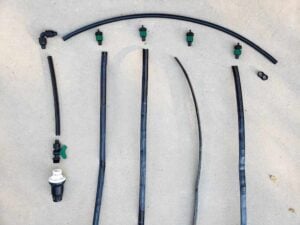
Ingredients
- 1 roll Standard ½ inch irrigation tubing (solid)- this will be used to create the main “header” that the drip tape lines will attach to.
- Adapters to connect the ½” drip tubing to your main water supply in each bed. We used this adapter to convert from threaded ¾” PVC pipe to ½” irrigation tubing (which has an option for ½” threaded pipe size under the same link). On the other hand, this 4-in-1 adapter is ideal to attach drip to a regular faucet or hose bib instead. It includes a pressure reducer, backflow device, filter, and drip tubing connector.
- Optional but recommended: a valve to control or turn off each raised bed individually. Our PVC-to-drip adapter (described just above) has a valve already included. However, you can buy these separate valves to install within your ½” tubing too.
- Pressure reducers. Standard drip systems must be reduced to 20 to 40 psi, which can occur at the main connection (such as at a hose spigot or irrigation valve). Our main irrigation valves already had 40 psi pressure reducers installed. Systems using drip tape must be further reduced to 8 to 15 psi (check your drip tape specifications) so we added an additional 15 psi pressure regulator at each bed. Note that our regulator is made to connect to ¾” pipe thread, but other sizes are available.
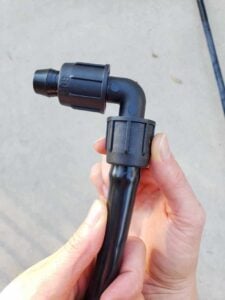
- Elbows and/or tee connectors to create the header. We prefer these Perma-loc connectors that screw on over the tubing. They can easily be disconnected as needed for repairs or changes.
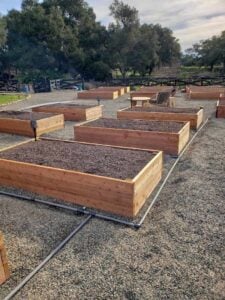
- Drip tape of choice. We used this heavy-duty 15 mil drip tape with 0.25 gph emitters every 6 inches. The 0.5 gph would be ideal for raised beds too! Determine how much you need. For example, we installed (4) 8-foot rows of drip tape per 4×8’ bed. So that’s 32 feet per bed X 16 beds (plus a few smaller beds) = about 600 feet.
- Barbed adapters. We used these 3.6 mm barb adapters to connect the ⅝” drip tape to the ½” header tubing.
- End caps or clamps. We use figure 8 clamps to end the ½” irrigation tubing header. These closure clips are what we used to end each line of drip tape.
- 1 If you’re working with PVC, you’ll need PVC primer, glue, and a good set of ratchet-style pipe cutters.
- Optional: a timer or controller to automate the system. Our orchard, existing garden, and new raised bed drip irrigation systems are connected to a solar-powered Hunter 6-station controller. The other drip systems we run from hose bibs have this simple faucet timer.
- A backflow preventer and filter. There are a few options,depending on your main water supply connection. Hard-piped systems like ours usually have a filter and backflow preventer within main valve head. Or if you are connecting to a hose bib, use a 4-in-1 faucet adapter – which has a backflow device, filter, pressure reducer and drip connection.
Instructions
Run Water Supply to Each Bed
- Ever bed will need a water supply line, which could be PVC, other hard piping, or ½” black drip tubing.
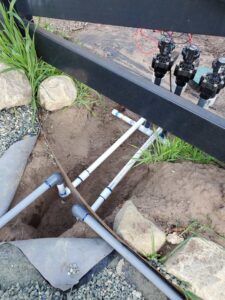
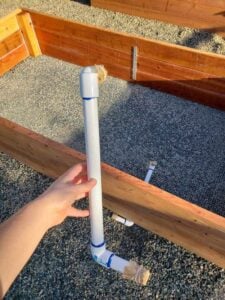
- Each bed will need a "riser" that brings the water line up to the soil surface. The water lines and risers could be concealed under/inside every raised bed, either before the garden beds are installed or trenched under existing beds after-the-fact. Or, simply run the water lines up the outside of the bed wall.
- For main water lines, follow best practices for your area in regards to materials, depth, etc. For instance, our climate doesn't freeze so we buried schedule 80 (UV resistant) PVC only a few inches deep in gravel.
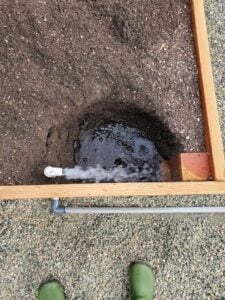
- Flush the main lines to remove dirt or debris before adding any further components
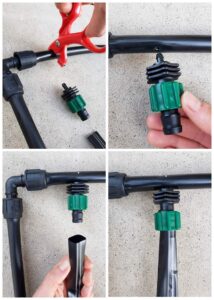
Connect Pressure Reduce and Drip Adapter at Each Bed
- Connecting to the main water supply/riser at each bed, add a pressure regulator at each bed for drip tape (8-15 psi) unless your system already has that low of pressure.
- Next, use an appropriate adapter for your system to convert to ½” solid drip irrigation tubing. The right adapter will depend on your particular supply lines (various sizes of PVC, other hard-piping, a hose bib, etc) as discussed above and in the video.
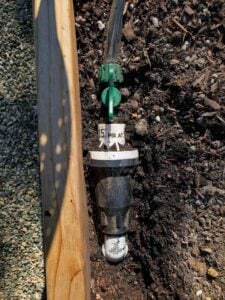
- For example, we used these adapters to connect our 3/4" PVC (female threaded fitting in the pressure regulator) to 1/2″ drip tubing. The adapters also have a shut off valve so we can turn off each bed as desired.
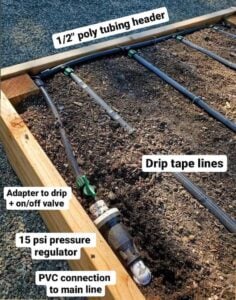
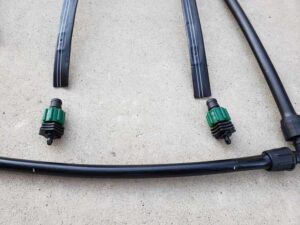
Assemble Headers and Drip Lines
- Each raised garden bed needs a “header” made of ½” solid tubing that sits inside one of the short ends of the bed, that the rows of drip tape connects to.
- I like to assemble my headers in a clean easy workspace away from the garden, such as a patio or table (especially if making several). Make and measure one header fit to the beds as a guide and then repeat.
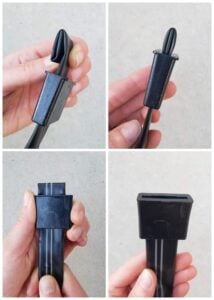
- Measure and cut the solid 1/2″ solid tubing to fit inside one short end of your raised bed. Leave a few extra inches at the end to fold over and use a figure 8 end clamp to end the line.
- Use a elbow coupler and additional tubing as needed where the header will connect to the main supply line.
- Measure and cut drip tape lines - long enough to run the length of the bed and connect into the header.
- Measure and/or mark where each row of drip tape will attach to the ½” header, spaced evenly across the bed 6 to 12 inches apart. (We typically space our rows of drip tape about 8-9" apart, or 4 evenly spaced across a 4x8' bed)
- Use a punch tool to create holes in the main header tubing. Be sure the holes are oriented in a way that will have the drip tape laying flat on the soil surface. Insert a barbed adapter into each hole.
- Attach drip tape. Completely loosen the perma-loc nut (exposing as much of the barb as possible), slip the drip tubing over the barb, then hold it in place while you tighten the nut down over it. Remember, keep the emitters facing UP!
- Add end caps/clips to both the main header line and drip tape lines (flat clips for drip tape, and a figure 8 end clamp for the main 1/2" tubing)
Connect Headers
- Connect the headers to the risers you’ve added to each raised bed. Tuck the header inside the short end of the bed and attach it to the riser. Secure it in place with landscape staples or pins.
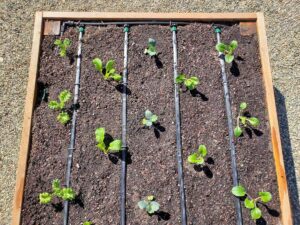
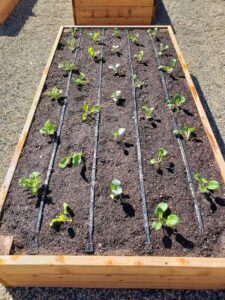
- Next, position the drip tape lines evenly down the length of the bed and pin them in place too. Remember to keep the emitters facing up.
- It’s okay to cover or bury the drip tape with mulch
- See the main post text for FAQ about how long to run the system, winterizing tips, and more.
Tried this recipe?Let us know how it was!