

Potting Up Seedlings: What, Why, When & How
Come learn everything you need to know about potting up seedlings – including tips on when, why, and how to pot up vegetable, herb or flower seedlings. Potting up is a simple but essential step for success when starting seeds indoors or in containers! Chances are, you’ll likely need to repot seedlings at least once (maybe twice) before they get transplanted into the garden. With these tips, your seedlings will grow as healthy, happy, and large as possible.
I’ve also included a demonstration video at the end of this post that shows our process for repotting tomato and cucumber seedlings.

Would you like to save this?
Disclosure: Homestead and Chill is reader-supported. When you purchase through links on our site, we may earn an affiliate commission.
What is “Potting Up”?
Potting up means the act of transplanting seedlings “up” into larger containers than they were previously living in.
Seedlings are usually potted up into a slightly richer potting soil than they were started in. Sometimes, seedling are also thinned (gently separated or teased apart) in the process, and then individually potted into larger containers.
Keep in mind that once you do repot seedlings, the plants and containers will take up more space under your indoor grow lights – so plan accordingly!


The Importance of Potting Up
Potting up seedlings as they grow helps them grow faster, healthier, larger, prevents stress or stunting, and generally live their best life.
- Potting up seedlings into larger containers prevents root-binding. A plant is “root bound” when it’s roots run out of space to grow, so they begin to wind in a tangled circle around themselves. While you can sometimes very gently loosen the roots, severe root-binding can also cause permanent stunting and damage to a plant – even after it’s transplanted outdoors.
- Potting up promotes better (even) water retention and prevents seedlings from accidentally drying out. As seedlings grow larger, they drink more water and thus dry out more quickly. You’ll notice that a 6-pack of tiny seedlings needs water far less often than the same size 6-pack full of large, thirsty seedlings.
- Repotting also feeds the seedlings by offering new richer soil. Fluffy seed starting mix is ideal for germinating seeds, but is fairly devoid of nutrients. Within a few weeks of sprouting, your seedling’s growth may begin to stall out. The plants will appreciate a slightly richer soil now, and/or an occasional water with dilute seaweed extract for added nutrients.

When to Pot Up Seedlings
There is no hard-and-fast rule as to when to repot seedlings. In general, it’s time to pot up once the seedlings have outgrown their current container, which could be within two to six weeks after sprouting.
The exact time depends on a number of factors including the plant type and size, current container, and when you intend to transplant the seedlings outside for good. When in doubt, it’s better to pot up early than wait too long!
- The smaller the container or cells they’re started in, the sooner seedlings will need to be potted up. Plants will feel cramped and overgrown in those fairly quickly.
- Large, fast-growing vegetables like tomatoes or squash will outgrow their container more quickly than something smaller like herbs or lettuce started in the same size pots.
- Check the roots. If a lot of roots are growing out of the bottom drainage holes, it may be time to pot up soon – though few poking through is normal! If you gently lift the entire root ball out of the container and they’re growing in a circle around themselves, it’s time.
- Monitor plant growth and health. Is the seedling still steadily growing? Does the color look good? If it seems to stop growing or turn yellow, it’s probably time.
- When do you intend to transplant seedlings outdoors? If it’s next week or two, then don’t bother potting up! (That is, unless they’re getting really overgrown and bound, then it might be worth it.) Yet, if the seedlings are cramped in their containers and will still be inside for several more weeks, pot those babies up.

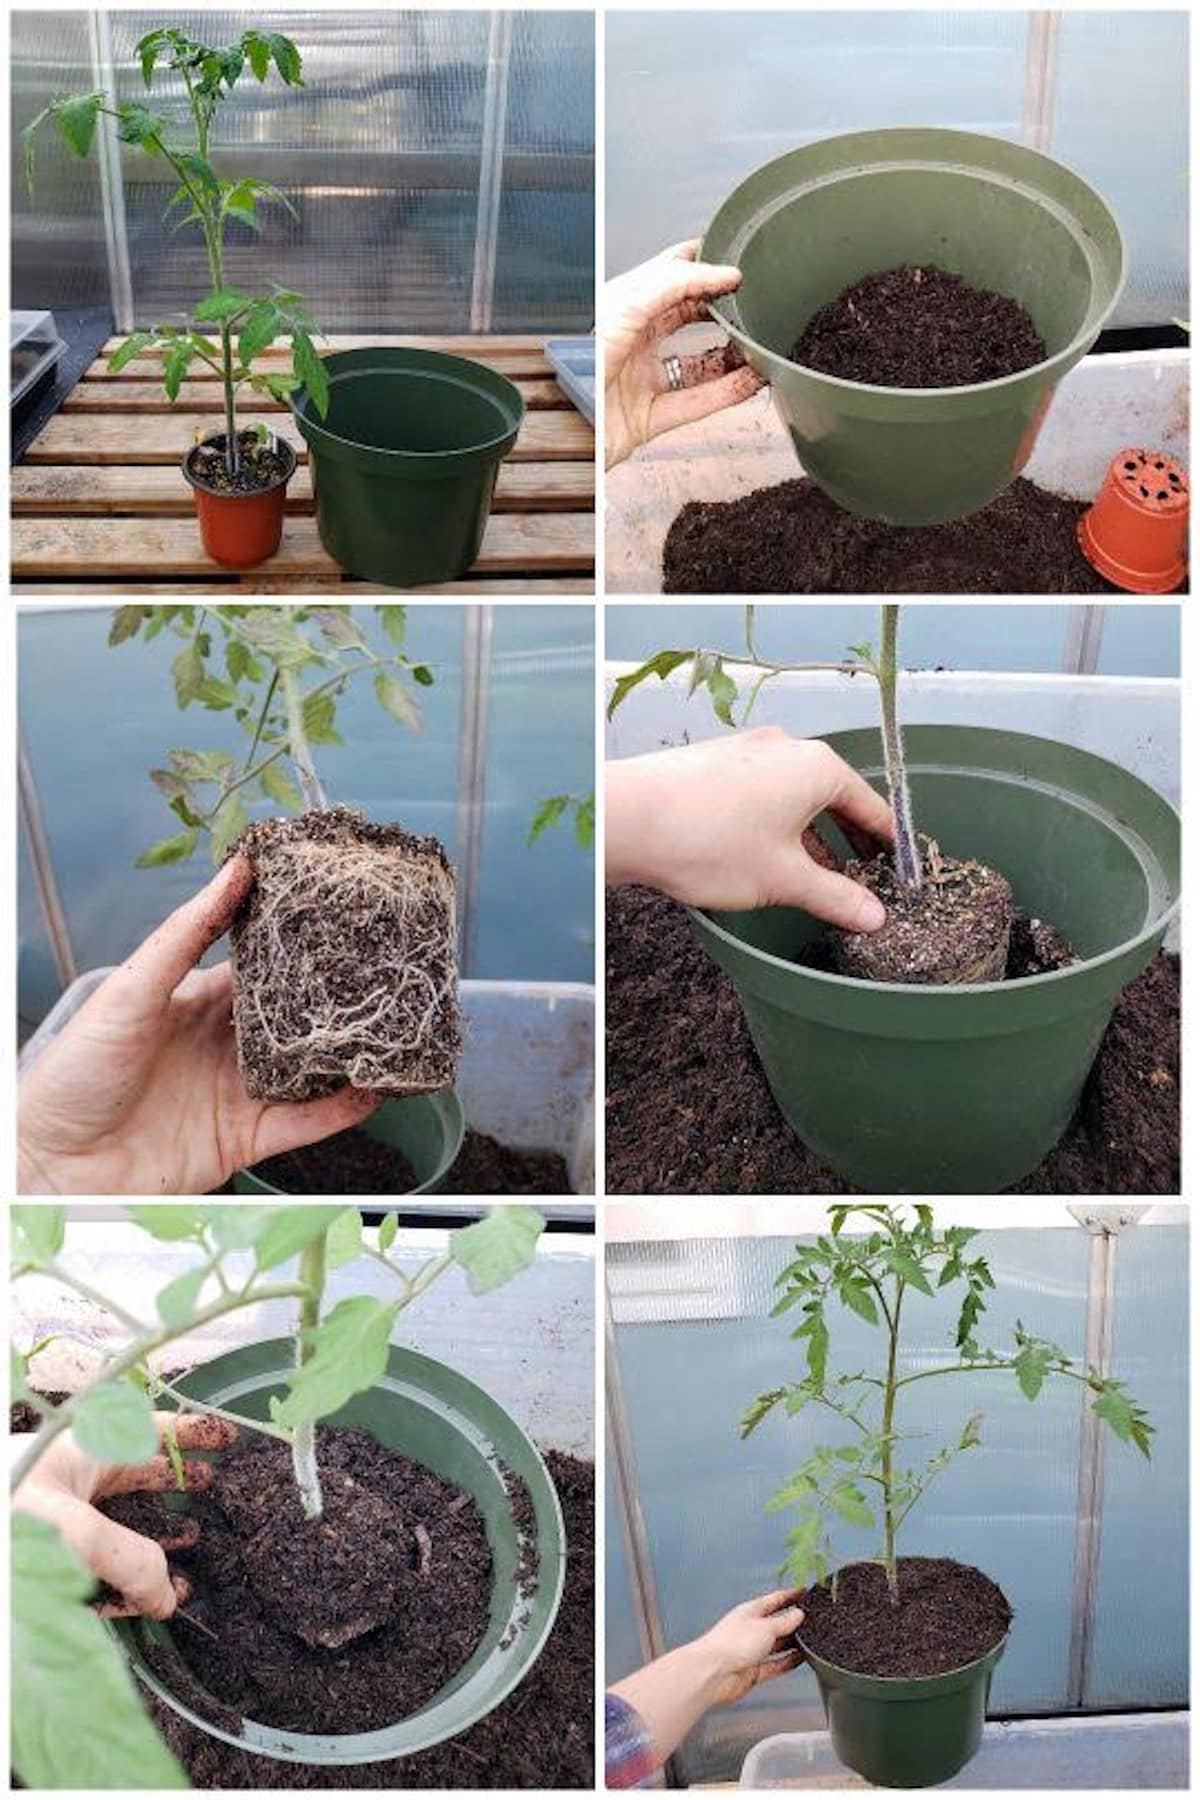
How to Pot Up Seedlings
- Pot up into new containers that are slightly bigger than the current size. About twice as large is a good goal – where the rootball will have more room both below and around the sides. (If you started in very tiny cells, you could pot up to more than twice as large, reducing the need to do it again soon.) Don’t go too big however, as it can lead to moisture issues and rot.
- Add a little soil into the bottom of the new container. We like to lightly pre-moisten the soil to reduce sinking and settling later. See soil options and my neat trick for making the perfect size hole below!
- Gently ease the seedling out of the smaller container without pulling on the stem itself. Place the entire root and soil mass in the new container, and then fill around the sides with the fresh soil. Lightly press or pat down as needed, but avoid compacting the soil or root area.
- No, you don’t need to break up the roots when repotting seedlings! Gently teasing roots is recommended for very root-bound plants (especially larger shrubs, trees, or perennials), but otherwise can stunt or shock some tender annual vegetable seedlings. When in doubt, leave the roots alone or only very gently loosen them. Do not cut or rip. Squash, melons, peas, beans, corn and cucumber have especially sensitive roots so avoid teasing those at all.
- If you have tall, leggy seedlings you can bury a small portion of the stem when potting up. Some plants like tomatoes, peppers, and eggplant will even grow new roots off the buried stem! However, I don’t recommend this if the seedlings are less than a few weeks old. They’re still too tender and may rot.
- Finally, provide light water. We prefer to water from below, allowing the soil to soak up water from the tray beneath it.
Best Soil for Potting Up
When potting up fairly large, established seedlings with a decent root ball (like the tomato in this example) we use a high-quality organic potting soil, straight from the bag. Potting soil is more dense and rich (and often contains mild fertilizer) than the seed starting mix it was previously growing in. At this stage in maturity, the seedlings will appreciate the additional nutrients!
However, if you’re repotting very small, less established seedlings (under 2 inches tall) that have thin fragile roots and no solid formed root ball, they will do best in lighter soil. In that case, mix 60% organic potting soil and 40% of your favorite seed starting mix. That way, the tender roots meet less resistance when they’re trying to grow.

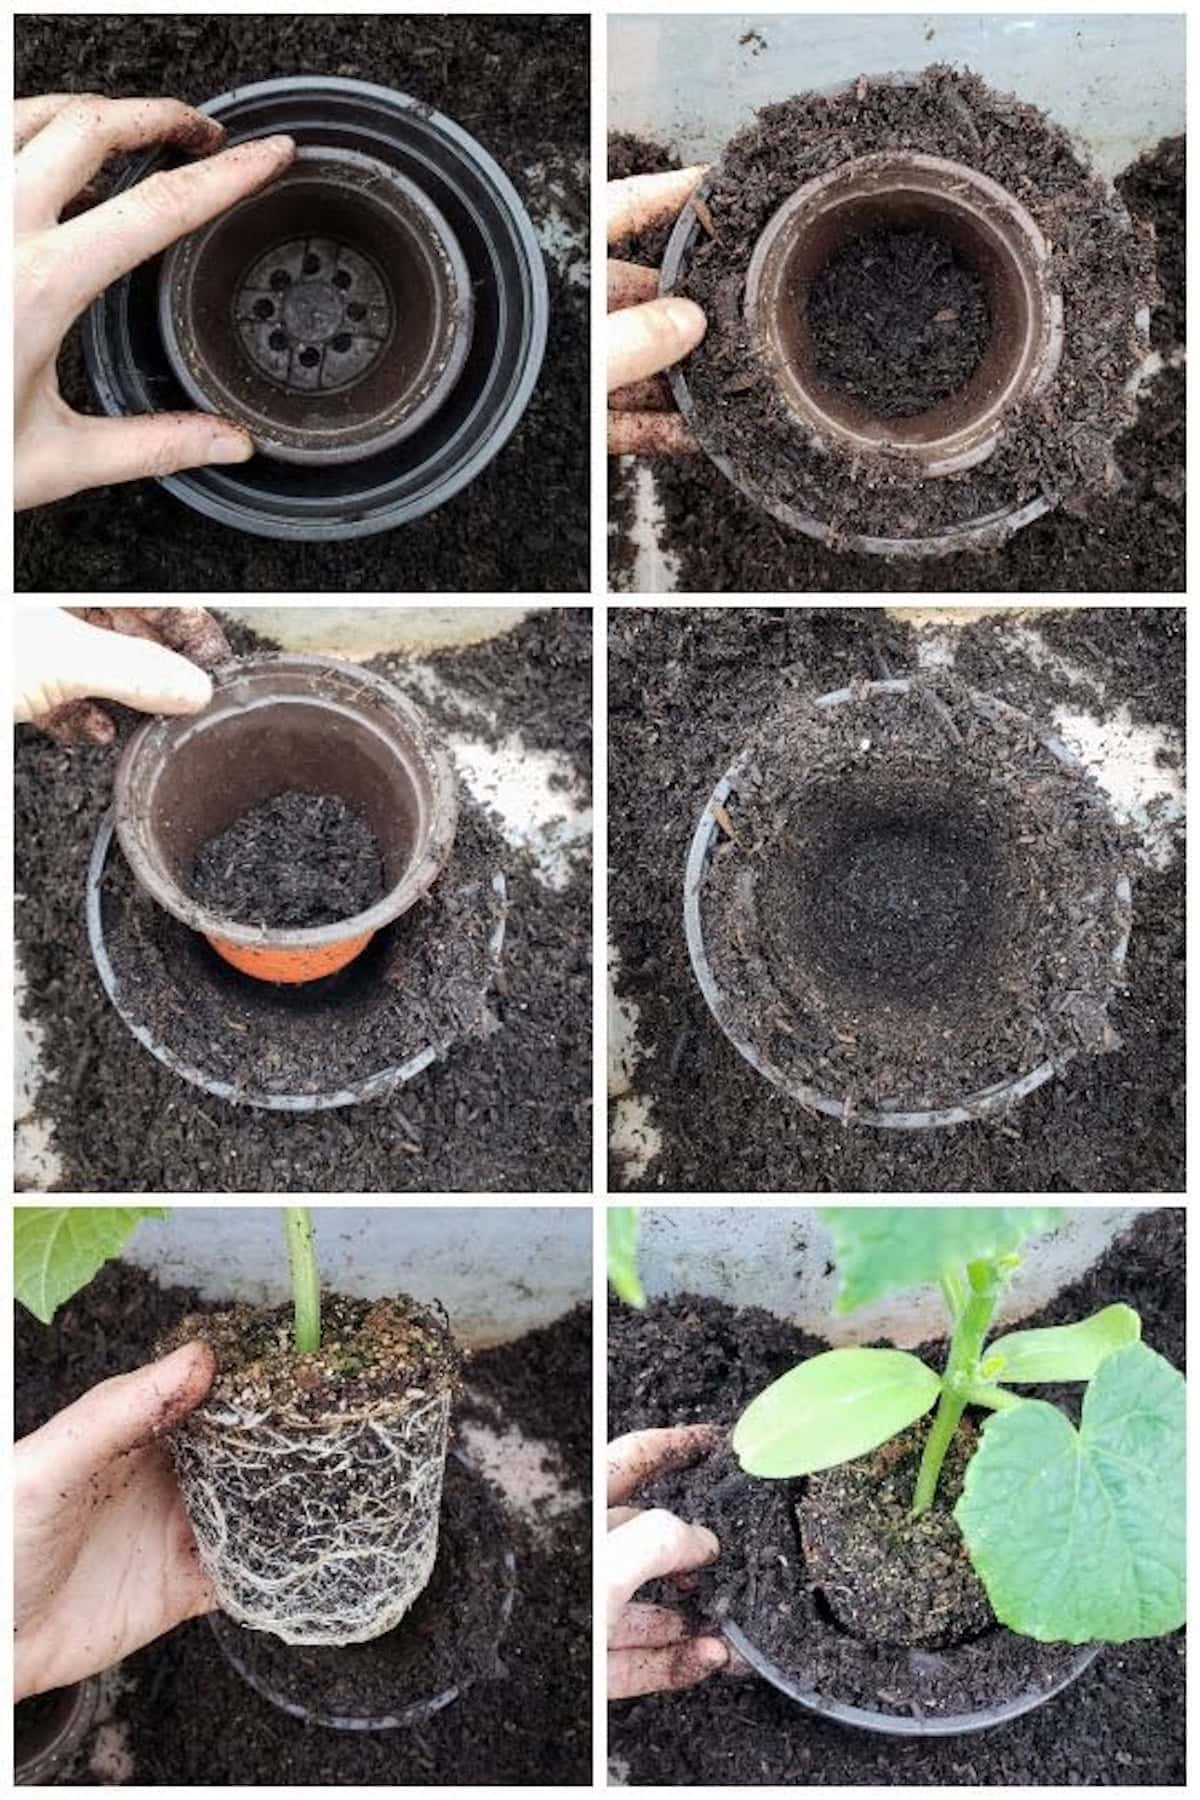
A Neat Potting Up Trick
Check out this easy way to create the perfect size hole for potting up – which we also use when we’re planting big, heavy plants like shrubs or small trees in to pots! The idea is to make a dummy hole, or a placeholder for the root ball, inside the container that the plant is being transferred in to. This trick works best with pre-moistened soil.
- Fill the new, larger container with the amount of soil you estimate should go below the plant.
- Next, set the plants current container down inside the larger one. You can use an empty/extra one (if you have another of the same size) or the potted plant itself. Is it at the right level? Keep in mind things usually sink down a little after time and watering.
- Now lightly pack soil in around the outside of the inner pot, creating a nest of soil.
- Finally, pull out the dummy container, and gently ease the plant out and into its new perfectly-sized hole!
Planning to Reduce Potting Up
If you plan in advance, you can start certain vegetables, herbs, and flowers in appropriate size containers that reduces the need or urgency to pot up. Since I personally do not love the chore of potting up, I prefer to start my seeds in larger containers that don’t require potting up as quickly (or at all, depending on the seedling type).
For instance, I never use those tiny 72-cell seed starting trays, which need to be potted up within a couple weeks after germination. Instead, we use a combination of larger cell 6-packs and mini pots when starting seeds indoors.
I start the vast majority of our seedlings (flowers, brassicas, and leafy greens) in large 2″ cell trays, where they can happily live for 4-5 weeks and not need potting up at all. Then we start larger, fast-growing seedlings like tomatoes, eggplant and cucumber in smaller round 4″ pots, and then pot up to 6″ pots and 8″ pots after a few weeks. We start our summer squash in 6″ pots and then transplant outside within a few weeks (no potting up) since squash don’t like their roots disturbed.

Ongoing Seedling Care
A week or so after potting up, the seedlings may appreciate some dilute seaweed extract as a very gentle fertilizer. We sometimes also feed our transplants with a fresh aloe vera soil drench, either alone or mixed along with seaweed. Aloe vera reduces the risk of transplant shock, and encourages robust new root development!
See more tips about ongoing seedling care in our Beginner’s Guide on Starting Seeds Indoors – including tips about hardening off, transplanting, and more!

That’s really all there is to it.
The freshly transplanted seedlings can now live happily in their new spot for several weeks, until they move in to their forever home – your garden. Don’t forget to harden off indoor seedlings before transplanting outside to prevent damage and transplant shock!
You may also like:
- 7 Useful Seed Starting Supplies for Success Indoors
- When to Start Seeds Indoors: Planting Calendars for Every Zone
- Garden Companion Planting Chart, Plans, and Benefits
- How to Plant Tomatoes: When, How Deep, Fertilizer, Pots & More
Here’s a little demo video:
Check out our YouTube Channel for more video


21 Comments
Donna Skinner
I have the same question that someone else asked (but never was answered) about onions, specifically shallots for me, needing to be potted up. ? Thanks
Aaron (Mr. DeannaCat)
Hi Donna, How to Grow Onions: from Seed or Sets to Harvest is our article which includes how we transplant them as well. In short, we typically start onions in 6 cell packs and sprout 6-8 seeds per cell (spread out evenly over the soil), from there we just let them grow until we want to plant them into our garden (so we don’t pot them up), we harden them off first and then lightly tease apart each of the root balls that have formed in each cell, then we plant each little onion or shallot into our garden. This way we are able to grow a lot of onions without worrying about potting up or having to start too many seed trays if we only left one onion per cell. Again, check out our onion grow guide for a more in depth look on the process. Hope that helps and have fun growing!
Eunice Suess
Hi, I’m curious why not just plant the seed into the pot you were planning to pot up into in the first place so we don’t have to double our work? I’ve been wondering this for a while lol.
Aaron (Mr. DeannaCat)
Hi Eunice, that’s a good question! We actually pot up some seedlings and don’t have to pot up others. We start flowers, herbs, and greens in larger 6 cell containers and we don’t pot these up before planting out into the garden as they usually get to a fair size in the cell packs. We also start peppers in 4 inch pots and squash in 6 inch pots (squash doesn’t like to have its roots disturbed much) and those don’t require a pot up before we plant them into the garden either. The main veggie we pot up are tomatoes as they can grow quite large and vigorously and can be stunted if you don’t give them more root space. We also usually start 12-15 tomato seedlings so we initially sprout them in 4 inch pots where they end up in 6 or 8 inch pots, however, germinating seeds using 12-15 8 inch pots takes up about 5 times the space versus 4 inch pots.
So in all, we’ve learned to start certain veggies in certain containers to eliminate the need to pot up seedlings but also allows us to start the many seedlings that we grow every season. Most people need to start their seeds on a heat mat as well and there may only be so much room for the containers which may lead them to start seeds in smaller containers. Anyway, it just depends on your system and the containers you have for your seeds. We’ve learned over time what works best for us with our schedule and set up. Hope that helps and good luck!
Arthur
Thanks for sharing this blog post! It helps a lot.
Sharyce
Hi, looking for some advice on tree seedlings. I experimented with some apple and pear seeds last fall, placed them in some egg cartons filled with soil and kept mildly moist in garage refrigerator over the winter. Then brought them out the spring. They have quickly outgrown the original containers they were in so they’re roughly 4 to 6 inches tall. I took the task on of transplanting them into larger pots and relocating them to an area of more space because of the large number. While they are not directly outside they seem in a bit of shock and droopy also a few have turned slightly yellow on a few leafs.
What options do i have to help them adjust faster???? Any advice and tips are appreciated. Also and advice to help them thrive is appreciated too, this is 1st time attempting plant growing project like this.
Thank you
Sharyce
Aaron (Mr. DeannaCat)
Hello Sharyce, the seedlings were likely root bound and unhappy from living in the cramped conditions of the smaller pots. They will likely rebound but it may take them some time. You can feed them compost tea (AACT) to give them a boost or mix 1/4 cup of kelp meal in 5 gallons of water and let steep for 24 to 48 hours before watering the seedlings with the water. Again, the plants may take a minute to adjust bet they will bounce back in time. Good luck with your project and let us know how it turns out!
Jessica Davis
Hi! I started all my babies this year in 2″ soil blocks, and have largely been happy with them. But some seem to be outgrowing the blocks wildly (I have schizanthus that is already 4″ tall, but won’t be ready to set out for over three weeks), and I’m wondering whether there is any utility to potting up some others to encourage faster growth (e.g., foxglove; almost ready to set out but really not growing great).
Obviously, if they’re plants that require peat pots, should probalby err on the side of keeping in the soil block, but do you have any insights on whether it is beneficial to move some of these to larger containers–even just setting the blocks into the soil in the container, to allow them to grow more, but keeping the soil block “raised” so can still easily remove and put in ground when the time comes?
REALLY need some advice. Thanks much for your blog!
Aaron (Mr. DeannaCat)
Hello Jessica, glad things have gone mostly smooth for you with the soil blocks. The seedlings out growing their blocks was one of the things that deters us from giving it a go. If you have small 4″ pots or larger, I would just pot them up into a potting soil of choice until they are ready to be transplanted outside. The seedlings may become stunted if their roots are exposed and don’t have anywhere to spread to. Hope that helps and let us know what you come up with and how it works out. Good luck!
nonit nanda
Hi, Instead of repotting, can one just cut the bottom of the pot and then plant the smaller pot into a larger pot? The smaller pots are biodegradable and can be easily cut from bottom.
Second question – watering the seedlings – should these be watered daily and how much in 60-80 deg outdoor temperatures?
Thank you.
DeannaCat
If using biodegradable pots you should just leave them and maybe carefully cut out the bottom to ensure the roots have easy access to the new soil and space. As far as watering goes, seedlings and most plants like moist soil. Most people have a tendency to overwater young plants especially. They will let you know if they are thirsty by drooping and slightly wilting, you can also assess how moist the pots are by picking them up. The pots with moist soil will be heavier than the pots with dry soil. Hope this helps and good luck!
Rachael Stevens
Hi there! I’m a newbie and have cucumbers in 4” pots that are looking anxious to pot up, about 4” tall with some roots peaking out the holes in the bottom. Once I go to the larger container, do they still need lights?
Thank you in advance!
DeannaCat
Hi Rachael – If they’ve been under lights, I would keep them under until they transition to going outside. Have fun!
Jenna Congdon
Hi! Quick question- how do you handle getting the tiny seedling out of your 10×20 seed trays? You can’t flip the whole thing upside down to tap them out, and at that stage they’re so delicate you definitely can’t grab the stem and pull! What do you do to get them out one at a time? Thanks!! I love love love your blog 🙂
Michelle Garcia
Do you thin seedlings before potting up? I have tomatoes, onions, and carrots in the small 6 pack containers and I have no idea if they need to be thinned or not. Help! 😒
DeannaCat
Hey Michelle! Yes we have usually already thinned our seedlings. Sometimes, the act of potting is when we do thin them. Or, we have trimmed them previously. It sounds like you didn’t see the seedling thinning post, which should help! Check it out here!
Danielle
Great info! I have two quick questions. I started my seedlings in a 50 and 70 cell tray, so the modules aren’t very big. My tomatoes have only been growing for 3 weeks now, is that too early to pot up? They’re only about 2 inches tall but all look healthy so far. My other question is regarding the richer soil. I’ll have to keep the ones I pot up indoors still, and I know potting soil can have pests or fungus in them. Can I pot up in the starter mix still? Or is there a way to treat the richer soil before you pot up so you prevent pests inside? Neem oil?
DeannaCat
Hi Danielle! If the roots are starting to poke through the bottom, I would carefully pot them up. If you want to keep using seedling mix, you could give the plants a little boost a couple weeks after by feeding them with dilute seaweed extract to keep them happy until they go outside. Or, if you do choose to pot them into potting soil and you have any issues with gnats, stick traps may help – and also avoiding over-watering. I have an article about dealing fungus gnats if needed. I hope that helps! Good luck!
Brooke
As usual, this post is super helpful!
This might be a dumb question but do bunching onions/onions need to be potted up too?