

How to Make Kombucha 101: Kombucha Recipe and Brewing Basics

Are you interested in brewing your own kombucha at home? Perfect! Welcome to your crash-course on how to make kombucha. I’ve been brewing kombucha off and on for over 10 years now, and can’t wait to show you how! This guide will teach you everything you need to know: a basic kombucha recipe, necessary brewing supplies, tea options, tips on bottling and flavoring, and more.
This post will also briefly explore the science of kombucha brewing (e.g. what is a SCOBY?), the difference between primary and secondary fermentation, different ways to make kombucha (batch vs continuous brew method), and answer frequently asked questions about alcohol, sugar, and caffeine content in homemade kombucha. Once you understand these basics, you can easily adjust your kombucha recipe to your liking!
The good news is, it’s really easy to make kombucha at home – and saves a lot of money and waste compared to drinking store-bought kombucha! Watch, you’ll be sipping a delicious glass of homemade bubbly in no time.
If you already know how to make basic kombucha but are interested in more detailed tips on flavoring and carbonation (secondary fermentation) see this separate post all about it!
What is Kombucha?
Kombucha is a refreshing, tangy, slightly fizzy beverage that is made by fermenting sweet tea with the assistance of a SCOBY (explained below). It’s often flavored with fruit or fruit juices to create even more interesting and delicious flavors. Kombucha has been brewed around the world for centuries, and has become increasingly popular in mainstream culture due to its numerous potential health benefits.
Thanks to its high levels of probiotics and acetic acid, kombucha may help to boost energy, the immune system, gut health and digestion, while also reducing inflammation, toxins, free-radicals, bad cholesterol levels, and blood sugar spikes!

Would you like to save this?
What is a SCOBY?
- SCOBY is an acronym that stands for Symbiotic Culture (or Colony) of Bacteria and Yeast. A SCOBY is the mother culture needed to make kombucha, as it is what slowly turns sweet tea into the desired finished beverage. The SCOBY feeds off sugar and caffeine, so both are required to make kombucha.
- At first, a SCOBY forms as a fairly thin, slick, white film or layer floating on top of the kombucha vessel. Over time, the SCOBY will get increasingly thick and firm, growing new layers on top of itself with every batch of kombucha brewed. It can be split and given to friends, chopped up and fed to chickens, composted, or stored in a separate “SCOBY hotel” as backup.
- While it may be possible to grow a SCOBY at home using store-bought kombucha, it can be tricky and easily lead to mold too. So, the best way to get started to make kombucha is to get an established SCOBY from a friend or buy a SCOBY from a trusted source – like this one.

How is Kombucha Made?
Kombucha is usually made through a two-part double fermentation process.
Primary Fermentation
First, a SCOBY is added to a mixture of sweet tea (usually black tea and white sugar) in a large vessel – such as a one gallon or two gallon fermentation crock. During the primary fermentation stage, the SCOBY interacts with sweet tea to ferment it into gluconic and acetic acid. It encourages beneficial bacterial reactions, lowering the pH and preventing growth of harmful bacteria. Additionally, probiotics, enzymes, and antioxidants are formed.
Primary fermentation of kombucha usually takes one to three weeks depending on the strength of the SCOBY, brew temperature, and desired results. It is an aerobic process or “with air”. The fermentation vessel is covered with a cloth to prevent contamination (e.g. from dust or fruit flies) but it is otherwise not sealed.
Kombucha is technically ready to drink a the end of primary fermentation. However, most people like to make kombucha carbonated and flavored, which is where the secondary fermentation comes in.

Secondary Fermenation
Secondary fermentation, also called “second ferment”, is when the finished kombucha is added into air-tight bottles. Homemade kombucha can be bottled plain, though most folks like to add a little fruit juice, pureed fruit, or other flavoring at this stage.
By enclosing the kombucha in an anaerobic environment and feeding it a little fresh sugar (in the form of fruit), yeasts convert that sugar into carbon dioxide. The sealed bottle prevents the carbon dioxide from escaping, thus leading to carbonation – which is desirable to most kombucha brewers!

Continuous Brewing Method vs Batch Method to Make Kombucha
There are a couple ways you can make kombucha: using a batch method, or continuous brew approach. We have always followed a continuous brew method, as I find it to be the easiest and quickest option.
Using the batch method of brewing kombucha, you completely empty your brewing vessel each time you bottle and start a new batch of booch, including all the liquid (mostly to bottle, plus some to save for the next batch) along with the SCOBY. Then the whole thing is reassembled with fresh sweet tea, a small amount of finished kombucha, and a (usually) thinned SCOBY.
In contrast, the continuous brew method makes quick and easy work on bottling day by using a vessel that has a dispenser. Unlike the batch method, you don’t take everything apart or remove the SCOBY. Instead, you simply draw off the amount of kombucha you want to bottle through the dispenser, leave the rest alone, and add back the same volume of fresh sweet tea that you took away in finished kombucha. This method keeps the kombucha very active and usually ferments faster, and is usually recommended for large batches (2 gallon vessels or larger).

HOW TO MAKE KOMBUCHA
Supplies Needed
Here is a rundown of the basic supplies needed to make kombucha. I also have a more detailed kombucha brewing supply list with even more information about the exact supplies we use. Or, shop our favorite kombucha supplies here.
- SCOBY – You can either obtain a “baby” SCOBY from a friend, buy one from a reputable source, or attempt to grow your own. We tried to grow one recently, twice… and it didn’t go all that well. We got our original SCOBY from Fermentaholics years ago, and decided to pick up another one for this demonstration. They’re one of the few certified organic providers, and very affordable!
- Starter liquid – Two things get your sweet tea kickin’: a SCOBY, and some already-finished kombucha – also referred to as the starter culture or starter liquid. You’ll need 1 to 2 cups of mature stater culture per one gallon of sweet tea. Purchased SCOBY will often come with some included. Fermentaholics says their SCOBY package contains enough starter liquid to add to a one-gallon batch. Another option is to pick up a bottle of kombucha from the store. Choose plain, not flavored.
- A Brewing Vessel: One or two gallon glass vessels are most commonly used to make kombucha. If you intend to follow the continuous brew method like we do, choose a vessel that has a spigot. (You probably want to replace that spigot with a better, safer option – as I discussed in the kombucha supplies post). It’s best to start your first batch of kombucha using only one gallon of sweet tea. A new small SCOBY can’t handle fermenting much more than one gallon at first. Yet once it’s strong and developed, we prefer using a 2-gallon crock for our regular brewing needs. Therefore, we are starting this batch in a 2-gallon vessel, but only half full. Other folks may start with a one gallon container and never upgrade to larger one. It all depends on how much kombucha you want to make and drink.
- Tea: For this kombucha recipe, you’ll need either 2 tablespoons of loose leaf tea, or 4 to 6 teabags. We prefer to use organic bulk loose leaf tea, and steep it in this stainless steel infuser. It’s best to start with black tea (what SCOBY loves most) but once we have a healthy brew going, we usually use a combination of half jasmine or gunpowder green tea with half black tea.
- Sugar: This kombucha recipe will use 1 cup of regular cane sugar. Organic is definitely preferable!
- Water: Filtered, de-chlorinated water if possible.
- Pressure-rated glass bottles like these – especially if you intend to do secondary fermentation for flavoring and carbonation.

Homemade Kombucha Recipe (Primary Ferment)
- 1 gallon of filtered water
- 3/4 cup to 1 cup of white sugar
- 1 to 2 cups of starter liquid (finished plain kombucha)
- 2 tbsp of loose leaf tea, or 4-6 teabags (caffeinated black tea recommended)
- Scale up or down using the chart below
You can find a condensed printable kombucha recipe and instructions at the end of this post.

INSTRUCTIONS
1) Clean your supplies
You want to make sure all of your kombucha supplies are fairly clean, but they don’t need to be “sterile”. Avoid using bleach, harsh cleaners, or even soap when you make kombucha! The residual soap could stick around and really make things “off”.
We spray or rinse our supplies with plain white vinegar, let it sit a few minutes, and then rinse well with hot water. I also wash my hands very well and then rinse with vinegar before handling a SCOBY. If you chose to get a replacement spigot for your crock, give it a good cleaning and install it now.
2) Prepare the sweet tea
- Heat one gallon of water.
- Steep either 2 tbsp of loose leaf tea in an infuser or 4-6 teabags of your choice.
- Add one 1 cup of sugar, and stir until dissolved.
- We find this easiest to do all of this on the stovetop in a large pot.
However, it’s important to allow the sweet tea to cool down slightly before adding it to the brewing vessel with the SCOBY. Warmish (75-85°F) to room temperature is good. Too hot of temperatures can kill the good bacterial cultures! Yet cold conditions will greatly slow down your ferment, and will also cause the SCOBY to sink (which is okay, we’ll talk more about that soon).
TIP: To save time, we often only heat half the called-for water in the kombucha recipe, add the full ratio of tea and sugar, then pour in the second half of water cold, rapidly cooling it down to the perfect lukewarm temperature. You may find it helpful to use a probe thermometer to determine the temperature of your tea.

3) Assemble the brew
- Once your sweet tea is at the ideal lukewarm temperature, add it to your brewing vessel.
- Next, add 1 to 2 cups of starter liquid – see notes below.
- Last but certainly not least, plop that SCOBY in there!
To make kombucha, there are varying recommendations for how much starter liquid to add to one gallon of sweet tea, usually ranging around 1 to 2 cups. We go on the generous end of the spectrum. The SCOBY we got from Fermentaholics came with around a cup of liquid. For a little extra oomph, we added a half bottle of GT Dave’s Synergy plain kombucha as well. It makes for a great inoculant on its own!
Is it okay if my SCOBY doesn’t float?
Yes, it’s fine. A SCOBY may sink or float sideways at first, but that is okay. It will still ferment the kombucha, and will usually right itself and start floating soon. Reasons a SCOBY may not float include: 1) the SCOBY is young and small, 2) the sweet tea or kombucha mixture is too cold, or 3) it was recently disturbed, such as after bottling and adding fresh sweet tea. A young SCOBY may stay submerged during the entire brew but grow a new fresh layer of SCOBY floating on the surface, which is also normal and fine.

Where to store your kombucha brewing vessel
Store your kombucha brewing vessel somewhere warm, but not necessarily hot. You may find the need to change its location depending on the season. (We’ll talk more about temperature momentarily.) Contrary to popular myth, kombucha doesn’t need to be in complete darkness while brewing. Ambient room light is fine! However, do avoid direct sun rays, such as next to a bright window.
Cover your kombucha brewing vessel with a breathable but tight-knit material. The kombucha needs to breathe, but we don’t want to allow contamination like dust, mold spores, or fruit flies inside. Use something like a lint-free dish or thick tea towel, an old clean pillowcase, or even a coffee filter for smaller crocks. Secure it with a large rubber band or similar.
NOTE: We learned the hard way that cheese cloth is not effective at keeping fruit flies out! Its holes are too large.
4) Let it Ferment
Now it’s time to simply sit back and let it do it’s thing! The time it takes for kombucha to finish brewing depends on a number of factors: temperature, maturity of SCOBY, and personal flavor preference (explored below). A brand new kombucha brew with a fresh baby SCOBY may take up to 21 days to ferment, while a mature brew can take as little as 7 days – especially utilizing the continuous brew method.
Temperature
The temperature of your brew is the largest dictator of ferment time. Warmer temperatures accelerate fermentation, and cooler temperatures slow it down. Too cold of temperatures can slow SCOBY activity and fermentation down so much that there is a risk for mold to develop. This is particularly true for a new not-so-strong brew. The ideal temperature range for kombucha fermentation is between 75-85°F. Lower than 70 will result in a sluggish brew.
To monitor temperature, you may want to use a thermometer. Some folks check the actual temperature of the liquid with a probe thermometer. The easiest option is to keep one on the outside of the crock, like one of these adhesive strip thermometers. By checking the temperature, you’ll feel confident that you’re in the ideal range, or see that adjustments are needed.
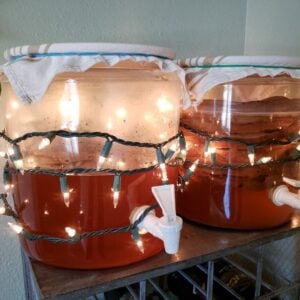
How do I keep my kombucha warm?
To provide the warmth that kombucha loves so much, we used to wrap our crocks in holiday lights when it’s cool in the house. Traditional incandescent lights give off the perfect amount of heat. (New LED styles will not.) Nowadays, you can buy specialized kombucha warming mats that wrap right around your brewing vessel! This popular kombucha heating pad also comes with a handy adhesive thermometer. Other ways to keep kombucha warm include using a seedling heat mat, or keeping the crock on top of a warm appliance.

Strength of SCOBY and Culture
Other factors that influence the time it takes for kombucha to finish fermenting include: the size of the SCOBY, how strong your brew is, and how much “starter liquid” you leave behind to jump start the next batch.
The fatter the SCOBY, the quicker the kombucha will ferment and be ready. Some brewers like to thin their SCOBY after each batch while others let it get nice and thick. Sometimes ours are 3 to 4 inches thick before we peel away a few layers!
The more starter liquid in the brew, the faster it will ferment. When you first make kombucha or use the batch method, it’s good to follow the basic kombucha recipe and ratios (e.g. about 1 to 2 cups of starter culture per gallon of tea). Yet the continuous brew method is a lot more flexible and less precise. Using the spigot, we often draw off about 2/3 to 3/4 of the volume of finished kombucha to bottle and leave the rest in the crock. In a 2-gallon crock, that means we could be leaving up to half a gallon of finished kombucha in the crock as starter for the next batch!

Personal Preference
The last factor that influences your kombucha brew time is your personal flavor preference.
The longer kombucha ferments, the more tart and vinegar-like it will become. A shorter brew time will result in a sweeter finished product. Do keep in mind that we want to ferment off a good amount of that sugar and caffeine though! Kombucha is supposed to be tart. If you bottle your brew too prematurely, you are not getting all of the true benefits of a properly fermented kombucha. You’d be drinking semi-fermented uber-sweet tea instead.
On the other hand, if it ferments way too long, you’ll end up with “kombucha vinegar”. It may be too strong to enjoy by that point, but it can still be used for many things – including as the starter liquid for a fresh batch, to make fire cider, or even as a natural hair rinse!
So, do a taste test! That is another beauty of using crocks with spigots. If you suspect your brew may be about ready, pull a little off and give it a try! For those using a crock without a spigot, I have seen people sticking a straw right in the top to take a sip. Keep in mind the flavor will continue to change slightly (get more tart, but also sweeter if you add fruit juice) during secondary fermentation.

pH of Finished Kombucha
According to experts, the proper pH level of finished kombucha is between 2.5 and 3.5. We honestly don’t check very often because we like a pretty tart booch anyways. But if you’re curious to see exactly where it’s at, get some pH test strips to see!

“My SCOBY Looks Weird!” Normal or Not?
When you first make a new batch kombucha, you’ll notice it go through some changes. If your SCOBY doesn’t already take up the entire surface area of your crock, a film will start to develop on the top of the liquid. That is a new layer of SCOBY forming. Sometimes SCOBY can get pretty darn ugly, TBH! It can get lumpy and even have white spots that look alarmingly like mold. Yet unless they’re fuzzy and raised, it is very unlikely that it is mold.
As your homemade kombucha brew matures, the color will usually lighten. It may also develop brown stringy bits hanging from the SCOBY. There may also be a brown film on the bottom of the crock, particularly if you’re using continuous brew. That is yeast, and is totally normal! Excessive yeast build-up should be removed every few months by emptying out your continuous brew vessel and rinsing it out.

5) Bottling Homemade Kombucha
Once your homemade kombucha has fermented to your ideal tartness, it is time to bottle it up!
The topic of secondary fermentation, flavoring, and carbonation is so vast that I needed to save it for another post (here!). In short, you’ll add the finished kombucha to air-tight bottles. If you wish, you can also add a couple ounces of fruit puree or juice, but the volume should be mostly kombucha. See our top 18 favorite fruit/flavor combinations here.
Following a traditional “batch” method (in a crock without a spigot): Pull out your SCOBY, set it on a clean plate, carefully pour most of the finished kombucha into bottles, and leave behind the appropriate amount of starter liquid for the next batch. See the kombucha recipe chart previously provided for how much starter liquid to keep behind, depending on your size vessel.
Continuous brew kombucha is a little more free-flowing. Pull off as much as you want to bottle, but leave at least a few cups of finished booch behind. The SCOBY can stay in place during bottling.
Next, the bottled kombucha sits at room temperature for anywhere from 2 to 10 more days, depending on the temperature and flavor. Finally, move them to the refrigerator to halt second ferment and chill before enjoying.

Homemade kombucha carbonation and safety
Fizzy carbonation is desirable for homemade kombucha, but it can also be dangerous when done incorrectly! The most essential part when it comes to safety is using high-quality bottles; those that are made to withstand the high pressure of brewing and carbonation. The wrong bottles can literally explode! It’s also important to monitor the carbonation level by routinely burping the bottles during second ferment. Learn more in our detailed kombucha carbonation post – including how to get the perfect level of carbonation!
6) Add Fresh Sweet Tea
After bottling, make more fresh sweet tea to add back to the crock to start a new batch of kombucha (following the same ratios as before). Make enough to roughly replace the volume of kombucha you bottled from the vessel. Allow it to cool slightly, and pour it in!
Using the continuous brew method, we simply pour the replacement sweet tea right on top of the SCOBY and remaining kombucha in our vessel. Or, you can take out your SCOBY, then add the sweet tea, starter liquid, and the SCOBY like we did to start this kombucha recipe.
Note: If you started a one-gallon batch in a 2-gallon container as we did here, I would wait a couple of rounds until you add more volume to it. Once your SCOBY is looking larger and strong, slowly increase the amount of replacement tea you make, using the chart below.
For a visual recap of these steps, check out my kombucha 101 tutorial from Instagram below! Swipe/click though the slides to the right to see all 9 videos.
And then the whole process starts over. And over...

FREQUENTLY ASKED QUESTIONS
Why is there so much sugar in kombucha? Can you make kombucha without sugar?
White sugar is a necessary ingredient in brewing kombucha. In addition to caffeine, sugar is what feeds the SCOBY and keeps it healthy. While there’s a good amount of sugar in the initial stages, that doesn’t mean the finished kombucha is high in sugar! Thankfully, the SCOBY converts the majority of the sugar to healthy acids during the fermentation process. Meaning, the final beverage you will consume is pretty dang low in sugar.
If you read the nutrition label on bottled kombucha, most of them range from 5 to 12 carbs per 16 ounce bottle. Plus, those usually have fruit juice added for flavor. Because you’re making your own, you have ultimate control over your own brew. For instance, you can choose to not flavor yours at all during second fermentation, or run the primary ferment even longer. Both of which would further reduce sugar content.
I have heard of some people brewing successfully with honey, though I believe it can take a toll on SCOBY health over time. Avoid using other sugar substitutes or artificial sweeteners, as it can harm the SCOBY.
Kombucha’s effect on blood sugar
Hey there, Type 1 Diabetic here! And guess what? Despite the initial sugar content, kombucha does not noticeably raise my blood sugar. Instead, it can actually have the opposite impact, and help keep it more level. The gluconic and acetic acid found in kombucha are known blood sugar stabilizers that can help reduce glucose spikes – much like taking a shot of apple cider vinegar before a meal.
Moreover, the fermentation process cleaves sucrose (polysaccharide) into fructose and glucose – both of which are utilized by the fermentation process thereby reducing the glycemic load.

Is there alcohol in homemade kombucha?
The short answer is yes. But just a tiny bit, depending on how it is made. The chemical reactions between bacteria, yeast, and sugar result in the formation of a small amount of alcohol during the fermentation process. That very reaction is part of what keeps it safe and healthy to consume.
Commercial kombucha that you’ll find in the store is marketed as “non-alcoholic”. To be called so, it is limited to contain less than 0.5% alcohol. Miniscule. In contrast, home-brewed kombucha may contain slightly higher amounts. Various sources say that homemade kombucha can range from .5% up to around 2-3% alcohol content.
Most people will not feel any type of intoxicating effects from consuming kombucha. You may experience a short-term invigorating buzz when drinking kombucha, but that doesn’t mean it is from alcohol! Even drinking store-bought kombucha gives me a little rush sometimes, but remember, those are extremely limited in their alcohol content. I accredit it to the acetic acid and antioxidants.

How much caffeine is in kombucha?
It’s up for debate, but most resources say that SCOBY needs some caffeine to thrive. Herbal or decaf brews may still taste good, and I’ve heard of people successfully doing this, but many experts say the beneficial cultures will weaken and die off with time. The most popular tea in kombucha recipes is a combination of black and green – which is what we use. It produces a great balanced flavor and healthy brew!
When properly fermented, finished kombucha should contain less than 1/3 of the caffeine concentration than when initially started. The fermentation process vastly reduces it. I am pretty caffeine-sensitive; I can’t drink tea or coffee past 3 pm without being wired all night. On the other hand, I can easily drink kombucha in the evening with no noticeable impact on sleep.
If you’re concerned about caffeine levels, you could try something on the lower end of the spectrum, for example mostly white tea or rooibos tea mixed with green tea. We tried to go all green, but found our brew seemed weaker and less carbonated.
Who should avoid drinking kombucha?
Because of the small amount of alcohol and caffiene that may be present, pregnant or breastfeeding women should avoid routinely drinking kombucha. It’s also not recommended for people with kidney or liver disorders, or alcohol dependency. Folks that are sensitive to acidic foods (e.g. those who struggle with GERD or acid reflux) may also have issues drinking kombucha. Whether or not kids can drink kombucha is up to parental discretion, though a limited amount should not be harmful.
Is it worth making your own kombucha?
I definitely think so! While it does take a little time to routinely bottle and make fresh tea (maybe an hour, once every week or two?) it’s SO easy to do! Plus, there are many benefits to making your own kombucha.
By making your own at home, you have the utmost control over the end product. You can choose the quality of ingredients, get creative using different teas, fruit and flavors, and adjust how sweet or tart you prefer the end product to be. We have come to favor the flavor of our homebrew compared to store-bought kombucha. It’s delicious!
Let’s not forget the cost savings! Because they’re significant. The cost of bulk sugar and tea is peanuts compared to routinely buying bottled kombucha at the store. Making our own kombucha at home greatly increases its availability, and therefore our ability to drink it more often. That means we get exponentially more exposure to the health benefits.
Last but not least, making kombucha is fun!

All in all, I hope you found this post informative and empowering, so you feel excited to start brewing kombucha at home too. Let me know if you have any questions, and please spread the booch love by leaving a review, sharing or pinning this post!
Don’t miss these related articles:
- The 18 Best Seasonal Homemade Kombucha Flavors for Second Ferment
- Kombucha Carbonation Tips: How to Bottle, Flavor, & Second Ferment
- 7 Clever Ways to Use Sour Kombucha Vinegar
- Preserving Apples: How to Make Homemade Apple Cider Vinegar
- Easy Fermented Garlic Honey Recipe + Benefits and Uses
Homemade Kombucha Recipe (How to Make Kombucha)
Equipment
- 1 SCOBY
- 1 Brewing vessel, such as a 1 or 2 gallon glass crock
- Pressure-rated glass bottles like these – especially if you intend to do secondary fermentation for flavoring and carbonation.
- Optional: thermometer, pH test strips, kombucha warmer or incandescent holiday lights
Ingredients
- 1 gallon water (filtered and/or de-chlorinated preferred)
- 1 to 2 cups starter liquid (plain finished kombucha, such as store-bought bottled kombucha)
- 1 cup white sugar, organic/raw is ideal
- 4 to 6 teabags OR 2 Tbsp loose leaf tea (caffeinated). Black tea is best, or half black and half green
Instructions
- Start by brewing 1 gallon of sweet tea: combine the called-for water, tea, and sugar in a pot on the stove (or other container large enough to steep the tea in hot water)
- Allow the sweet tea to cool to lukewarm or room temperature. 75-85F is ideal.
- Transfer the lukewarm sweet tea to your chosen kombucha brewing vessel.
- Add the starter liquid and SCOBY.
- Cover the brewing vessel with a cloth towel (not cheesecloth) and set in a warm location out of direct sunlight. Again, 75-85F is ideal. Use a kombucha warming pad or incandescent holiday lights to keep the vessel warm if needed.
- Allow the kombucha to ferment for 7-20 days. (This is considered "primary fermentation"). Time depends on strength of SCOBY/brew, temperature, and personal flavor preference. Young SCOBIES will take longer than thick mature ones, and cooler temperatures will take longer than warm conditions. Do a taste-test or pH test to assess doneness.
- Once it's fermented to your liking, add the kombucha to pressure-safe glass brewing bottles. Be sure to reserve a cup or two to start the next batch! Also leave a couple inches of headroom in the bottles if you'd like to add a couple ounces of fruit juice or puree for flavor and secondary fermentation.
- Leave the bottled kombucha out at room temperature for another 2 to 10 days -depending on temperature, flavor, and carbonation activity. It's important to carefully monitor the carbonation during second ferment by routinely burping the bottles.
- Please see our guide on secondary fermentation and carbonation for more information – including flavoring ideas and how to achieve excellent carbonation.
- Once the kombucha is carbonated to your liking, move it to the refrigerator to halt secondary ferment – and enjoy!
- After bottling, make more fresh sweet tea to add back to the crock to start a new batch of kombucha. Allow it to cool slightly, and pour it in! Using the continuous brew method, we simply pour the replacement tea right on top of the SCOBY and remaining kombucha in our crock. Or, you can take out your SCOBY, then add sweet tea, starter liquid, and the SCOBY like we did to start this recipe.


104 Comments
Caroline
thank you for this highly detailed blog! I made a 1 gallon batch of booch with a scoby I got from a friend, and didn’t realize that you do not recommend that size for CB method (that’s what I was planning on doing) My vessel does have a spigot on it, can I still do a CB method or is there a reason I need to do a batch method? Thanks so much!
Aaron (Mr. DeannaCat)
Hey Caroline, as long as you have a spigot than the continuous brew method is definitely recommended, no matter the vessel size. Oftentimes we don’t even fill our two gallon crocks all the way full. Thanks for tuning in and enjoy that booch!
yassy
Hey Deanna! Thanks for the awesome advice. I started my scoby a while ago and left it too long (4 months) and so the liquid turned into vinegar. I used 1/2 cup of it for my starter liquid when I started brewing a gallon of tea into my two gallon crock a few days ago. I figured since the vinegar is probably so acidic that I wouldn’t need more than that. Should I have added another 1/2 cup or so? do you think it’s too late?
Also, do you have any advice on maintaining a scoby hotel? I started my scoby in a liter jar after I thinned it out becuase it was pretty thick. Would you recommend I get another two gallon crock like yours so when I thin out the scoby again, it will fit perfectly? Should I add fresh sweet tea to the scoby hotel? THANK YOU!
Aaron (Mr. DeannaCat)
If the SCOBY was mature and well maintained then that may be enough to kick start your new brew. Just keep an eye on your new brew to make sure it is starting to ferment. As far as the SCOBY hotel goes, we find it easiest to have the same size container as your crock so the SCOBYs fit easily inside. It is a good idea to give some sweetened tea to the hotel once every month or so. Hope that helps.
Ryan Bianchi
I would have been lost without these awesome instructions on your blog – thank you! Kombucha is not as hard as it seemed and so fun and delicious!
Brian
Hey Deanna! Your website has helped so much!!! I found everything I needed to start making quality kombucha with no prior knowledge — Thank you so much, what a truly great gift 🙂
I have a question for you, though — I noticed on reviewing the process that you recommend coffee filters only for smaller crocks. I am using the large crock that you posted a link for and doing the continuous brew method. I used a chemex coffee filter that I unfolded and it is large enough to cover the opening of the big crock. I wondered if you recommended coffee filters only for small crocks because most are not wide enough to cover, or if there is another reason I am unsure of. Do you think a chemex filter is too tight knit for that large a quantity of booch, should I search for another form of tight knit cloth to maximize my fermentation? Or were you saying to use it only for smaller crocks because most filters aren’t large enough to cover a big one?
Thanks again!!!
DeannaCat
Hi Brian! Yes, that sounds like it should work! We use a french press so I honestly didn’t know they made coffee filters so large, haha! Yes, the only reason I suggested for smaller crocks “only” was because of the size issue. Best of luck!
Melissa
Thanks so much for this!!
I’ve grown my own scoby! Can I use the kombucha from growing the scoby as my starter liquid in making my kombucha? Thanks!
DeannaCat
Hey there! It sounds like your Scoby liked it, and it is smells acidic, it would probably work!
Jenna
Hello Deanna! Super glad I found your website, there is so much fun and helpful info here 🙂 I’ve been gathering supplies to home brew kombucha, hopefully starting it this week…Our drinking water is from a well that goes through a softener system and reverse osmosis. We do get occasional sulfur odor in the shower. I’m hoping that does not affect the brew quality, because I don’t think I could keep buying filtered stuff from the store! Fingers crossed! Thanks for all the awesome info!!
Emily
Hi! Thanks for this helpful guide! Question:
I’m onto the second ferment stage for carbonation and Im leaving the kombucha in ball jars, about 3/4 full. Im noticing after day 3 or 4 a thin white film forming on top of one of my jars. It is not fuzzy or anything, looks more like a Thin baby SCOBY or something? Have you seen this before? Is it safe to just pull it out and drink the remaining booch? I hate wasting anything! Also, in All 3 jars I didn’t notice bubbles until after I opened the jar slightly (letting air out) and then closing back up. Any idea why? Thanks so much!!
DeannaCat
Hi Emily! Yep, totally normal. The bottled booch will form a baby scoby inside after several days. Aaron likes to drink/eat it… I like to pick it out and throw it to the chickens. If you don’t want it in your glass at all, there are funnels with strainers built in – I know some folks like to pour their booch from the bottle through a strainer and into a glass for a an extra refined product, lol! I don’t mind a little pulp. You will not see bubbles until the gases are allowed to escape (e.g. opening it to pour, or burping the bottles to check on them) – though you’ll lose some of the bubbles/carbonation then so you want to avoid opening them alllll the way or to often unless necessary. Did you check out the second ferment/carbonation article we have, which also goes over burping? Just so you’re aware, you probably won’t get the most insane carb with ball jars. They’re not truly air tight, unless you get lucky and reallllly screw the lid on tight. Usually some gas will be able to leak out still. Not a big dig at all! Just a heads up if you’re pondering over why you can’t get the level of fizz you may want. I hope that helps!
Emily
That helps a lot. Thank you very much!!
Raphael
Hi Deannacat, my wife and are looking to start making our own Kombucha using your super informative guide (thanks!). I had one question though when using the continuous method after the first fermentation when adding more sweat tea to the main batch do we need to put some type of starter in that tea as well? If so can we use a store bought bottle of Kombucha? Sorry for the run-on sentence and thanks again for making this super helpful and extensive guide :)!
DeannaCat
Hi Raphael! As long as you leave behind some finished kombucha in the crock (a couple cups at least) when you bottle the rest, that leftover IS your starter culture – so you don’t need to add any more bottled kombucha when you add tea. I hope that makes sense! Happy brewing!
Emily
Hi there! Thanks for all the info!
Have you ever had bits of “stuff” floating in your kombucha after the second ferment? Is that ok?
Also, can I do a second ferment in ball glass jars instead of the swing tops? How do you know when its “carbonated enough”?
Thanks so much!
Jennifer
My favorite flavor is cranberry! During thanksgiving time I get the fresh cranberries and freeze them. Makes my favorite flavor ever. Sometimes I’ll purée them but usually I just put them in whole. Which makes the whole process quick and clean.
Joanne schultz
Ive been doing kraut but this is new!
Ashtyn
I originally started following you/subscribed because I was so inspired by your yard. It gave me lots of ideas for my own. Then I started seeing your posts about foods and fermentation, and was even further inspired. I love a good bootch, but hate how expensive it is so thought I’d follow your guide to brewing my own. I have a couple of questions about it though! It looks like you keep your bootch in a pretty common place in the home, is it particularly odorous? I’d like to go straight to the continuous brew method, but I see your chart recommends the 2.5 gallon container with 2 large scoby’s. Since I’d just be starting, will a small scoby just take longer? Lastly, for the water – we are on a well with a filter. Should the filtered well water be okay, or should I look at getting an additional filter at the tap for my brews? Thank you so much!
DeannaCat
Hey there Ashtyn! Thanks for being here. It sounds like you’re up to some fun projects! To answer your questions: No, I don’t find the booch crock smells much except maybe in the hotter months, but it just smells a bit like apple cider vinegar and only when you’re in pretty close proximity to it. To me, it isn’t offensive at all. Second, if you have a smaller new SCOBY, I would probably start with just one gallon as the recipe/instructions call for to get started, let it grow and develop for several batches (maybe a couple months) and then gradually increase the amount you brew with it. It would ferment much slower, but also too small a SCOBY in too much liquid could lead to mold issues if it isn’t strong enough to ferment it – especially during cool winter months. Last, I think well water with a filter should be just fine. Probably better than most city water! 🙂 I hope that helps. Happy Brewing!
Sasha
Hey Deanna!
This looks super interesting! And as usual you’ve done an amazing job presenting this article with instructions and pictures. Your bottled kombucha looks delicious. Thank you so much!