

How to Make a Dried Orange Garland (Oven or Dehydrator)
Want to create your own beautiful, natural holiday decorations? Come learn how to make a DIY dried orange garland in this step-by-step guide. They’re easy to make using either the oven or a dehydrator and only a handful of supplies. This sustainable craft project is one of my favorite winter holiday season traditions!
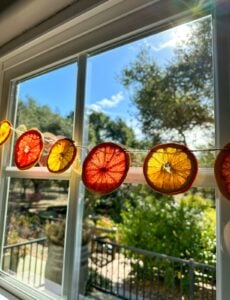
Catching light like candied stained glass, dried orange garlands look absolutely stunning strung across a sunny window, glowing on a Christmas tree with lights, and more. In this guide, I’ll show you exactly how to make one – along with several ideas for how to hang and decorate with them, tips for storage, and how to make them last.
RELATED: Looking for more natural holiday decor ideas? Come learn how to make a fall leaf garland or DIY grapevine wreath! Our guide on how to dry orange slices also highlights other ways to use them: as Christmas ornaments, in simmer pot recipes, table centerpieces, wreaths, and more.

Would you like to save this?
Disclosure: Homestead and Chill is reader-supported. When you purchase through links on our site, we may earn an affiliate commission.
Drying oranges in the oven vs dehydrator
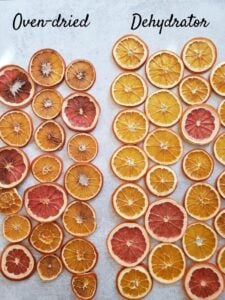
To make a DIY dried orange garland, you can dry fresh orange slices in either an oven or a food dehydrator. Both options work great! The most notable difference is the final color, shown below. Or, you could buy already-dried orange slices to make a garland.
Drying oranges in the oven is faster, but is easier to accidentally overcook or burn your oranges, resulting in a darker color. Even on the lowest temperature setting and with a very watchful eye, oven-dried orange slices will always turn out slightly more brown than those dried in a dehydrator – but still look beautiful and rustic!
On the other hand, using a dehydrator to slowly dry the fruit at a lower temperature will result in lighter, brighter colored dried orange slices, nearly preserving their raw natural color. Starting light means the garland will look better and last longer over time (up to a few years) since it will gradually darken and turn more brown. While it takes a little longer, a dehydrator requires less oversight than the oven. Just set it and forget it!

Supplies
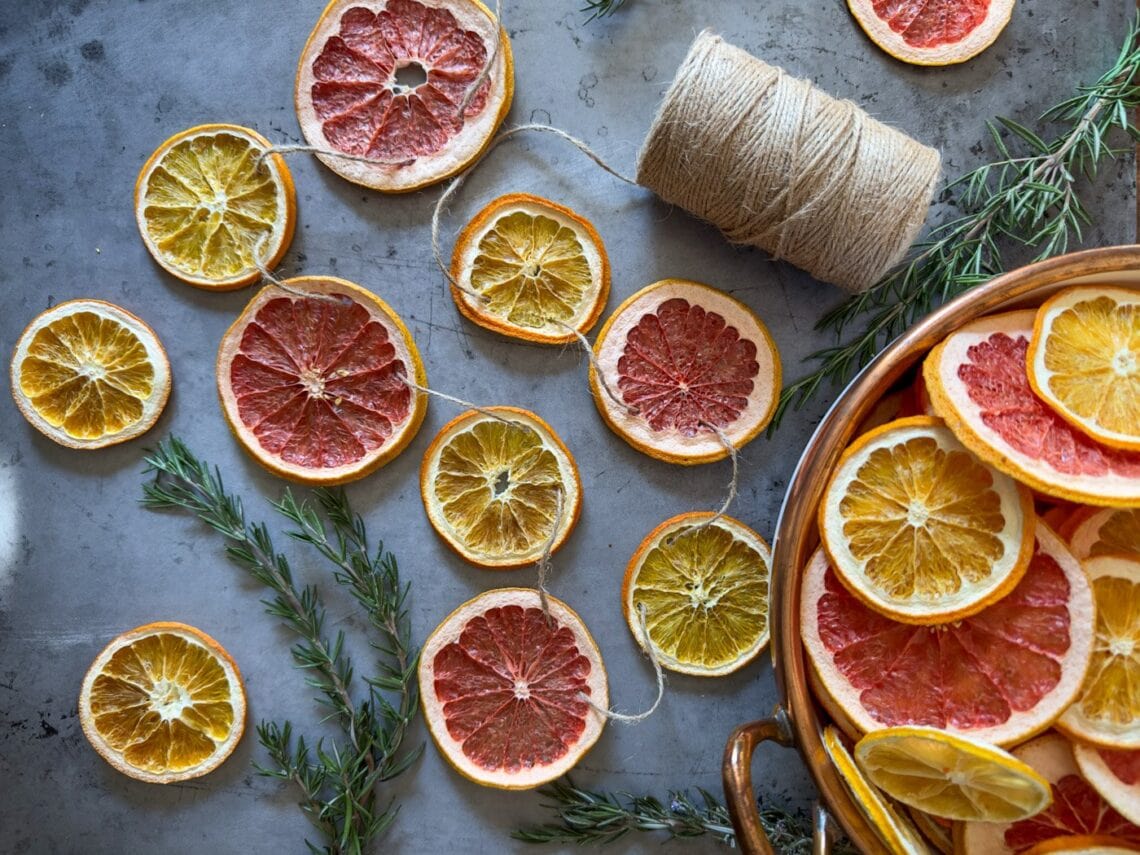
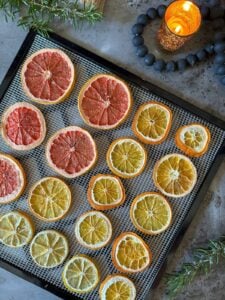
- Fresh oranges (or pre-dried orange slices). You can use other types of dried citrus in your garland too, such as mandarins, lemons, limes, or blood oranges. I personally love to use grapefruit for a beautiful pop of pink!
- Sharp knife and cutting board
- Jute twine, string or ribbon of choice
- Lint-free cloth towels or paper towels for blotting
- Oven method: baking sheets lined with parchment paper or a wire baking rack
- OR a food dehydrator
- Optional: mini clothespins to clip the oranges to the twine, or even to a strand of petite twinkle lights

Instructions
If you’re making your garland using already-dried oranges, skip straight to step 3.
1) Prep Oranges
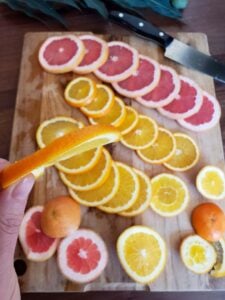
- First cut the oranges into thin even slices, approximately 1/8 to 1/4 inch thick. Try your best to cut them all the same thickness so they’ll dry evenly.
- Your dried orange garland will look the best if the oranges are cut across the middle “equator” instead of top-to-bottom, revealing the perfect cross-section.
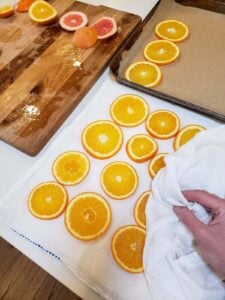
- Lay the orange slices out in a single layer on a cloth towel or paper towels. Then use another towel on top to gently blot them and remove excess moisture. Don’t smash them though!
- Finally, transfer the oranges to either food dehydrator trays, a wire baking rack, or baking sheets lined with parchment paper. Spread them out in a single layer, not overlapping.

2) Dry the Orange Slices
In the oven:
- Dry the orange slices in the oven on 200 to 225°F for several hours, until they’re fully dry*. (See notes below). I found 215°F is the sweet spot for my oven! 200 was taking forever, but 225 made them more brown.
- It should take anywhere from 3 to 5 hours to dry, depending on your oven and thickness of the orange slices.
- Carefully flip the oranges every hour or so to promote even drying (unless using a wire baking rack).
- Once they’re done, transfer the oranges to a cooling rack.

In a dehydrator:
- To dry orange slices in a dehydrator, set the thermostat to 130-135°F (a “fruit” setting or medium heat).
- If your machine doesn’t have a precise temperature control, check them after an hour or two to ensure they’re not turning brown and adjust as needed.
- Allow them to dry until no moisture remains. (See notes below.) In my machine, most orange slices dry within about 8 hours, but if there are a few damp pieces left I turn it down to 125F for a few more hours to finish off.
- Depending on your dehydrator (e.g. if it has a top or bottom fan), you may also want to rotate the trays after several hours to promote even drying. I don’t find the need to do this with our Excalibur since the fan is located in the back with even airflow.
With either method, the orange slices are considered “fully dry” once they appear dry, and the thickest parts of the fruit are no longer gooey or soft to the touch. It is okay if they feel ever-so-slightly sticky still, since they will continue to dry and harden once they’re removed from the heat. If you plan to keep your garland for many years, make sure the oranges are extra dry so they won’t mold in storage!

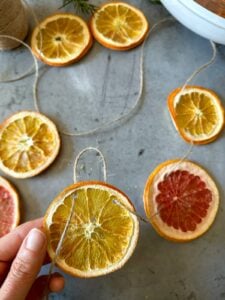
3) Add Twine
Now it’s time to string the dried oranges onto twine to create a garland. There are a number of ways to accomplish this, so I’ve shared my favorite simple method and tips here, along with a few alternative styles in the section to follow!
- Begin by cutting a piece of twine as long as you’d like your garland to be, plus some extra length – just in case.
- Use the tip of a pen, chopstick, a thick nail, wood skewer, or other slender pointed object to make two small holes in each orange. (I used a kitchen probe thermometer.) Creating two holes instead of one helps the orange slices hang in a nice straight line along the garland.
- Poke the holes through the orange slices near the rind (the strongest part) and about an inch or two apart.
- Thread one end of the twine through each hole in the orange slice, and then gently pull to the end of your garland.
- Repeat the process and continue to add more dried oranges to the garland, spacing them however far apart you prefer. Keep them close together for a very full look.


Alternative Methods
There are plenty of other clever and creative ways to make a DIY dried orange garland. You can attach the orange slices to twine using mini clothespins, connect the oranges end-to-end using smaller sections of string (shown below), or even hang the garland vertically – such as several sections hanging vertically in a window like a dried orange curtain or mobile!


5) Enjoy!
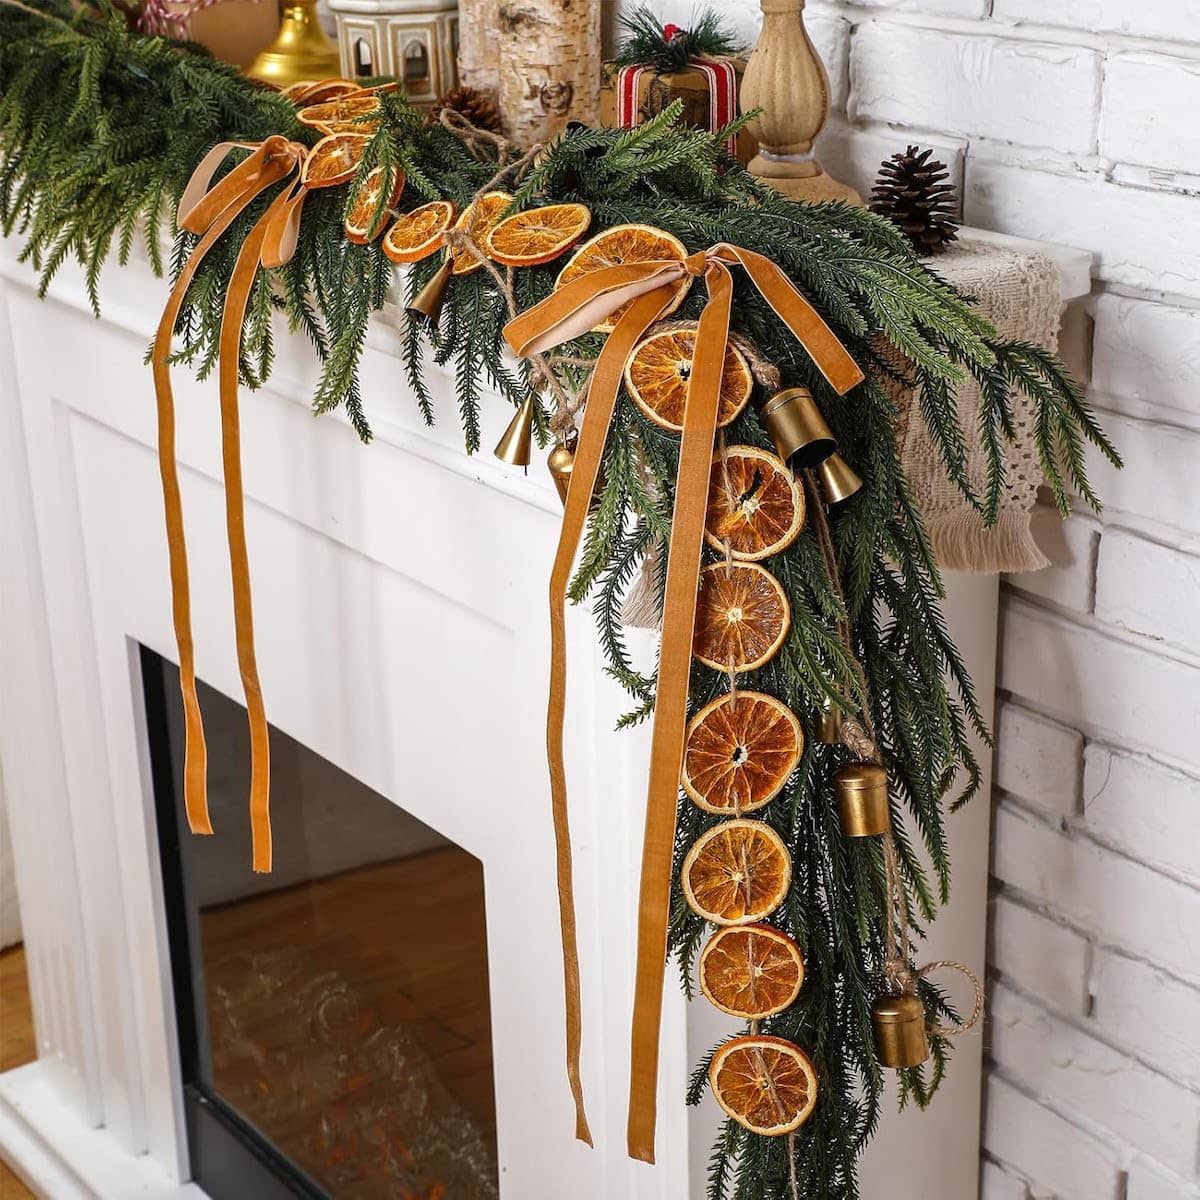
Now it’s time to find a special place to hang and admire your beautiful new DIY dried orange garland! I always hang a couple in our living room windows near the Christmas tree, which is also adorned with matching orange slices and blown egg ornaments. Here are some other pretty ideas:
Where to hang a dried orange garland
- Wrapped around a Christmas tree
- On a fireplace mantle
- Strung across a sunny window, or hung vertically
- Down a stairwell banister or other railing
- Hung on the front door
- Draped across the front of a bookcase, cabinet or other shelving
- Wrapped around a wreath
- Across an open doorway or nook
- From a chandelier
- Thoughtfully laid out as a part of a tablescape centerpiece
- Use several strands to create a dried orange mobile

Storage and Shelf Life
To keep your dried orange garland for next year, store it in a cool, dry, dark location where it won’t get crushed. You can carefully fold and stack the garland into a bag, or lay it out to store flat. Either way, I recommend protecting the fragile oranges with tissue paper or other cushioning.
Dried orange garlands can last for many years! With proper drying and storage, they should not mold. However, the oranges will gradually turn more brown and darken over time – so it’s a personal decision as to how long you enjoy yours. Some folks love the look of more aged, rustic brown dried oranges!

Easy peasy. I hope you enjoy your beautiful natural homemade garlands as much as I do. Please spread the holiday joy and leave a review, or ask any questions you may have below!
Don’t miss these related posts:
- How to Make a DIY Fall Leaf Garland
- Easy Salt Dough Ornaments Recipe for Handprints, Shapes and Keepsakes
- Holiday Stovetop Potpourri Mason Jar Recipes (Free Printable Gift Tag)
- How to Make Dried Flower Candle Jar Lanterns (Pressed Flower Crafts)
- DIY Bath Salts Recipe: Beautiful Natural Herbal Bath Salts
- How to Make Pressed Flower Pumpkins: No-Carve Pumpkin Decorating Idea

DIY Dried Orange Garland (Oven or Dehydrator)
Equipment
- Sharp knife and cutting board
- Baking sheet lined with parchment paper (for oven method) OR a food dehydrator
- Lint-free cloth towel or paper towels for blotting
- Twine, string, or ribbon of choice
- Mini clothespins (optional)
Ingredients
- Fresh oranges (or lemons, grapefruit, limes, blood oranges, etc)
Instructions
Prep
- Cut the oranges into thin slices, ⅛” to ¼” thick. Try to cut each slice the same thickness for even drying. Cutting across the “equator” or center of the orange (as opposed to top stem to bottom) to reveal the perfect cross-section.

- Gently blot them with paper towels or a cloth towel to remove excess juices and expedite the drying process.
- Spread the orange slices in a single layer on either a parchment-paper lined baking sheet or food dehydrator trays.
Drying Oranges in a Dehydrator
- Set the thermostat to 130-135°F (a “fruit” setting or medium heat). When in doubt, check them after an hour or two to ensure they’re not turning brown and adjust as needed.
- Allow them to dry until no moisture remains** (See notes below.) In our machine, the orange slices were mostly dry within about 8 hours, though a few damp pieces remained, so I turned the temp down to 125F and let it continue to run overnight to finish off.
- Depending on your dehydrator, you may want to rotate the trays after several hours to promote even drying.
Drying Oranges in the Oven
- Dry the orange slices in the oven on 200 to 225°F for several hours, until they’re fully dry* (see notes below). It should take anywhere from 3 to 5 hours, depending on your oven and size of orange slices. I found the sweet spot in our oven to be 215F, where 200 was going too slow but 225 was turning them brown.
- Carefully flip the slices every hour or so to promote even drying, then transfer to a cooling rack once complete.
Create a Garland on Twine or String
- Cut piece of twine as long as you’d like your garland to be, plus some extra length – just in case.
- Use the tip of a pen, chopstick, a thick nail, wood skewer, or other slender pointed object to make two small holes in each orange. Creating two holes instead of one helps the orange slices hang in a nice straight line along the garland.
- Poke the holes through the orange slices near the rind (the strongest part) and about an inch or so apart.
- Thread one end of the twine through each hole in the dried orange slice, and then gently pull to the end of your garland.
- Repeat the process and continue to add more dried oranges to the garland, spacing them however far apart you prefer. Keep them close together for a very full look.


Hang and Enjoy
- Hang your dried orange garland across a sunny window, on the Christmas tree, down a stair railing, on the fireplace mantle, on the front door, across a bookshelf, as part of a tablescape, and more. You can also hang your garland (or several strands) vertically!

Storage and Shelf Life
- Store flat in a cool, dry, dark location. Use tissue paper or other cushioning as needed to protect the dried oranges. If dried and stored properly, a dried orange garland can last many years. However, they will all naturally turn a darker brown color over time.
Notes


4 Comments
Sarah Sullivan
Love this craft! Made them last year and going to again this year. Thank you for the great article and instructions.
Aaron (Mr. DeannaCat)
Amazing to hear Sarah, have fun and enjoy decorating!
Dani
So detailed as always. Thank you! I have a batch in the dehydrator as I type.
I have an inexpensive round tiered dehydrator, and it takes quite a bit of time for all of the layers to dry out thoroughly.
My dry time is usually a couple of days rotating the tiers every so often.
Definitely need to upgrade the dehydrator situation!
Aaron (Mr. DeannaCat)
Hi Dani, we used to have a Nesco food dehydrator (probably similar to yours) but once we got an Excalibur dehydrator, we haven’t looked back!