

DIY Berry Trellis: How to Build a Wire Raspberry or Blackberry Trellis (Video)

Are you growing caneberries and looking for a way to support them? Right on! Come along and learn how to build a sturdy DIY berry trellis system. Our simple homemade berry trellis design works to trellis raspberry, blackberry, boysenberry, loganberry, marionberry, olallieberry, or any other type of vining caneberry plants.
This tutorial will walk you through all the supplies and step-by-step process to build a wire berry trellis – photos and video included. We used wood along with metal fence t-posts for our berry trellis design, though I’ll also provide alternate options if you’d like to bury wood posts in the ground instead. Last but not least, we’ll briefly cover how to train and prune raspberries and blackberries too!

Would you like to save this?
Disclosure: Homestead and Chill is reader-supported. When you purchase through links on our site, we may earn an affiliate commission.
Looking for more trellis ideas? Don’t miss our popular A-frame DIY tomato trellis, these cucumber trellis ideas, or this cheap and sturdy DIY trellis design that can be used for any type of climbing plant!
The Benefits of Trellising Raspberries and Blackberries
Some gardeners may wonder, do blackberries and raspberries need a trellis? While not required, a berry trellis will help keep raspberry and blackberry vines more tidy, manageable, easier to prune and harvest. So, I highly recommend growing these berries on a trellis system!
Blackberries and raspberries are both considered caneberries – where they grow long canes or vines from a crown just below the soil. If left to grow without support or some type of trellis system, blackberry and raspberry vines will naturally flop and sprawl all over. Blackberries in particular will turn into big brambling bushes. If you’re growing thorny caneberry varieties, that can make them even more difficult to access, maintain, or harvest fruit from.


Best Blackberry or Raspberry Trellis Height and Dimensions
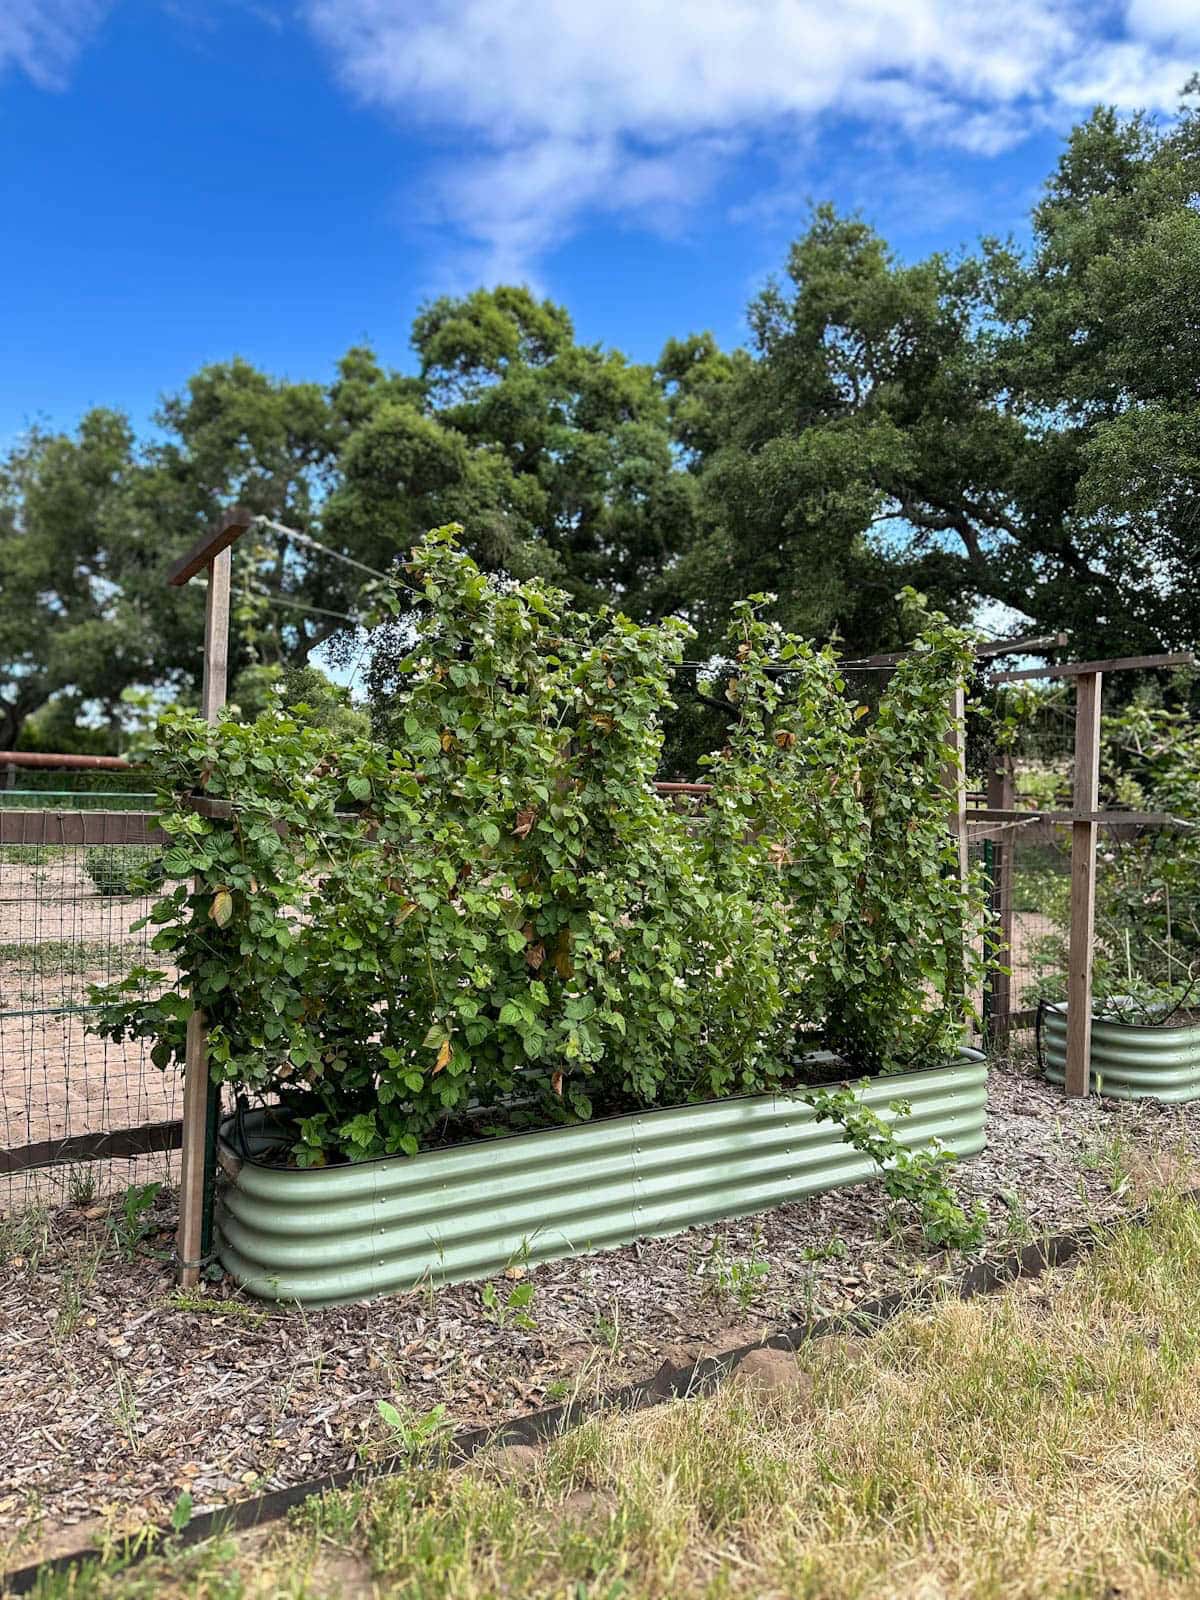
Most raspberry canes grow at least 5 feet tall, and blackberry vines grow even taller! So, it’s best to build a berry trellis that is about 5 or 6 feet tall. Also plan to build your berry trellis about a foot wider than the garden bed or berry patch where they’re growing.
Our berry trellis design has four horizontal wire supports that run the length of the berry patch (two on each side). The lowest wire is about 3 feet above the soil level, with the upper wire at 5 feet tall. This way, you can tuck the blackberry or raspberry vines up between the rows of wire as they grow taller. See photo below.
If you happen to be growing shorter varieties of raspberries, consider lowering the horizontal supports and wires slightly from our design (e.g. the lower one at 2 or 2.5 above the ground, and the highest one at 4 feet tall).

Now, let’s go build a berry trellis, shall we? Here is the video tutorial, with the supplies list, written instructions and more photos below.
Supplies Needed
- Two vertical wood posts (one on each end) such as 2×4’s or 4×4’s. They should be tall enough to extend 5 to 6 feet above the soil level once installed. Plan accordingly if you’re growing in raised beds, or want to bury the posts in the ground (e.g. start with 8 foot posts and bury 2 feet).
- Four horizontal supports (two per end) such as 2x2s or 2x4s. We used this rough cut 2×2 redwood lumber. The top bar should be about a foot wider than your berry bed, and the lower bar about 6” narrower than the top. For example, our berry beds are 24” wide, so the tap bars are 36” wide and the bottom bars are 30”.
- Screws, to connect the horizontal bars to the main wood posts. We used 2.5-inch exterior wood screws in our berry trellis design.
- Hooks (4 per end, or 8 total per trellis) to connect the wire to the horizontal bars. We used screw eye hooks like these.
- Wire (10 to 12 gauge is best), durable twine, or woven wire rope/cable. We used 1/16” gauge galvanized steel wire cable, which requires a few extra supplies (list below). To determine the length of wire needed, figure out how far apart your trellis ends will be, and then multiply by four. There will be two lines of wire running the length of your berry bed on each side.
- Optional: wood glue, to strengthen connection between post and horizontal bars
- Optional: Turnbuckle tension tighteners, so you can tighten or even completely unhook the berry trellis wire as needed. You could put a turnbuckle at each end of every wire (8 per trellis); we chose to add them at just one end of each wire (4 per trellis).
- Drill and saw as needed
- Reusable soft garden wire ties


Berry trellis wire kits
Looking for berry trellis supplies? This handy wire trellis kit comes with 50 feet of stainless steel wire cable, 8 ferrules, 4 hooks, and 2 turnbuckles. (To follow our berry trellis design you’d still need to get 4 additional hooks and 2 more turnbuckles). Or, this larger trellis kit includes 100 feet of wire, 14 ferrules, 10 hooks, and 5 turnbuckles – everything you’d need to build a berry trellis!
Supplies for T-Post Option
If you’d like to make your DIY berry trellis with fence t-posts like we did, you’ll need:
- One 6 foot t-post at each end of the trellis.
- A post driver is really helpful to set them in the ground.
- You’ll also need these vertical t-post brackets and screws to connect the wood post to the t-post. We used 1.25″ wood screws to secure the 2×4’s to the brackets.
- Two adjustable 5-inch pipe hose clamps (one for the bottom of each trellis end) – which will fit around the t-post and 2×4”. You’ll need a larger pipe clamp if using larger wood.

Supplies for Wire Cable
- 1/16” gauge woven wire cable
- 1/16” aluminum ferrules (aka double barrel loop sleeves) are required to connect and secure the 1/16” wire cable in a loop at each end of the trellis (4 per side, or 8 total per trellis)
- A swaging tool or crimping tool like this allows you to crimp the ferrules onto the wire cable. No, you can’t pinch them with regular pliers – we’ve tried!
- Good wire cable cutters make nice clean cuts – which prevents the rope from fraying, making it easier to insert into the ferrules
- OR, pick up something like this well rated 2-in-1 crimping tool that cuts wire cable AND crimps ferrules

Notes for Using 4×4’s vs T-Posts
We chose to use metal fence t-posts to support the ends of our berry trellis. They’re sturdy, easy to install, and we also had a few leftover from another project. Even more, wanted to minimize digging around the berry beds because we installed hardware cloth on the ground below/around all the beds for gopher prevention. The wood posts we connected to t-posts do not go down in the ground.
To set 4×4 posts in the ground instead, plan to dig it at least two feet into the ground, and pack gravel, soil, and/or concrete firmly around it. Or, we often use these cinder block piers to help securely set wood posts in our loose sandy soil.
Because we used metal fence t-post in our DIY berry trellis design, we built the trellis end wood supports on our patio first, and then attached them to the t-posts mostly assembled. However, if you’re going to set 4×4 posts in the ground, you may want to do that first and then connect the horizontal bars, hooks, wires, etc.


Instructions to Build a DIY Berry Trellis: T-Posts, Wood, and Wire
Step 1: Build Berry Trellis Ends
- Cut your wood to the dimensions needed for your berry bed.
- Use wood glue and screws to attach the two smaller horizontal wood pieces to the main vertical wood support. We squeezed a bit of wood glue between the wood, drilled pilot holes, then added 2 screws each.
- Again, the top horizontal bar should be about 5 feet above the soil level, and the lower horizontal bar about 2 feet below that (or 3 feet above the ground) to trellis tall raspberry or blackberry vines. *Reduce height by a foot each for shorter raspberry varieties.*
- Flip the trellis over, and add 1 eye hook to each end of the horizontal pieces, for a total of 4 hooks. (Pilot hole also recommended here)
- Repeat the process for the second side of the berry trellis.


Step 2: Install T-Posts and Ends
- Use a post driver to install a metal t-post at each end of your berry bed. Try to keep it as straight as possible. (OR, bury 4×4 posts at each end of the bed and connect horizontal supports as described above).
- If you’d like the wood facing out (to hide the t-posts) install the t-posts with the bumpy part facing in towards the berry bed.
- Slip a vertical t-post bracket over the post, and lock into place on one of the top bumps.
- Connect the pre-assembled wood berry trellis end to the t-post by screwing it to the bracket. Make sure the trellis eye hooks are facing in towards the berry bed!
- At the bottom of each berry trellis end, add and tighten an adjustable pipe clamp around both the wood and t-post, securing them together.
- Repeat to attach the second wood trellis end.


Step 3: Add Berry Trellis Wires
Now it’s time to string wire between the eye hooks on your DIY berry trellis. Again, you can simply run some basic 10 to 12 gauge wire from hook to hook, or follow the instructions below to use wire rope cable like we did in our berry trellis design:
- Insert one end of the 1/16” wire cable into a 1/16” ferrule. Loop the wire through an eye hook on the trellis end, and then back into the ferrule. Use a crimping tool to pinch/crimp the ferrule, securing the cable wire to the hook.
- Run the wire down the length of the berry bed to the opposite end of the trellis. On this end, we added an optional turnbuckle. I started by loosening the turnbuckle almost all the way (so it can be tightened later), hooked it onto the trellis eye hook, then put the wire through the solid loop end of the turnbuckle.
- While pulling the wire tight, repeat the same process to secure the cable wire to the 2nd side of the trellis (to the turnbuckle) using a ferrule and crimping tool.
- Repeat for the remaining 3 wires in your DIY berry trellis.


Ta-da! You just built a homemade raspberry trellis.
How to use a berry trellis: training raspberry and blackberry vines
Once the berry trellis is installed, it’s quite easy to use. Simply tuck the blackberry or raspberry vines up inside the wires as they grow. It’s easiest to do so before the berry vines get too long (and may break), so check and tuck them regularly. I definitely recommend wearing thorn-proof gloves when working with prickly berry vines!
I found that our blackberry and raspberry vines tend to slide along the berry trellis wires, especially on windy days. So, I secured some of the canes to the wire using soft reusable garden wire ties to help hold them in place, and it worked like a charm. You can also add small stakes to individual canes if needed.
Blackberry, raspberry, and other caneberry vines can also be pruned (topped) to control their height. Our raspberries are fairly short and manageable. However, we plan to top our olallieberry and blackberry vines once they’re a few feet taller than the trellis (keeping them no longer than 7 or 8 feet tall). The act of topping them will also make each cane branch more.

Pruning Caneberries
Beyond topping the vines, the subject of how to grow and routinely prune blackberries and raspberries deserves a post of its own! Stay tuned for a dedicated article on that topic soon.
In the meantime, here’s the quick and dirty for how to prune raspberries and blackberries:
- Each year when the vines are dormant (late fall to early spring), cut them back to the ground – but leave about 8 to 12 raspberry canes and 5 to 8 blackberry canes per plant.
- The canes you choose to leave or remove depends on the variety of caneberry you’re growing.
- For June-bearing raspberry or blackberry varieties (aka primocane), cut away the two year old vines that already fruited the previous year, leaving just the freshed canes that grew the past year.
- For everbearing raspberries and blackberries (aka floricane), only cut back three year old canes – as the younger 1 and 2-year old canes will still bear fruit later.
- Some gardeners like to mark the canes with small ties or flags to help keep track.
- Because they require different pruning techniques, it’s best to grow everbearing and June-bearing caneberries in separate beds.

And that concludes this lesson on how to build a sturdy DIY berry trellis.
Well folks, I sure hope that was useful – and helps you feel empowered and prepared to go make a berry trellis of your own! If so, please spread the love by sharing or pinning this post. Please also feel free to ask any questions or simply say hello in the comments below. We truly appreciate you tuning in today. Happy berry growing… and eating!
Don’t miss these related posts:
- How to Build a Raised Garden Bed: Step-by-Step Guide
- Easy Raised Bed Drip Irrigation (from Faucet or Spigot)
- How to Make the Best DIY Tomato Trellis (Stake Weave Hybrid)
- How to Build a Trellis: Inexpensive & Easy Designs (flat or arched trellis for vining plants)
- 9 Ways to Add Whimsy and Interest to Your Garden
- How to Choose Fruit Trees to Plant: Climate, Varieties & More

How to Build a DIY Berry Trellis
Equipment
- Electric drill
- Saw
- Wire cable cutter
- Optional: Crimping tool
- Optional: Post driver (for t-posts)
Ingredients
- Two Vertical wood posts such as 2×4's or 4×4's
- Four Horizontal wood posts such as 2×2's or 2×4's
- Screws
- Eight Hooks
- Wire (10 to 12 gauge is best or braided cable with ferrules and crimping tool)
- Optional: Wood glue
- Optional: 4 Turnbuckle tension tighteners
Trellis with T-Post Option
- Two 6 foot t-posts
- Two Vertical t-post brackets
- Two 5 inch pipe hose clamps (will fit around t-post and 2×4 but you will need larger clamp if you use 2×6 or larger)
Instructions
- Cut the wood (vertical and horizontal posts) to the dimensions needed for your berry bed.
- Use wood glue and screws to attach the two horizontal posts to the vertical posts, making sure that the top horizontal post is about 5 feet from the ground (bottom) while the lower horizontal bar is close to 3 feet from the ground. *Note: reduce each of the horizontal post height by one foot if trellis is for raspberries.*
- Flip the trellis over and attach one hook to each end of the vertical post (4 hooks per trellis and a pilot hole may be necessary).
- Repeat the process for the second side of the berry trellis.
Installing T-Posts and Ends
- Use a post driver to install the t-post at each end of the berry bed.
- Slip t-post bracket over the post and lock into place on one of the top bumps of post.
- Connect the preassembled wood trellis end to the t-post bracket with screws, make sure the trellis eye hooks are facing towards the berry bed.
- Add the pipe clamp to the bottom of the trellis to secure the wood and t-post together.
- Repeat this step for the second side of the trellis.
Add Berry Trellis Wires with 10 or 12 Gauge Wire
- If using regular 10 or 12 gauge wire, string the wire from one eye hook to the opposite eye hook and secure it on each end. Repeat this step for each section of the trellis until you have four individual lines running lengthwise along your berry bed.
Add Berry Trellis Wires with Woven Wire Cable
- Insert one end of the 1/16” wire cable into a 1/16” ferrule. Loop the wire through an eye hook on the trellis end, and then back into the ferrule. Use a crimping tool to pinch/crimp the ferrule, securing the cable wire to the hook.
- Run the wire down the length of the berry bed to the opposite end of the trellis, loop the wire around the eye hook or optional turnbuckle.
- Pull the wire tight and repeat the step to secure the cable tight using a ferrule and crimping tool.
- Repeat these steps for the remaining 3 wires of your trellis.


20 Comments
Jon Berg
Curious about the flowers you planted along with berries. Assuming they have a symbiotic benifit, pest control or something else entirely. Would love to get info if you have suggestions on planting combos. Thanks for the awesome tutorial, its extremely helpful!
Aaron (Mr. DeannaCat)
Hi Jon, I think we planted small zinnias and marigolds as the berries were quite young when we first planted them out. Since then, the berries have more or less taken over the beds so we don’t have flowers growing in them anymore.
Gabe
great recipe! Excited to find something that doesn’t involve 4×4 post and concrete which seems like overkill. I noticed the U post is very similar to the T posts except it has holes that I could bolt through to connect to 2×4 (in place of t post bracket). Would the U post work alright you think? Thanks
Aaron (Mr. DeannaCat)
Hi Gabe, u posts should be able to work well, I would just secure them to the 2×4’s multiple times along the length of the u post to ensure a solid connection. Good luck!
KW
I really appreciate how detailed your instructions are. The photos are awesome! Thank you so much for sharing.
Aaron (Mr. DeannaCat)
Hi KW, we are so glad you found the article helpful and we wish you luck if and when you build your berry trellis!
D
Fantastic article as always. Thanks for the information friends!
Morgan
What beds are you using for the berries?
Aaron (Mr. DeannaCat)
Hi Morgan, we are using Birdies metal raised beds (use code “deannacat3” to save 5% off your order) in the 10 foot by 2 foot (15 inches tall) configuration. We also are converting our calendula farm area to Birdies beds (instead of large grow bags) and we constructed the large beds into the 8 foot by 4 foot size. Hope that helps and reach out if you have any other questions.
Robert Warren
Hi there:
I have a 6′ x 4′ raised bed with both blackberries and raspberries in it? Is that a problem? Should I have the two different berries in separate beds?
Aaron (Mr. DeannaCat)
Hi Robert, I don’t see that being a huge issue aside from chance that the blackberries may outgrow the raspberries as they will usually spread out more and grow taller than the raspberries (you may need to make the trellis about a foot shorter to accommodate the raspberries). You will likely just have to be sure to maintain your plants with proper pruning to ensure that they both have equal space and resources. If you know what variety of blackberry and raspberry you have, you need to find out if they are floricane or primocane cultivars which will give you a better idea on how to prune your plants. Hope that helps and good luck!
Robert Warren
Thank you for the information Aaron. The raspberry plants were already in our yard when we arrived and the blackberries were given to us by someone who had them given to them. Is there a way to tell if they are floricane or primocane?
Aaron (Mr. DeannaCat)
Hi Robert, most raspberries and blackberries are floricane fruiting for the most part, meaning they produce fruit on the second year growth. The stems of the second years growth will be brown and firm compared to the green and soft first year growing canes. Hope that helps.
Robert Warren
Yes, that definitely helps. Thank you so much.
Sam Copeland
Excellent post and videos! How would you recommend treating/sealing/staining the wood beforehand to prevent rot, weathering, decay?
Aaron (Mr. DeannaCat)
Hi Sam, we didn’t use anything on our trellis as redwood or cedar is naturally rot and pest resistant. However, we did seal our garden beds with Garden Seal which could be something to use if you didn’t want to use a typical outdoor sealant or varnish, we typically just leave wood such as this natural. Even at our older property, we put in a new cedar fence and within a few days, our neighbor was out there trying to stain and seal their side of the fence while we just left our side unfinished. Hope that helps and good luck!
Justine
Hello! Thank you for the thorough post! We are going to copy this beautiful idea (though we’ll only have one of the Birdie containers given our space). I have a quick question for y’all…how many raspberry bushes did you plant in the (I’m guessing) 10 foot x 2 foot bed? Thank you so much!!
Aaron (Mr. DeannaCat)
Hi Justine, that’s great to hear and the raised bed size is the 9 or 10 foot long by 2 foot wide design. We have 3 raspberry bushes in the raised bed, we are hoping they stay contained within the bed but we may see some suckers shooting out the bottom of the bed in time. Hope that helps and good luck with your berry patch!
M
Hi there,
Thanks for this great post! We are trying to grow berries too but are concerned about our ability to control them from spreading underground and taking over areas where we are growing other plants. Have you encountered thsi issue and, if so, how would you advise dealing with us. One of our basic limitations is that we don’t have space in our yard to separate the berries from other plants.
Thanks!
M
Aaron (Mr. DeannaCat)
Hi M, berries spreading can be a concern (especially so with limited space). Currently our raspberries are starting to shoot new growth but everything is contained within the bed, however, this is only our second year of having this berry patch set up so that could change. You may find some varieties that maybe aren’t as prolific or you will just have to do a really good job of keeping up with pruning, you can always opt to grow blueberries which grow in more of a bush and you won’t run the risk of them taking over your limited yard space. Hope that helps and good luck!