

Vermicomposting 101: How to Make a Simple Worm Compost Bin

Come learn how to make a DIY worm bin – video included! It’s easy, inexpensive, and quickly turns food waste into amazing nutrient-rich compost that will help your garden thrive. This post will explore the basics of vermicomposting (the term for composting with worms) along with how to start a simple worm compost bin or worm farm. We’ll also cover how to properly maintain your worm bin, including tips for hot or cold weather, what to feed it and how often, harvesting worm castings, and more.
Of the all the ways we compost at home, vermicompost is by far my favorite. When people ask why or how our gardens look so lush and healthy, I blame the worms! We’ve had a worm farm for almost 15 years now, even when we lived in an apartment.
We buy our compost worms from Uncle Jim’s Worm Farm.

Would you like to save this?
Disclosure: Homestead and Chill is reader-supported. When you purchase through links on our site, we may earn an affiliate commission.
What is Vermicomposting?
Vermicomposting is a style of composting with the assistance of worms. The prefix vermi- literally means “worm”. When added to a compost bin or pile, worms greatly increase the rate of decomposition. This means you’ll have ready-to-use compost in no time!
In addition to the quick turnover, there are a number of other benefits to vermicomposting:
- Worm bins are very compact and tidy compared to other compost methods, making it easy to vermicompost in a wide variety of living situations or spaces. Contrary to popular belief, they do NOT smell bad if they’re well-maintained!
- Worm farms are a fantastic and sustainable way to dispose of food waste at home, which diverts waste from the landfill and reduces carbon emissions.
- The final compost that comes out of a worm bin (called worm castings) is arguably one of the best types of natural fertilizer around! So much so, vermicompost is often referred to as “black gold“.

What are Worm Castings?
Worm castings, aka vermicastings, is a fancy term for worm poop. Rich in nutrients and beneficial microbes, worm castings are a wonderful well-balanced, slow-release form of natural fertilizer!
As worms eat and break down the food scraps, garden trimmings, bedding and other organic matter in a worm bin, the nutrients found in those materials become highly-concentrated in the excreted worm castings. Even better, the nutrients become more bioavailable, meaning the plants can make use of them more readily! Yet worm castings are also very gentle and cannot “burn” your plants like other animal manure or fertilizer can.
But that’s not all! When added to garden soil, worm castings also increase soil aeration, drainage, biodiversity, and water retention. Cornell University refers to worms as a living soil amendment. Learn more about the benefits of worm castings for plants here.

Supplies Needed
Here’s a quick list of the supplies you’ll need to start a worm bin, with further explanation of each item below.
- A simple bin with a lid, such as a large durable plastic storage tote.
- Recommended: a drill and 1/4″ bit to add air holes to the bin.
- Dry bedding material, such as shredded newspaper, coco coir, dry leaves, grass clippings, shredded cardboard, or straw.
- Compost worms
- Grit or dirt
- Food or garden scraps
1) A Bin or Tub
There are plenty of neat worm-tower systems out there, but inexpensive plastic storage bins or totes work perfectly! It’s what I’ve always used. Choose one that is durable, heavy-duty, and made of non-transparent plastic. (Worms like the dark.) Also ensure the top lid area doesn’t have any holes where rain can seep in.
The blue tub shown in this example is 35 gallons, which works quite well. We’ve made worm farms as large as 55 gallons and as small as 15 or 20 gallons. If you may need to move your worm bin on occasion (such as to protect it from freezing in the winter – discussed more to follow), keep mobility and weight in mind when choosing your bin size.

2) Bedding Material
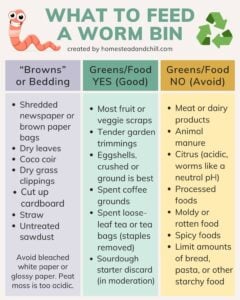
Worm bin bedding is the bulk dry carbon material or “browns” in the bin, which is essential to balance the wet food waste or “greens”. Good worm bin bedding options include shredded newspaper, rehydrated coco coir, dry leaves, dry grass clippings, brown paper bags, shredded cardboard, or straw. Avoid bleached white paper or glossy paper. Peat moss also is not recommended for worm farm bedding since it’s too acidic.
Bedding is used both to start a worm compost bin and added later during routine maintenance. We use a combination of coco coir and shredded newspaper to set up our bin, and then switch to newspaper and dry leaves thereafter. We also invested in a basic paper shredder to routinely shred newspaper for our bin.
3) Compost Worms
The most popular kind of worms used in worm bins are Eisenia fetida, commonly known as “red wigglers“. We get ours from Uncle Jim’s Worm Farm. You could also check to see if you happen to live near a worm farm, and make a little field trip out of going to pick some up!
I recommend starting with 1,000-2,000 worms (about 1 to 2 pounds) for a 35-gallon bin or larger, and half that for smaller bins. Under the right conditions, they can double their population in just 90 days!

4) Dirt or Grit
In addition to bedding, worms need a little natural grit to help their digestive track. We add few small scoops of our native sandy soil to our worm farm. If you have clay soil, add some potting soil instead.
5) Food Scraps
Last but not least, you’ll need some kitchen scraps or garden trimmings to feed your worms. Do not put moldy, rotten food in your worm bin! Keep reading below to learn more about “feeding” your worm farm, including the best things to add, materials to avoid, how much, and how often to feed it.

Location: Where to Keep a Worm Bin
Ideally, a worm bin should be kept in a sheltered location that is protected from extreme temperature swings. For instance, in a shady spot in the yard, tucked along a shaded wall or fence, on a covered porch, or even in a laundry room or other indoor location. It may be necessary to move your worm farm to different locations depending on the time of year.
Red wiggler compost worms are most happy and active at temperatures ranging from 55 to 85°F. Outside of that temperature range, they will slow down, eating and reproducing less. Therefore, you may need to feed your worm bin less often during cold winter months to make up for their decreased activity. In extreme cold or heat, they may die.
Freezing temperatures below 35°F or hot temperatures over 95°F can kill your compost worms.
However, the outdoor temperature is not the same as the internal temperature inside your worm bin! A well-maintained worm farm with fluffy, healthy bedding and castings can naturally buffer and protect itself from temperature swings (to some extent). A compost thermometer is very handy for monitoring the temperature inside the bin.
Here on the temperate Central Coast of California, our worms happily live outside year round with no added protection. Yet we have experience vermicomposting in much more challenging climates too! We’ll talk about easy ways to protect your bin from excessive heat or freezing conditions in the maintenance section to follow.

Instructions to Make a Worm Bin
1) Add Air Holes
The first step to make a worm bin is to add some air holes to your chosen container, which helps with fresh air exchange and prevents the bin from getting too hot or stagnant. Using a quarter-inch drill bit, we add a couple dozen air holes around the sides of the bin near the top. See photo below. Be sure to make the holes small enough to keep pests (e.g. rodents) out!

Should I add drainage holes to my worm bin?
No, there are NO holes in the bottom of this DIY worm bin. A well-maintained bin does not need drainage holes since it shouldn’t get overly wet. We’ll keep the moisture and consistency on point with the right balance of bedding to food (discussed in the feeding/maintenance section to follow). Plus, if you add holes in the bottom, the worms will escape the bin!
Some pre-made worm farms come with a drainage catchment, but the liquid that seeps from an overly wet bin is considered leachate, not true “worm tea” or “compost tea”. Leachate is stagnant and anaerobic (meaning without air) and lacks many of the beneficial microbes found in proper compost tea. See our guide on making aerated compost tea with worm castings to learn more.

2) Add Bedding
Next, it’s time to partially fill your DIY worm bin with “brown” bedding material such as dry leaves, shredded newspaper, cardboard, dry grass clippings, straw, and/or cardboard. The amount doesn’t need to be exact, but aim to fill the bin about a quarter full. The more fine the bedding material is, the faster the worms can break it down. For instance, it’s better to use smaller bits of cardboard instead of large chunks.
In this example, we used a mix of shredded newspaper and coco coir. I really like using coco coir bedding to start a worm bin because it’s has perfect fine fluffy consistency and excellent moisture retention. Unlike peat moss, coco coir has a neutral pH – ideal for a worm farm. See more details about using and rehydrating coco coir below.

3) Dampen Bedding
Now, lightly moisten the bedding with a modest amount of water. A happy, healthy worm compost bin should always be slightly damp but never soggy. An easy way to remember is: the ideal consistency is that of a wrung-out sponge. Start small, stir, assess, and then add more water if needed. It’s easier to add more than take it back!
Worms love damp environments, but also need air because they breathe through their skin. With too much water, they can and will drown. That’s why you see earth worms coming to the soil surface when it rains – to get air! Plus, an overly wet worm bin is how they get gross and stinky.
Rehydrating coco coir
Coco coir comes in dehydrated bricks and must be rehydrated and fluffed up before adding it to your worm bin. We already had a 10-pound brick of organic coco coir on hand, but I knew it was too much so I cut in half with a saw and only used half (or about 5 pounds for a 35-gallon bin). It would be easier to buy several smaller 1-pound bricks instead.
To rehydrate coco coir, I recommend putting it in a separate container (just in case you don’t want to use it all) and then add just a little bit of water at a time. Remember, the goal is to create damp bedding, but not sopping wet! So add some water, wait for it to absorb, then add more as needed until it’s all broken up and nicely moistened.

4) Add Worms
It is important to have your worm bin and bedding ready and waiting before your worms arrive so you can get those buggers put to bed straight away! Like any of us would be after a long road trip or flight, they’ll probably be a bit cranky upon arrival and need a snack and a nap, pronto.
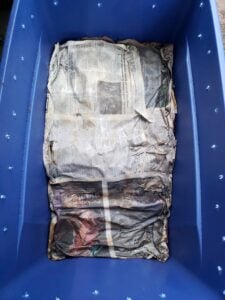
Upon arrival, dig a little hole in the damp bedding. Add some food as explained below, dump in the worms, and cover them up with more bedding. Finally, we like to add a damp layer of newspaper on top, which helps to keep them in the bin, explained more below.

Why are my worms trying to escape the bin?
When you first set up your new worm compost bin, it’s not uncommon for worms to crawl up the sides and try to get out. They’re just a little wigged out by their new environment. To help keep ‘em in and happy, their environment needs be how they like it: the right moisture level in the bin (damp but not soggy), enough of the right food to eat, and plenty dark.
A trick to help prevent worms from crawling out of a new bin is to place a few sheets of damp newspaper on top of the “soil” mound inside the bin. Go back and check the bin after a day. Ours will sometimes cluster around the lid and handle portion of the bin. Put them back under the damp newspaper.
Fast forward a couple weeks. If worms are still trying to escape from an established worm bin? That may be a signal that there’s a problem with the bin, like not enough oxygen, too much acidic food, too wet of conditions. Try fluffing up the bin with fresh bedding and/or food, or adjust the moisture level as needed.

5) Feeding a Worm Bin
Now it’s time to start feeding these hungry little babies! The right type and amount of food is key to maintaining a healthy, happy, and odorless worm compost bin. First let’s talk about about what to feed them, and then we’ll discuss amount and frequency.
When you set up a new worm bin, add just a few handfuls of food at first. Check back in a few days to see how much they’ve eaten and go from there.
What Food to Add or Avoid
Worms, believe it or not, do have some preferences in regards to their food. Certain things need to be avoided altogether – for their health and the health of the compost bin.
Things that are good or okay to put in worm compost bin include:
- Almost all fruit and veggie scraps (see the few caveats in the “no” list)
- Tender garden trimmings
- Eggshells, especially crushed or ground!
- Spent coffee grounds
- Spent loose-leaf tea or tea bags (staples removed)
- Sourdough starter discard (in moderation, since it’s wet and goopy!)
Avoid adding these things to your worm bin:
- Meat or dairy products
- Animal manure
- Citrus (it’s too acidic, we want a well-balanced neutral pH in the bin)
- Processed foods
- Moldy, rotten food
- Spicy foods (we found our worms won’t eat hot peppers or radish greens… weirdos)
- Limit amounts of bread, pasta, or other starchy foods

How Much and How Often
Under the optimal conditions, worms can eat their body weight per day! That means if you started out with 2 pounds of worms, they could theoretically eat through 2 pounds of food scraps per day. As their population grows inside the bin, they can consume even more. When it’s cold outside, they slow down and consume far less.
We prefer to feed our worm bin on a weekly basis, storing up food waste in a compost crock under the kitchen sink between feedings. The crock has a carbon filter, so it doesn’t get smelly or attract fruit flies.
I suggest to err on the conservative side. If you add more more food than your worms can eat in a reasonable amount of time, it will rot and go anaerobic instead. That will result in a stinky, gross bin… and no one wants that!
With time, you’ll learn to judge how much food your worms can eat in a week. If after a week later there is no food left at all, you can increase how much you’re giving them. Or, even introduce a mid-week snack. However, if there is a bunch of food leftover, you should scale back and feed them less quantity each week.

How to Feed a Worm Bin
- Before adding food each week, carefully stir and fluff all of the contents of the worm bin to introduce air, assess how much food they’ve eaten since last week, and generally check the condition of the bin.
- To add food, gently dig a hole in the bedding, put food into the hole, and then cover it back up. It’s always good to bury the food in your worm farm by at least a couple inches of bedding, which helps the worms find it more quickly and reduces odors or flies.
- You don’t have to cut up food into smaller bits, but it does help them break it down faster! I suggest cutting up large chunks of really dense material, like the butt end of a cabbage.
- In an established worm farm, it is best practice to add a handful of “browns” (bedding) each time you add more food scraps, or at least once every other week. The dry browns help to offset the higher nitrogen and moisture content of the “greens” – the food or garden waste. This is essential in keeping a well-balanced, healthy bin that doesn’t get stinky and gross! For ease, we always keep a bucket of dry leaves or shredded newspaper nearby.
A nasty-smelling worm bin is usually the result of too much food, too little browns, too much moisture, and too little air.


General Maintenance
Thankfully, worm farms are pretty fuss-free once you get the hang of them. The main task is to keep them routinely fluffed and fed. Yet it is important to keep an eye on the moisture content as well as extreme temperatures to keep your worms safe and happy.
Moisture and air
In addition to the right balance of food to bedding, the key to maintaining a healthy, pleasant-smelling, biologically-active worm bin is the right amount of air and moisture. Remember, the goal is damp but never soggy.
Fluff and stir the bin weekly (or every other week) to break up big clumps and introduce air before adding new food or bedding. Beneficial microbes also enjoy aerobic environments.
If your bin seems soggy and stinky, stir in more shredded newspaper, leaves, cardboard bits, or other fresh brown material throughout the entire bin to help absorb the moisture.
If the bin seems too dry on the other hand, give it a light shower with the hose or watering can – but go easy! Start small, stir, assess, and then water. You can always add more water if needed, but it’s more difficult to dry out an overly wet bin if you overdo it.

Worm bins in the winter
Worms bins need to be protected from freezing, and they also vastly reduce their activity in cold conditions. If temperatures below 32°F are the norm for you during winter, plan accordingly. Can you permanently locate or move your worm bin inside a garage, shed, laundry room, or other spare space to help protect them?
When we lived in an apartment in Providence, Rhode Island (brrrr), our worm farm lived outside our door in a shared uninsulated stairwell. It got *almost* as cold as outside, which was single digits in the winter! We wrapped the bin in a large fleece blanket to help insulate it. Wool blankets would be even better.
You can also help insulate the bin with deep mulch inside the bin, such as a layer of cardboard plus a lot of leaves on top. Ours weren’t all that active in the Rhode Island winters, but they survived. Our new homestead has an occasional hard freeze and we often forget to protect them at all. They’re tough little guys.
Worm bins in the summer
Temperatures over 95F can also kill worms. In the heat of the summer, definitely keep your worms in a shady spot with good airflow. If it’s crazy hot out, can you move the bin inside to a more cool location? Keep your worm bin away from radiant heat sources, like a hot south-facing wall.
If you can’t move your bin to a cooler location, and it’s projected be over 95°F, the following measures can help keep a worm bin cooler:
- Putting ice cubes or blocks of ice on top.
- Place a frozen bottle of water (wrapped in newspaper) down inside the bedding.
- Stir and fluff the bin to release some heat, then place damp sheets of newspaper, cardboard, brown paper bags, or burlap on top to cover the bedding and worms, and leave the lid off a for a little while.
All that said, we kept a worm compost bin for years while we lived in Chico, CA where summer temperatures were regularly over 100°F and occasionally over 110°F! We lost the worms only once in a prolonged heat wave. Other times, some died but some lived, so the population bounced back once the weather improved. Back then, I didn’t do many of the intervention techniques I just described. I was a busy, distracted college student – and the worms did okay. Try not to stress about it too much!
If you’re worried about temperature extremes, keep in mind that worm bins are perfectly fine to keep indoors year-round. An Instagram follower once told me she hid a worm bin under her kitchen sink for over 6 months before her nay-saying husband even noticed. Back in Chico, my environmental studies department had a worm bin right in the office. Worms make very well-behaved office pets!

We have just covered are all the key elements you need to make and maintain a simple worm compost bin! I’m sure you’re curious… what about actually using the compost though?
How to Harvest Worm Castings
Once you’ve had your bin up and running for a few months, you can start harvesting small amounts of finished compost – worm castings! With time, you can gradually harvest more and more as your population grows and they start turning more of the bin over. We add worm castings to every planting hole when transplanting seedlings outside, and the plants love it!
Here is our guide on how to harvest worm castings from a worm farm. In short, we feed the worms on just one side of the bin for several weeks so they will migrate there. Then we can harvest the castings from the opposite side of the bin, getting as few worms as possible. Finally, we sift the castings with a DIY screen to catch any large chunks (or worms) and toss them back into the bin.

Demonstration video: setting up a new worm bin
That is how we vermicompost.
It’s simple, it’s fun, and it’s effective! I hope you find this tutorial to be the same, and feel ready to start your own worm bin at home. Feel free to ask questions in the comments below, and happy composting!
Don’t miss these related articles:
- How to Make Actively Aerated Compost Tea to Fertilize Your Garden
- How to Build a 3 Bay Compost Bin: Step-by-Step Guide with Photos
- Hugelkultur: A Natural, Cheap Way to Make or Fill Garden Beds
- Companion Planting 101 (w/ Garden Companion Planting Chart)
- How to Practice Crop Rotation (Benefits Explained)

How to Make a Worm Compost Bin (Worm Farm)
Equipment
- A simple bin with a solid lid, such as a large durable plastic storage tote. 20-50 gallons recommended, durable/heavy duty and not transparent
- Dry bedding material, such as shredded newspaper, coco coir, dry leaves, grass clippings, shredded cardboard, brown paper bags, or straw. enough to fill about the bottom 1/4 of the bin
- Compost worms. I start with 1,000-2,000 worms (one to two pounds) for a 35 gallon worm bin
- Grit or dirt just a few handfuls
- Food or garden scraps
- Recommended: a drill and 1/4" bit to add air holes to the bin
Instructions
Making a New Worm Bin
- Add a couple dozen small air holes to the side walls of the bin near the top. We use a 1/4" drill bit. Do NOT add "drainage" holes to the bottom.

- Fill the bottom quarter of the bin with brown/dry bedding material of choice. We like to use a mix of shredded newspaper and coco coir – which comes in brick form and needs to be rehydrated and fluffed first. Use about 5 pounds of coco coir bricks for a 35 gallon bin. (Don't overwet the coir, damp is good – not soggy)

- Lightly moisten the bedding in the worm bin. Worms like damp environments, but not sopping wet – they breathe through their skin and can drown! Too wet of a worm bin also makes it stink.

- Add compost worms. Dig a hole in the bedding, add the worms, then bury them.

- Tip: the worms may try to escape the bin at first. Cover the material in the bin with a layer of damp newspaper or brown paper bags to help keep them in, and check the bin every day or two. Collect worms that have gathered around the lid or walls and put them back inside the bedding.
- Add a small amount of food right away. See "yes" and "no" list for food and routine feeding tips below.


Feeding a Worm Bin
- Each time you feed the worm bin, dig a small hole and bury the food by at least a couple inches of bedding.

- Good food for worm bins include most fruit and vegetable scraps, crushed eggshells, spent coffee grounds, loose leaf tea or paper tea bags (staple removed) and tender garden trimmings. Avoid dairy, meat, processed or moldy/rotten foods, citrus (too acidic) or animal manure, and limit starchy foods, grains or bread.
- Under ideal conditions, worms can eat their body weight in a day (so 1 pound of worms can eat 1 pound of food waste). Yet they slow down during cool conditions, so err on the conservative side. We prefer to feed our worm bin weekly. You'll learn with time how much your worms can eat in a week. If you add too much food before they can eat it, it will rot and stink.

- Before adding food each week, carefully stir and fluff all of the contents of the worm bin to introduce air, assess how much food they’ve eaten since last week, and generally check the condition of the bin.
- In an established worm farm, it is best practice to add a handful of “browns” (bedding) each time you add more food scraps, or at least once every other week.
- Cutting or breaking up large chunks of food will help the worms break it down faster.
- See the full written blogpost for more ongoing maintenance tips, including how to keep your bin the right moisture level, and how to protect it during extreme heat or freezing.


Notes


180 Comments
Savanna
Hi!! We started our first worm compost bin after watching your videos. We ordered our little guys from the same place as you all as well. We put them in their new home two weeks ago and put the newspaper on top as you said. Two weeks later and we still have a TON of worms trying to get out. And they don’t seem to be eating their food but somehow are very lively still 🙁 we have done everything almost exactly the way you guys did but are wondering if there’s something you could think of were missing ? :/ should they still be trying to escape? And not eating? we have them in a room that stays around 65 degrees. Hoping you can shed some light – we don’t want to lose any little guys!! Thanks so much!!
Aaron (Mr. DeannaCat)
Hello Savanna, is the worm bin too wet? Don’t worry about how quickly they are eating or not but don’t keep giving them food if they aren’t eating it all between feedings. We got down a schedule of feeding them once a week and that was usually enough time and material for them to make before subsequent feedings. Just make sure you aren’t overfeeding them, the bin isn’t too wet, and keep them in the bin with paper on top. Things should normalize some after that and or with time. Hope that helps and good luck!
Camila Simões
Hello guys!
I’ve been vermicomposting (with your method) and I have come across a problem. I’ve been feeding coffee grounds to my worms and they have started to escape the bin. I’m not sure if it is because it’s too acidic because I put a pH regulator and I wouldn’t say the bin has a strong smell. So I was thinking that perhaps it’s because I should feed them more since coffee grounds are easier to break down I suppose (so maybe I should feed them twice instead of once a week?). I’m doing this for a biology class experiment and for its purpose I can’t feed them anything else.
Any advice you guys could give me? Do you think it’s possible that they are escaping because I don’t feed them enough?
Thank you for your time and for your incredibly helpful videos and posts 🙂
Aaron (Mr. DeannaCat)
Hello Camila, is your worm bin too wet? We make coffee with a french press and the remaining coffee grounds are usually fairly wet. We have found that when adding coffee grounds to a worm bin it is best if they are more on the dry side or else your bin is at a greater risk of becoming too wet which will make the worms search for a different home. On average, worms will eat their weight in food per day, If you have an idea of how many pounds of worms you started with, you should shoot for about that weight in coffee grounds. Let us know if you have any more questions.
Camila Simões
Thank you so much! I will see if it’s the moisture that is causing the problem or if I’m just not feeding them enough.
Thanks again for your quick reply. Have a great day!
Lynette Bailey
Hey yall, I have had a worm bin for almost a year as we live on a lake here in Louisiana and got tired of buying worms for fishing. I am so glad I watched your video because the video i watched to make my bed {not yours unfortunately} said to drill the holes in the bottom and place another tub underneath to catch the drippings. I have lost so many worms this way! I will be making a new bin today and ordered my worms already. I have never taken any soil out of the one I have now, but planning to do that after I watch your next video on how to do that. I did get ants in my bin at one time. I put food grade diatomaceous earth in not knowing if I should but the ants were bad. Would you have any insight on this and maybe how to keep ants out? Also, I find the big white ugly worms in there wine feeding sometimes. I would appreciate any feedback you have. By the way, because of finding you on instagram, I am growing many vegetables that I never have before. I am so excited about my garlic that will be ready to pick sometime in June. Thanks again!
Aaron (Mr. DeannaCat)
Hello Lynette, that is great to hear that you are expanding the types of vegetables that you grow and hopefully vermicompost will help your veggies out as well as your fishing excursions. Ants are tough to deal with because they usually go where they choose to, sprinkling DE in and around your worm bin is a good start. We have had ants in our worm bin on occasion throughout the years and they usually move on to a new place with time. As far as the white worms in your bin, we mostly get potworms on occasion but they are very small. You may be seeing beetle larvae if they are fat or large in size… I would suggest making sure your worm bin is secure from pests by making sure you have a tight fitting lid to reduce the amount of outside activity entering into your bin. Hope that helps and good luck!
Janelle
Love your website and videos. I started looking into this because I’ve started growing microgreens in soil. The waste product is roots all tangled up in a one inch layer of soil. Instead of throwing this out, I wondered if this would be good material to feed worms. I haven’t really found anyone else talking about this. I’m sure the roots and leftover stems would be great for the worms, but would all the extra soil be okay to add to their bin each week?
Aaron (Mr. DeannaCat)
Hello Janelle, that shouldn’t be a problem though you may have to monitor how quickly the worms go through the material and be sure not to overload them with food. Breaking the sheet of roots/soil into smaller pieces would also be beneficial in aiding the breakdown of the material. The worms will handle the soil just fine as they will consume it and turn it into castings. Good luck!
Sherice Potter
Hi Guys!
I started worm composting when the VID hit and I got sent home in mid march. I was reading a homesteading book and they were talking about this and I was like, I have a worm composting system downstairs. I
Hauled it up and got to worm composting!!!
I use the 360 worm composting bin setup (bc I won it like 10+ yrs ago on some blog and it had been sitting downstairs all these years. I believe everything has perfect timing and it’s when you are able to understand and utilize the information!)
I love my worms, My family teases me but they like them too!
I fed my worms moldy food last summer only a few days old in the worm chow bucket and that’s the only time I’ve ever seen a massive worm ball all over the food not just the underside, and they had moved it to the center of their bin instead of in the food corner! so I do feed mine moldy food once in a while and they seem to really like it, Interesting little creatures for sure!!
cheers!
Emily Taylor
I am very interested in vermicomposting.
I know you mentioned that a little goes a long way for worm castings. Can you tell me how many pounds of red wigglers approximately I would need to get enough worm castings for 3 raised beds that are 6 x 8 ? Thanks
Aaron (Mr. DeannaCat)
Hello Emily, you can start off with a small amount of worms and if given enough space and food, they will repopulate themselves rather quickly. I would also suggest starting the worm bin in a 30 to 50 gallon container which should allow for enough space to create vermicompost for those sized beds. How & Why to Make Actively Aerated Compost Tea to Feed Your Garden will also make your castings go ‘further” by using a handful of castings for a tea that can be applied over a larger area. Hope that helps and good luck!
LC
hey Deanna, thank you for this post! I’ve had my worm bin set up for about 3 months now. I followed your instructions to setup the worm bin bedding throwing in some soil from the outside. I just started with this gardening stuff so I didn’t realized that the “soil” I was adding was actually contaminated with weed seeds. is there any way to realistically separate the castings from the bad soil or would i have to start a new bin and just cut my losses?
Aaron (Mr. DeannaCat)
Hi LC, it’s really up to you. Usually if we add squash or tomatoes to our bin, the seeds will germinate inside the worm bin itself where it is then turned back into worm food. We also try to add somewhat quality compost or soil into the worm bin since it is going to be food for our garden. Hope that helps and good luck!
Jimena
Hello Deanna and Aaron,
First of all, thank you for creating this space, it’s so full of super useful tips for things I’ve always wanted to do, and things I didn’t even know that existed!
Last week I did a worm bin following your instructions the best way I could, and yesterday I received my worms!
I tucked them in as soon as they arrived, and checked on them later that afternoon and today. They haven’t moved, they are moving around the food, just expanded a bit from where I placed them. I guess that could be a good sign, right?
However, this morning I noticed a bit of mold on the pieces of paper that are on the surface. I tried to use non-bleached paper but I didn’t have newspapers (getting more and more uncommon here). It had been without mold for some days before the worms, but I think it was because of the paper I put to cover them (this one was “bleached” paper). Maybe it doesn’t breathe as it should.
Anyway, I removed the paper and left it just like that, hours later the worms are still there. But I am concerned about the mold. Is it harmful? Is there something I can do? I’ve tried to remove the moldy papers but it’s still there!
Thank you in any case, love your blog!!!
Jimena
Aaron (Mr. DeannaCat)
Hello Jimena, thanks for reading and we appreciate the kind words. Your worm bin shouldn’t get moldy from the paper, we have found if the food isn’t covered by soil/compost/or castings it will mold but I am unsure of why the paper itself was moldy? Look for a local free newspaper that is released on a weekly basis that can usually be found outside cafe’s, grocery stores etc. they are normally bleach free as well. Also try shredding the paper and it will break down and breathe better. Be sure that your worm bin also has holes drilled into it towards the top of the bin so the bin itself will be able to breathe easier with more air flow. Hope that helps and good luck!
Jana
Hi Deanna,
I found your site earlier this year and it has been so helpful. Thank you!
We decided to get a worm bin going and followed your instructions to a T. This was 4 months ago. We are obsessed with them and check on them every day.
Things were going great, but a few weeks ago I could barely find a single worm in the bin. I was devastated! The bin smells like good compost, we feed them blended veggie scraps and eggshells twice a week and I don’t know what happened. I’ve never just turned the bin out so maybe they were hiding in the corners? Well, that issue has resolved itself as I find that every day there are about 20 worms of various sizes on the bottom of the lid (it’s always moist) and upper sides trying to escape. What are we doing wrong that they all want to leave?
We’re in a mild climate (Seattle). Is moisture on the underside of our bin a bad thing?
Thank you for reading my long message. 🙂
Aaron (Mr. DeannaCat)
Hello Jana, usually worms will try to leave the bin if its too wet, acidic or anaerobic, too much food or not enough food, but usually something about the environment is off. I would suggest that you mix your worm bin on occasion to aerate the material and make sure there aren’t any wet or anaerobic pockets within your bin. We find worms on our lid on occasion but it isn’t usually a mass exodus. As long as you get the environment in check, the few worms you have left over will be able to repopulate themselves with time. Good luck!
Grace
Hi D,
Thank you for this amazing blog and video. I have followed your instructions exactly and the worms are in! I accidentally added too much water to the Coco coir so I had to add in a heap load of newspaper to get the right dampness. If they only sit on the surface of the bedding does that mean I don’t need to make the bedding so deep? Now that I added extra newspaper, there is more in the box than I anticipated. Hope that makes sense and thank you again for this informative blog and video.
Grace
Aaron (Mr. DeannaCat)
Hello Grace, as long as your bin isn’t overflowing with the material you should be fine. Just keep an eye on the bedding material and make sure it doesn’t revert back to being too wet which will lead to anaerobic conditions. With the extra material in the bin it will just take the worms longer to process it into castings so you may have to wait awhile before using their castings. All in all you should be just fine. Thanks for reading and good luck!
Lauren
Hey Deanna & Aaron!
Thanks so much for all your info (on every topic!!)
I really want to start a worm bin but current don’t have a constant “brown” supply. Our yard doesn’t produce many leaves or pine needles and we don’t get the newspaper. Do you have any suggestions for getting shredded newspapers/phone books/etc?
Thanks!
Lauren
Aaron (Mr. DeannaCat)
Hello Lauren, we struggle with the same problem since many trees around here are evergreen. The best supply of “browns” I have found is your free local newspaper publications that typically offer one issue per week and can be found outside grocery stores, coffee shops, book stores etc. Though I am unsure of what is available in your location, there should be something similar. Good luck!
Pam
Hey friends,
My easy source of browns is the processed foods that we still eat… that is, the boxes they come in!
Pizza boxes, cereal boxes, pasta or crackers boxes, etc. There’s also junk mail. And shipping boxes, if you’re an amazon shopper.
Pizza boxes are the easiest, I use them to line the bottom and also serve as a loose inside “lid”.
Junk mail, avoid glossy pages.
Other boxes, I discovered that the printing is done on a thin layer that could be removed to reveal just the brown cardboard underneath, if you want to go a little extra 🙂
I do realize that I made the mistake of putting in too much starch, now that I am reviewing this. The rice is getting moldy, sadface. I just re read long time vermicomposter Bentley’s blog and I see that he recommends avoiding starch in the beginning altogether, oops.
Thanks for your tips!
Molly
Thanks for always posting useful content — I always learn so much from your blog and ig account!
I started a worm bin this year and the worms are doing great – eating lots and multiplying – but I also see lots of little white mites. I don’t know where they came from, but also don’t know if I need to get rid of them or how. It doesn’t seem like my bin is too wet, if that helps. After a Google search, it looks like I could put the bin uncovered in the sun for a bit, but it’s below freezing here so I don’t think that’s an option. Any suggestions or advice? Thank you!!
Aaron (Mr. DeannaCat)
Hello Molly, thank you so much for being a part of the community! I believe you are referring to the common white springtail. They are mostly harmless and can be found in worm bins from time to time. I would suggest cutting down on the amount of food that you are giving to your worms and/or make sure that the food isn’t too wet along with the rest of the worm bedding. Allowing the material to dry out somewhat should cut down on the population of springtails. Hope that helps and good luck!