

Potting Up Seedlings: What, Why, When & How
Come learn everything you need to know about potting up seedlings – including tips on when, why, and how to pot up vegetable, herb or flower seedlings. Potting up is a simple but essential step for success when starting seeds indoors or in containers! Chances are, you’ll likely need to repot seedlings at least once (maybe twice) before they get transplanted into the garden. With these tips, your seedlings will grow as healthy, happy, and large as possible.
I’ve also included a demonstration video at the end of this post that shows our process for repotting tomato and cucumber seedlings.

Would you like to save this?
Disclosure: Homestead and Chill is reader-supported. When you purchase through links on our site, we may earn an affiliate commission.
What is “Potting Up”?
Potting up means the act of transplanting seedlings “up” into larger containers than they were previously living in.
Seedlings are usually potted up into a slightly richer potting soil than they were started in. Sometimes, seedling are also thinned (gently separated or teased apart) in the process, and then individually potted into larger containers.
Keep in mind that once you do repot seedlings, the plants and containers will take up more space under your indoor grow lights – so plan accordingly!


The Importance of Potting Up
Potting up seedlings as they grow helps them grow faster, healthier, larger, prevents stress or stunting, and generally live their best life.
- Potting up seedlings into larger containers prevents root-binding. A plant is “root bound” when it’s roots run out of space to grow, so they begin to wind in a tangled circle around themselves. While you can sometimes very gently loosen the roots, severe root-binding can also cause permanent stunting and damage to a plant – even after it’s transplanted outdoors.
- Potting up promotes better (even) water retention and prevents seedlings from accidentally drying out. As seedlings grow larger, they drink more water and thus dry out more quickly. You’ll notice that a 6-pack of tiny seedlings needs water far less often than the same size 6-pack full of large, thirsty seedlings.
- Repotting also feeds the seedlings by offering new richer soil. Fluffy seed starting mix is ideal for germinating seeds, but is fairly devoid of nutrients. Within a few weeks of sprouting, your seedling’s growth may begin to stall out. The plants will appreciate a slightly richer soil now, and/or an occasional water with dilute seaweed extract for added nutrients.

When to Pot Up Seedlings
There is no hard-and-fast rule as to when to repot seedlings. In general, it’s time to pot up once the seedlings have outgrown their current container, which could be within two to six weeks after sprouting.
The exact time depends on a number of factors including the plant type and size, current container, and when you intend to transplant the seedlings outside for good. When in doubt, it’s better to pot up early than wait too long!
- The smaller the container or cells they’re started in, the sooner seedlings will need to be potted up. Plants will feel cramped and overgrown in those fairly quickly.
- Large, fast-growing vegetables like tomatoes or squash will outgrow their container more quickly than something smaller like herbs or lettuce started in the same size pots.
- Check the roots. If a lot of roots are growing out of the bottom drainage holes, it may be time to pot up soon – though few poking through is normal! If you gently lift the entire root ball out of the container and they’re growing in a circle around themselves, it’s time.
- Monitor plant growth and health. Is the seedling still steadily growing? Does the color look good? If it seems to stop growing or turn yellow, it’s probably time.
- When do you intend to transplant seedlings outdoors? If it’s next week or two, then don’t bother potting up! (That is, unless they’re getting really overgrown and bound, then it might be worth it.) Yet, if the seedlings are cramped in their containers and will still be inside for several more weeks, pot those babies up.

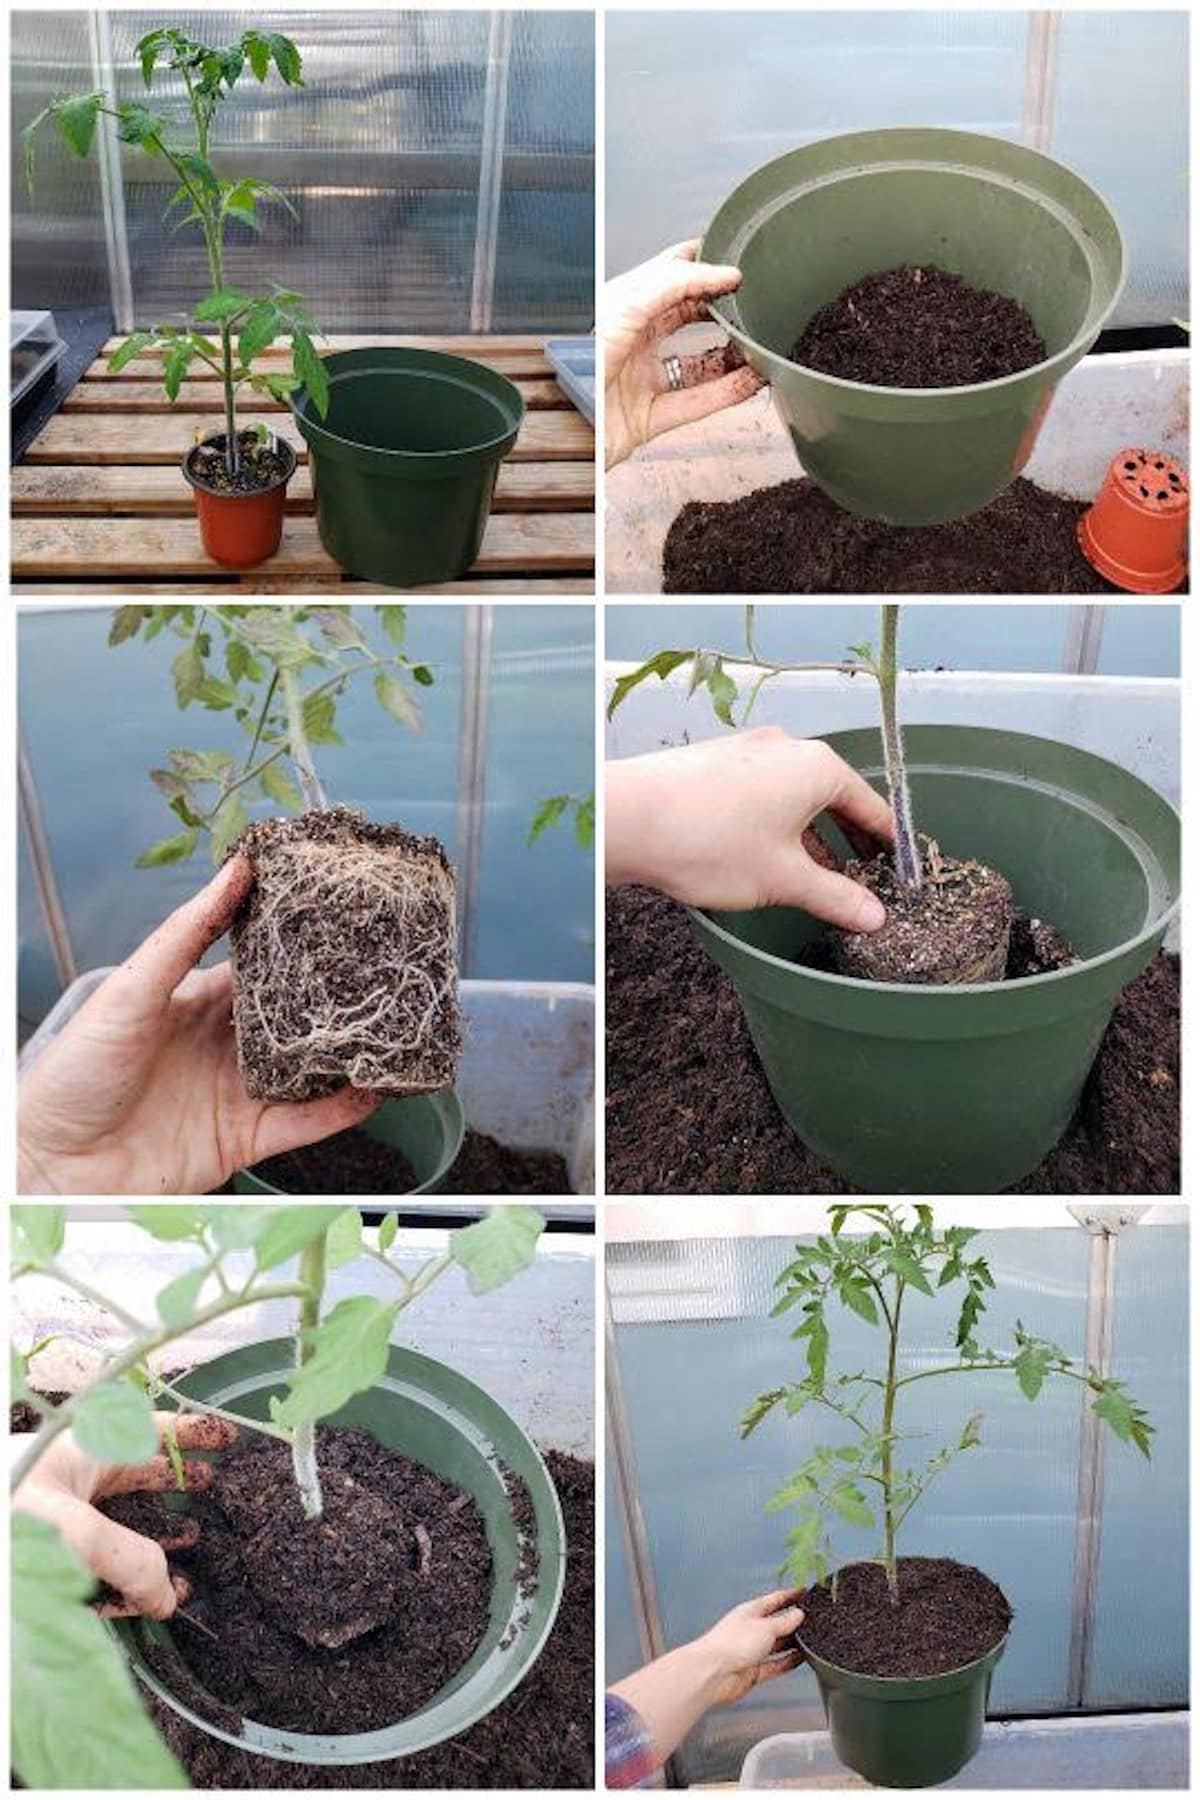
How to Pot Up Seedlings
- Pot up into new containers that are slightly bigger than the current size. About twice as large is a good goal – where the rootball will have more room both below and around the sides. (If you started in very tiny cells, you could pot up to more than twice as large, reducing the need to do it again soon.) Don’t go too big however, as it can lead to moisture issues and rot.
- Add a little soil into the bottom of the new container. We like to lightly pre-moisten the soil to reduce sinking and settling later. See soil options and my neat trick for making the perfect size hole below!
- Gently ease the seedling out of the smaller container without pulling on the stem itself. Place the entire root and soil mass in the new container, and then fill around the sides with the fresh soil. Lightly press or pat down as needed, but avoid compacting the soil or root area.
- No, you don’t need to break up the roots when repotting seedlings! Gently teasing roots is recommended for very root-bound plants (especially larger shrubs, trees, or perennials), but otherwise can stunt or shock some tender annual vegetable seedlings. When in doubt, leave the roots alone or only very gently loosen them. Do not cut or rip. Squash, melons, peas, beans, corn and cucumber have especially sensitive roots so avoid teasing those at all.
- If you have tall, leggy seedlings you can bury a small portion of the stem when potting up. Some plants like tomatoes, peppers, and eggplant will even grow new roots off the buried stem! However, I don’t recommend this if the seedlings are less than a few weeks old. They’re still too tender and may rot.
- Finally, provide light water. We prefer to water from below, allowing the soil to soak up water from the tray beneath it.
Best Soil for Potting Up
When potting up fairly large, established seedlings with a decent root ball (like the tomato in this example) we use a high-quality organic potting soil, straight from the bag. Potting soil is more dense and rich (and often contains mild fertilizer) than the seed starting mix it was previously growing in. At this stage in maturity, the seedlings will appreciate the additional nutrients!
However, if you’re repotting very small, less established seedlings (under 2 inches tall) that have thin fragile roots and no solid formed root ball, they will do best in lighter soil. In that case, mix 60% organic potting soil and 40% of your favorite seed starting mix. That way, the tender roots meet less resistance when they’re trying to grow.

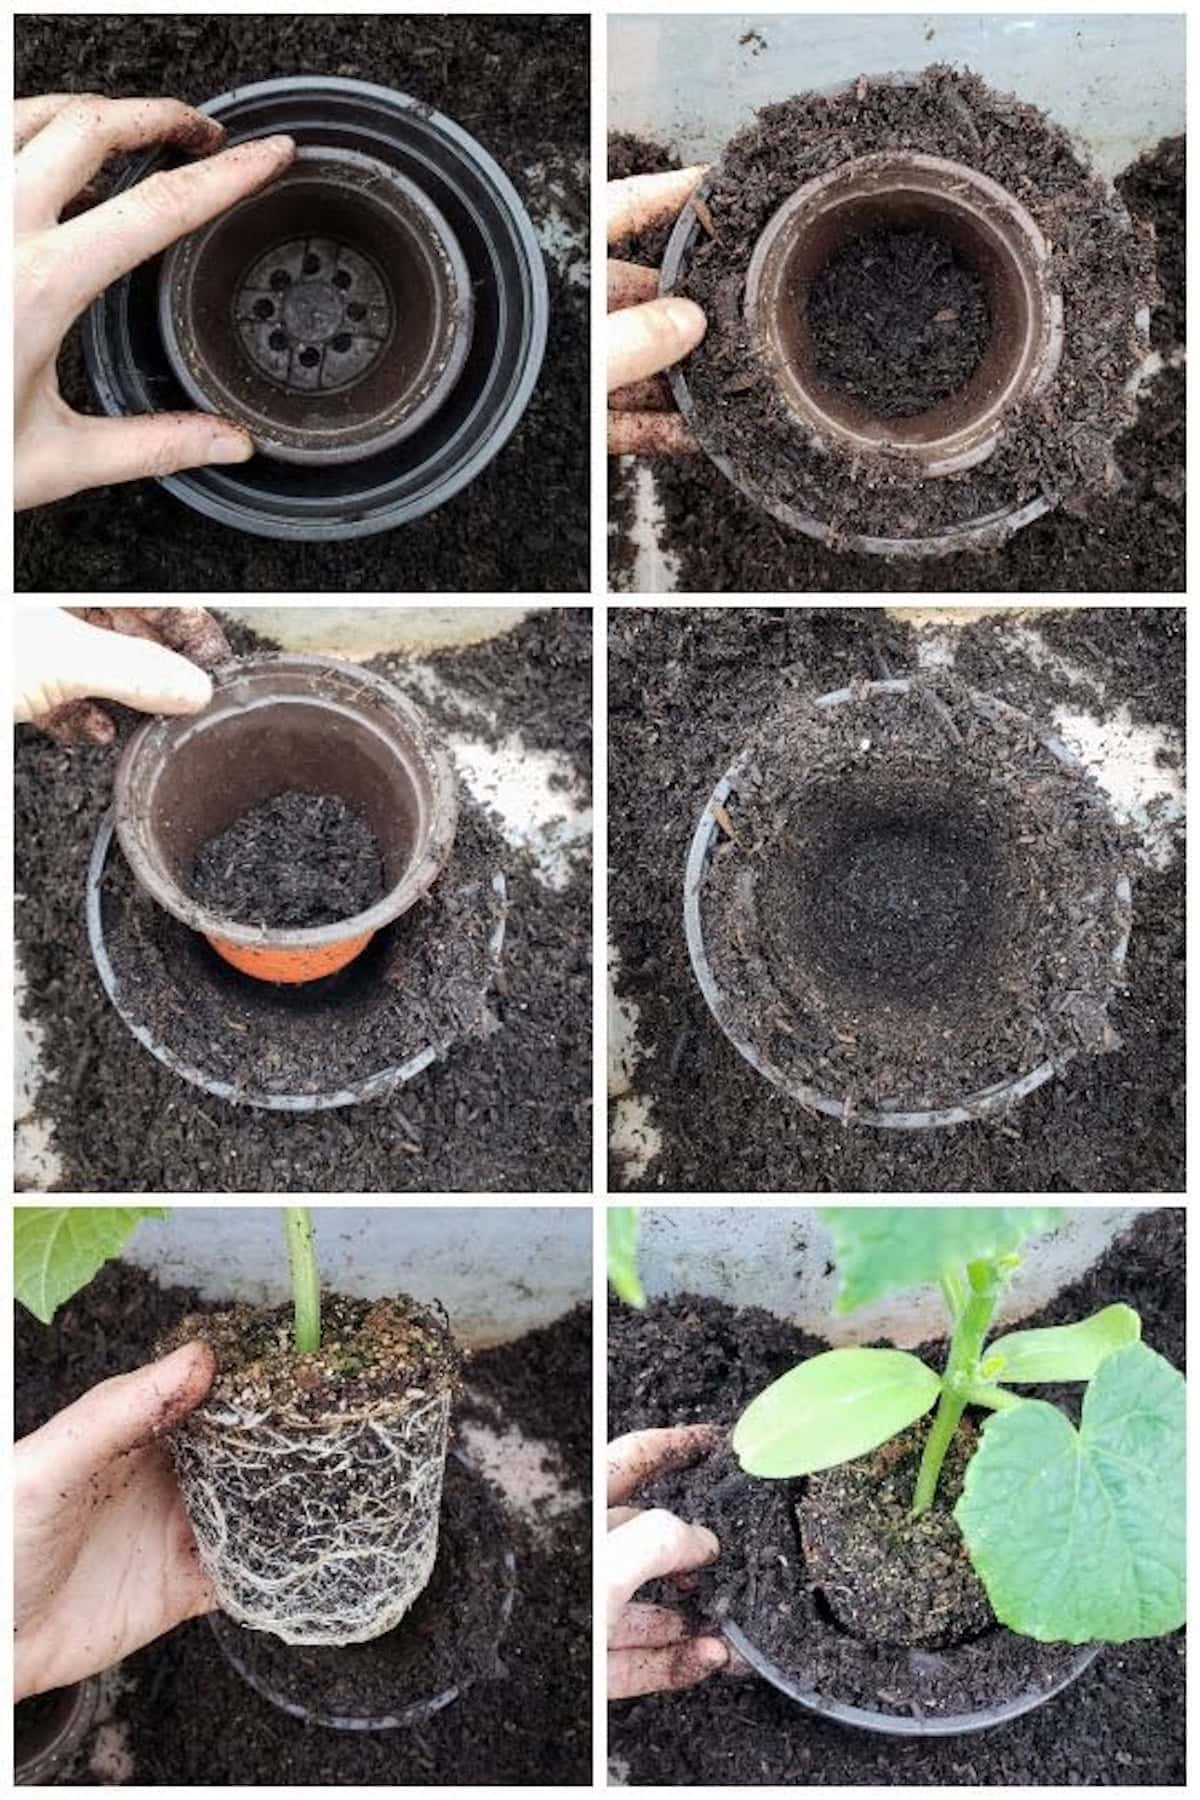
A Neat Potting Up Trick
Check out this easy way to create the perfect size hole for potting up – which we also use when we’re planting big, heavy plants like shrubs or small trees in to pots! The idea is to make a dummy hole, or a placeholder for the root ball, inside the container that the plant is being transferred in to. This trick works best with pre-moistened soil.
- Fill the new, larger container with the amount of soil you estimate should go below the plant.
- Next, set the plants current container down inside the larger one. You can use an empty/extra one (if you have another of the same size) or the potted plant itself. Is it at the right level? Keep in mind things usually sink down a little after time and watering.
- Now lightly pack soil in around the outside of the inner pot, creating a nest of soil.
- Finally, pull out the dummy container, and gently ease the plant out and into its new perfectly-sized hole!
Planning to Reduce Potting Up
If you plan in advance, you can start certain vegetables, herbs, and flowers in appropriate size containers that reduces the need or urgency to pot up. Since I personally do not love the chore of potting up, I prefer to start my seeds in larger containers that don’t require potting up as quickly (or at all, depending on the seedling type).
For instance, I never use those tiny 72-cell seed starting trays, which need to be potted up within a couple weeks after germination. Instead, we use a combination of larger cell 6-packs and mini pots when starting seeds indoors.
I start the vast majority of our seedlings (flowers, brassicas, and leafy greens) in large 2″ cell trays, where they can happily live for 4-5 weeks and not need potting up at all. Then we start larger, fast-growing seedlings like tomatoes, eggplant and cucumber in smaller round 4″ pots, and then pot up to 6″ pots and 8″ pots after a few weeks. We start our summer squash in 6″ pots and then transplant outside within a few weeks (no potting up) since squash don’t like their roots disturbed.

Ongoing Seedling Care
A week or so after potting up, the seedlings may appreciate some dilute seaweed extract as a very gentle fertilizer. We sometimes also feed our transplants with a fresh aloe vera soil drench, either alone or mixed along with seaweed. Aloe vera reduces the risk of transplant shock, and encourages robust new root development!
See more tips about ongoing seedling care in our Beginner’s Guide on Starting Seeds Indoors – including tips about hardening off, transplanting, and more!

That’s really all there is to it.
The freshly transplanted seedlings can now live happily in their new spot for several weeks, until they move in to their forever home – your garden. Don’t forget to harden off indoor seedlings before transplanting outside to prevent damage and transplant shock!
You may also like:
- 7 Useful Seed Starting Supplies for Success Indoors
- When to Start Seeds Indoors: Planting Calendars for Every Zone
- Garden Companion Planting Chart, Plans, and Benefits
- How to Plant Tomatoes: When, How Deep, Fertilizer, Pots & More
Here’s a little demo video:
Check out our YouTube Channel for more video


21 Comments
Leticia E. Anaya
Hello, Deanna and Aaron. Do you have a recommendation for high-quality organic potting soil?
Aaron (Mr. DeannaCat)
Hi Leticia, if you are looking for potting soil to pot up your seedlings, Gardner and Bloome’s or E.B. Stone’s Potting Soil will work and are likely the most accessible. Hope that helps and reach out if you have any other questions!