

How to Grow Turmeric: A Complete Guide with Photos

Come learn how to grow turmeric: a beautiful, fun and unique superfood! While it’s not the most common crop for home gardeners, it’s actually quite easy to grow – especially if you live in a temperate climate. With a few adaptations, you can successfully grow turmeric in colder zones too!
This guide covers everything you need to know: where to get turmeric “seed”, tips for starting indoors or growing turmeric in pots, soil prep, planting instructions, ongoing care, harvesting and more. I also share some of our favorite ways to use it in the kitchen, like our delicious golden milk recipe or homemade fire cider.
We’ve been growing turmeric for over 10 years! I can’t wait for you to give it a try too.
NOTE: This post was originally published in September 2019 but significantly updated since.

Would you like to save this?
About Turmeric
Turmeric (Curcuma longa) is a tropical perennial herb native to Southeast Asia. It’s closely related to ginger, so many of these growing tips can apply to ginger too!
Turmeric is a popular culinary spice that’s used fresh or dried (as turmeric powder) in a wide variety of dishes including curries, soup, stew, marinades, rice, vegetable dishes and more.
In addition to infusing the meal with its beautiful bright golden-orange color and earthy, mildly spicy flavor, turmeric also adds a wealth of nutrients!
Health Benefits
Turmeric powder, nutritional supplements, or other edible extracts are made from the rhizome – where most of the plant’s flavor, color, and nutrients are stored. The rhizomes also contain the most important active ingredient in turmeric: curcumin.
Thousands of scientific studies show that curcumin is one of the most beneficial medicinal herb compounds in existence! With its strong anti-inflammatory and antioxidant properties, curcumin has been proven to reduce inflammation, improve memory, prevent and slow cancer development, boost antioxidant activity, regulate blood pressure, and more.

How Does Turmeric Grow?
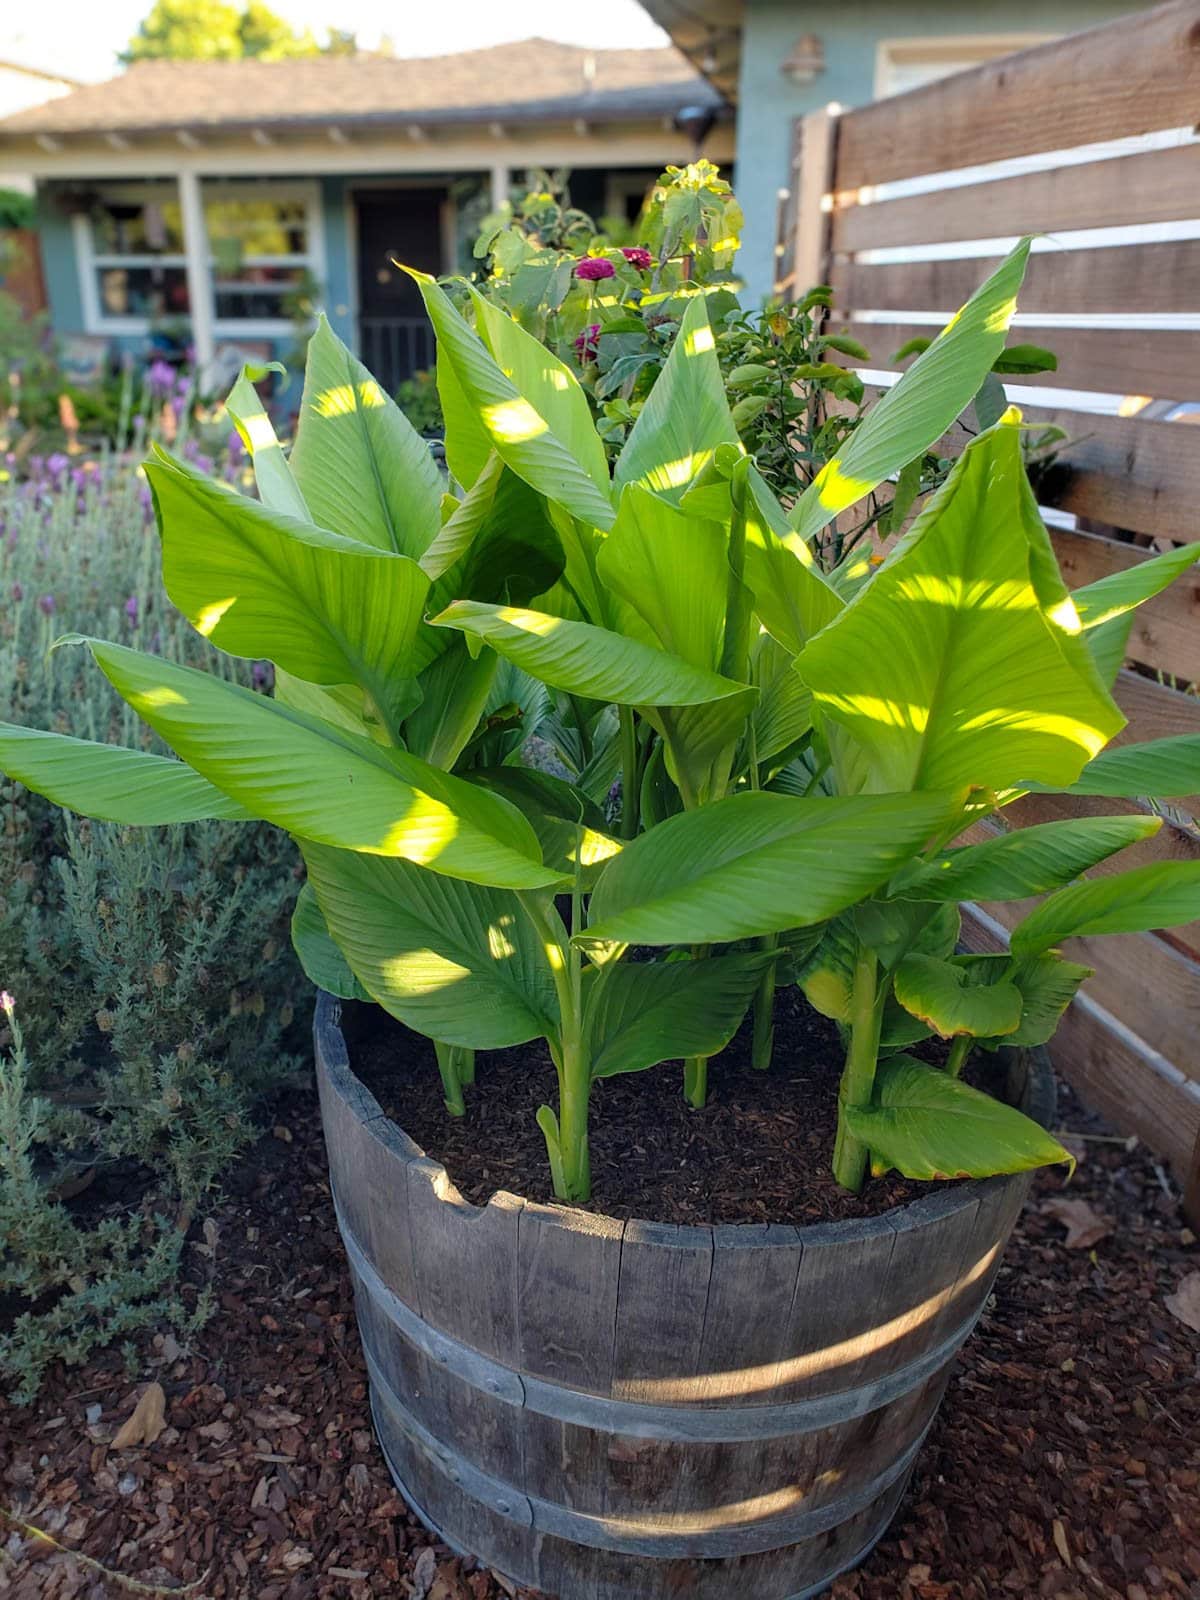
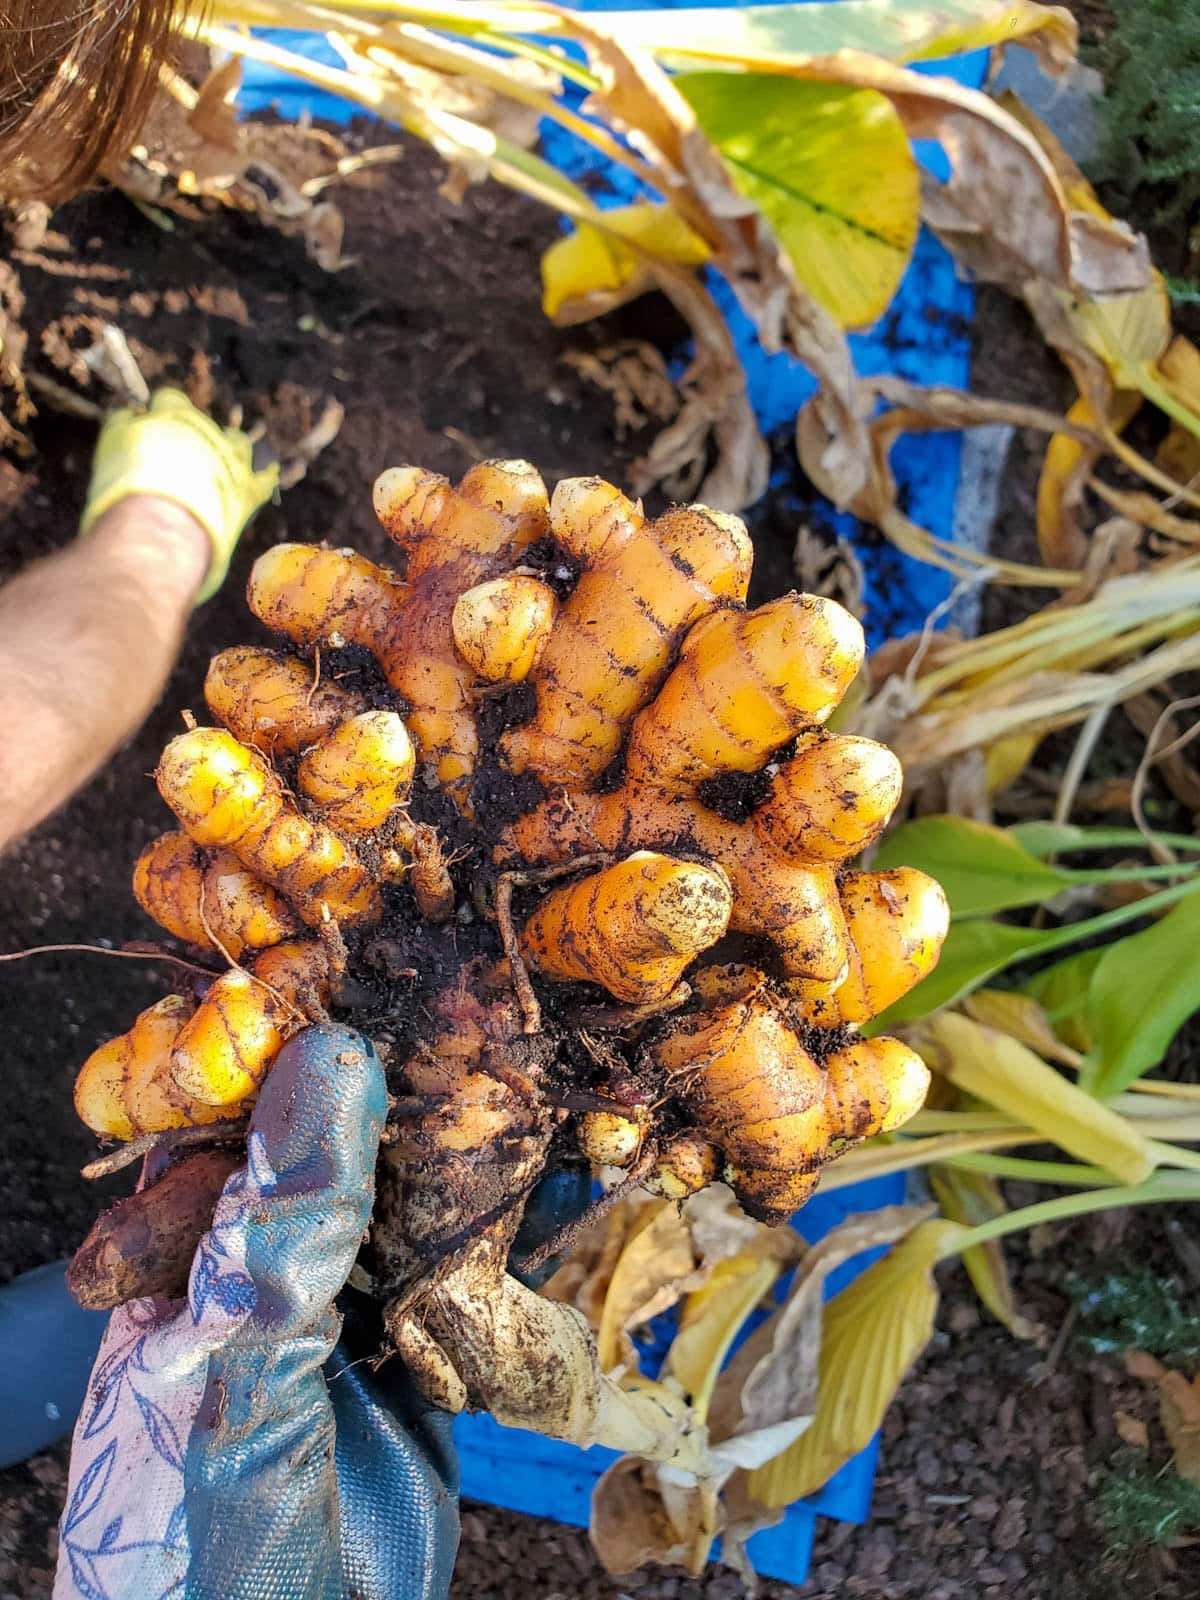
Turmeric grows lush foliage above ground along with edible rhizomes and roots below the soil. The rhizomes are the part that we most often harvest and consume, and is what is used to make turmeric powder.
To grow turmeric, you plant small pieces of the rhizomes rather than typical seeds like other plants. Once they sprout, the rhizome “seeds” send up large tropical-looking leaves as well as clusters of new, larger rhizomes in the soil below.
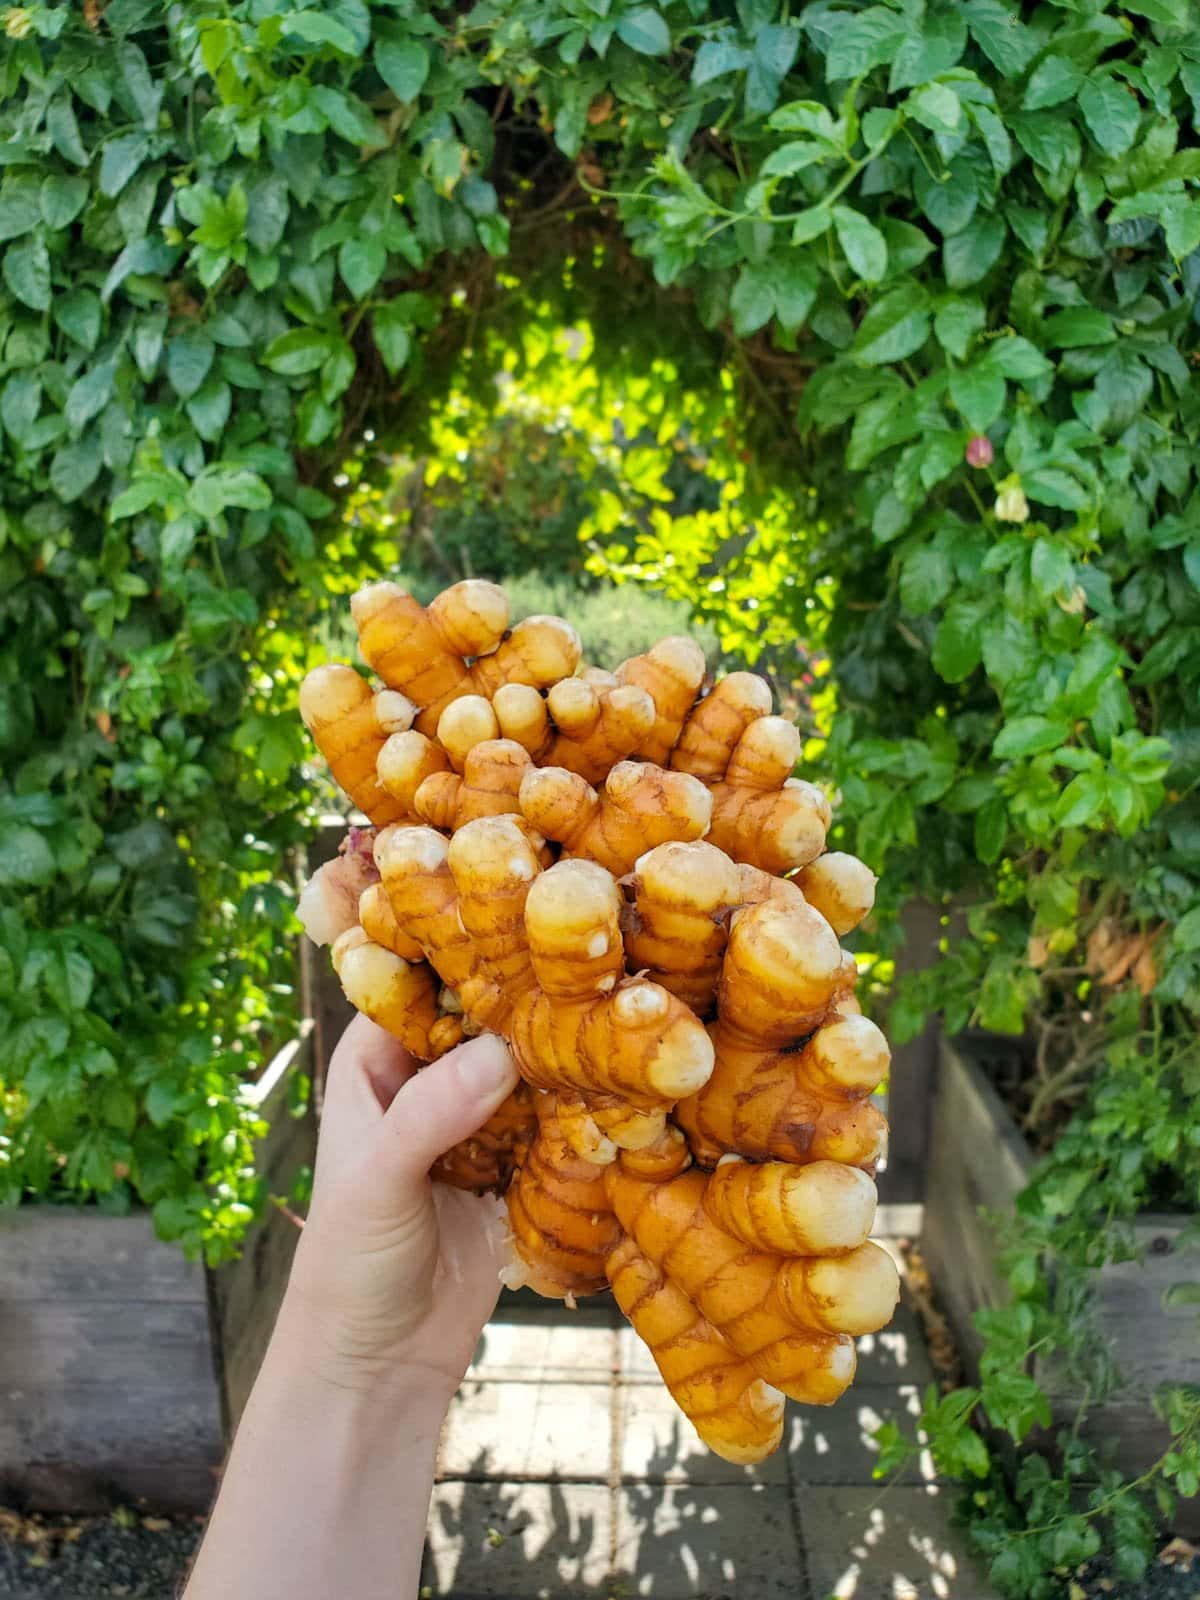
Each seed rhizome is often referred to as a “finger” because when fresh turmeric is harvested, the new big cluster of rhizomes resembles a hand with many fingers.

Where to Get Turmeric Seed
You can grow turmeric from pieces you buy in the grocery store or online. We have successfully grown turmeric both ways! However, it’s essential to start with certified organic rhizomes since non-organic produce is often treated with substances designed to inhibit sprouting. Check the produce section near the ginger.
If you can’t find fresh turmeric locally, or if you want to try growing specific varieties, you can order turmeric rhizomes online. We’ve used Hawaii Clean Seed many times over the years, and have always been very pleased with the quality and results.
Once you grow your own turmeric, you can save seed rhizomes from your harvest to replant!
PRO TIP: When choosing turmeric from the store, try to find the most fresh and firm turmeric pieces to plant. In my experience, old shriveled rhizomes (already starting to go soft) may rot in the soil instead of sprouting. Natural food stores or Asian markets are more likely to sell fresh turmeric if you’re regular grocer doesn’t.

Turmeric Varieties
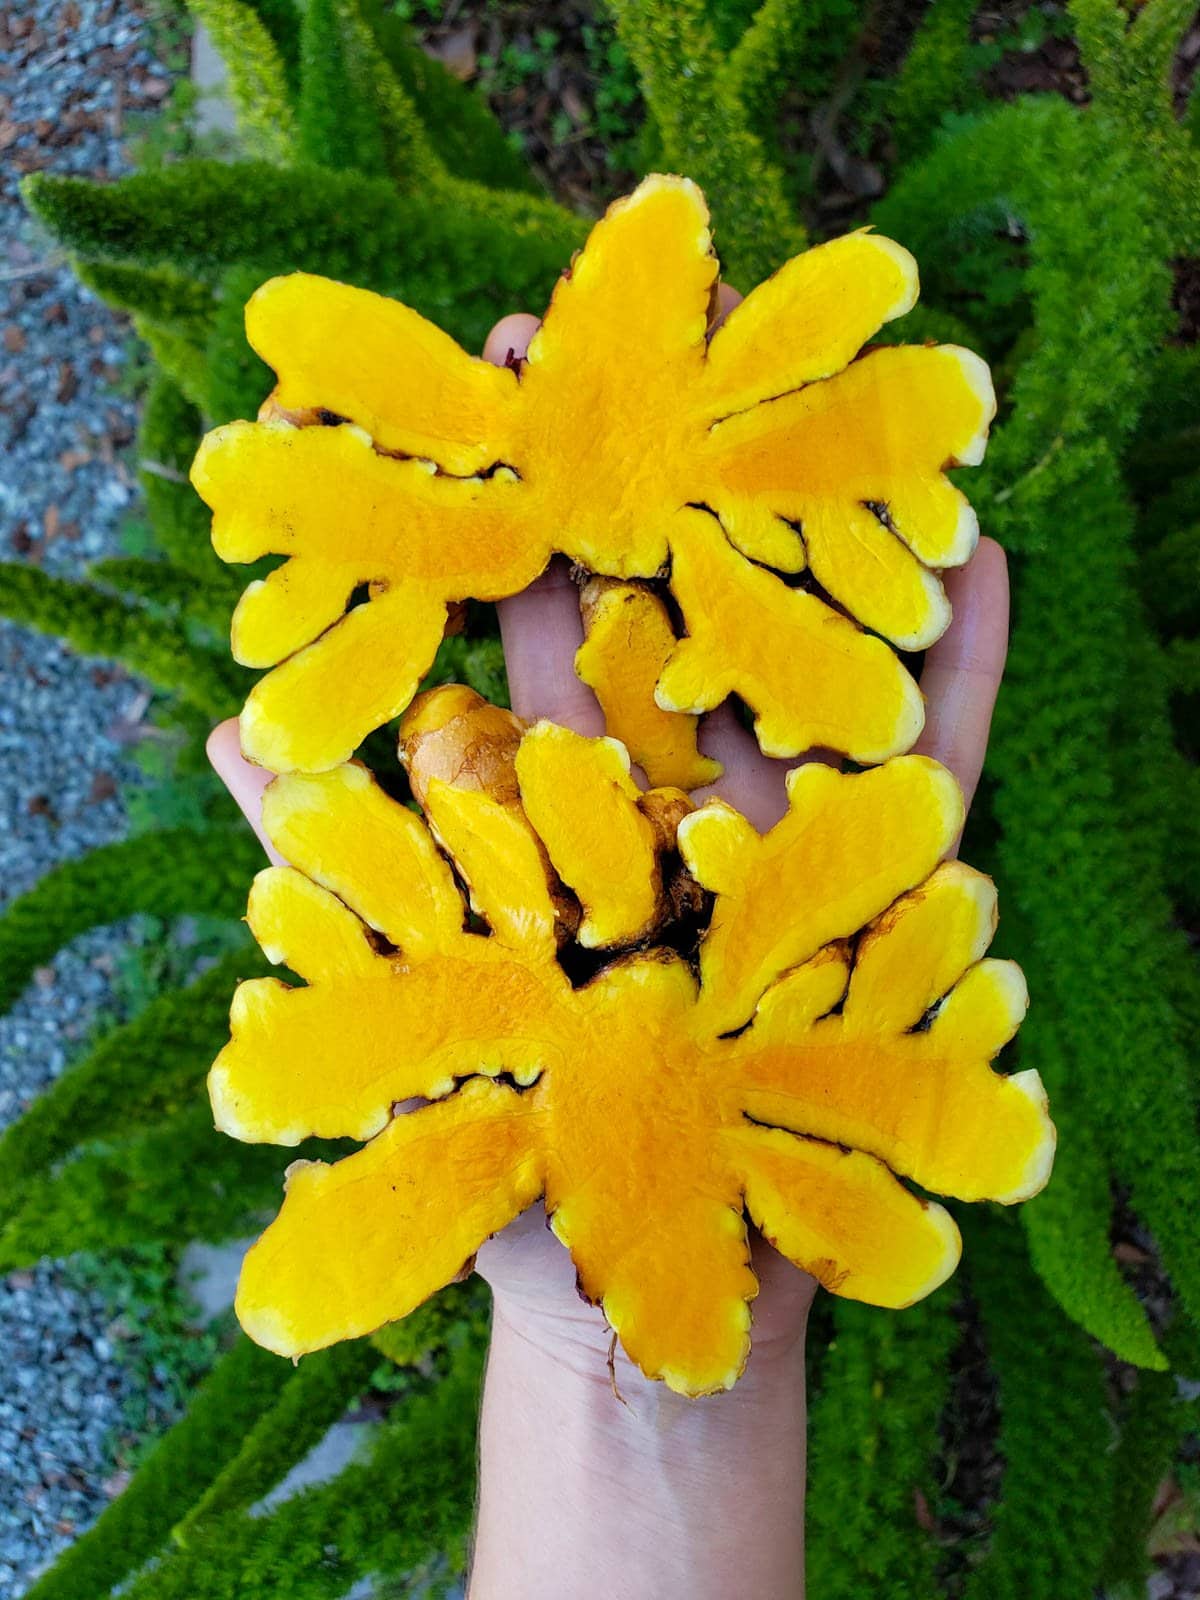
The most common variety of turmeric is Curcuma longa, which has a beautiful deep yellow-orange color. We usually see it labelled as “Hawaiian Red” turmeric in the stores.
We’ve experimented with growing a couple other varieties, including Indira Yellow and White Mango, but I prefer the deeper color and sweeter flavor of the Hawaiian Red. The yellow is a bit more pungent and spicy, and the white mango tastes similar to a green, underripe mango.
As it turns out, the darker orange varieties contain more curcumin and are therefore better for your health! So while the yellow and white varieties are unique and fun to grow, they don’t pack the same punch in regards to nutritional benefit (if that’s important to you).


Optimal Conditions to Grow Turmeric
- Temperature: Turmeric is a tropical plant that thrives in warm temperatures between 65°F to 90°F. It is not frost-tolerant and growth will slow significantly below 50°F, but that doesn’t mean you can’t successfully grow turmeric in colder climates! (See tips below.)
- Time: Turmeric has a long growing season, requiring 8 to 10 months of frost-free growing from planting to harvest. It’s usually planted (or started indoors) in the winter to early spring, and harvested in the fall to early winter.
- Sun: Turmeric loves sun but is prone to scorching in extreme heat. So, choose a planting location that receives full sun to partial shade, but try to offer afternoon shade in the hottest climates (when over 90 degrees). For example, I’ve seen Arizona gardeners utilize shade cloth to protect their turmeric plants in the late summer.
Hardiness Zones
It’s easy to plant and grow turmeric outside in USDA hardiness zones 8 and higher, in the ground or in containers. We like to grow ours in several wine barrels, which allows us to easily control the soil quality and moisture level. It also makes harvesting a breeze!
In zones 7 and lower, it’s best to start turmeric indoors in a mobile container during winter to early spring, and then bring it outside once the weather warms up. The plants will need ample sun or light after sprouting, so an indoor grow light may be required. See tips on sprouting turmeric indoors below.
Container Size
Turmeric will happily grow in a large container, or portioned out into several smaller pots for added mobility.
It’s best to use a container that is about 10 to 12 inches deep, and as wide as possible (depending on how many pieces you want to plant). The more surface area, the better! Turmeric rhizomes should be spaced several inches apart, so a narrow container will limit the amount you can grow.
Since turmeric is prone to rotting in overly wet soil, ensure the pot or container has holes for ample drainage. We often grow our turmeric in half wine barrel planters but have also used wide fabric Smart Pots – which have superior drainage! They will dry out a little more quickly though, so keep that in mind when your establishing your water routine. Add drip trays as needed to catch runoff, especially for indoor containers.
RELATED: Come see how we modify and prepare wine barrel planters (or whiskey barrels) for planting before use, or this guide on how to set up automatic drip irrigation for containers.

Soil Preparation and Drainage
- Turmeric grows best in soil that is loose, well-draining, free of big clumps or rocks, and fairly rich in organic matter. Turmeric also prefers slightly acidic soil (pH around 5.5-7), which most garden soil and potting mix already is.
- Good drainage is essential, especially in the early stages of growth (including before sprouting) as young turmeric rhizomes are susceptible to rotting if left in soggy soil or standing water. Therefore, avoid planting turmeric in clay soil, or in a location where water pools or drainage cannot be controlled.
- For pots or containers, combine approximately 70-80% organic potting soil with 20-30% aged compost. Work and loosen native soil to at least a foot deep and amend with aged compost, sand, and/or potting soil as needed.
- Amend soil with a slow-release, well-balanced organic fertilizer (e.g.4-4-4) prior to planting. Follow the instructions on your product of choice; I suggest erring on the lighter side of whatever they recommend.

When to Plant Turmeric
For folks growing turmeric exclusively outside, plant rhizomes when the soil is regularly 55°F degrees or warmer, with daytime air temperatures close to 70°F . Here on the Central Coast of California (zone 9), we usually plant our turmeric in March and harvest in late December.
To figure our when to start turmeric indoors in colder climates, first determine the first fall frost date for your zone (on average) and then count backwards about 9 to 10 months. That means you might need to plant turmeric inside as early as December or January. See tips on starting indoors to follow.
RELATED: Not sure when your frost dates are? Come see our free garden planting calendars for every zone – including frost dates, when to start vegetable seeds indoors and transplant seedlings outside.
Preparing Turmeric Seed to Plant
- Prior to planting, store turmeric seed in a moderately cool, dry, dark area with decent airflow. We store ours in a partially open cardboard box in a cool closet.
- If your turmeric is still in large chunks or clusters (hands), break it down into smaller pieces before planting (which also means more to plant).
- Use a clean knife to cut the hands or rhizomes at the narrowest junctions (where the fingers meet a base, or “palm” of the hand) to create several seeds.
- Cut the turmeric into smaller seed pieces a few days to a week prior to planting, so the cuts have time to dry and scab over (put them in a location with good airflow to promote drying). This reduces the chance of rot and disease.
PRO TIP: Each turmeric seed piece (rhizome) should have at least two to three nubs or fingers left behind – because that is what is going to sprout! See example photos below.


How to Plant Turmeric
Once the turmeric rhizomes have been broken into small pieces (if needed), dried, and the soil is prepared – it’s time to plant!
- Plant each turmeric rhizome about 2 to 4 inches deep and spaced at least 4 to 6 inches apart in your chosen bed, container or pot.
- To avoid breaking the fingers, I usually dig a little hole, pop it in, and gently cover it back over – as opposed to shoving it down into the soil as I may when planting garlic cloves.
- In the planting hole, place the rhizome with any small fingers or nubs facing upward. The sprouts will grow from the nubs, so this sets them up in the right orientation from the start.
- Water in lightly after planting.


Starting Turmeric Indoors
For those in USDA zones 7 or lower and starting turmeric indoors, follow the same planting instructions provided above – but keep your pots indoors for now!
- Keep the pots in a sheltered, warm location in your home or use a seedling heat mat below the pots to encourage sprouting. (Light isn’t needed until they sprout).
- Once they sprout, provide ample bright light – either in a sunny window or by using grow lights overhead.
- The pots can be moved outside in spring after your last risk of frost has passed, but keep an eye on the forecast for the next few weeks since the new tender leaves will easily be damaged by frost.
- To prevent shock, it’s best to harden off or gradually acclimate the plants to outdoor conditions over the course of a week before fully moving them outside. This process is called hardening off, and it is important! Bring them out for short durations in a sheltered and shady location for a few days, gradually increasing the time and direct sun exposure over the period of a week.
- You can also simply leave your turmeric to grow indoors, as long as it has ample light.
Patience After Planting
After planting, the waiting game beings. Turmeric not only takes a long time to grow, but also a surprisingly long time to sprout – sometimes months! If you’re starting turmeric indoors, it may sprout faster than ours does outside. Yet when we plant turmeric outdoors in February or March, our first sprouts don’t usually poke through the soil until July, and some as late as August!
Even though I’ve been growing turmeric for years, the slow start still stresses me out every year. I always think they’ve crapped out on us! Turmeric may sprout faster in warmer climates (we have a really cool, foggy weather in spring and early summer) but at least you’ve been forewarned. Be patient. Don’t worry.

Water Needs
Turmeric doesn’t need much water or care before it sprouts. Water occasionally as needed to keep the soil mildly damp but not soggy. Use your finger to check the moisture a few inches below the soil surface (or a handy moisture meter) and only water once the soil begins to dry out slightly.
To reiterate, those precious rhizomes are prone to rotting if they’re overly wet! Between occasional spring rain and foggy weather, we hardly water our un-sprouted turmeric at all, until things start to dry out and warm up.
During the active growing season (once it has large leaves), continue to maintain the soil modestly damp at all times. This will likely mean watering more frequently than you were before! The plants will drink up more water as they grow larger and the weather warms up.
In fall to winter, cut back the water a bit again, particularly if you’re receiving rain. A week or two prior to harvesting turmeric, you can stop watering all together. (This isn’t required, but we’ve learned that it’s easier to harvest rhizomes from semi-dry soil!)
Fertilizer
Turmeric is a fairly heavy feeder while it’s actively growing.
To keep our plants happy and healthy, we apply a top-dressing of aged compost along with a light dusting of well-balanced, slow-release fertilizer once or twice during the mid-to-late growing season (summer and fall). Aged pelletized chicken manure is another popular choice to feed turmeric.
We sometimes water our turmeric plants with homemade compost tea and/or dilute seaweed extract too. Both are gentle enough to offer on a monthly basis if desired, though once every two to three months is plenty (especially when paired with compost or other fertilizers).

Harvesting Turmeric
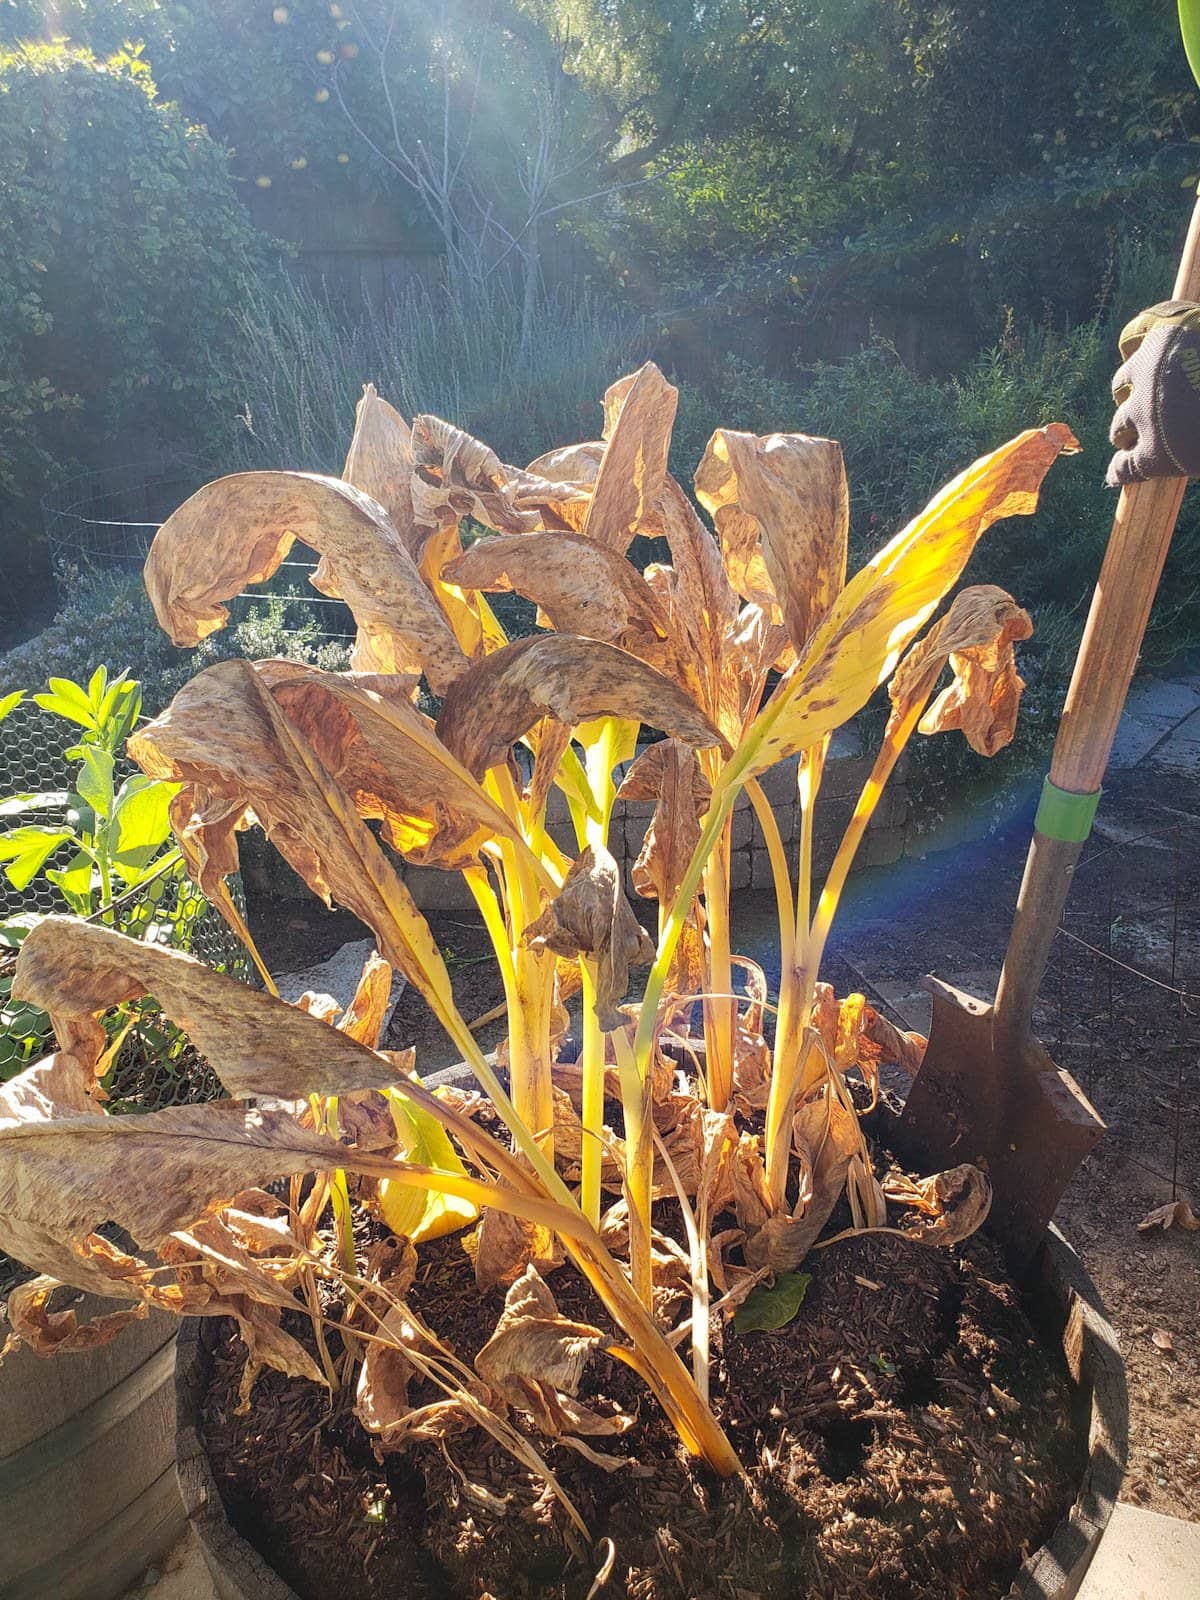
You’ll know it’s almost time to harvest turmeric when the leaves start to turn yellow-brown and dry out. See photos of our plants at harvest time below. In addition to leaf appearance, use time as a way to determine when to harvest – an average of 10 months after planting.
To harvest turmeric, avoid pulling up on the stalks. Instead, use your hands or a small shovel to gently dig and loosen the soil in a wide perimeter around the turmeric stalks, taking care not to stab and damage the rhizomes. Once the soil is loosened, gently scoop the rhizomes out of the soil with your hands or with a shovel from below.
After harvesting, rinse off the rhizomes to remove the dirt. Carefully cut the rhizome hand away from the top green stalk. Use clean scissors or snips to cut away any long stringy roots growing off the rhizomes. Thoroughly air dry before putting them away in storage.
See more storage and preserving tips below.
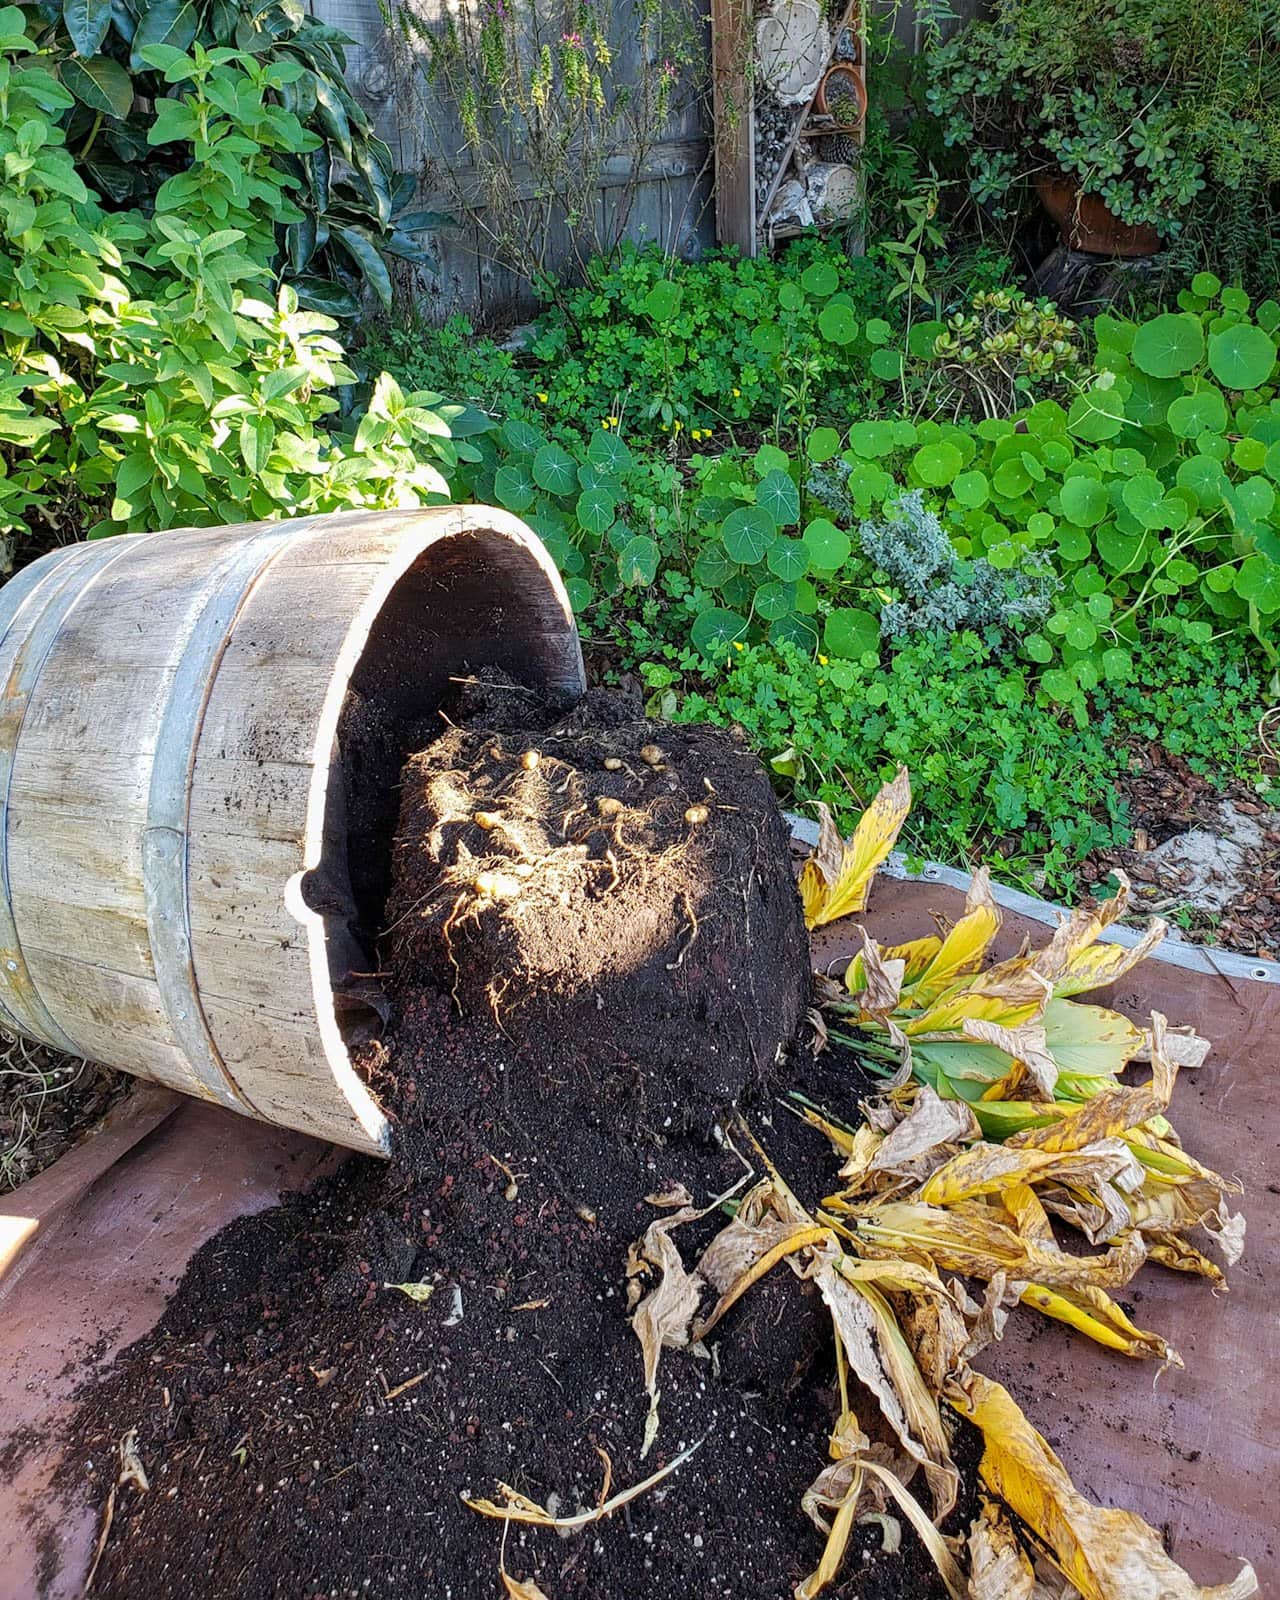
PRO TIP: To avoid breaking our turmeric during harvest, we often find it helpful to tip our wine barrel planters or other pots on their side (onto a tarp) to gently sift through the soil. In addition to water, we also sometimes use a very soft brush to gently remove soil from the cracks and crevices of the turmeric hands.

Frequently Asked Questions
Yes! While not used as often, turmeric leaves are also edible and nutritious. Some cultures use fresh leaves in cooking, dried and ground into powder, or steeped in water to create an infused liquid to use in cooking. You can also wrap fish in turmeric leaves to roast or grill like banana leaves. While turmeric is still growing, harvest leaves only sparingly since the plant needs them for photosynthesis and to produce sizeable rhizomes.
You can, but in my experience, I don’t find it necessary. Some sources recommend to lightly bury turmeric rhizomes in a wide shallow tray of damp peat moss or seed starting soil (on a heat mat) to encourage early sprouting – before planting them in their final growing location or container. However, the one year we did this, our harvest was smaller than ever. Perhaps it was just a coincidence but I don’t find it worth the effort.
Turmeric is a perennial, meaning it will continue to grow for several years (if allowed). If you harvest all of the rhizomes it won’t grow back, but if some are left in the soil, they’ll go dormant over winter and grow new sprouts and rhizomes the following year.
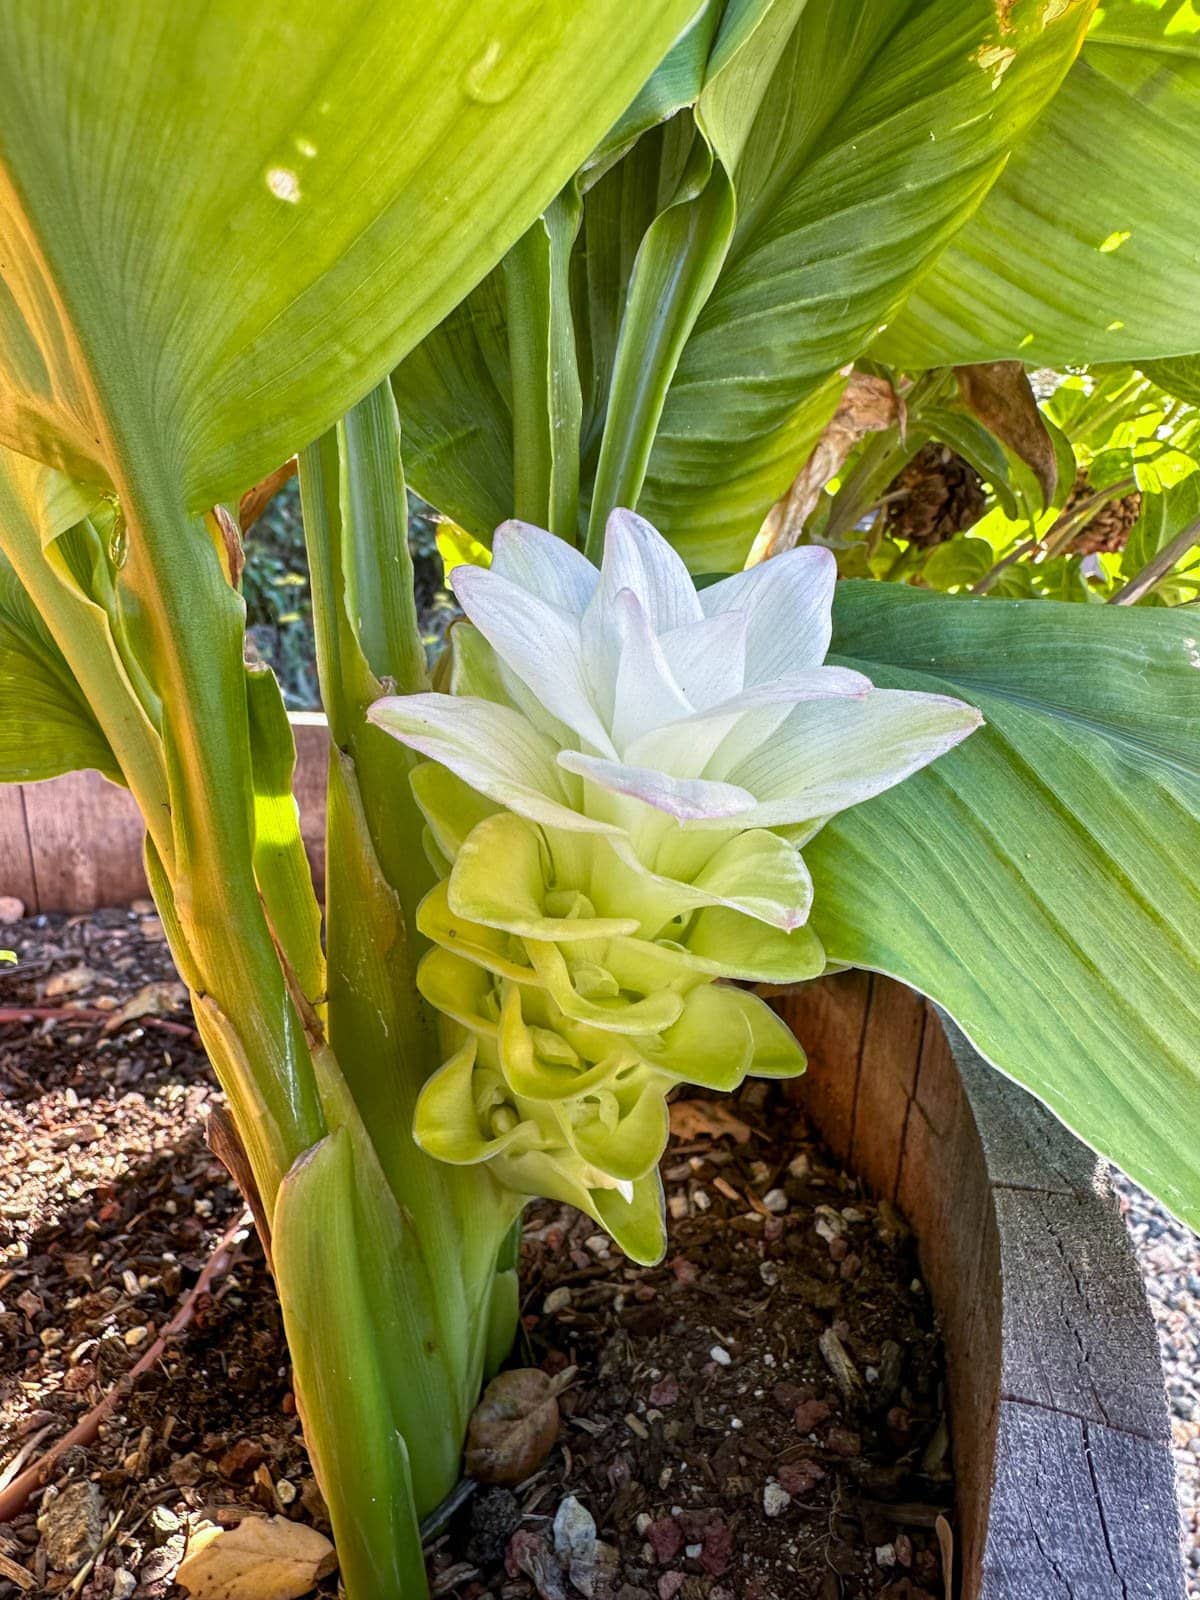
If you don’t harvest your turmeric at all, the underground rhizomes will continue to divide and form very large clusters and the above-ground plant will eventually grow a beautiful flower (usually during year 2).
How to Store and Preserve Turmeric
Store dry, unpeeled rhizomes in an air-tight container in the refrigerator, where they’ll stay good for several weeks to a month for fresh eating.
If you want to replant some rhizomes, they can be kept out in a temperate, dry, dark location (e.g. a cool closet) for up to a few months. Plus, you’re hoping they’ll eventually sprout anyways!
To preserve turmeric, we like to dehydrate and grind it into powder which lasts for two to three years. See our step-by-step guide on how to make homemade turmeric powder.
To freeze turmeric, simply freeze the whole rhizomes in an airtight container and plan to use them within a year. The sooner you use them, the more fresh and bright the flavor will be. To use them, we just pop a rhizome out of the freezer and grate it up as needed for meals! Homegrown turmeric skin is so fresh and tender, we don’t even bother peeling it.

Ways to Use Turmeric
Use a sprinkle of turmeric powder or grated fresh turmeric to add an earthy, curry-like pop of flavor and color to lentils, soups, sauces, brown rice, mixed veggies, eggs, and more. We also like to add turmeric to homemade sauerkraut, sourdough inclusions, fire cider, and seasonal kombucha flavors.
Another popular use for turmeric powder is to make golden milk – a delicious blend of turmeric, warm spices like cinnamon and ginger, and your milk of choice. It’s amazing for digestion, relaxation, inflammation, and more. Don’t miss our easy golden milk recipe!
To reap the optimum health benefits, always add a dash of black pepper with your turmeric. Studies show that consuming ¼ teaspoon of pepper with curcumin increases the bioavailability by 2000%. Consuming turmeric with fats or milks also helps it absorb better.
NOTE: If you haven’t had turmeric on its own, keep in mind that it is not spicy like the classic curry you may imagine. Turmeric is a key ingredient in curry and does have a slight sharp bite to it, but it’s nothing like pre-mixed curry powder (which also contains chili powder).

And that concludes this lesson on growing turmeric!
In closing, it’s probably obvious just how much we love and use turmeric around this homestead. I hope that you found this article informative, useful, and inspiring – so you can also discover the joy of growing turmeric at home! Please feel free to ask questions in the comments below, and spread the love by sharing this post.
You may also enjoy:
- Easy Fire Cider Recipe: How to Make Homemade Fire Cider
- How to Grow Pineapple Guava (Feijoa): Cold-Hardy Tropical Fruit
- Easy Golden Milk Recipe (Turmeric Latte) with Vegan Options
- How to Plant and Grow Garlic: The Ultimate Guide
- Super Green Sauerkraut Recipe w/ Garlic, Turmeric & Ginger


101 Comments
Mary W
I grew some (FL) and was so excited to see the beautiful leaves. Come fall I pulled one and nothing! (Probably broke off I I planted under a rooty oak) I left the rest to grow bigger (knowing nothing) and never saw them again. Wish I had read your article then! Great detail and so much info, you guys are the BEST! I will try again this week in a grow bag (I love them) and just know my results will be better thanks to you.
Aaron (Mr. DeannaCat)
Hi Mary, good luck this year on growing turmeric! The rhizomes definitely dig in and hold on well so you really have to loosen up the soil at harvest, have fun growing!
Kimberly Wills
Thank you for such a detailed article! I might have a greenhouse in the future (zone 6). Do you think I could have a constant smaller supply of fresh turmeric if I successively plant new ones every 2 months or so? Could it live entirely in a greenhouse its whole life? Any thoughts on that or things to consider?
Aaron (Mr. DeannaCat)
Hi Kimberly, you can definitely grow turmeric in a greenhouse but unless you have a way to keep it pretty warm during the winter, you likely won’t be able to grow turmeric year round. It’s probably still worth experimenting to see what you can grow and get away with though. Good luck!
Lilly Moscato
I wondered whether I could grow and harvest turmeric (and ginger) in my greenhouse (I’m new to growing there)… It turns out that while I did successfully store quite a bit of it, the leaves did die back. There wasn’t sufficient light for them to grow and also I only minimally heated my greenhouse. So, those are two things you may consider, when experimenting further. I’m going to replant my harvest from last year, in freshly mixed soil, and keep them in the greenhouse until either they sprout or it gets warm and crowded in there. Then they will grace my entryway until first frost in z7b.
Marcia Schnepf
My turmeric was looking good,then I moved it to a greenhouse, kept moist but leaves are looking pale and sad….should I fertilize or give more shade? Thanks
Aaron (Mr. DeannaCat)
Hi Marcia, if your turmeric plants have just sprouted and started to grow within the last month or two, your greenhouse may be getting too hot or there is too much direct sun along with the increased heat. You may need to increase air circulation or provide some afternoon shade if either of these two things may be an issue, fertilizing your turmeric plants every month or so is also a good idea. If your turmeric has been growing for over 6 months, your plants may be starting to die back as the turmeric gets closer to harvest. Hope that helps and have fun growing!
John Lynch
Very good article, and great accompanying photographic illustrations, So, I have now planted six turmeric fingers that friends sent from Italy. I look forward to seeing some nascent sprouts around April-ish! Thank you for taking the time and effort to share your knowledge. 🙂
Aaron (Mr. DeannaCat)
So great to hear John and have fun growing turmeric, it’s a lot of fun!
Gwen
I have a 3 year old beautiful purple flowering curcumer plant outside. It currently has 11 flowers and I feel it could be in a larger pot.. Can I replant it in the larger pot now while it’s flowering or do I have to wait until it’s loses its flowers? I live in Florida so it will be warm for a few more months.
Any information will be greatly appreciated-I am new at this. I do not harvest it for the turmeric.
Thank you
Aaron (Mr. DeannaCat)
Hi Gwen, you can likely repot your plant into a larger pot, the roots may have filled out the pot it’s in, forming a solid root ball which makes it easier to transplant and it should lessen any transplant shock the plant may receive. Good luck!
Stefany
How do you dehydrate it to make the powder?
Thank you, fantastic information in your article!
Aaron (Mr. DeannaCat)
Hi Stefany, check out our article on How to Make Homemade Dried Turmeric Powder to see how we like to do it. Good luck!
Vera
Thank you for your very informative and detailed article regarding growing turmeric. One thing I would like to share with you and that is our doctor’s (East Indian) comment she made after I’ve mentioned to her our daily rutine of making healthy juices. My husband is a twice cancer survivor (colon and liver cancer seventeen years ago). We used mainly fruit and vegetables with anticancerous properties. His juice always contained the turmeric. We started with a powder, but our doctor gave us this practical information. Make your own powder from dried turmeric and use it immediately or use only the fresh (or frozen) turmeric. Turmeric oxidizes very quickly in contact with air and becomes worthless. No more healing properties.
Aaron (Mr. DeannaCat)
Hi Vera, thanks for sharing that bit of information.
Lenka Eywa
Great article, thank you very much.