

How to Plant and Grow Potatoes in Containers, Pots, or Grow Bags
Potatoes are easy to grow, incredibly fun to unearth come harvest time, and the rich homegrown flavor is unbeatable! So come learn how to grow your own potatoes in containers, pots or grow bags – perfect for small gardens, patio gardens, or larger spaces alike. We’ve been using this method for nearly a decade with excellent results!
This post covers everything you need to know about growing potatoes in containers: how to prepare seed potatoes for planting, the best soil to use, hilling and other ongoing care, and tips for harvest and storage. We’ll also explore various types of potatoes to grow and container options. At the end of this post, check out the video of planting potatoes in grow bags too!
Note: This post was originally published in March 2019.
Would you like to save this?
Disclosure: Homestead and Chill is reader-supported. When you purchase through links on our site, we may earn an affiliate commission.
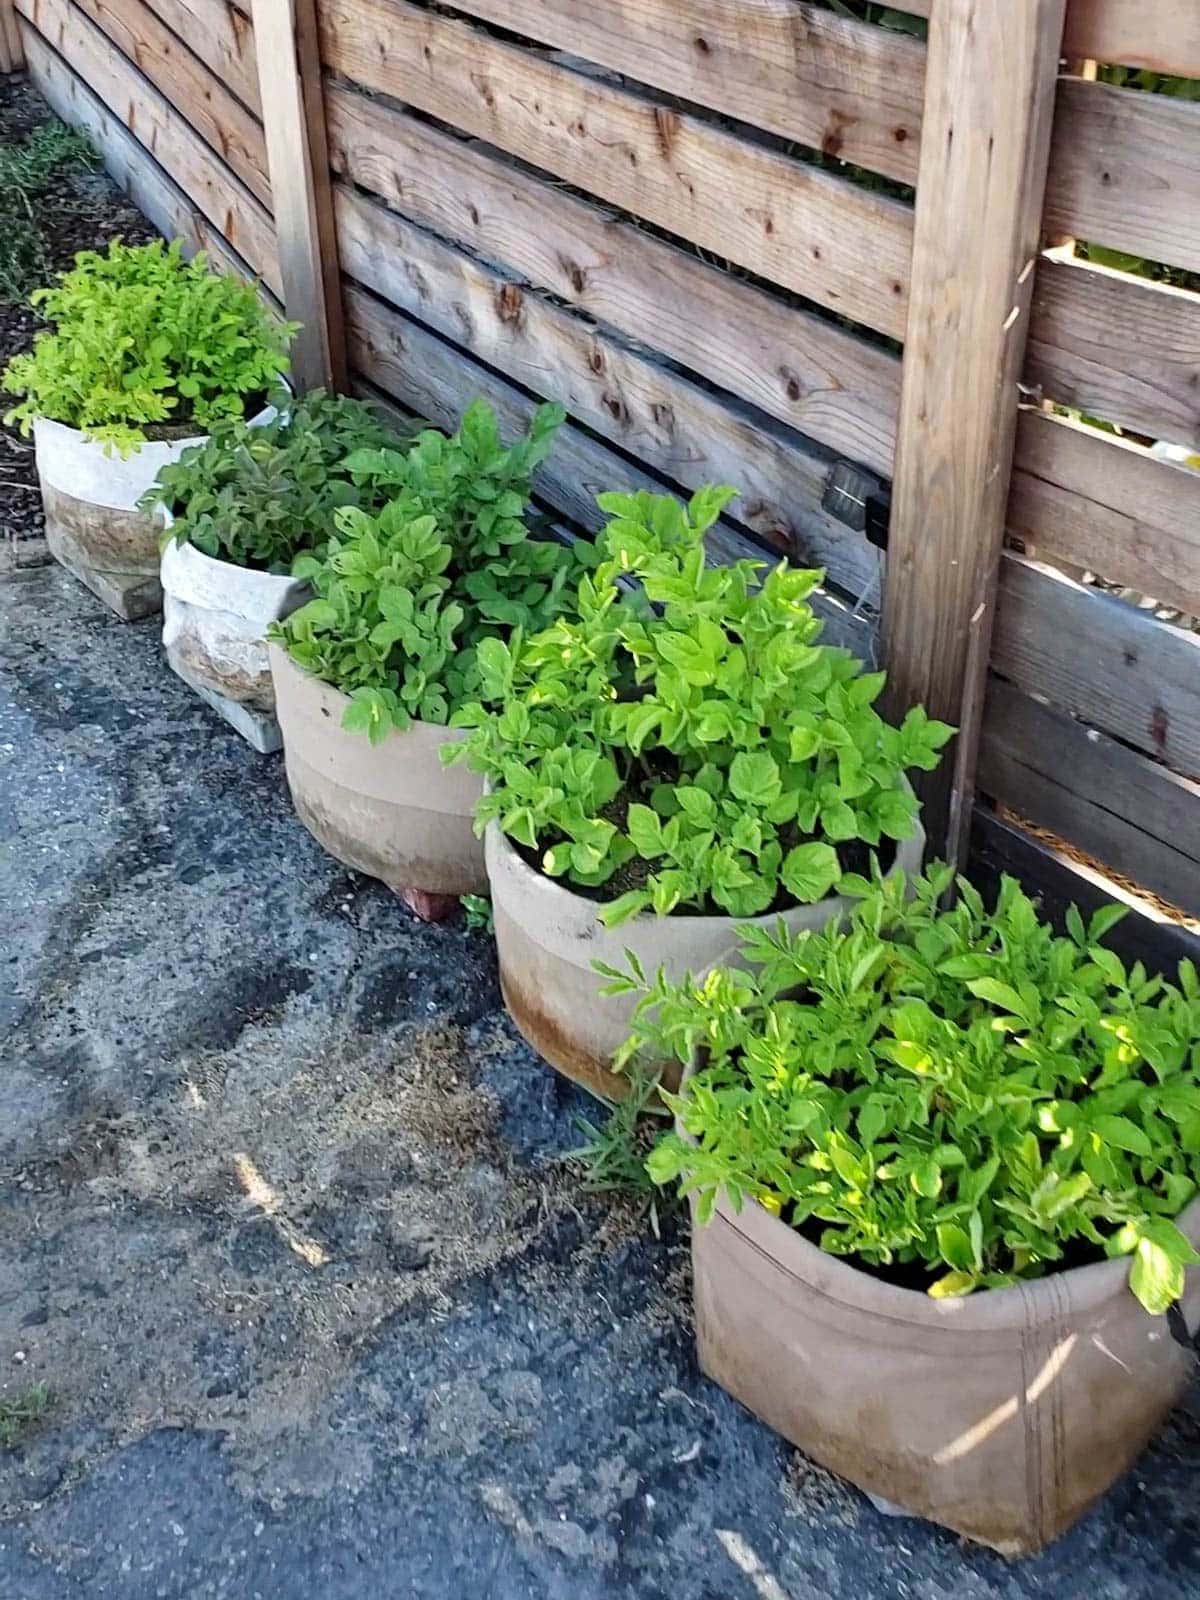
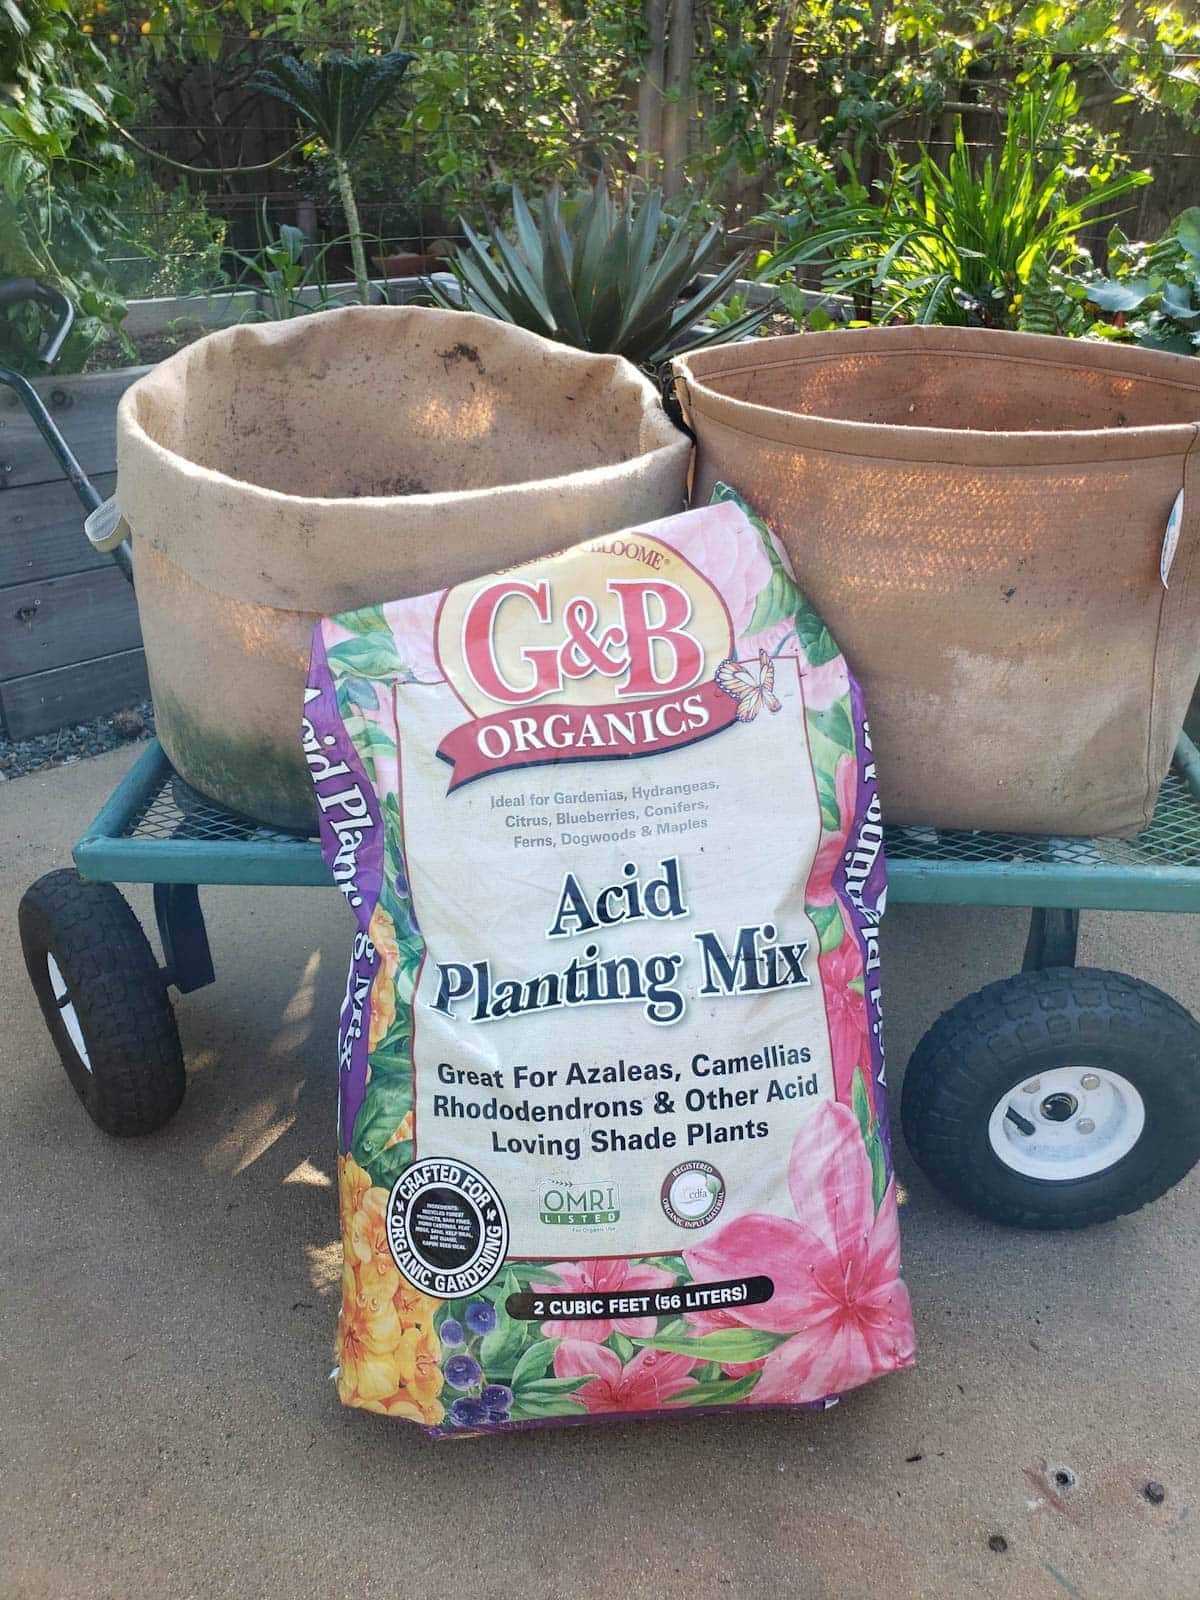
The Best Containers to Grow Potatoes
You can grow potatoes in a wide variety of containers: in a large pot, 5-gallon bucket, plastic tub, grow bags, used coffee sacks, half wine barrel planter, a cylinder made of wire fencing, or even trash cans!
The size of the container dictates how many potatoes you can plant and grow. For the best results, choose a container that is at least 15 to 24 inches tall (which allows space for gradual hilling) and has at least 10 to 15 gallon soil capacity. Seed potatoes need to be spaced about 4 to 5 inches apart, so the wider the container, the more you can plant.
Potatoes require excellent drainage and do not tolerate soggy soil (they will rot) so ensure your chosen container has ample drainage holes.
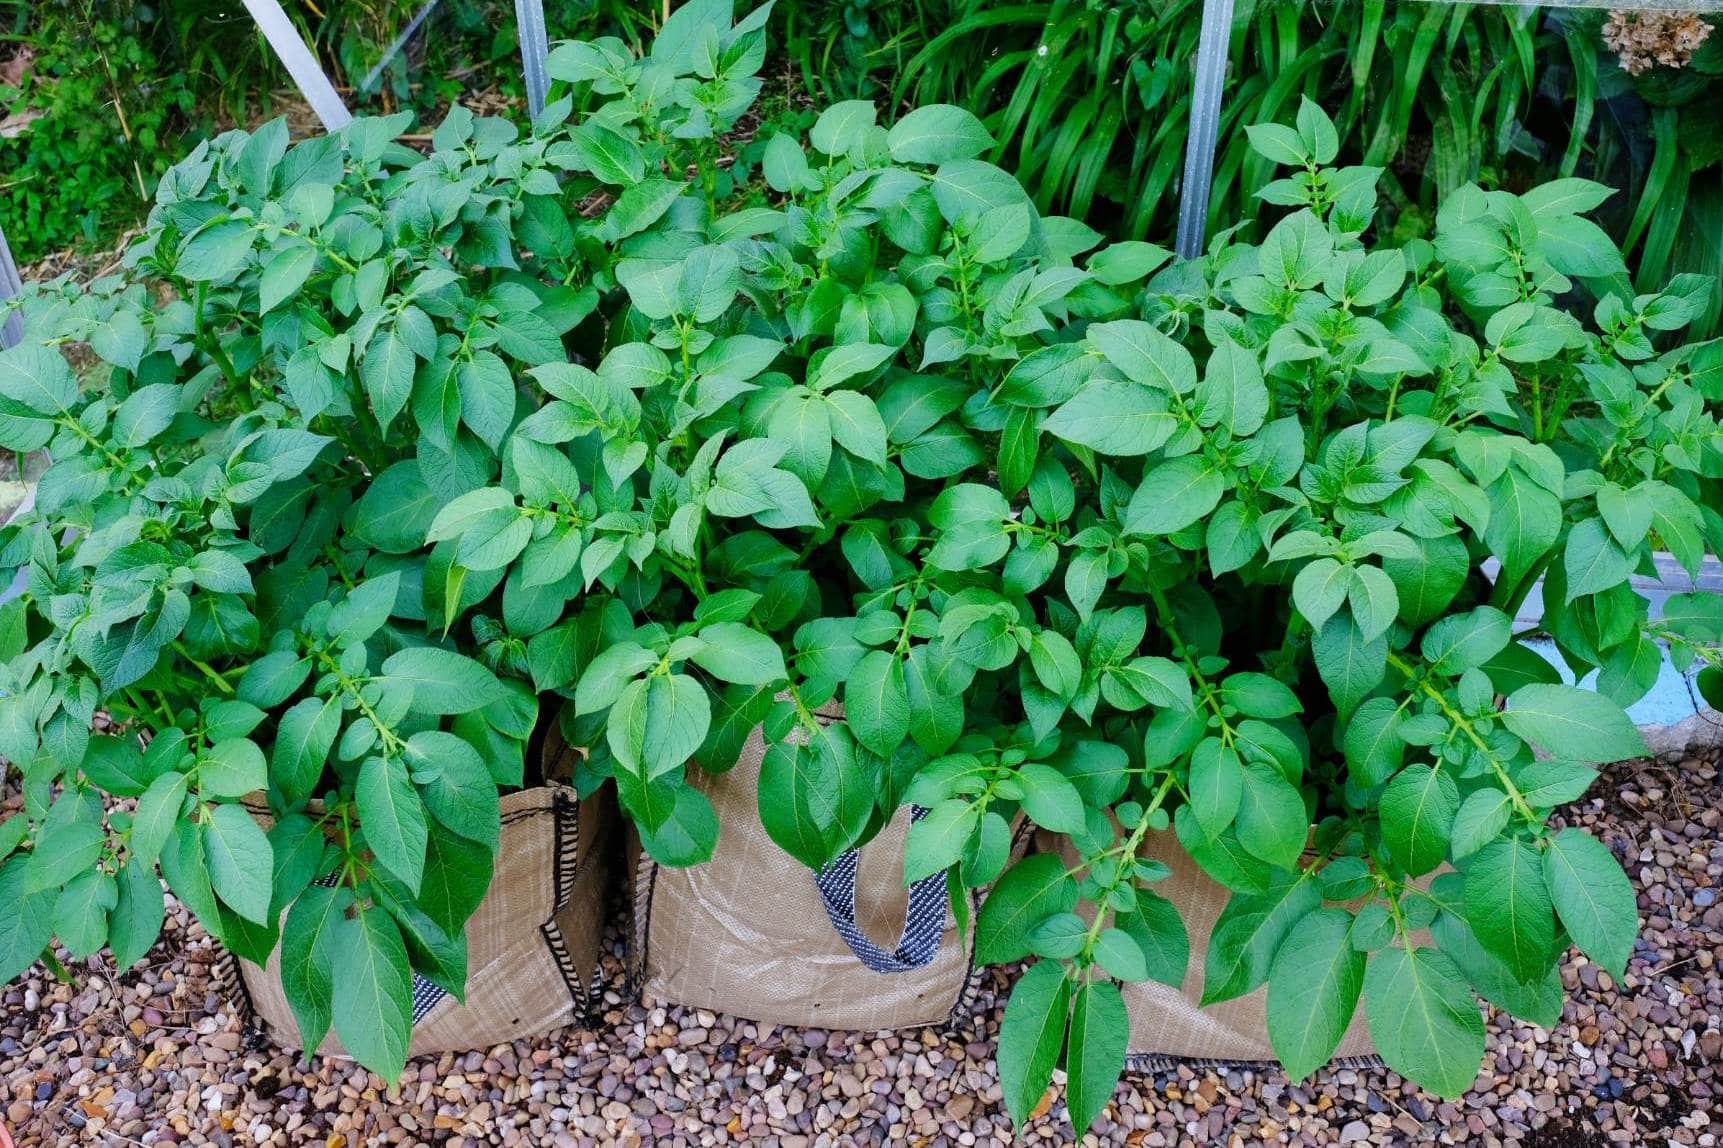
We personally love to grow potatoes in 15 to 20 gallon fabric grow bags because of their ideal drainage, mobility, ability to control the soil condition and moisture, and easy harvest.
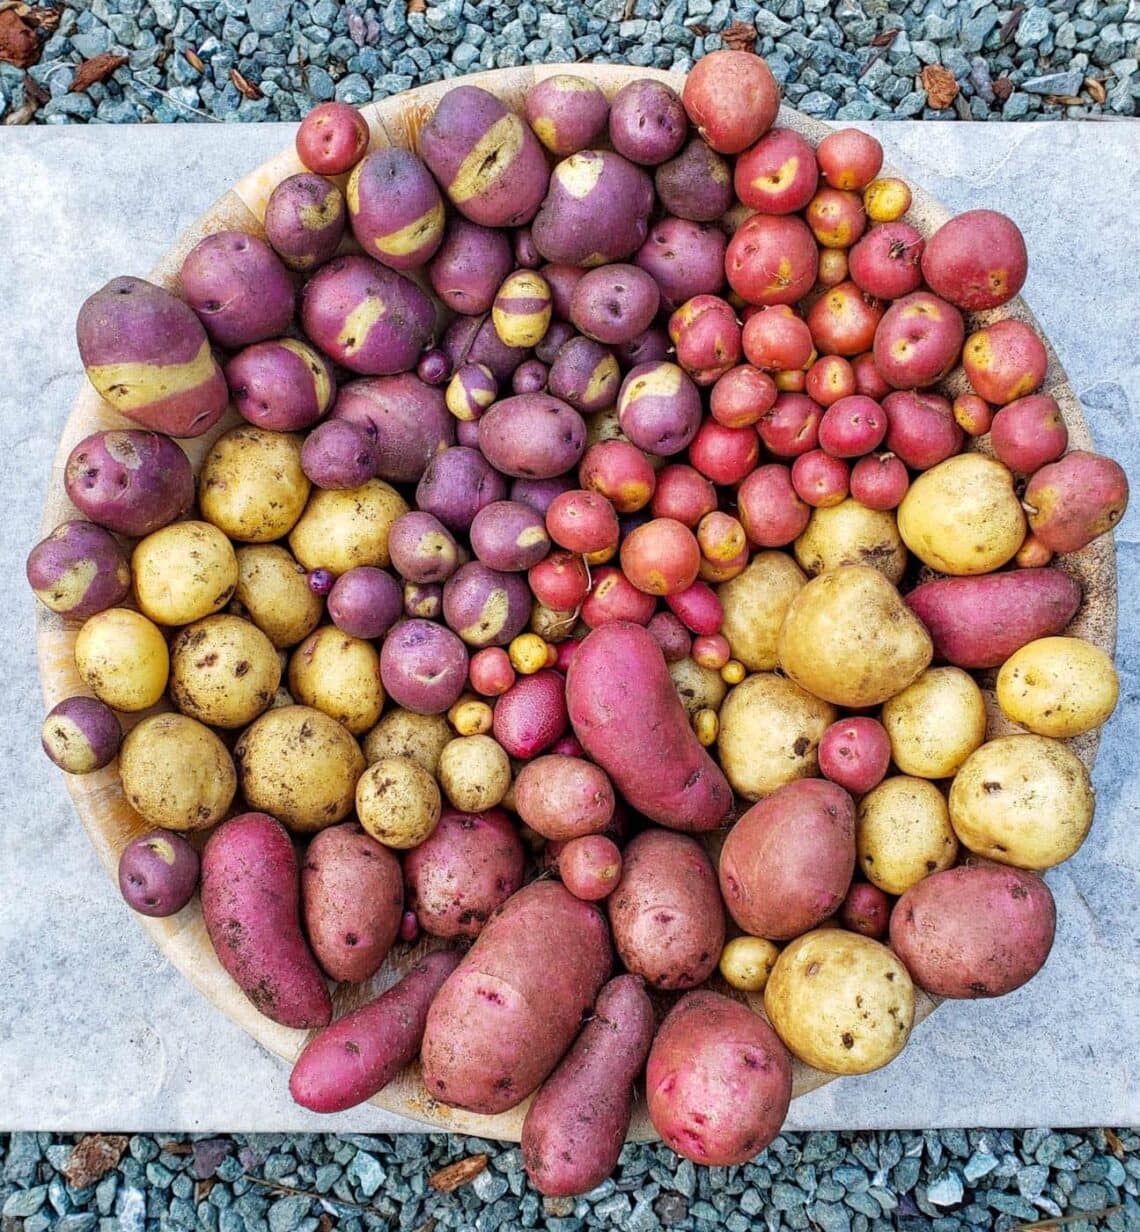
Potato Varieties and Characteristics
There are dozens of different potato varieties to choose from, which can vary in size, shape, color, texture, flavor, best use (e.g. frying, mashing or baking), storage life, and time to harvest. The variety description should outline all of these attributes. Potatoes are also broken down into three categories: early, late, or mid-season varieties.
Early, Late, and Mid-Season Potatoes
- Early season potatoes or “new potatoes” reach maturity within 75 to 90 days. These could be ready to harvest in early summer, depending on when you plant them. Early potatoes are least likely get blight, as they’re usually harvested before disease can take hold. However, they don’t last as long in storage. Popular early potatoes include Yukon Gold, Caribe and Red Norland, but there are many more.
- Mid-season potatoes, also referred to as “second early” are just a tad longer than earliest types. These ones will be ready to harvest in about 95 to 110 days. Red Pontiac and Kennebec are staple mid-season potatoes. Yukon Gold is sometimes considered a mid-season variety too.
- Late-season potatoes, also called “main crop potatoes” are generally ready to harvest within 120-135 days, closer to the middle or end of summer. While they take longer to grow, the late-season type are known to last longer in storage as well. These are said to be best for baking, mashing, and roasting. The earlier varieties are more crisp and tender for pan-frying. German Butterball, Kennebec, Russet Burbank, and Butte are well-known late-season varieties.
Ideal Sun and Temperature for Potatoes
Potatoes are considered a cool-season crop, ideal for the spring or fall garden. Potatoes grow best when temperatures are 50 to 80°F. They can withstand brief periods of higher heat, but will become stressed and stunted if the soil routinely stays over 55°F at night.
Potatoes are also sensitive to frost and freezing; the exposed greens will easily wilt with frost damage. It’s easy to protect potatoes from temperature extremes using either shade cloth or frost cloth as needed.
Place your potato container in a location that receives full sun. Yet if you live in a climate with very hot summers, consider a location with a little late afternoon shade. Also avoid the hottest spots of your garden, like near a south-facing wall or other source of radiant heat.
When to Plant Potatoes
- Plant potatoes outside in early spring once the soil temperature has reached at least 40 degrees Fahrenheit. Use a basic soil thermometer to monitor, and measure about 6 inches deep.
- Refer to your growing zone. You can plant potatoes as early as two to four weeks before your last frost date in spring.
- It’s best to chit (pre-sprout) potatoes a few weeks prior to planting. See instructions below.
- For climates with very hot summers, it’s key to plant potatoes as early as possible. Planting fast-maturing early season potato varieties in spring is good way to beat the heat! Or, plant early potatoes in late summer for a fall harvest; they can mature quickly before the first frost hits.
- In our temperate climate (cool coastal CA zone 9), we are able to plant potatoes at various times throughout the year.
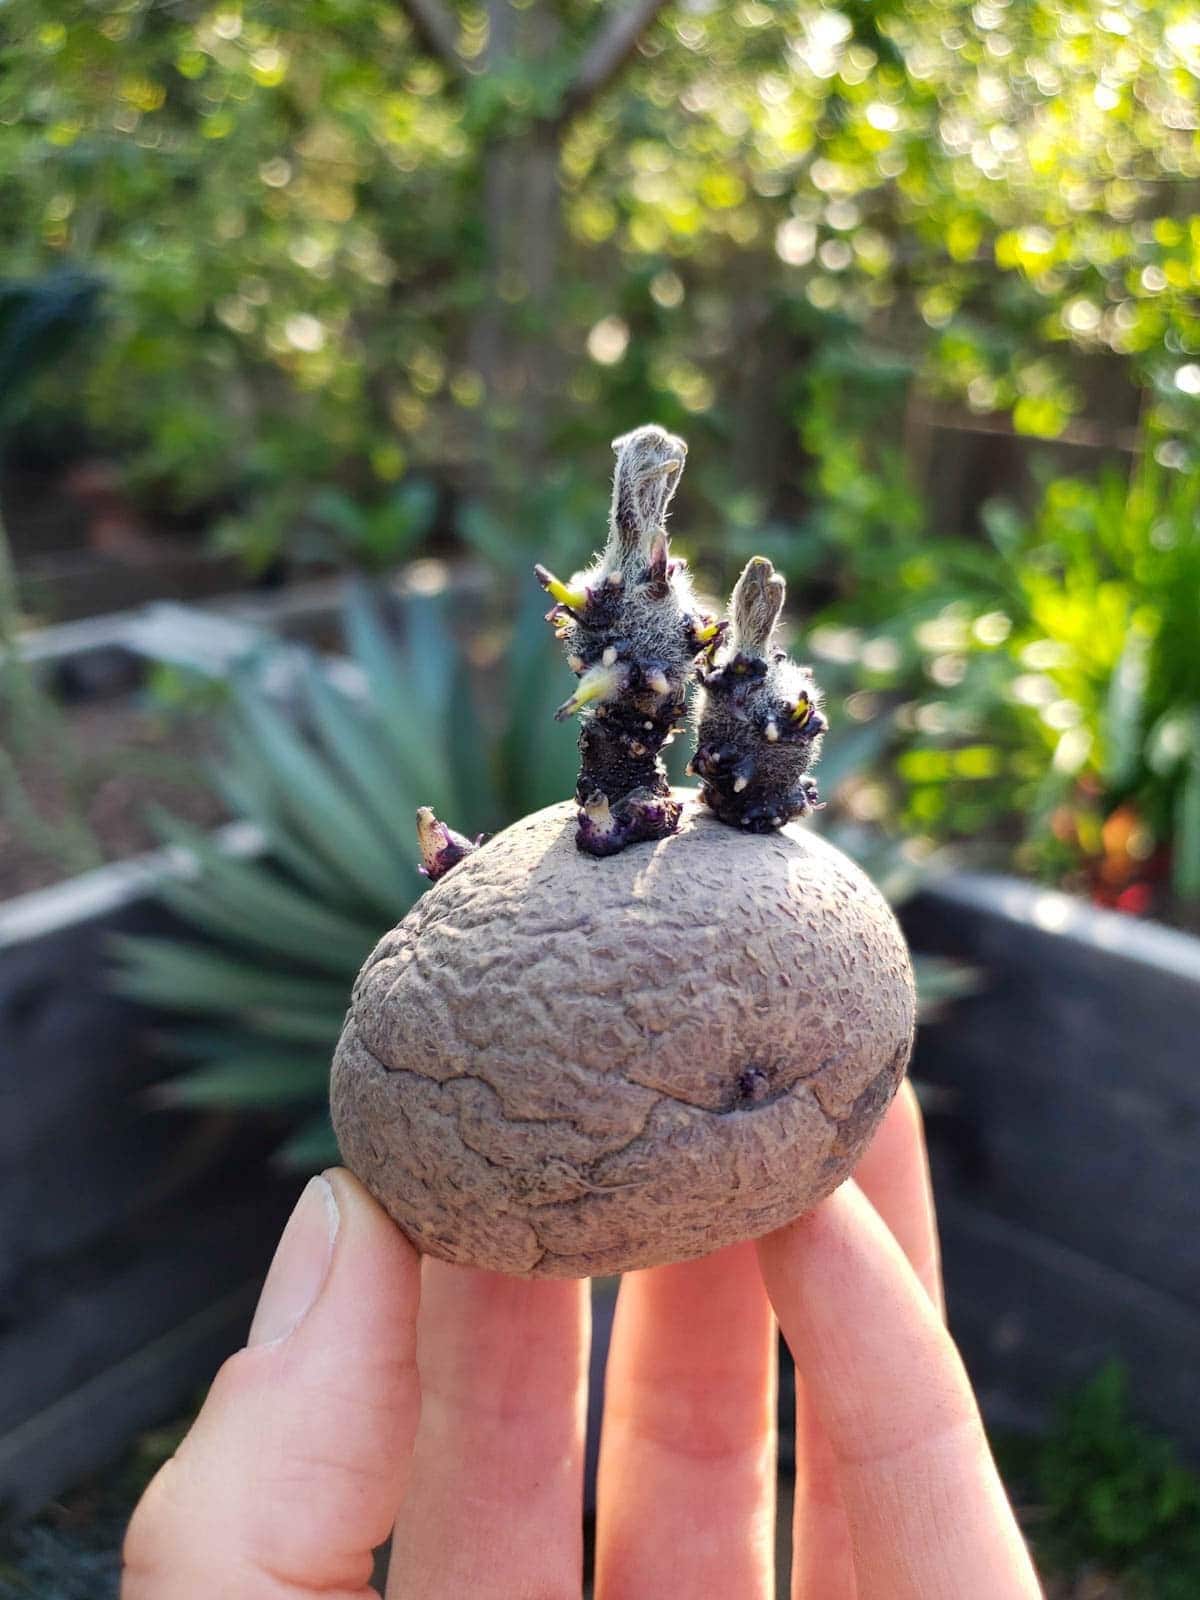
Starting with Seed Potatoes
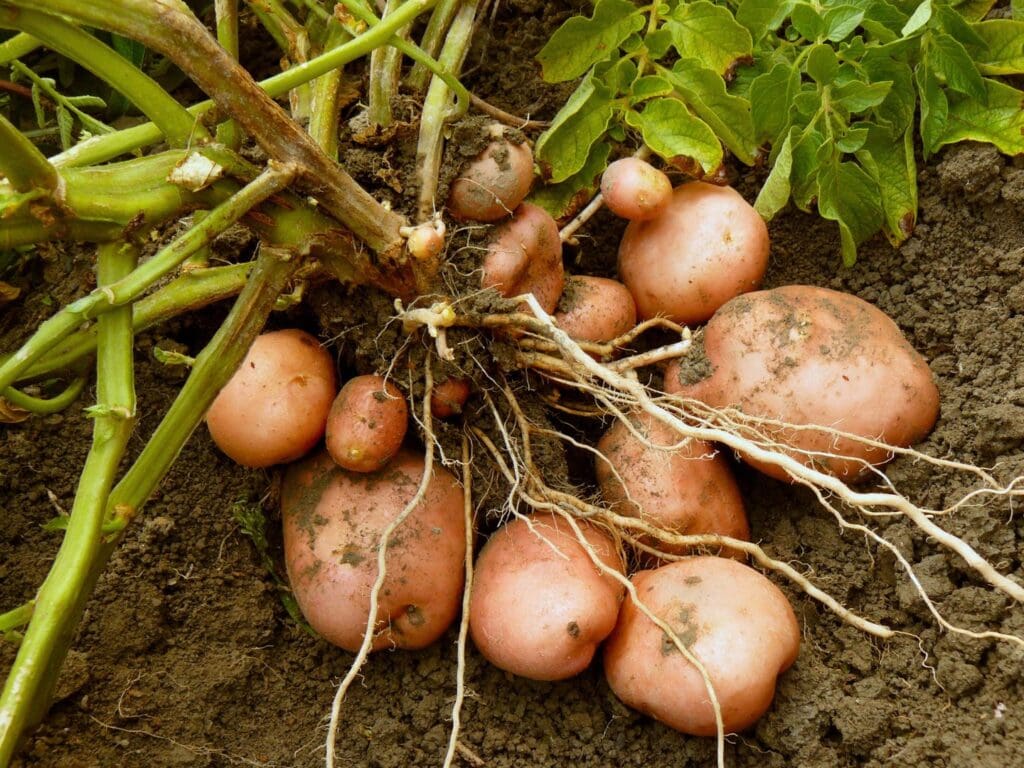
You can either buy potatoes that are specifically sold as seed, or try sprouting store-bought potatoes to grow. Each seed potato that you plant will grow a cluster of 3 to 8 new potatoes!
Generally, you’ll have the most guaranteed success with seed potatoes. They’re grown specifically for this task, and are usually certified to be disease-free. They often times even come slightly pre-sprouted for you! You will also have more options to find and grow unique varieties that way.
Some places we’ve bought seed potatoes from over the years include High Mowing Seeds, Seeds Now, Peaceful Valley, Territorial Seed, Johnny’s, and Irish Eyes. We also sometimes see them at our local garden center or nursery. Note that most places will sell out of seed potatoes by spring! It’s best to order them in the winter if possible, or you may be left with slim pickings.
Growing from Grocery Store Potatoes
If you opt to try to grow from store-bought potatoes, here are a few tips: One, most definitely choose organic. Non-organic produce can be treated with chemicals that inhibit sprouting. I’d also suggest buying your potatoes well in advance (like months) before you want to plant them. This will give them plenty of time to soften up and sprout, also referred to as “chitting” – explained below.
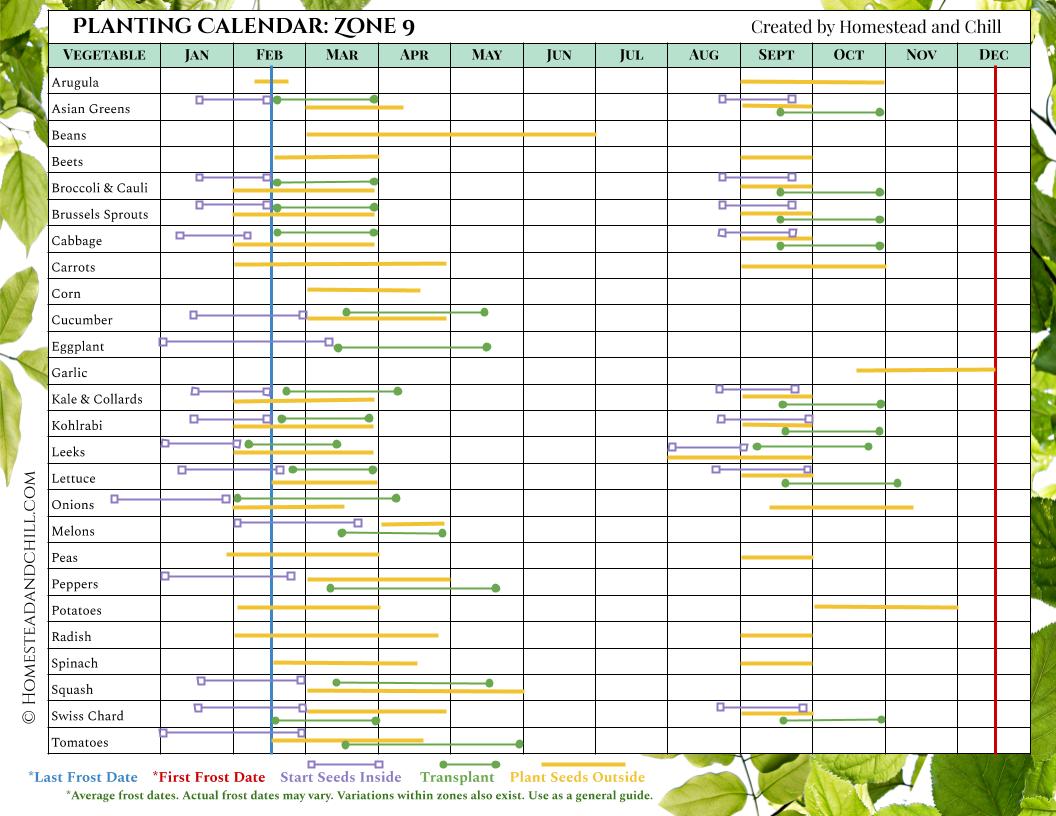
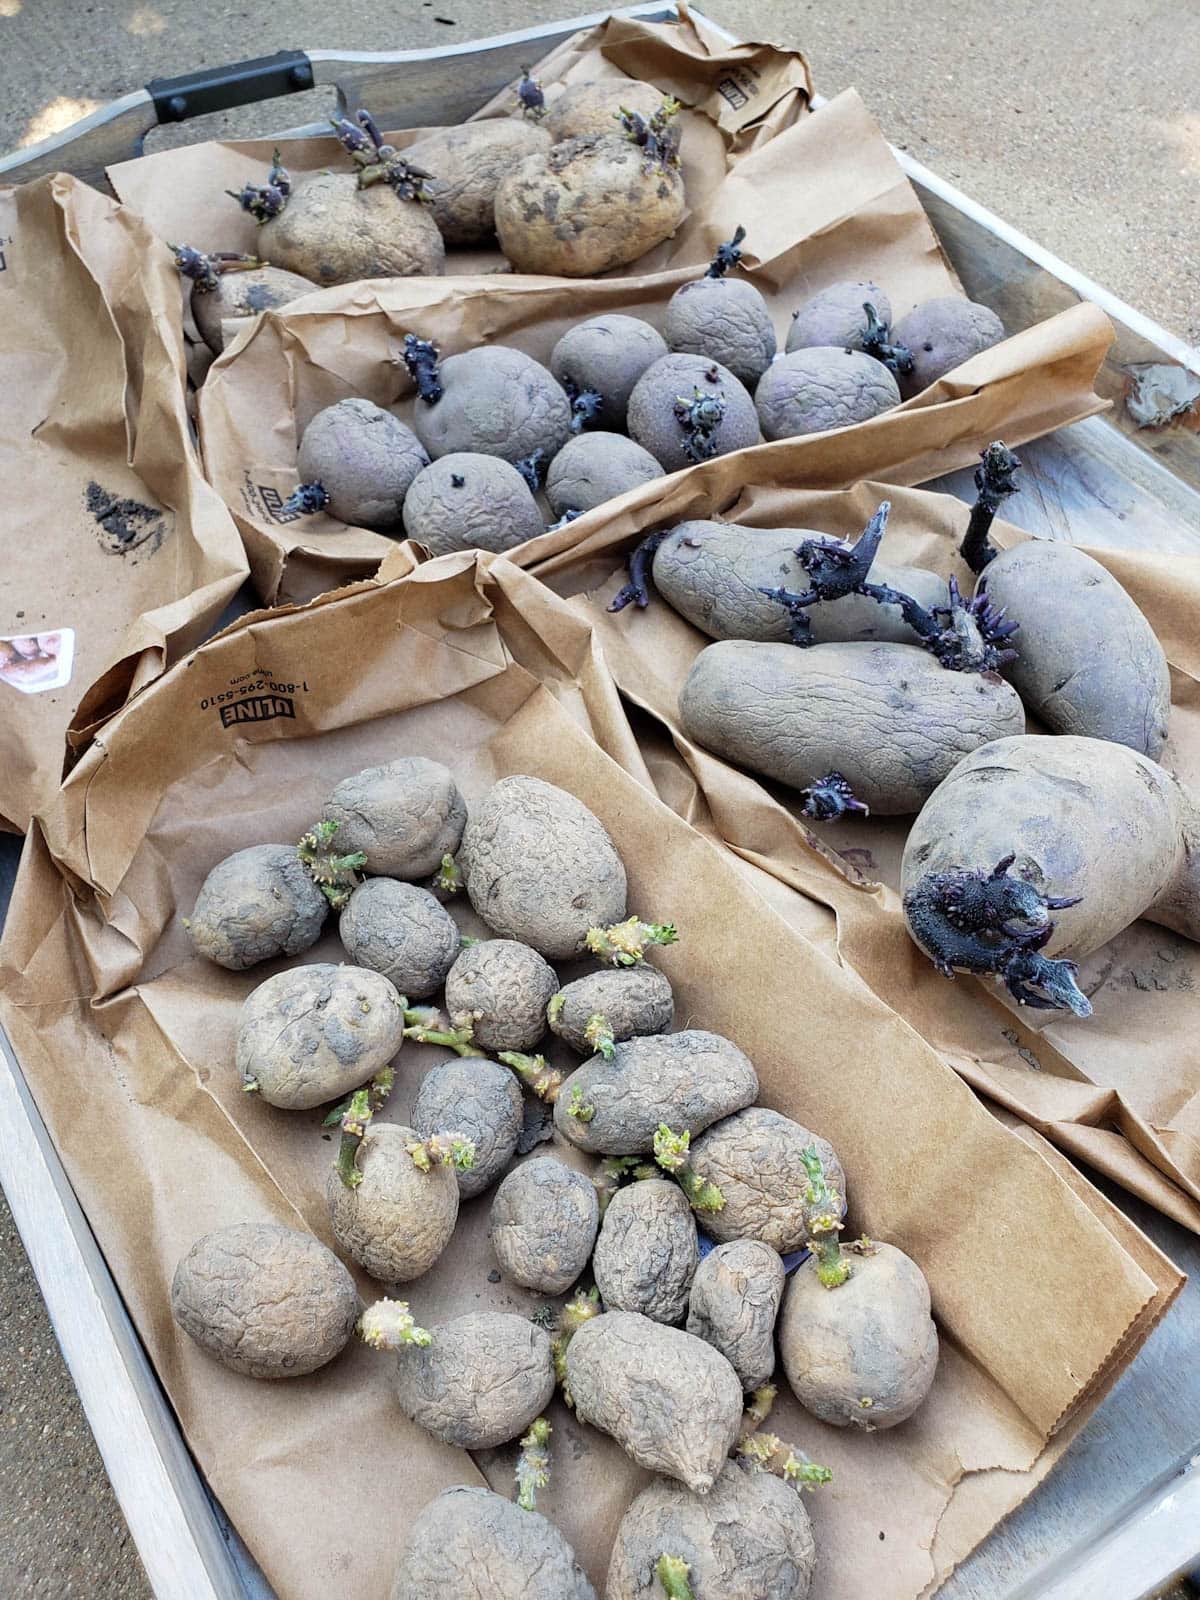
How to Pre-Sprout (Chit) Seed Potatoes Before Planting
Chitting is the process of encouraging your potatoes to sprout before planting. By sprouting them in advance, it gives the potatoes a head start and will result in a more robust harvest. The chitting process can take 4 to 6 weeks. If you buy seed potatoes from an online seed company, they may come sprouted and ready to plant right away.
- To chit potatoes, first put them in a warm, dark location for a week or two. Around 70 degrees is a good target. This helps them break dormancy – waking them up to allow for sprouting.
- After that time, move them into a slightly cooler area with bright ambient light (but not directly in the sun). We set ours on a shelf in a spare room across from a large window.
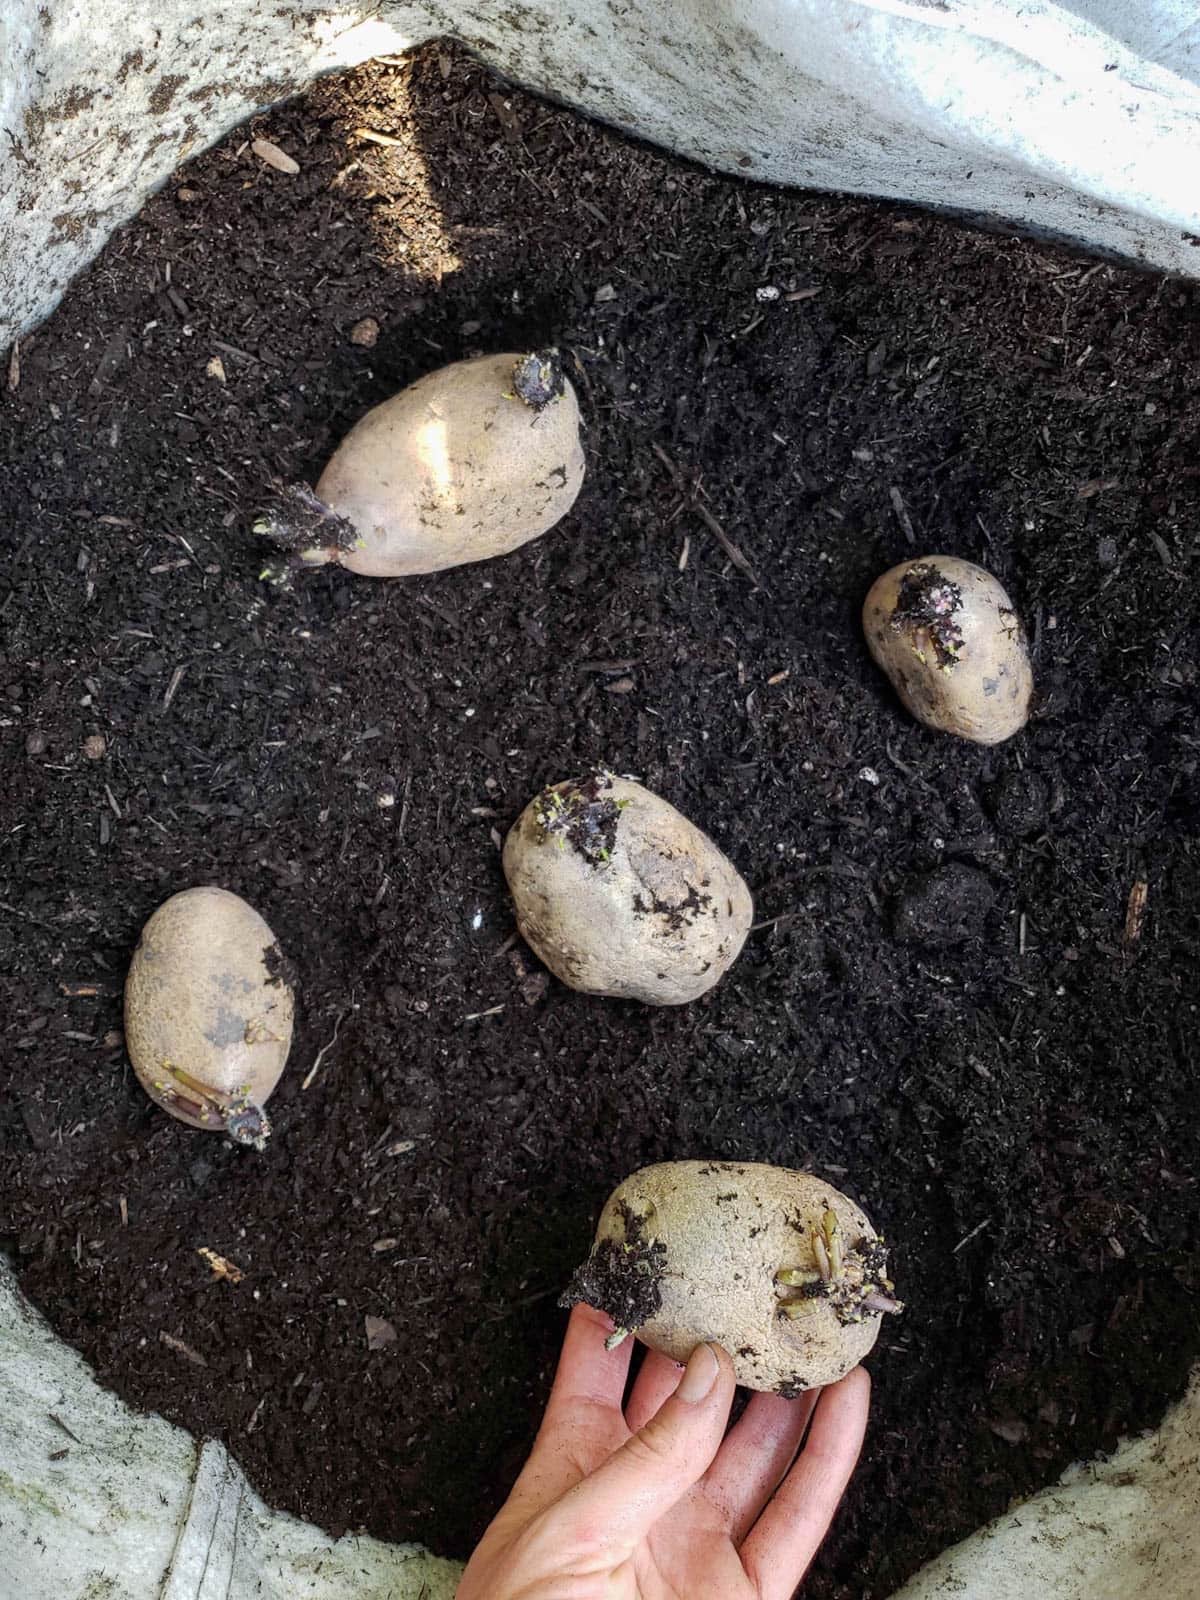
- When you move them out into the light, take a look at each spud. Determine which side of the potato has the most eyes. The eyes are the little indentation or nubs along the otherwise smooth potato skin. Those eyes are where potential sprouts will emerge from! The portion of the potato with the most concentrated number of eyes is called the “rose end”. Place the seed potato in a position with the rose end facing up, exposed to light.
- By following these steps, the potatoes should begin to sprout shortly.
Dividing Seed Potatoes
Large seed potatoes can be cut into smaller portions to create more seed pieces if desired. This isn’t necessary (or recommended) when the potatoes are fairly small, or if you have plenty of seed.
- When cutting up a seed potato, ensure that each new piece will still have at least one or two promising eyes once divided (explained above).
- Using a clean knife, cut the larger seed potato in half – or more, depending on size and number of eyes.
- It is important to do this at least several days prior to planting outside. A week or more is even better. The fresh cut sides need time to dry and scab over before being planted. Otherwise, they can easily rot!
Potato Soil Preferences
One of the best things about growing potatoes in containers is that you can easily control and adjust the quality, composition, and pH of the soil – which is key to success!
- Fill your potato container with soil that is rich in organic matter, loose, and well-draining, such as potting soil amended with compost.
- Potatoes grow best in acidic soil, and thrive in a pH range of 4.8 to 5.5. Therefore, we like to use a potting soil that is specifically made for acid-loving plants. You can also amend soil with horticulture sulfur to lower the pH and make it more acidic. However, sulfur is generally slow-release so it can take months for the soil to adjust its pH – plan in advance!
- Avoid high nitrogen fertilizers. Potatoes grow large green tops but smaller tubers when too much nitrogen is present.
- To help keep the soil from becoming too compact, straw is often layered between the soil while growing potatoes, explored more in the ongoing care/hilling section below.
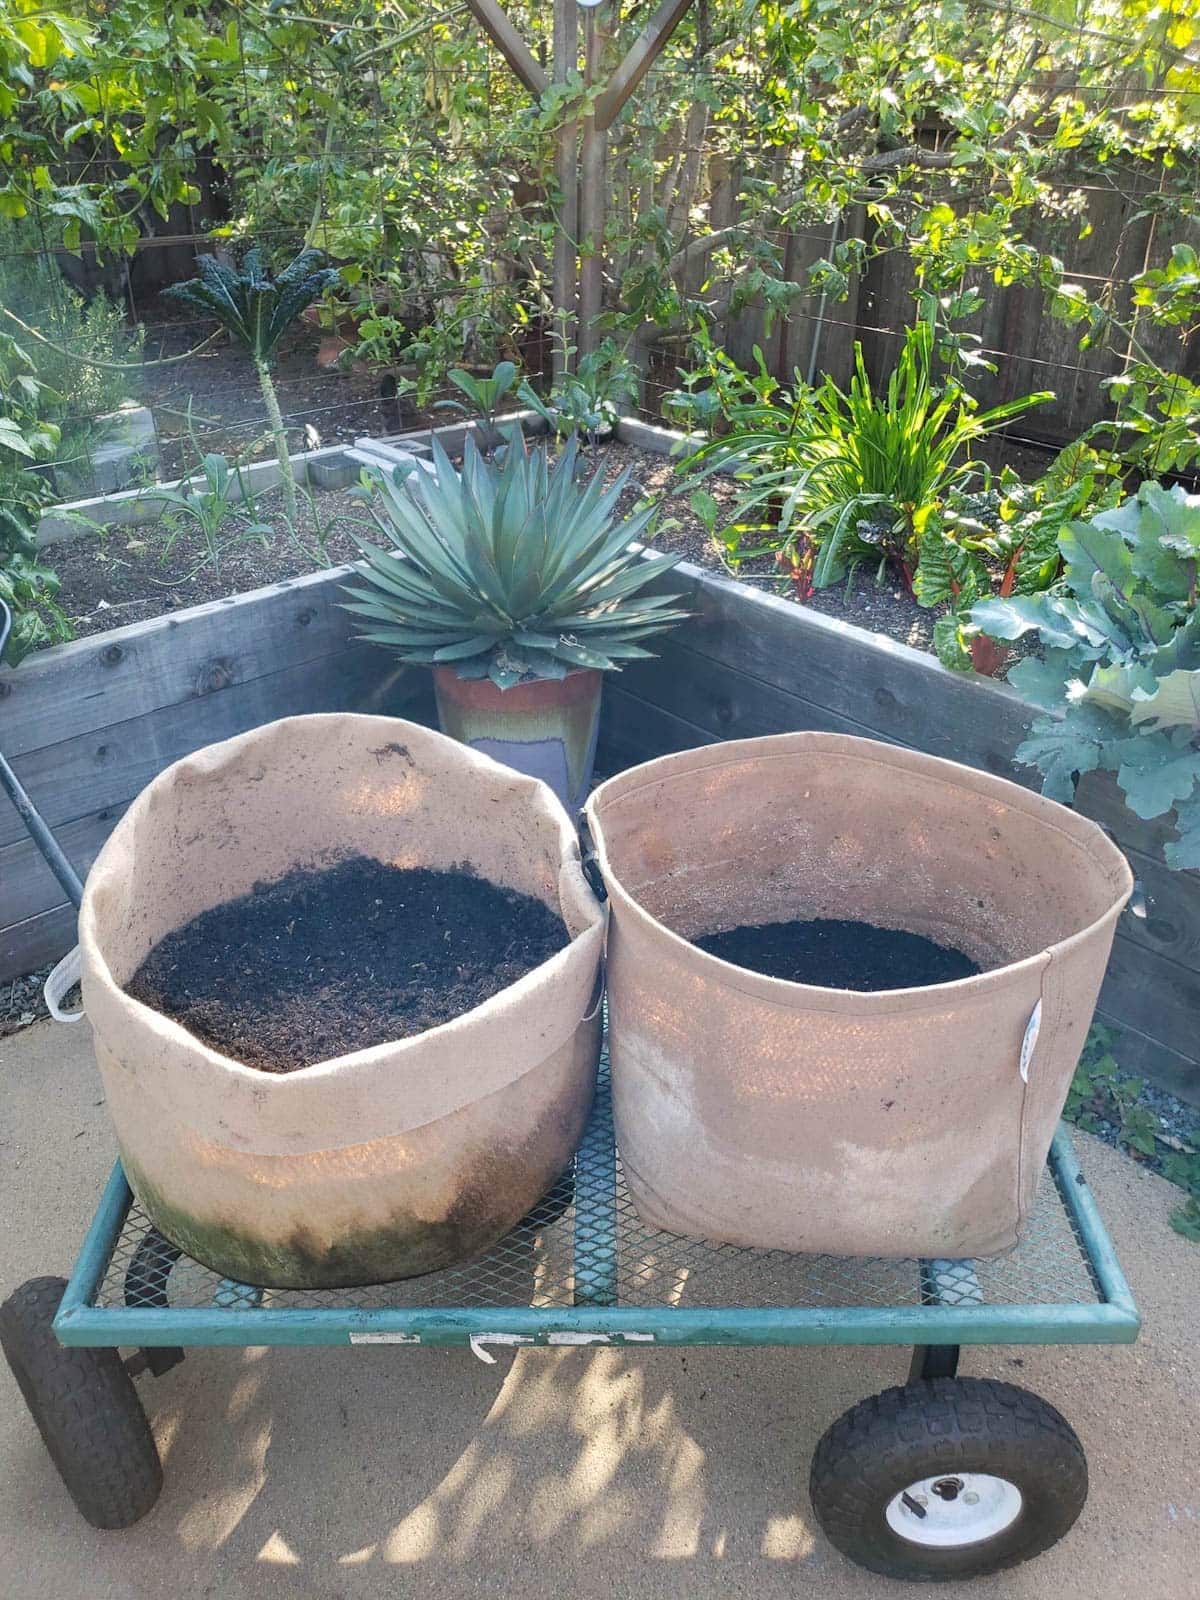
How to Plant Seed Potatoes in a Container
- To plant potatoes in a container, start by adding 4 to 6 inches of rich, fluffy, acidified soil and compost to the bottom of the pot. Don’t fill the container completely yet! You’ll add more soil and/or straw later as the potatoes grow.
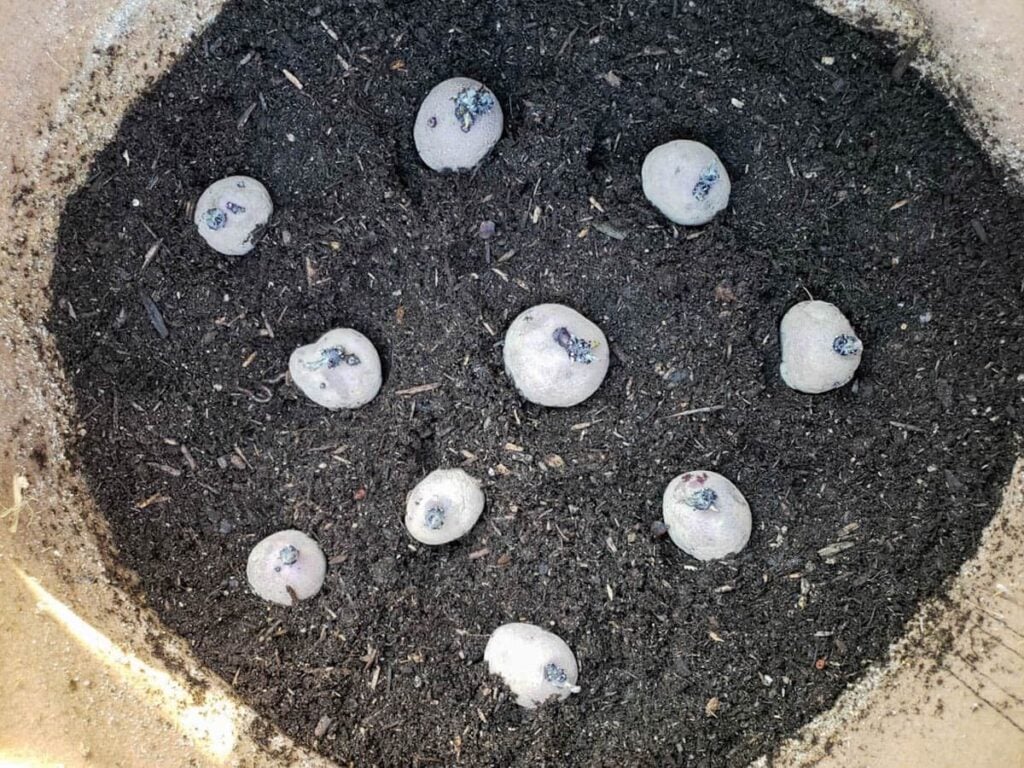
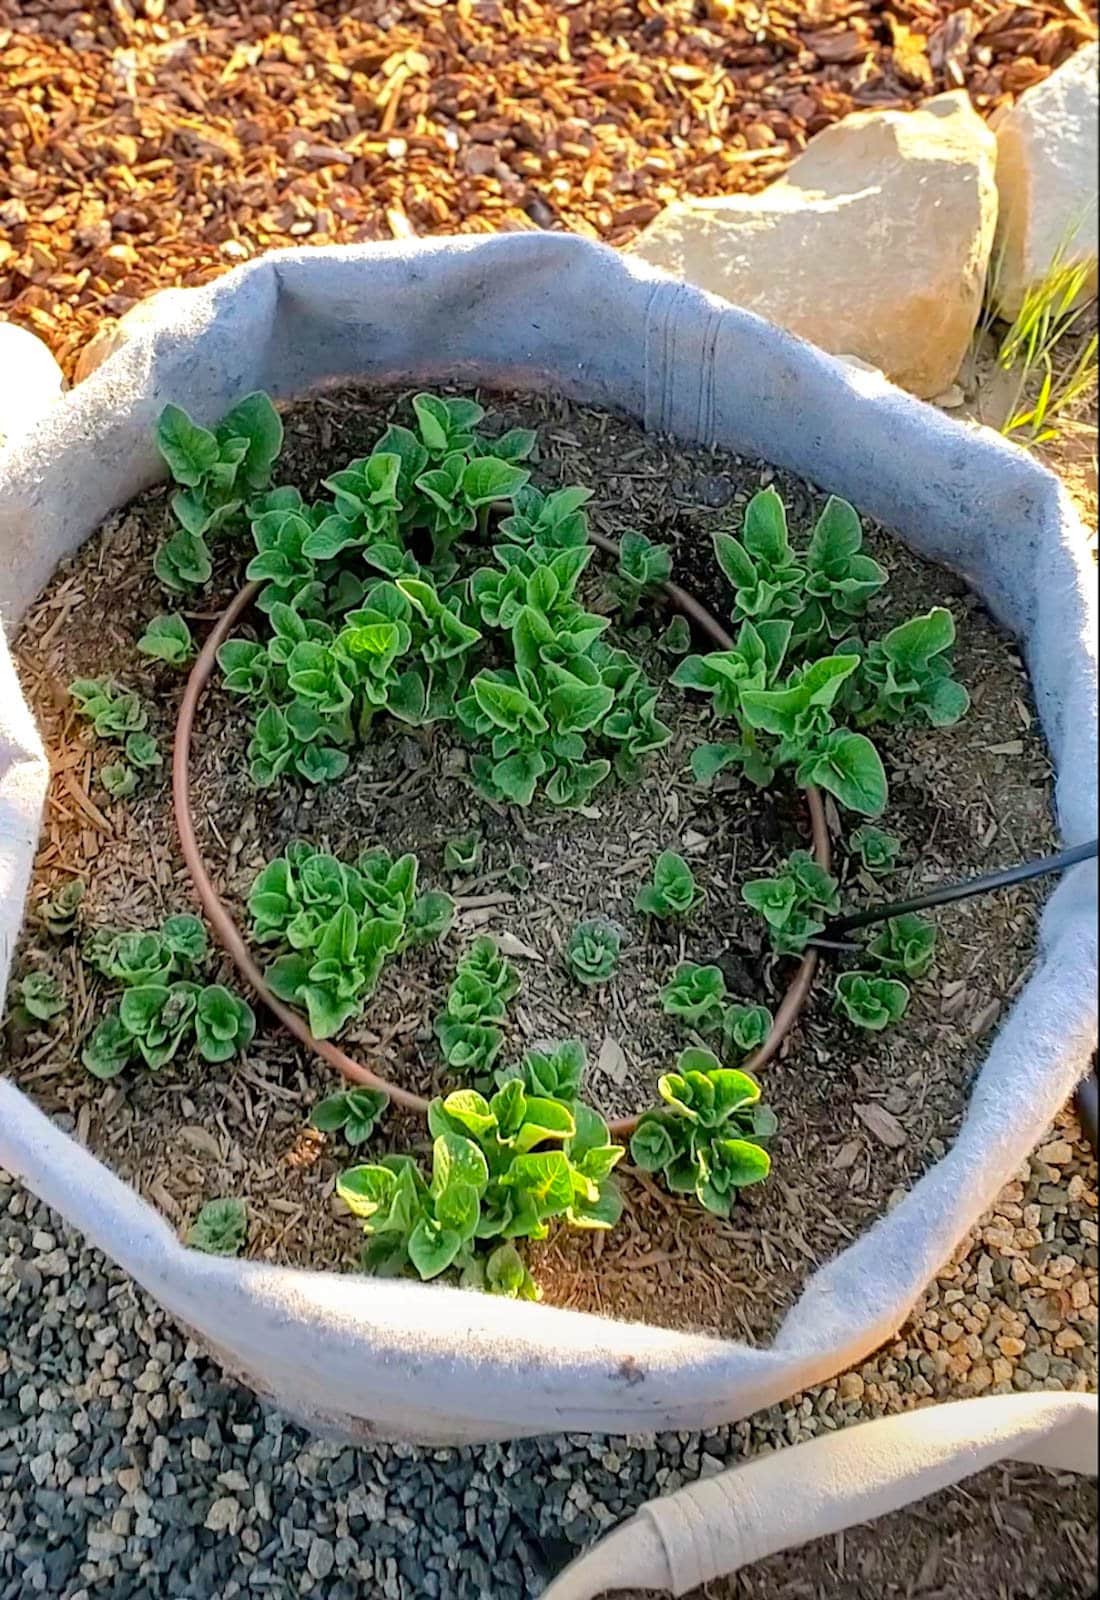
- Next, place pre-sprouted potatoes on top the soil, spaced about 4 to 5 inches apart. We usually plant about 5-6 large seed potatoes or 7-10 smaller seed potatoes per 15 to 20 gallon grow bag. I try to set them with the sprouted eyes facing up.
- Finally, cover the potatoes with 3 to 4 inches of soil on top, and water thoroughly after planting.
Watering Potatoes
Potatoes like to be evenly and consistently moist, but never soggy. When overwatered or grown in heavy soil, they easily rot. Yet a lack of water leads to undersized and less prolific potatoes. Therefore, water deeply and routinely but allow the soil to partially dry out (but not completely) between watering.
To make things easy, we like to use auto drip irrigation for our potato grow bags to provide consistent even moisture. Learn how to set up drip irrigation for containers here.
Burying or Hilling Potatoes
In-ground potatoes are usually hilled (buried) as they grow to encourage more potato formation, and you can do the same when growing potatoes in containers, pots, or grow bags! By covering the leafy green tops as they get taller, more potato tubers will grow off of the buried stems.
Once the green tops reach at least 6 to 9 inches tall, bury the majority of the exposed plant with more soil and compost, but still leave a couple inches of the greens exposed on top. Repeat this process every few weeks as the foliage continues to grow taller, until your container is full and you cannot add more soil.
When hilling potatoes, we usually add more of the acid planting soil mixed with compost. Sometimes, we add a light layer of straw too. Straw helps keep everything nice and fluffy, the way potatoes like it! If you live an area with rainy summers, I definitely suggest layering in straw with soil and/or compost to help promote drainage.

Fertilizing Potatoes
Potatoes are modestly heavy feeders, so don’t skimp on the compost! The fresh soil and compost added during the hilling process will continue to provide fresh nutrients as they grow. We also water our potatoes once or twice with a dilute seaweed extract or aerated compost tea halfway through the growing season.
If you’re using fresh quality potting soil, additional fertilizer likely isn’t needed. However, if you re-use the same containers and soil to grow potatoes again, amend the soil with a balanced all-purpose organic fertilizer before planting more. As I mentioned, a high-nitrogen fertilizer isn’t recommended for potatoes.
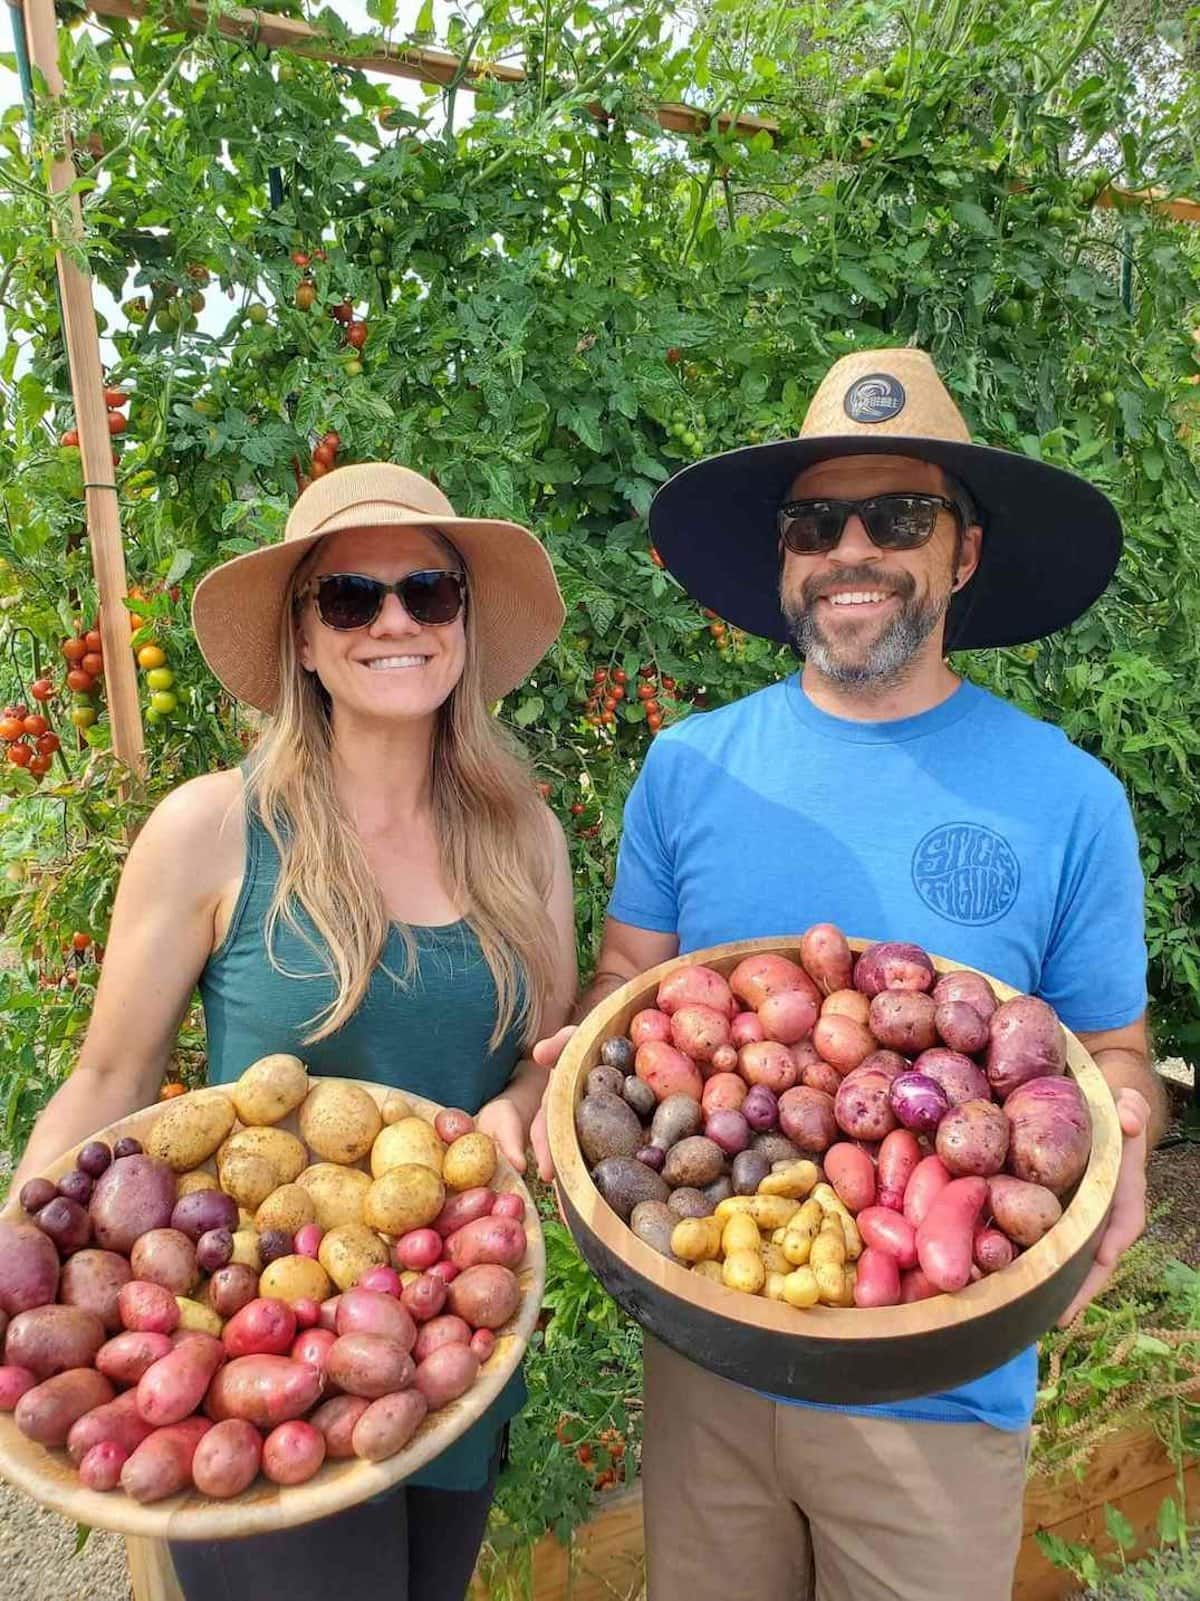
When to Harvest Potatoes
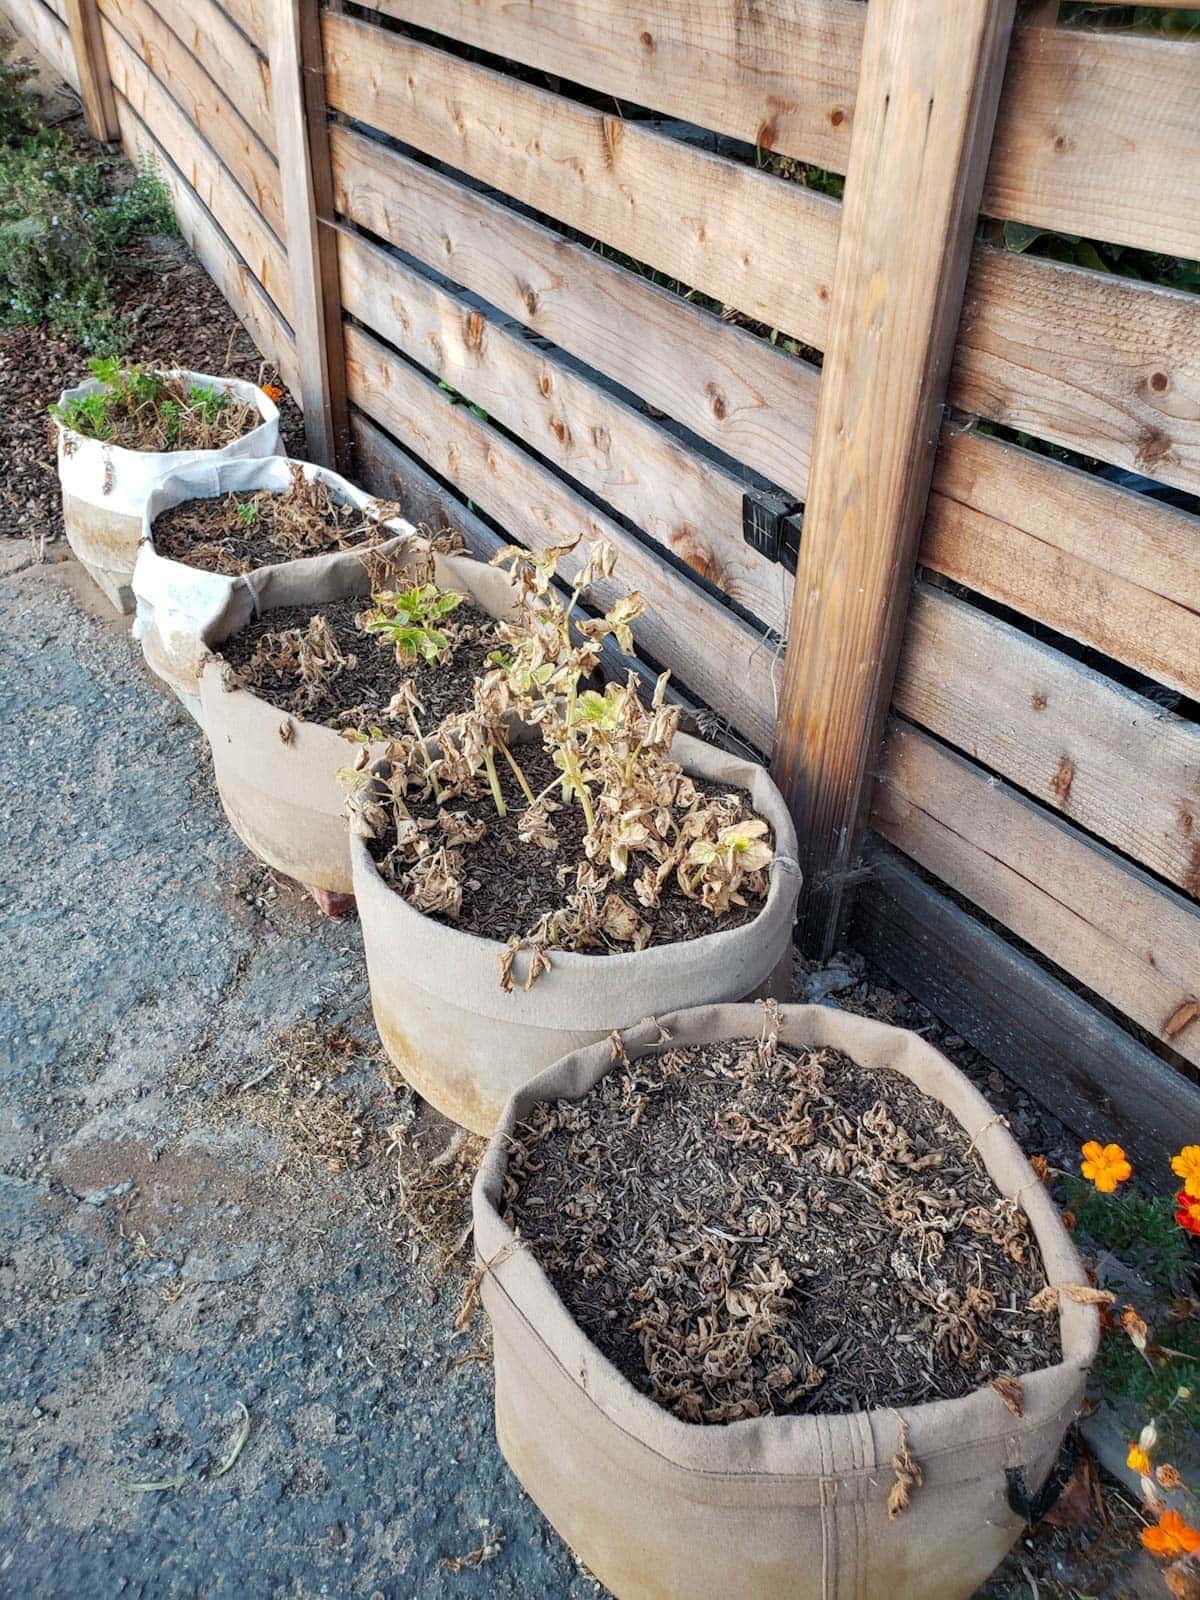
The exact time to harvest potatoes depends on the variety and growing conditions. After several months of growth, the potato greens will start to die back, turning yellow and then dry brown. This is a sign that it is close to harvest time! While the greens are withering away, the potato tubers are drawing in the last bits of energy and nutrition from them.
Once the greens have mostly died back, stop watering your potatoes (ideally 2 to 3 weeks prior to harvest). By cutting water, it helps the potato skins start to toughen and prepare for long-term storage.
Finally, it’s time to gently harvest potatoes about 2 weeks after the greens have completely died back. See tips on how we like to harvest potaotes from containers below.
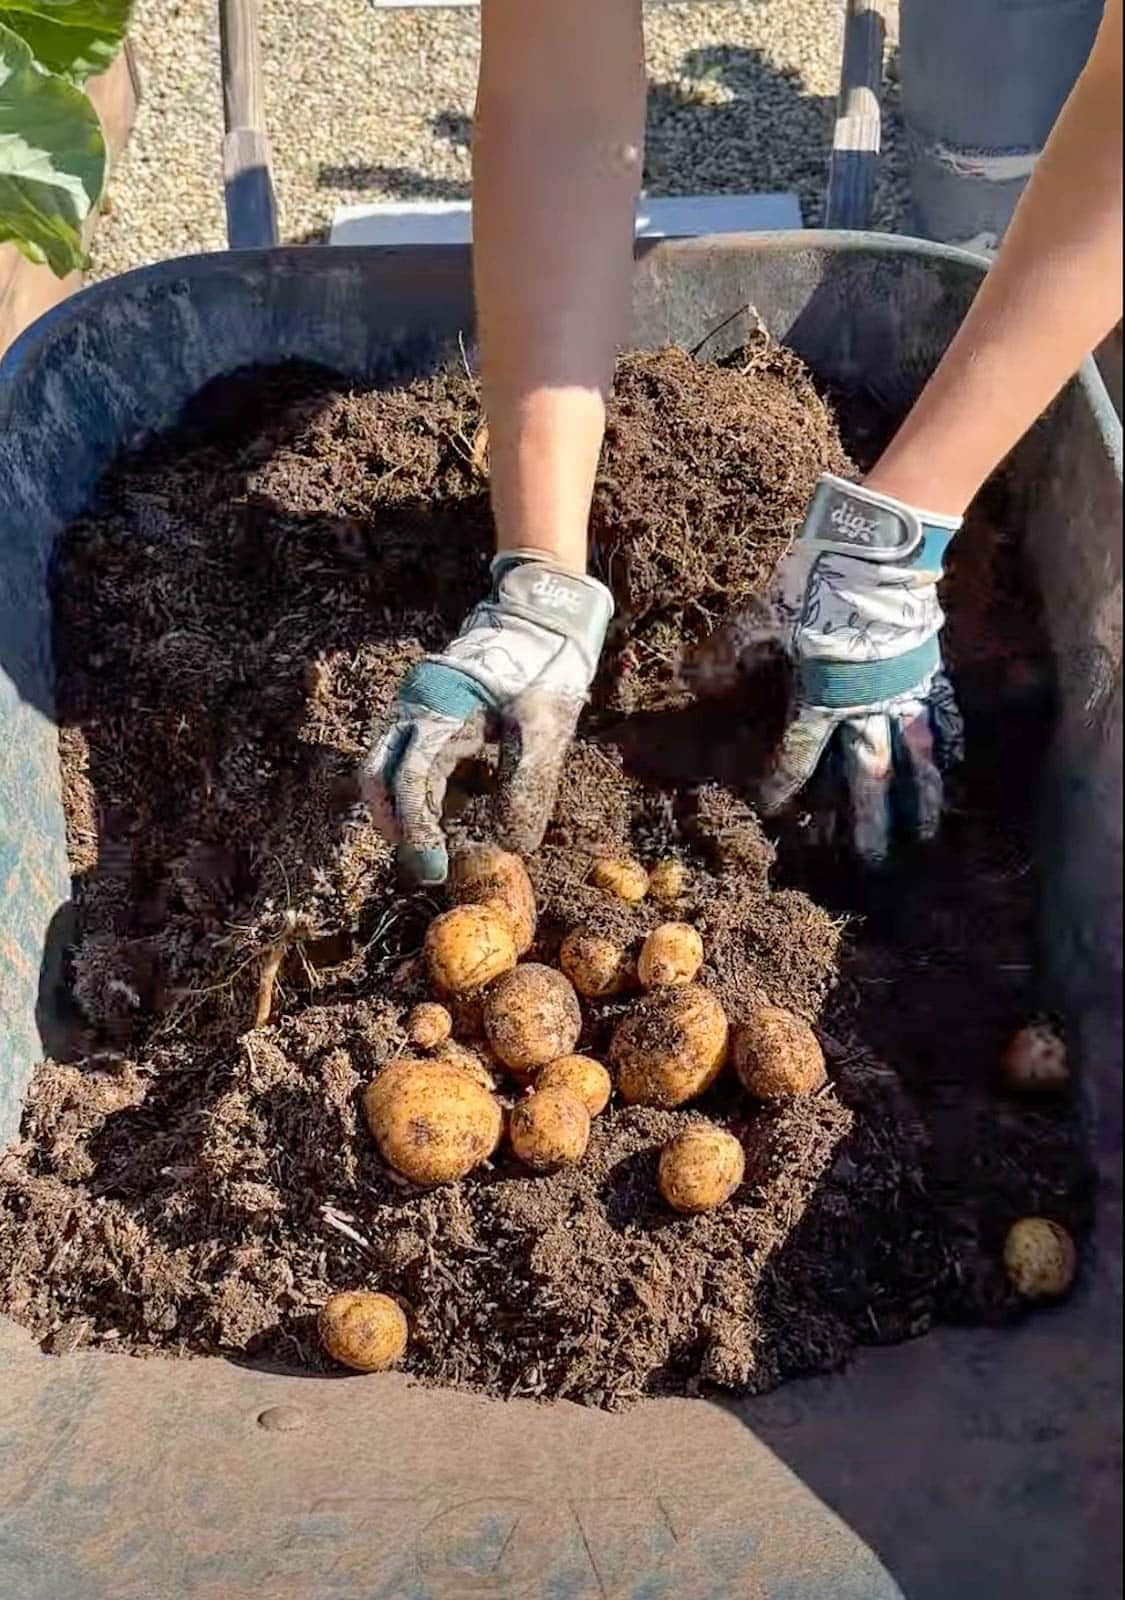
How to Harvest Potatoes from Containers
Growing potatoes in containers makes them exceptionally easy to harvest – and incredibly fun too! All you have to do is gently dump the container out and start hunting around for potatoes. We like to empty our potato grow bags into a wheelbarrow, which makes makes it more comfortable on our backs and also easier to dump the soil back into the bags afterwards. This method also reduces accidentally damaging the potatoes, compared to digging them up with a shovel or pitchfork.
It’s best to avoid washing or wetting potatoes prior to storage, though we have before without issue. Just be sure they’re 100% dry again before storing them.
Storing Potatoes
It’s best to store potatoes in a cool, dark, well-ventilated, dry space – ideally between 45-55°F. A basement or root cellar is ideal, though a cool pantry or spare closet can work too. Store the potatoes in a breathable container such as a paper bag, mesh bag, or cardboard box.
Most sources say to avoid refrigerating potatoes since colder temperatures can convert their starches to sugar, and therefore negatively impact the texture and taste. However, we don’t have the best cool dry storage options in our home, so we’ve often stored homegrown potatoes in the fridge post-harvest… and they taste just fine! That way, they stay firm and good for months.
And now for the best part: enjoy the best potatoes you have ever tasted! If you have never had the pleasure of tasting homegrown potatoes, I am super excited for you!
Here is a video about all how to plant and grow potatoes:
So, are you ready to go grow some spuds?
What is your favorite way to prepare potatoes? I am a sucker for pan-fried, or mashed with garden chives on top. One of our favorite potato recipes is this Roasted Two-Bite Garlic & Herb Smashed Potatoes, perfect for the smaller-than-average spuds. Or, try our drool-worthy, creamy vegan Potato Leek Soup recipe. We love to freeze portions as a way to preserve homegrown potatoes too!
I hope you enjoyed this post, and found it helpful! Please feel free to ask questions in the comments below.
You may also enjoy:
- How to Plant and Grow Cucumbers: Tips for Success and Big Harvests
- How to Grow Turmeric in Containers, in Any Zone!
- Garden Companion Planting Chart, Plans, and Benefits
- How to Make DIY Seed Starting Mix: The Best Recipe


111 Comments
sherice potter
we’ve only grown them once before a long time ago and it didn’t work so well. so now I’m reading this post to know what i’m doing. I’m just getting mine started for the season. I got some early/mid season varieties so i’m chitting them now.
Aaron (Mr. DeannaCat)
Good luck on your potato season Sherice, hopefully you have more success this time!
Michelle
Hello Friends,
I was wondering about the straw you use for container potato growing. Is it ok to use an organic wheat straw instead of rice straw since the seeds from the straw will not affect anything but the soil in the container? I am having a really hard time finding organic rice straw in my area, SF East Bay Area. Also, did you purchase straw
online? I appreciate any help you can offer.
Your new homestead is coming along beautifully! I have been following your progress, you two have a lot of energy!
Thank you,
Michelle
Aaron (Mr. DeannaCat)
Hello Michelle, I think we just used hay or straw from our local feed store. We haven’t used straw for the past few potato grows as we couldn’t find organic hay/straw and weren’t sure how using products that may have been sprayed with herbicides might affect our crops. I think using organic wheat straw would work out great, the seeds shouldn’t spread to other areas of your garden as long as they don’t blow away in the wind. Thank you for the kind words and for following along on our progress, good luck to you in getting your potatoes going, with or without straw, I think it will work out well!
Riley Adams
Hello, I just purchased my first house and am so excited to start my own little garden! I’ve been glued to your blog for a week reading so many of your posts and taking lots of notes – thank you for being and so thorough and accessible to a total beginner!
I’m curious, do you practice crop rotation with your potato soil to add back in the needed phosphorous or is it not recommended because the soil is acidic? Do you need to add more high phosphorous fertilizer every time you replant or does your ACT provide enough?
Thank you❤️
Aaron (Mr. DeannaCat)
Hi Riley, congratulations on your new home and that’s amazing you are going to get a garden going! We typically reuse our potato soil since it is more acidic and we just re-amend with our usual amendments (kelp meal, neem meal, alfalfa meal, crab meal) before replanting, the company Down to Earth offers an Acid Lover’s mix which would also be good for re-amending although we typically use less than what they recommend on the package. If you keep your soil healthy and alive, using AACT will definitely help with that, your potatoes should do really well. Good luck getting your garden going and keep us updated on your progress!
Cathy
I am growing potatoes For the first time, and am using grow bags. I know that you are supposed to rotate where you plant potatoes in the garden, but can you reuse the same soil and same grow bags next year? (I mixed my garden soil with peat moss to lower the pH and lighten the soil and I’d hate to just dump it out at the end of the season)
Aaron (Mr. DeannaCat)
Hi Cathy, that is exactly what we do for the most part, we usually amend the bags with some fresh compost at the beginning of the season. Good luck and have fun growing!
Lauren
Hi guys!! I’m whatever comes before a novice gardener but I loved this article and it inspired me to try potatoes this year! I think I’ve been pretty successful because they got huge and looked healthy over the summer. But I live in Wyoming and we’ve already had snow this year so I pulled them inside, determined to harvest them soon. It’s been 4 months since I’ve planted and was expecting them to start turning yellow and then brown but they’re still a deep dark green with a few random dead stalks. I was just wondering if I’m missing something or if it’s really as simple as them needing more time? Most of the reading I’ve done said they were usually ready in 80-100 days. Anyway I was hoping to hear your thoughts! Thanks so much for this blog, its really become my favorite pastime! 😃❤️
Aaron (Mr. DeannaCat)
Hi Lauren, it’s great to hear that you are jumping into gardening and have decided to give potatoes a try! We mostly take maturation times with a grain of salt as there can be a number of factors that go into the amount of days a vegetable can take to produce fruit. We have found that when potatoes are ready to harvest, the greens will die all the way back and turn yellow or brown. Potatoes can handle a light frost but anything considered hard is too much for them. If you are getting too late in your season it is best to harvest them and take what you can from them. Next year, you may wish to start a little earlier to ensure your potatoes will be ready to harvest before your cold weather sets in. We’re glad you enjoy the site so much and we appreciate your support, hope that helps and have fun growing!
Suzanne Phend
Hello! Unfortunately in the Midwest we don’t have those awesome soil options available. I want to try to add the acid to my organic soil mix. How far in advance do I need to make my soil amends before planting the potatoes? We plan to use fabric grow bags because we have very heavy/clay mix soil. We love potatoes and never have good yields. Hoping to have some luck this year!!
Aaron (Mr. DeannaCat)
Hello Suzanne, if using elemental sulfur, it can take up to a couple months for the amendment to acidify the soil as it is a slow process. Here is a good article from Ohio State on how to lower soil pH. Hope that helps and good luck on your future potato harvests!
Martina Webb
Hello and thanks for the great article! Once you harvest your potatoes, can the soil be re-used for potatoes the next year? Or, do you compost it? Would it be “safe” to dump onto an existing vegetable garden bed or would it be a risk to do so. I am thinking of it as a source of disease.
Aaron (Mr. DeannaCat)
Hello Martina, we usually save our soil for the following season as we typically use acidified soil. It is very easy to over winter the soil as long as you have the space, yet I don’t think of the potato soil to be too much of a source of disease as long as everything was healthy. Hope that helps and good luck!
Dejah
Deanna & Aaron, Just curious about how long the potatoes need to cure once they are removed from the soil. I have heard conflicting reports on this and would love to hear your take. We’ve got a big planting bed that became our grand potato experiment and it has produced quite a bit of crop, but the whole curing thing we honestly didn’t know about until more recently. Thanks in advance!
Aaron (Mr. DeannaCat)
Hello Dejah, that is great to hear you have grown such a large amount of potatoes, congrats! We are never able to commit enough space to grow enough spuds where we need to store them anywhere else but the refrigerator. Anyway, before you harvest the potatoes it is best to not water them for about two weeks. Come harvest time, the University of Nebraska states to store the potatoes between 45 and 60 degrees Fahrenheit at a relative humidity of 85 to 95 % for two weeks. Not sure how realistic it is for you to hit those numbers but it is something to shoot for. Once cured, store the potatoes in a dark and cool location for long term storage. Let us know how it works out for you!
Sandra Dostalik
Hi! I’m excited about growing potatoes for the first time this upcoming spring, and I wanted to ask if you could/how you could save more seed potatoes for the following season after growing them? Thanks!
Aaron (Mr. DeannaCat)
Hello Sandra, you could save the best looking potatoes for planting the following season. Store the seed potatoes in a cool and dark location until you are ready to plant them. However, if you are looking for continued good yields of potatoes it is best to use fresh certified seed stock each year or season. Hope that helps and good luck!
dc
Thank you so much for this post!
I’m a very newbie gardener, and your blog is very encouraging and inspiring!
I was wondering if this article applies to Sweet Potatoes, or is it only for “Irish-type” potatoes?
Thank you so much,
dc
Aaron (Mr. DeannaCat)
Hey DC, we have yet to grow sweet potatoes but I believe they grow best in warmer weather and need at least three to four months before they are ready to harvest. They will also need plenty of room for their vines to run and spread out. Sweet potatoes are best grown from “slips” which are sprouted pieces of sweet potatoes that may be available at nurseries or online. In all, giving them rich, well draining soil along with adequate water and care should provide good results. Good luck and have fun!
Maura
You have me tempted to try growing potatoes now! What do you do with the soil after you have pulled out the potatoes? Can it be reused?
DeannaCat
Hi Maura – Absolutely! We keep that same acidified soil in the grow bags after harvest (tuck excess aside in a bucket if we don’t need it all when planting the new round of seed potatoes) and continue to use it for many growing seasons. We amend with a little compost to refresh it, sometimes water with compost tea to also feed the soil and potatoes with nutrients, and you could add a little acid lovers fertilizer like this one in the following years. Enjoy!
Rebecca
Hi Deanna! Thanks for the really informative article! Just a question about topping up the grow bags throughout the season – how do you store the soil that’s set aside for the hilling process? Do you amend the whole lot then siphon off half of it to keep in a container somewhere to add back in later? I know it’s probably obvious but I’m trying to get my head around the logistics and where to keep things with limited space as I approach potato season in the southern hemisphere. Thanks!
Aaron (Mr. DeannaCat)
Hi Rebecca, we store our extra soil on the side of our house. It is also very easy to keep extra soil in storage containers, grow bags etc. You can either amend all of the soil or just amend parts of it as you go. If your space is extremely limited, you could forgo the hilling process and just plant into a full grow bag though your harvest may be impacted. You have the right idea and I am sure you will do great!