

How to Plant and Grow Potatoes in Containers, Pots, or Grow Bags
Potatoes are easy to grow, incredibly fun to unearth come harvest time, and the rich homegrown flavor is unbeatable! So come learn how to grow your own potatoes in containers, pots or grow bags – perfect for small gardens, patio gardens, or larger spaces alike. We’ve been using this method for nearly a decade with excellent results!
This post covers everything you need to know about growing potatoes in containers: how to prepare seed potatoes for planting, the best soil to use, hilling and other ongoing care, and tips for harvest and storage. We’ll also explore various types of potatoes to grow and container options. At the end of this post, check out the video of planting potatoes in grow bags too!
Note: This post was originally published in March 2019.
Would you like to save this?
Disclosure: Homestead and Chill is reader-supported. When you purchase through links on our site, we may earn an affiliate commission.
The Best Containers to Grow Potatoes
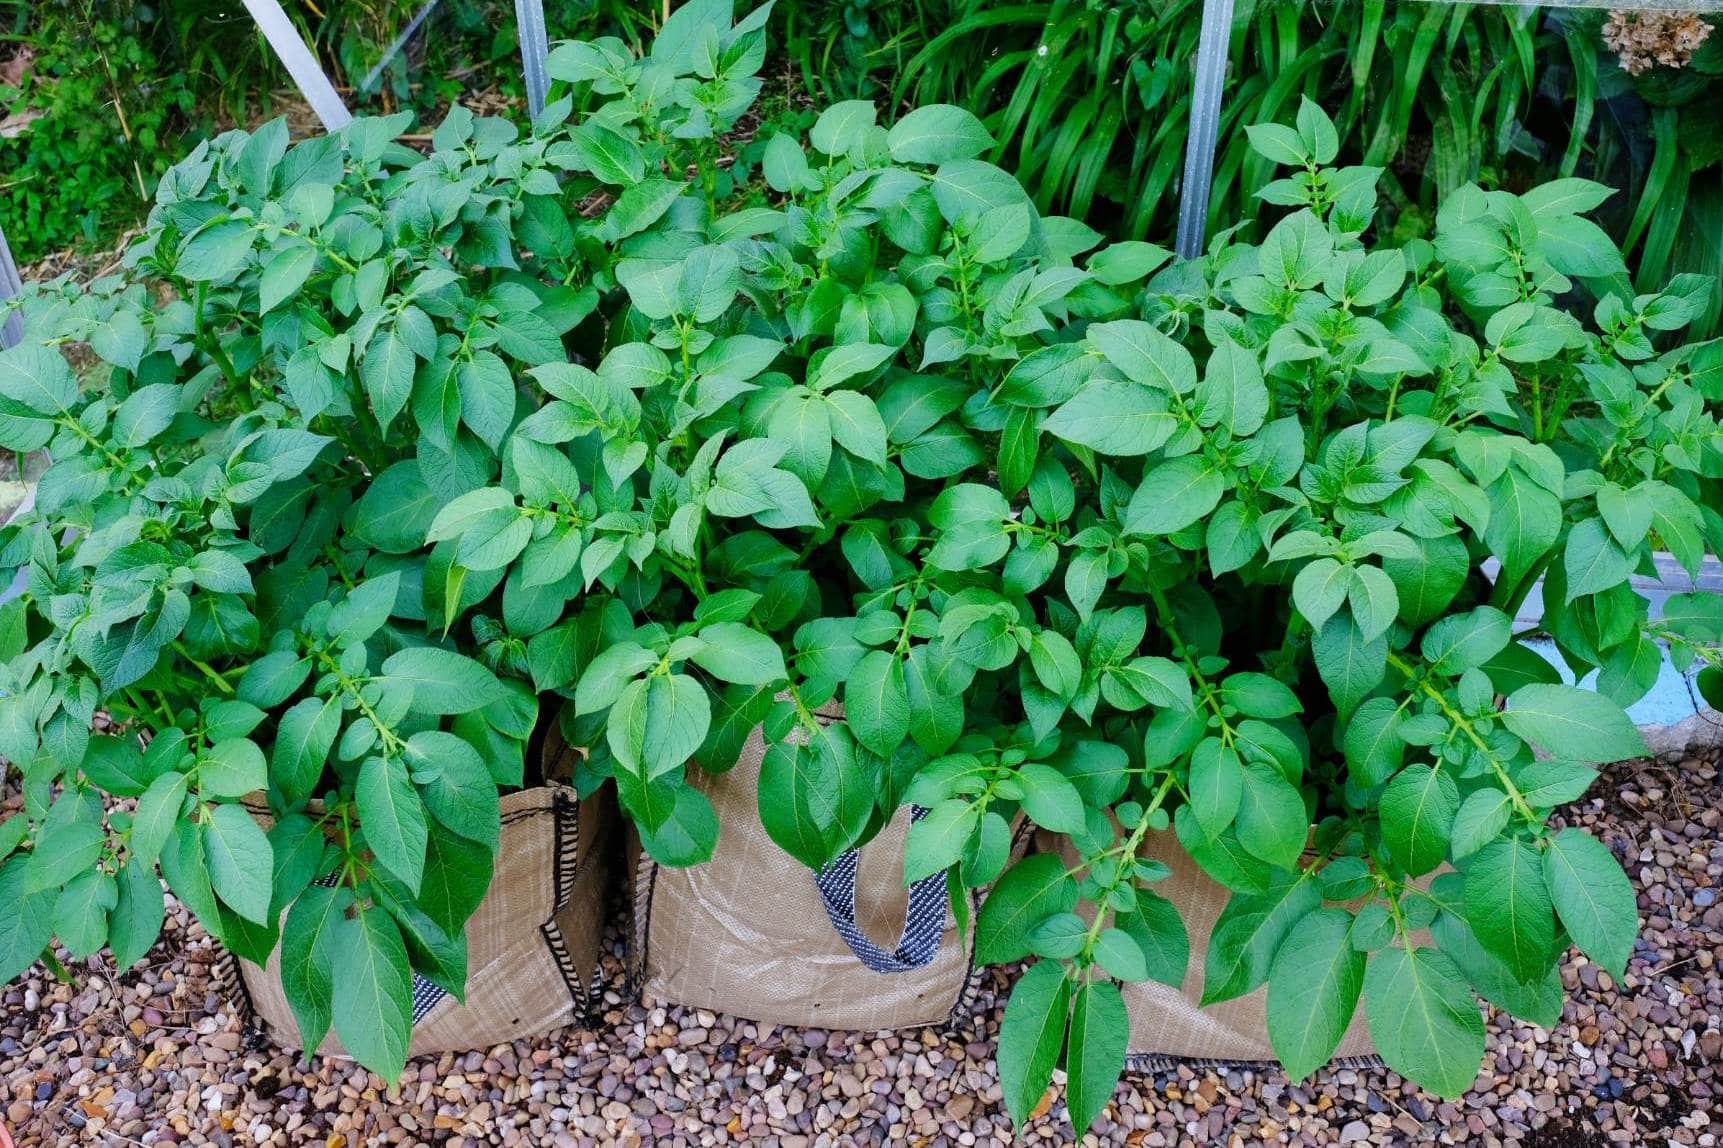
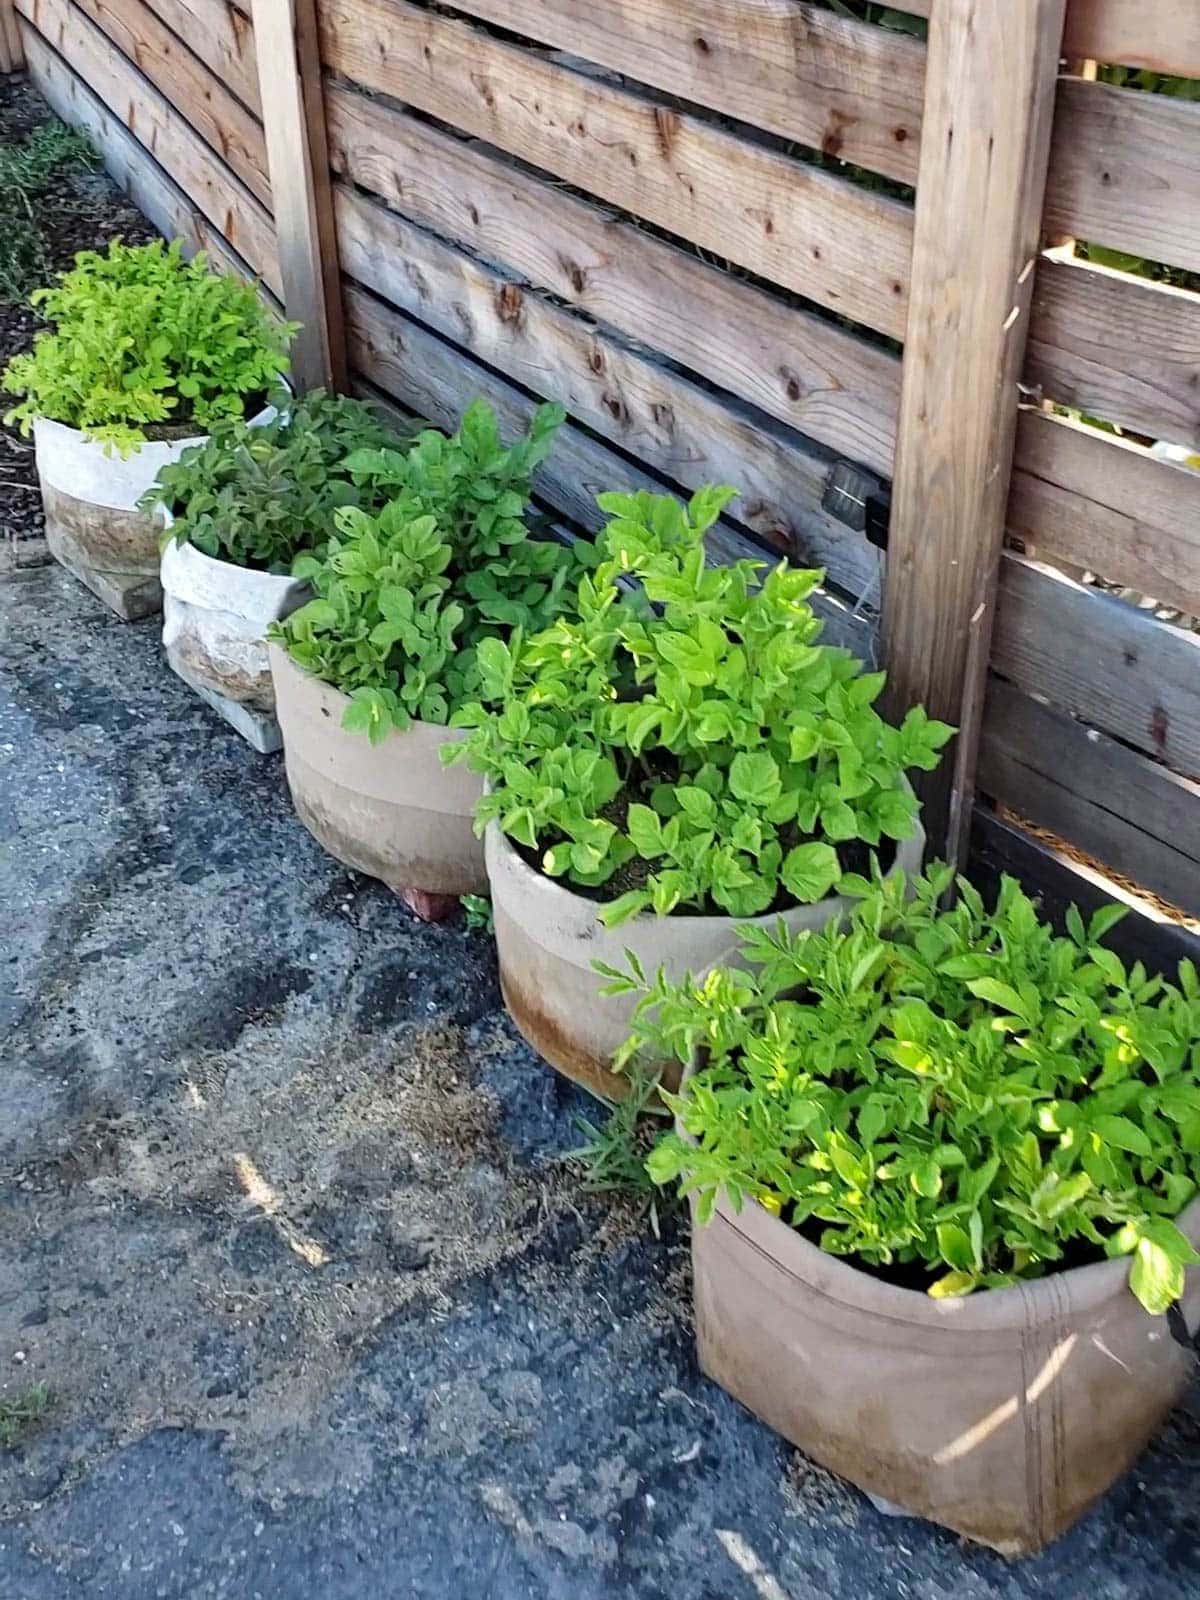
You can grow potatoes in a wide variety of containers: in a large pot, 5-gallon bucket, plastic tub, grow bags, used coffee sacks, half wine barrel planter, a cylinder made of wire fencing, or even trash cans!
The size of the container dictates how many potatoes you can plant and grow. For the best results, choose a container that is at least 15 to 24 inches tall (which allows space for gradual hilling) and has at least 10 to 15 gallon soil capacity. Seed potatoes need to be spaced about 4 to 5 inches apart, so the wider the container, the more you can plant.
Potatoes require excellent drainage and do not tolerate soggy soil (they will rot) so ensure your chosen container has ample drainage holes.
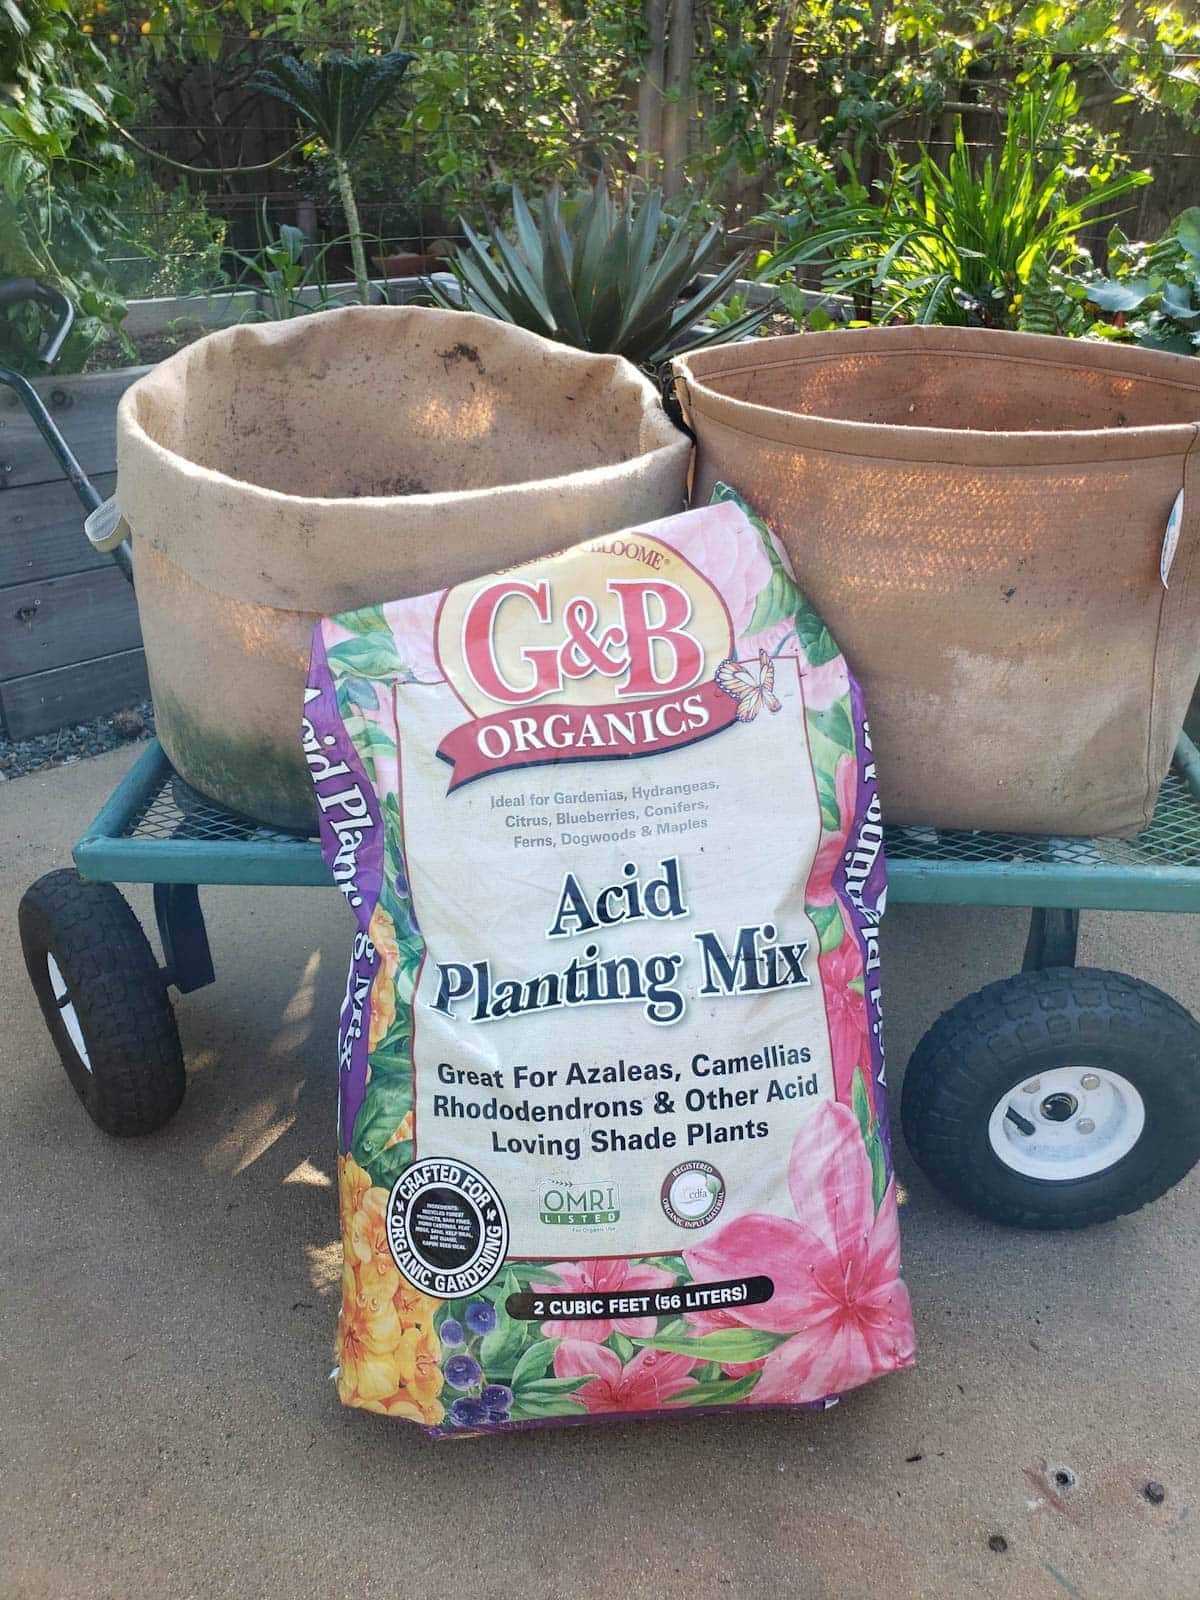
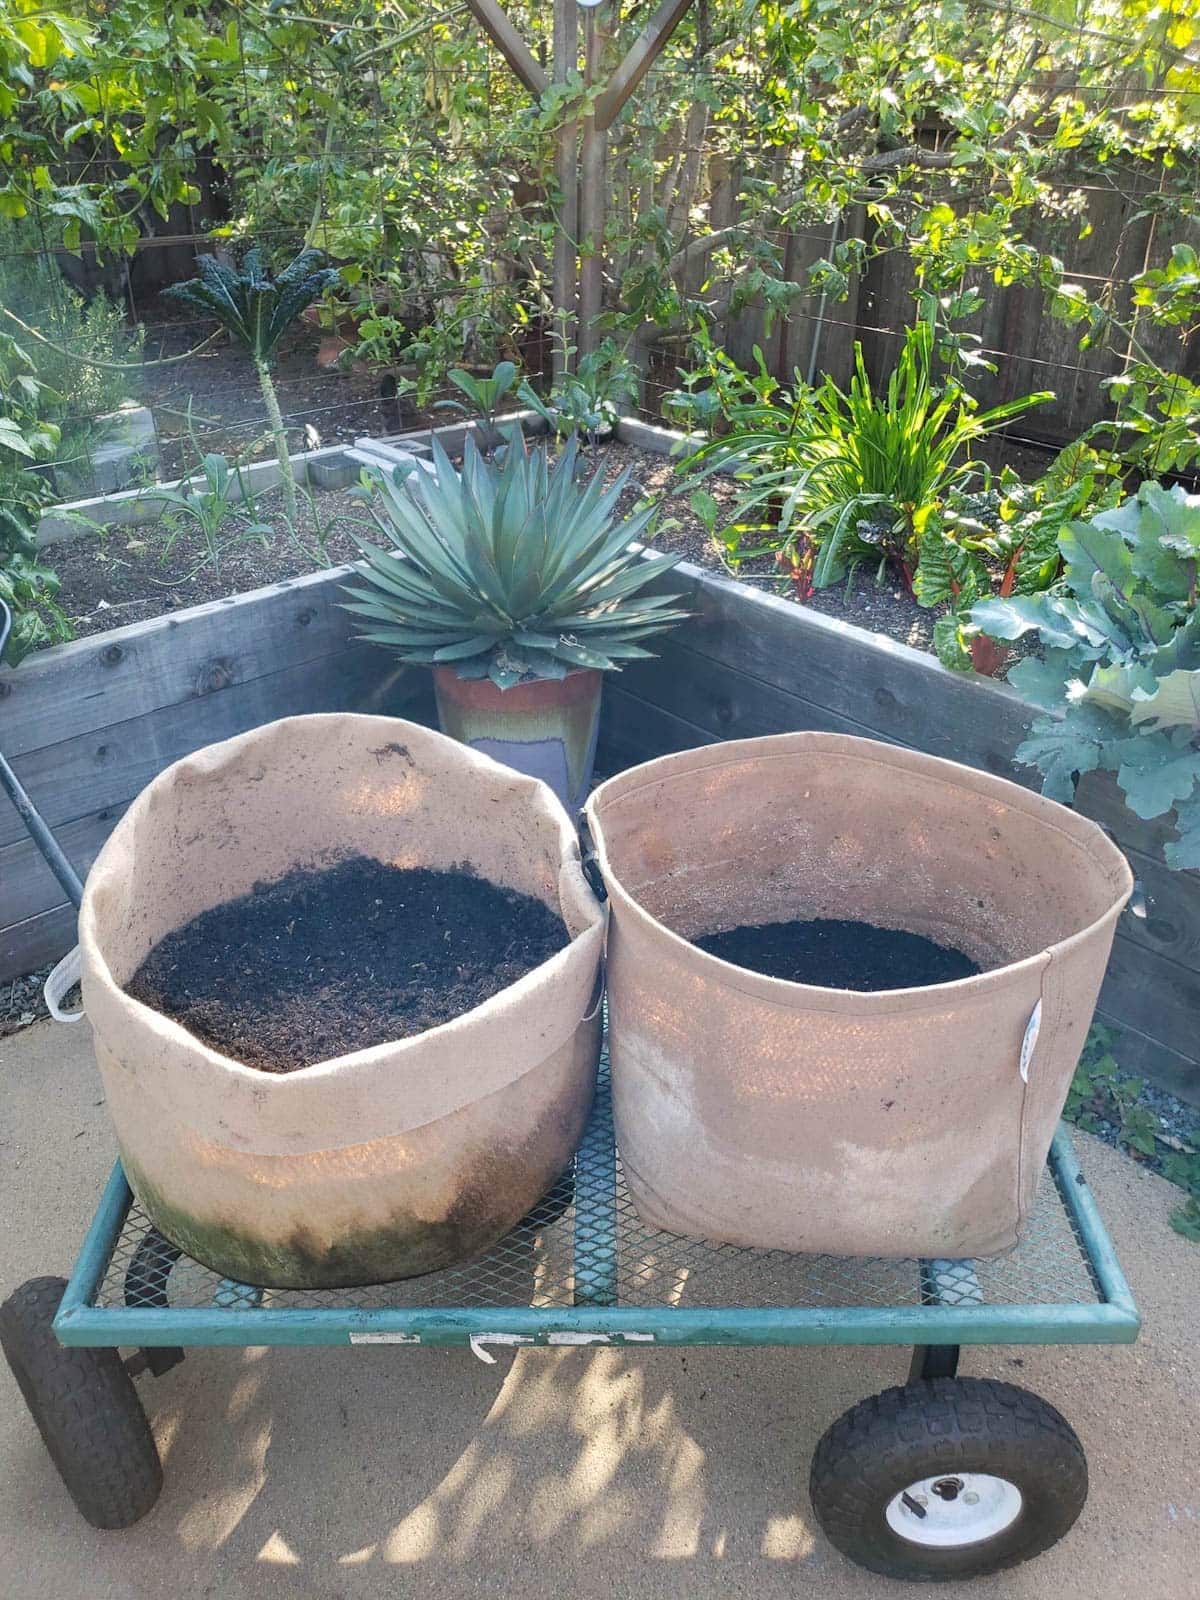
We personally love to grow potatoes in 15 to 20 gallon fabric grow bags because of their ideal drainage, mobility, ability to control the soil condition and moisture, and easy harvest.
Potato Varieties and Characteristics
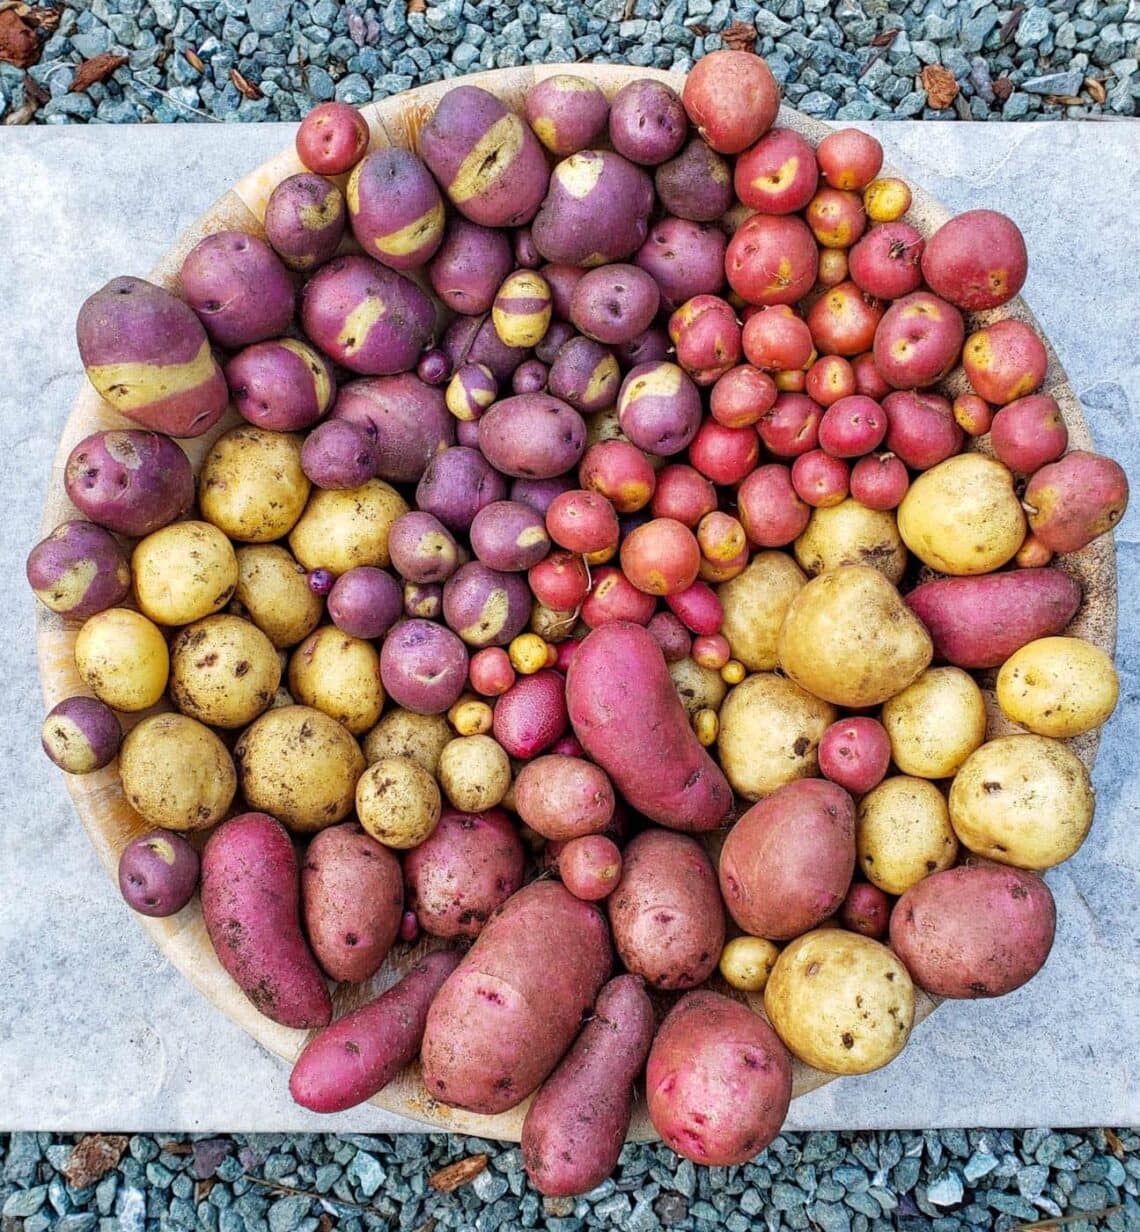
There are dozens of different potato varieties to choose from, which can vary in size, shape, color, texture, flavor, best use (e.g. frying, mashing or baking), storage life, and time to harvest. The variety description should outline all of these attributes. Potatoes are also broken down into three categories: early, late, or mid-season varieties.
Early, Late, and Mid-Season Potatoes
- Early season potatoes or “new potatoes” reach maturity within 75 to 90 days. These could be ready to harvest in early summer, depending on when you plant them. Early potatoes are least likely get blight, as they’re usually harvested before disease can take hold. However, they don’t last as long in storage. Popular early potatoes include Yukon Gold, Caribe and Red Norland, but there are many more.
- Mid-season potatoes, also referred to as “second early” are just a tad longer than earliest types. These ones will be ready to harvest in about 95 to 110 days. Red Pontiac and Kennebec are staple mid-season potatoes. Yukon Gold is sometimes considered a mid-season variety too.
- Late-season potatoes, also called “main crop potatoes” are generally ready to harvest within 120-135 days, closer to the middle or end of summer. While they take longer to grow, the late-season type are known to last longer in storage as well. These are said to be best for baking, mashing, and roasting. The earlier varieties are more crisp and tender for pan-frying. German Butterball, Kennebec, Russet Burbank, and Butte are well-known late-season varieties.
Ideal Sun and Temperature for Potatoes
Potatoes are considered a cool-season crop, ideal for the spring or fall garden. Potatoes grow best when temperatures are 50 to 80°F. They can withstand brief periods of higher heat, but will become stressed and stunted if the soil routinely stays over 55°F at night.
Potatoes are also sensitive to frost and freezing; the exposed greens will easily wilt with frost damage. It’s easy to protect potatoes from temperature extremes using either shade cloth or frost cloth as needed.
Place your potato container in a location that receives full sun. Yet if you live in a climate with very hot summers, consider a location with a little late afternoon shade. Also avoid the hottest spots of your garden, like near a south-facing wall or other source of radiant heat.
When to Plant Potatoes
- Plant potatoes outside in early spring once the soil temperature has reached at least 40 degrees Fahrenheit. Use a basic soil thermometer to monitor, and measure about 6 inches deep.
- Refer to your growing zone. You can plant potatoes as early as two to four weeks before your last frost date in spring.
- It’s best to chit (pre-sprout) potatoes a few weeks prior to planting. See instructions below.
- For climates with very hot summers, it’s key to plant potatoes as early as possible. Planting fast-maturing early season potato varieties in spring is good way to beat the heat! Or, plant early potatoes in late summer for a fall harvest; they can mature quickly before the first frost hits.
- In our temperate climate (cool coastal CA zone 9), we are able to plant potatoes at various times throughout the year.
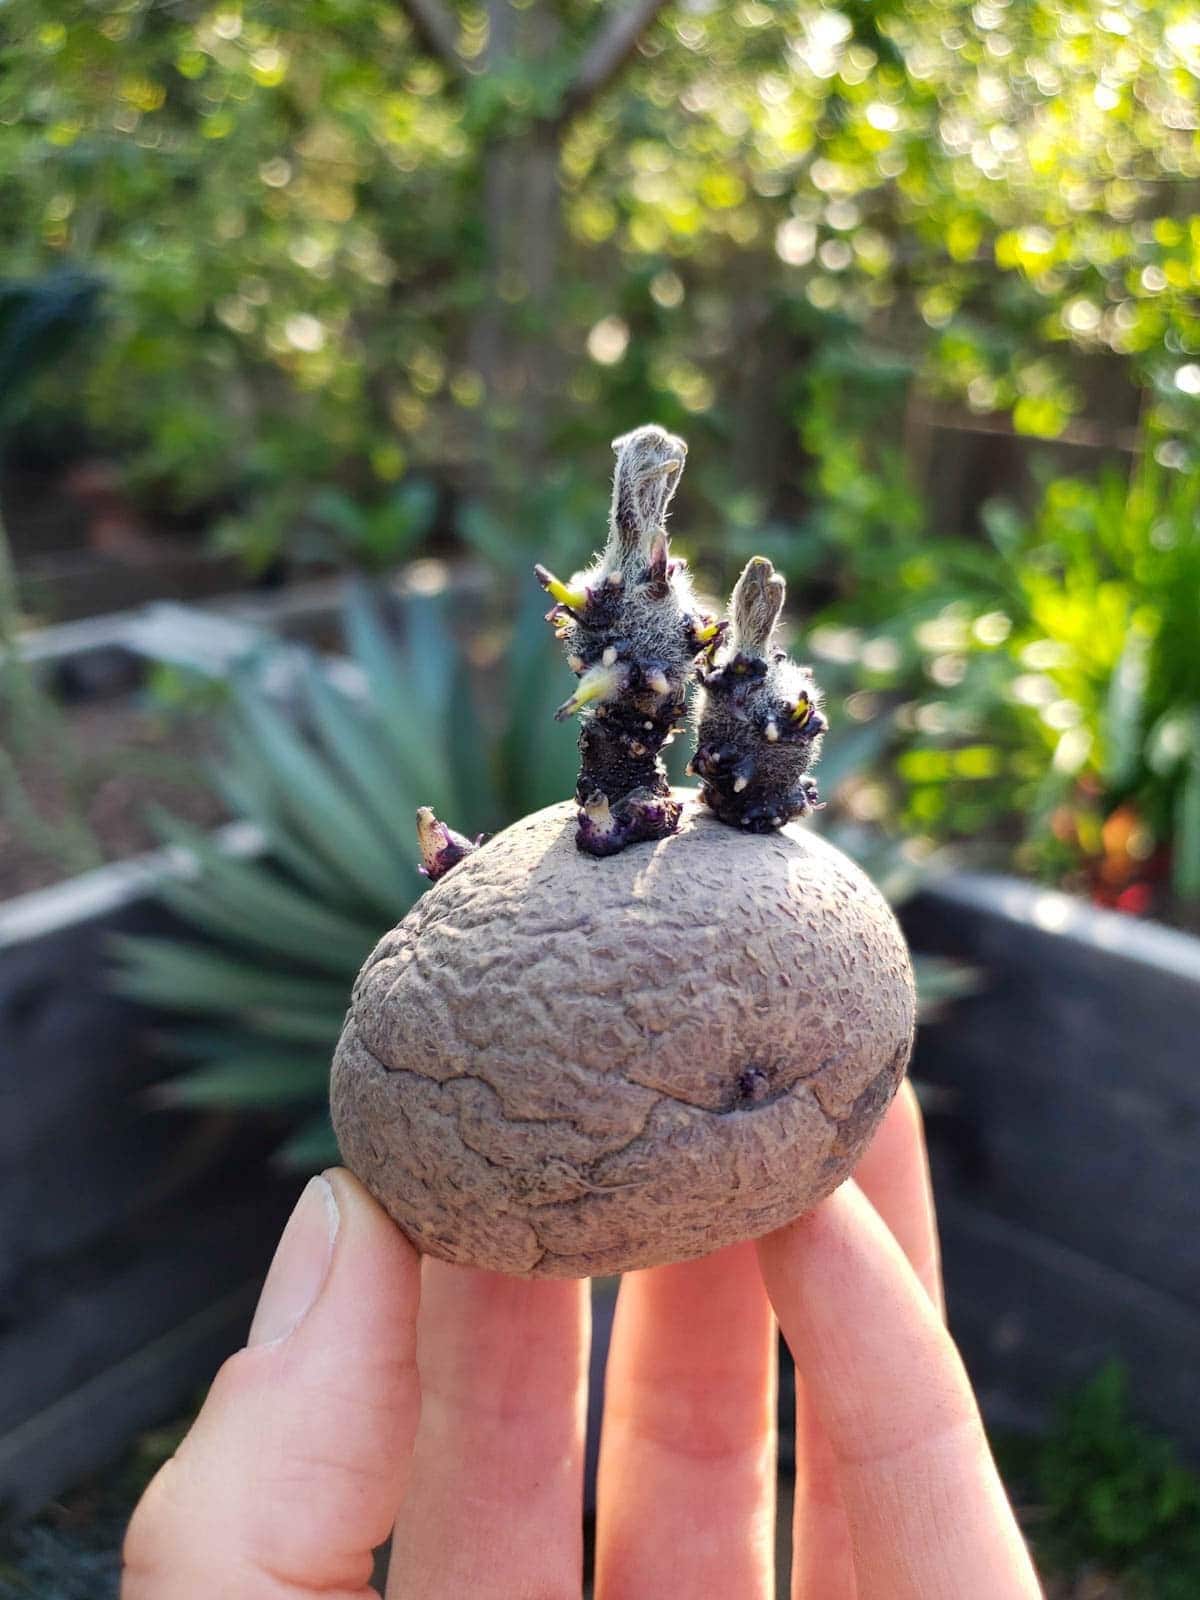
Starting with Seed Potatoes
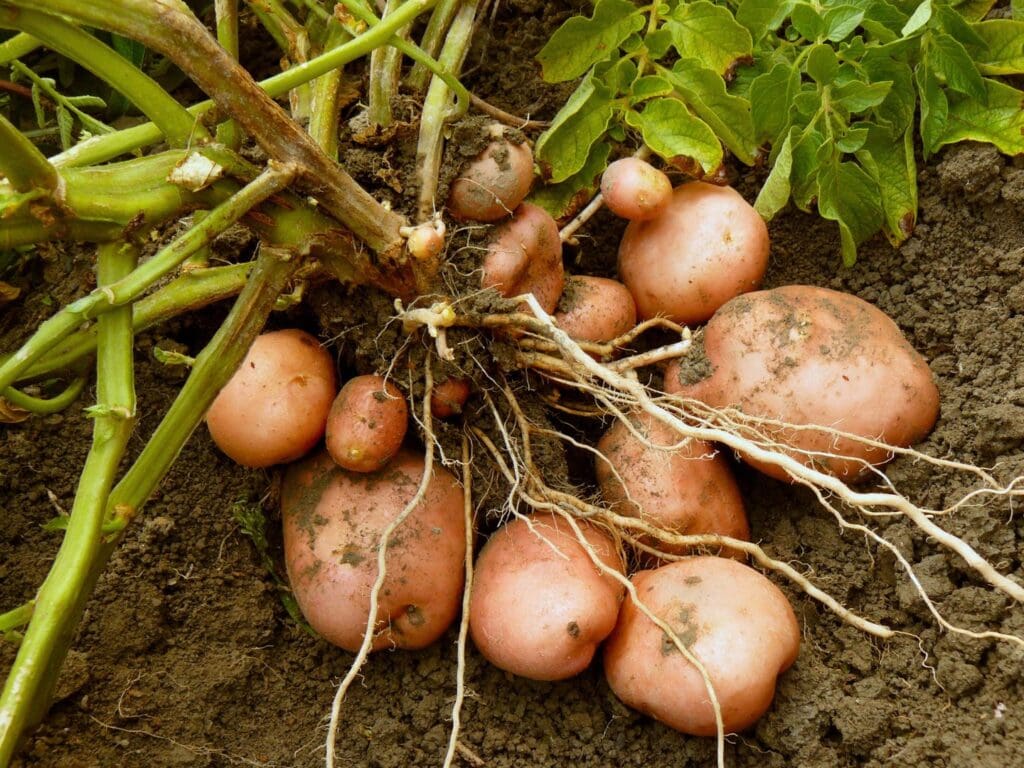
You can either buy potatoes that are specifically sold as seed, or try sprouting store-bought potatoes to grow. Each seed potato that you plant will grow a cluster of 3 to 8 new potatoes!
Generally, you’ll have the most guaranteed success with seed potatoes. They’re grown specifically for this task, and are usually certified to be disease-free. They often times even come slightly pre-sprouted for you! You will also have more options to find and grow unique varieties that way.
Some places we’ve bought seed potatoes from over the years include High Mowing Seeds, Seeds Now, Peaceful Valley, Territorial Seed, Johnny’s, and Irish Eyes. We also sometimes see them at our local garden center or nursery. Note that most places will sell out of seed potatoes by spring! It’s best to order them in the winter if possible, or you may be left with slim pickings.
Growing from Grocery Store Potatoes
If you opt to try to grow from store-bought potatoes, here are a few tips: One, most definitely choose organic. Non-organic produce can be treated with chemicals that inhibit sprouting. I’d also suggest buying your potatoes well in advance (like months) before you want to plant them. This will give them plenty of time to soften up and sprout, also referred to as “chitting” – explained below.
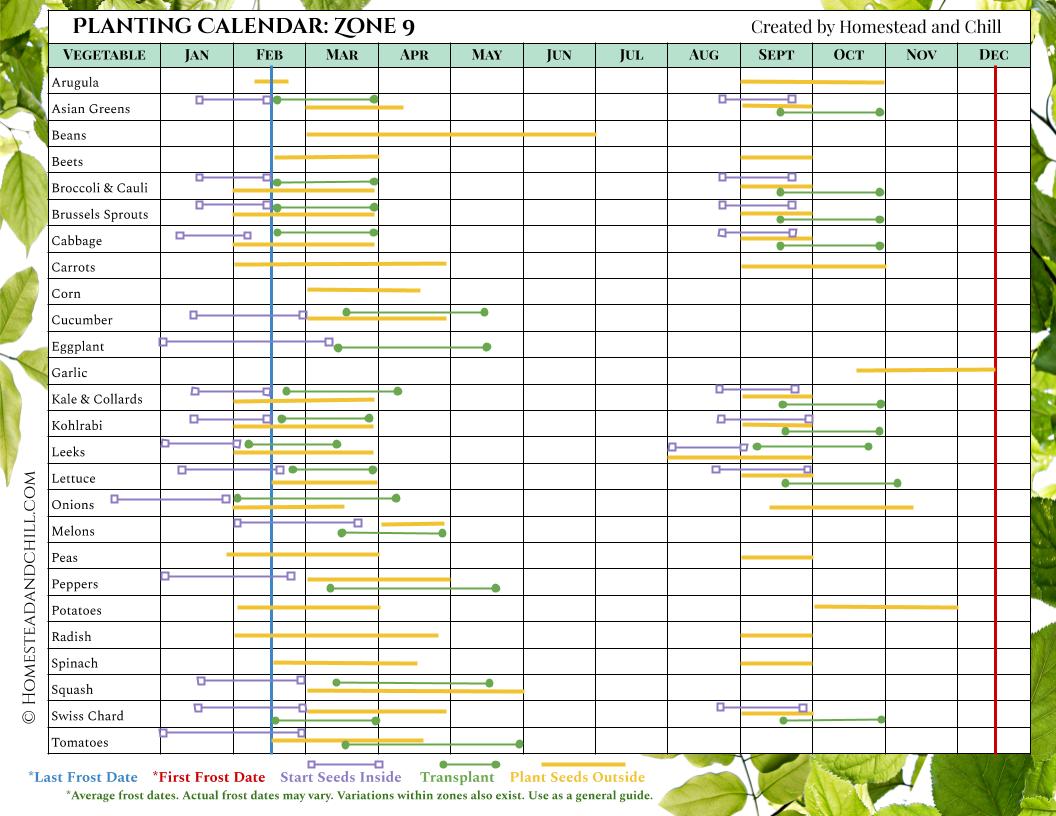
How to Pre-Sprout (Chit) Seed Potatoes Before Planting
Chitting is the process of encouraging your potatoes to sprout before planting. By sprouting them in advance, it gives the potatoes a head start and will result in a more robust harvest. The chitting process can take 4 to 6 weeks. If you buy seed potatoes from an online seed company, they may come sprouted and ready to plant right away.
- To chit potatoes, first put them in a warm, dark location for a week or two. Around 70 degrees is a good target. This helps them break dormancy – waking them up to allow for sprouting.
- After that time, move them into a slightly cooler area with bright ambient light (but not directly in the sun). We set ours on a shelf in a spare room across from a large window.
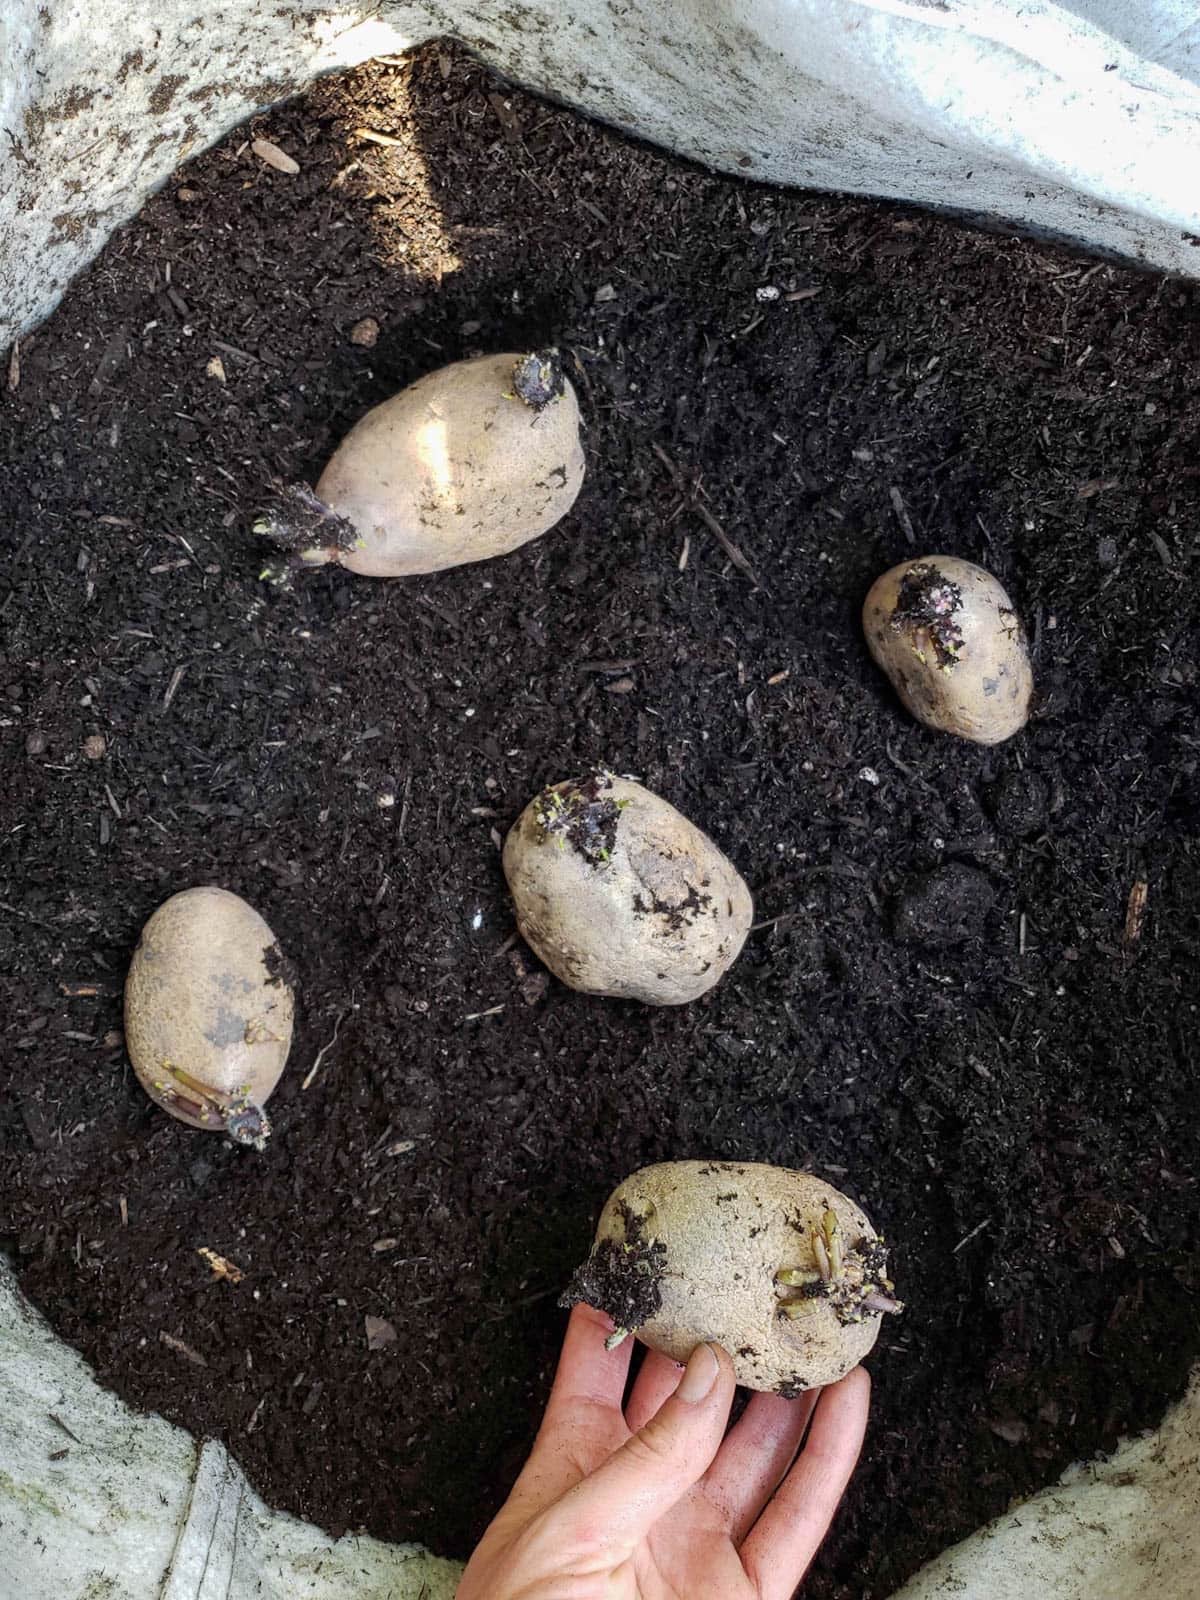
- When you move them out into the light, take a look at each spud. Determine which side of the potato has the most eyes. The eyes are the little indentation or nubs along the otherwise smooth potato skin. Those eyes are where potential sprouts will emerge from! The portion of the potato with the most concentrated number of eyes is called the “rose end”. Place the seed potato in a position with the rose end facing up, exposed to light.
- By following these steps, the potatoes should begin to sprout shortly.
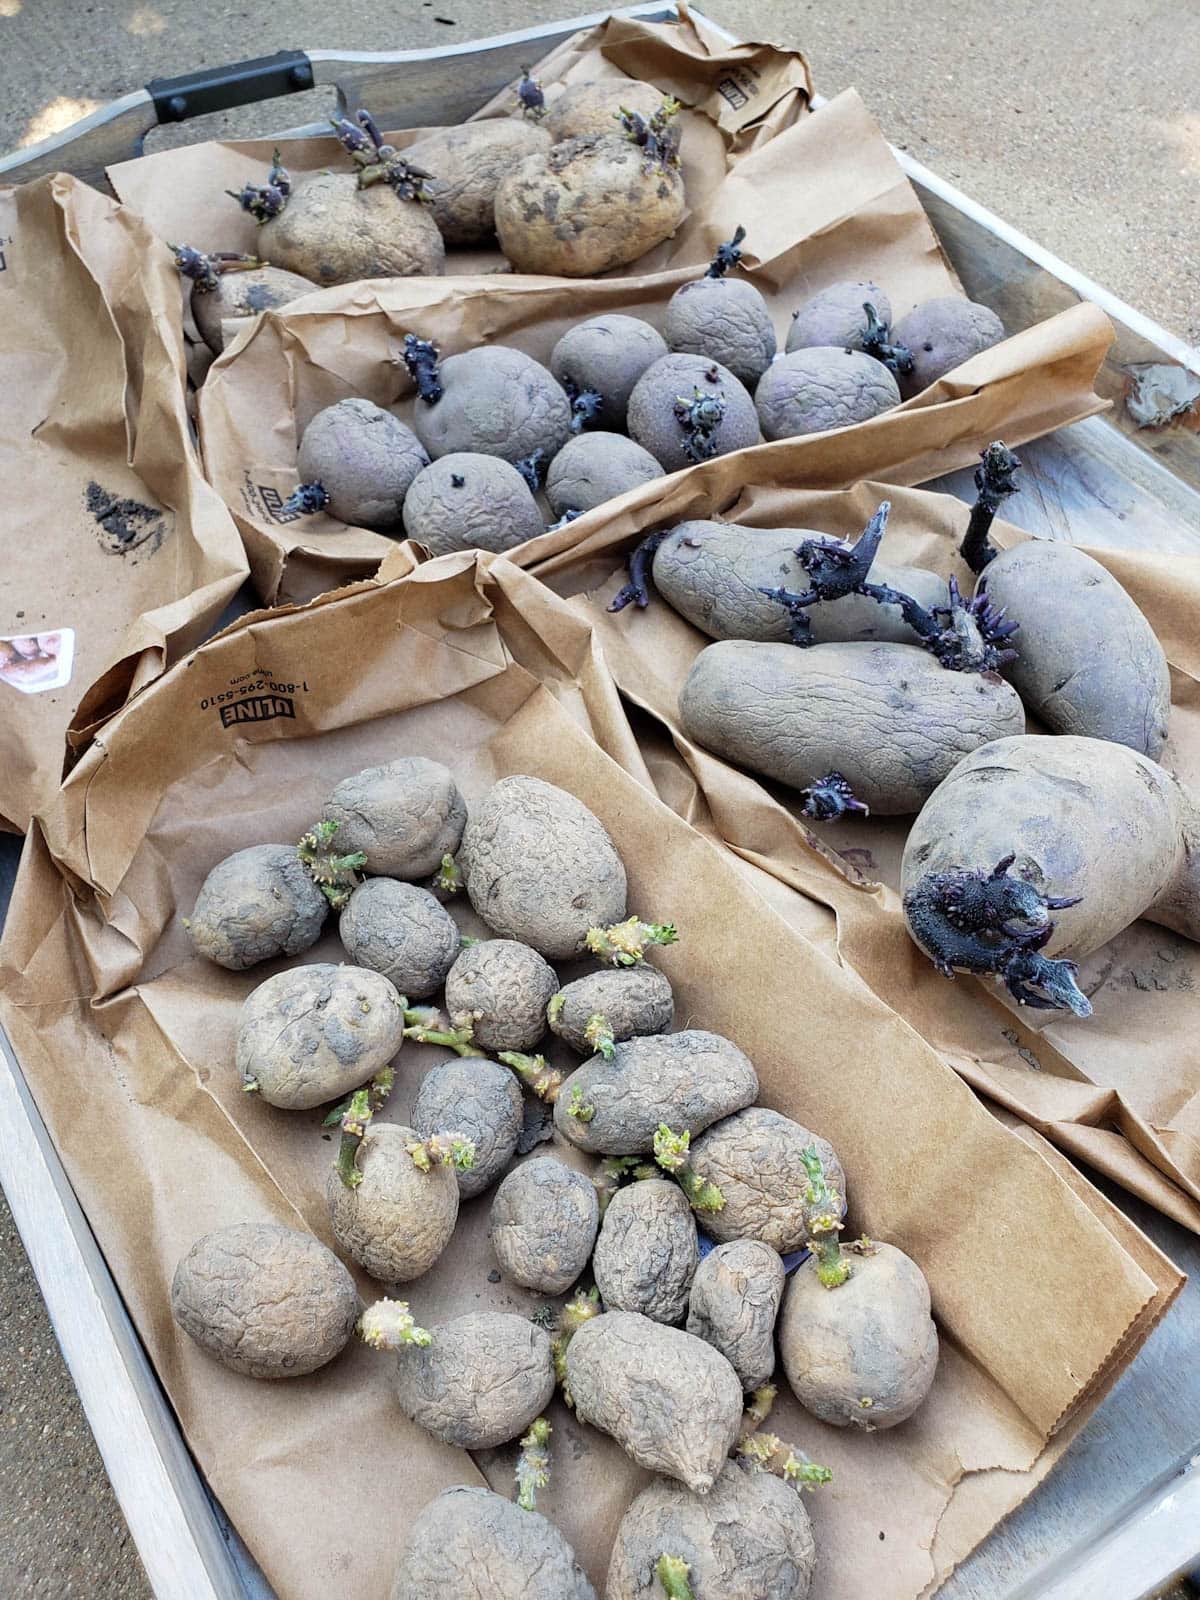
Dividing Seed Potatoes
Large seed potatoes can be cut into smaller portions to create more seed pieces if desired. This isn’t necessary (or recommended) when the potatoes are fairly small, or if you have plenty of seed.
- When cutting up a seed potato, ensure that each new piece will still have at least one or two promising eyes once divided (explained above).
- Using a clean knife, cut the larger seed potato in half – or more, depending on size and number of eyes.
- It is important to do this at least several days prior to planting outside. A week or more is even better. The fresh cut sides need time to dry and scab over before being planted. Otherwise, they can easily rot!
Potato Soil Preferences
One of the best things about growing potatoes in containers is that you can easily control and adjust the quality, composition, and pH of the soil – which is key to success!
- Fill your potato container with soil that is rich in organic matter, loose, and well-draining, such as potting soil amended with compost.
- Potatoes grow best in acidic soil, and thrive in a pH range of 4.8 to 5.5. Therefore, we like to use a potting soil that is specifically made for acid-loving plants. You can also amend soil with horticulture sulfur to lower the pH and make it more acidic. However, sulfur is generally slow-release so it can take months for the soil to adjust its pH – plan in advance!
- Avoid high nitrogen fertilizers. Potatoes grow large green tops but smaller tubers when too much nitrogen is present.
- To help keep the soil from becoming too compact, straw is often layered between the soil while growing potatoes, explored more in the ongoing care/hilling section below.
How to Plant Seed Potatoes in a Container
- To plant potatoes in a container, start by adding 4 to 6 inches of rich, fluffy, acidified soil and compost to the bottom of the pot. Don’t fill the container completely yet! You’ll add more soil and/or straw later as the potatoes grow.
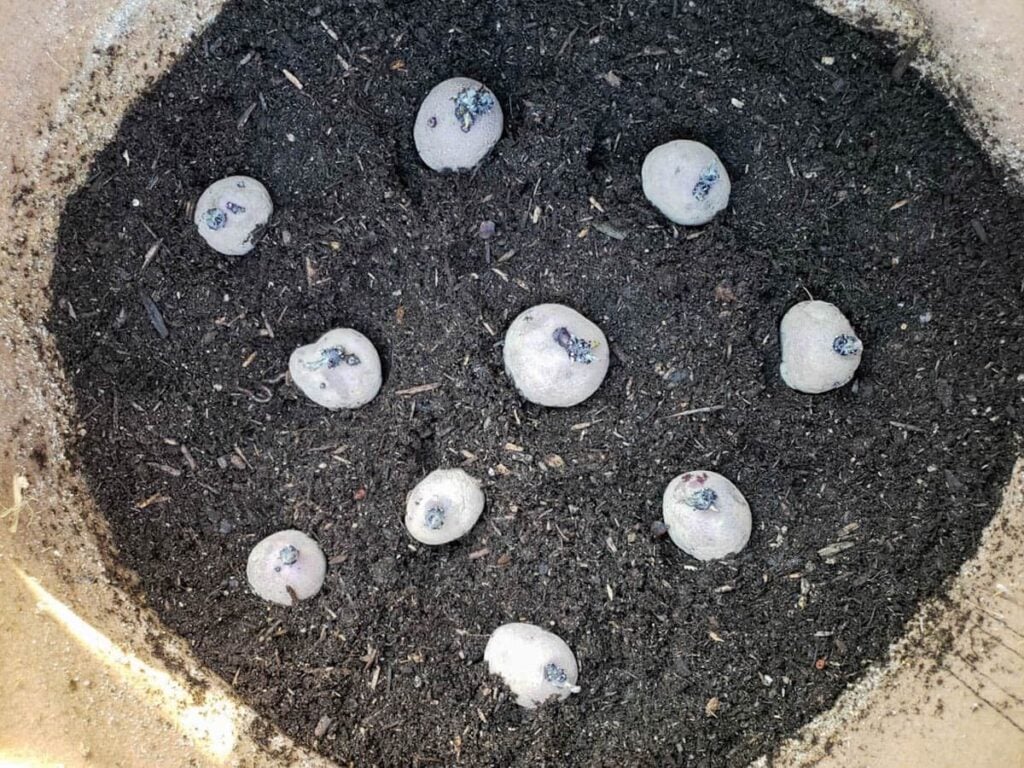
- Next, place pre-sprouted potatoes on top the soil, spaced about 4 to 5 inches apart. We usually plant about 5-6 large seed potatoes or 7-10 smaller seed potatoes per 15 to 20 gallon grow bag. I try to set them with the sprouted eyes facing up.
- Finally, cover the potatoes with 3 to 4 inches of soil on top, and water thoroughly after planting.
Watering Potatoes
Potatoes like to be evenly and consistently moist, but never soggy. When overwatered or grown in heavy soil, they easily rot. Yet a lack of water leads to undersized and less prolific potatoes. Therefore, water deeply and routinely but allow the soil to partially dry out (but not completely) between watering.
To make things easy, we like to use auto drip irrigation for our potato grow bags to provide consistent even moisture. Learn how to set up drip irrigation for containers here.
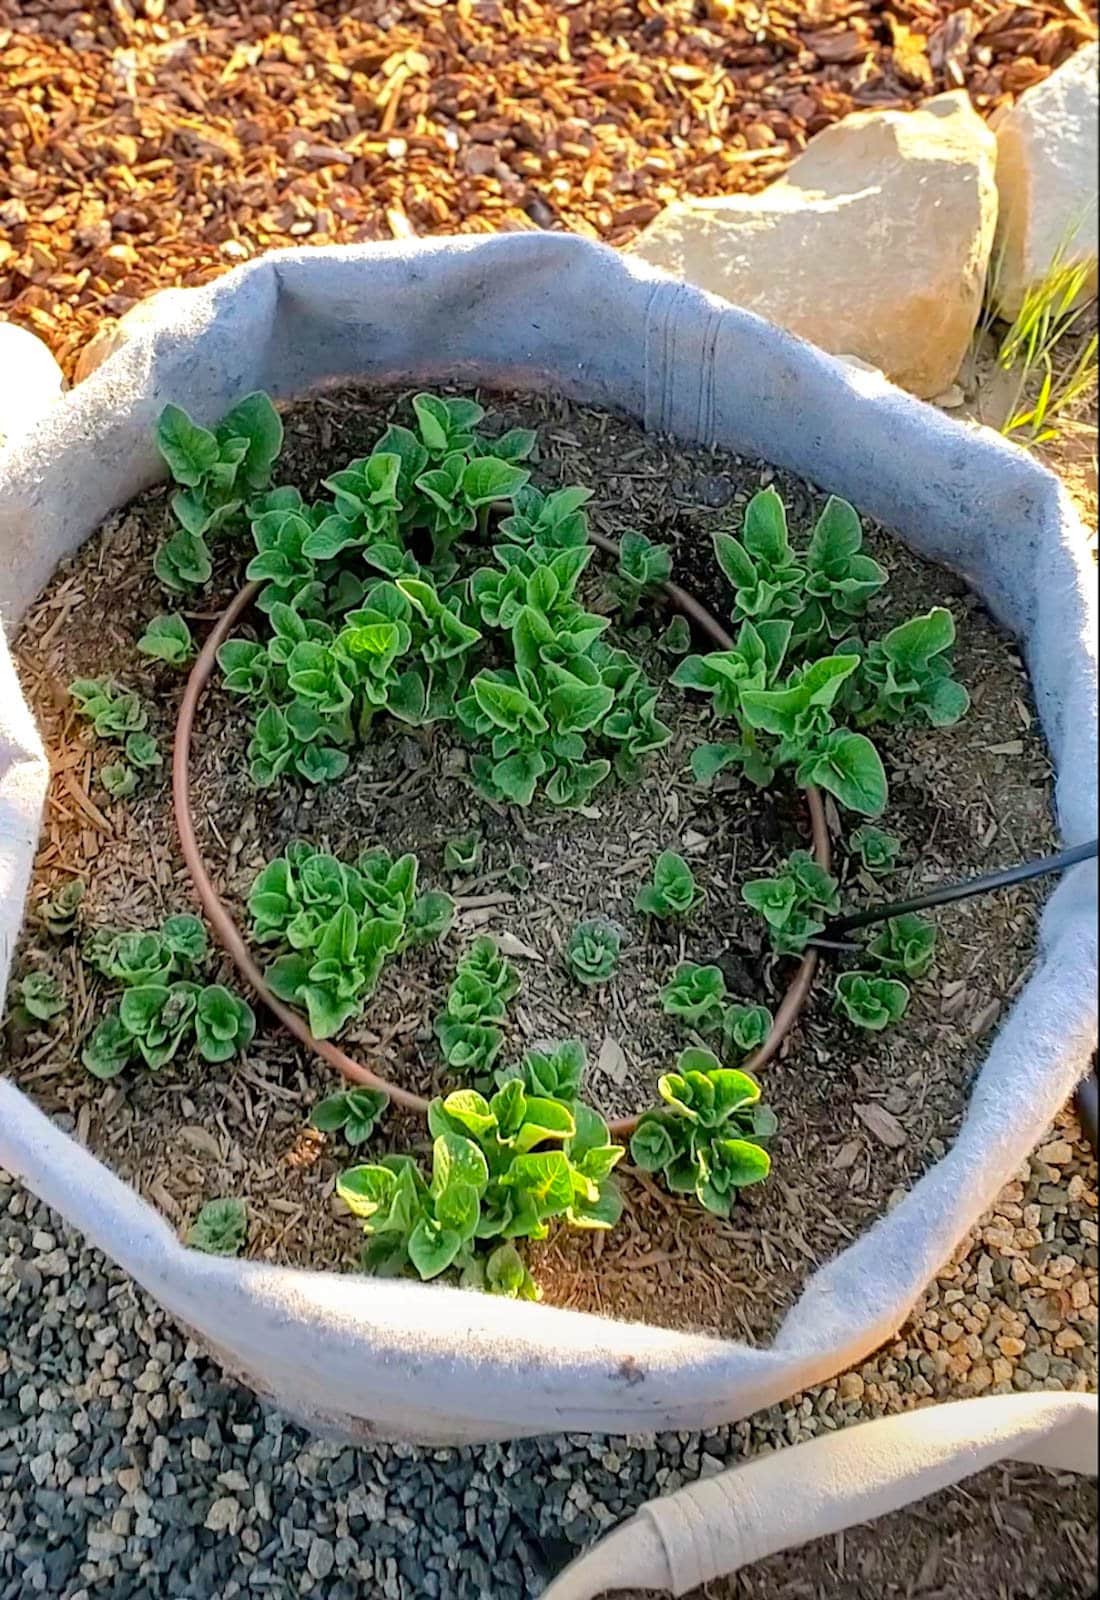
Burying or Hilling Potatoes
In-ground potatoes are usually hilled (buried) as they grow to encourage more potato formation, and you can do the same when growing potatoes in containers, pots, or grow bags! By covering the leafy green tops as they get taller, more potato tubers will grow off of the buried stems.
Once the green tops reach at least 6 to 9 inches tall, bury the majority of the exposed plant with more soil and compost, but still leave a couple inches of the greens exposed on top. Repeat this process every few weeks as the foliage continues to grow taller, until your container is full and you cannot add more soil.
When hilling potatoes, we usually add more of the acid planting soil mixed with compost. Sometimes, we add a light layer of straw too. Straw helps keep everything nice and fluffy, the way potatoes like it! If you live an area with rainy summers, I definitely suggest layering in straw with soil and/or compost to help promote drainage.

Fertilizing Potatoes
Potatoes are modestly heavy feeders, so don’t skimp on the compost! The fresh soil and compost added during the hilling process will continue to provide fresh nutrients as they grow. We also water our potatoes once or twice with a dilute seaweed extract or aerated compost tea halfway through the growing season.
If you’re using fresh quality potting soil, additional fertilizer likely isn’t needed. However, if you re-use the same containers and soil to grow potatoes again, amend the soil with a balanced all-purpose organic fertilizer before planting more. As I mentioned, a high-nitrogen fertilizer isn’t recommended for potatoes.
When to Harvest Potatoes
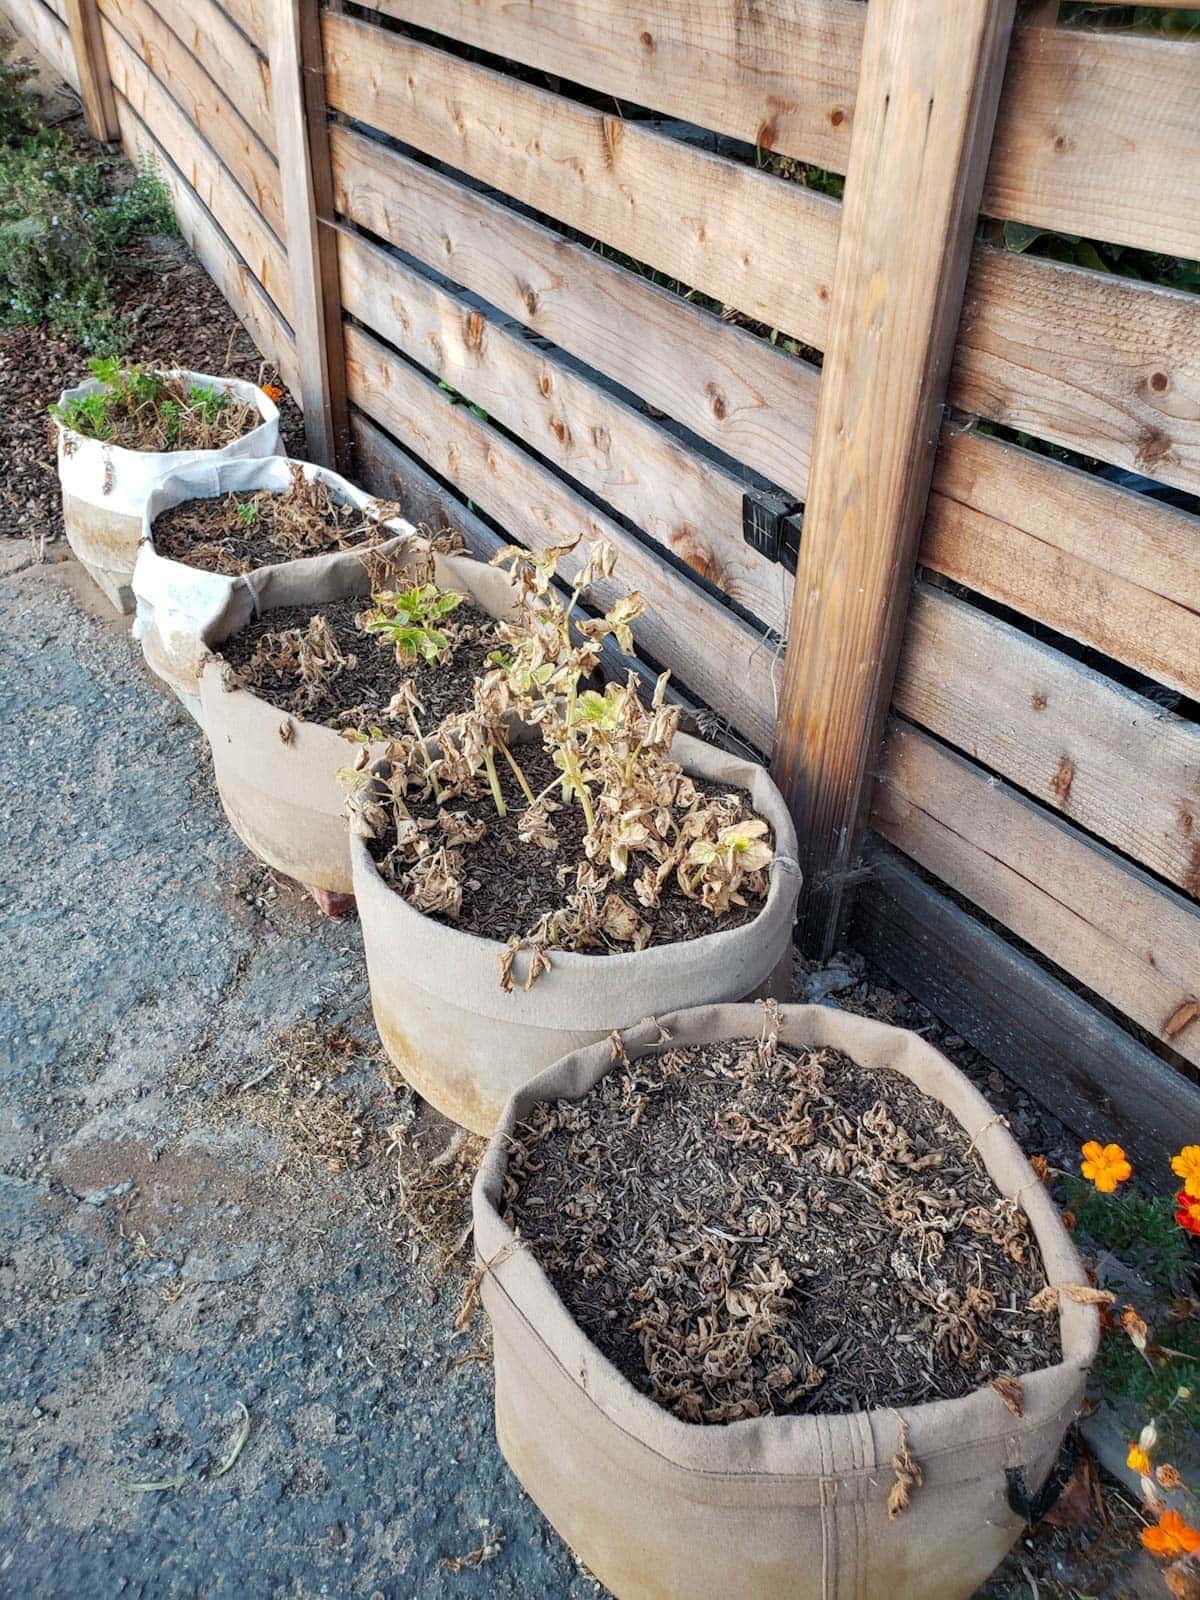
The exact time to harvest potatoes depends on the variety and growing conditions. After several months of growth, the potato greens will start to die back, turning yellow and then dry brown. This is a sign that it is close to harvest time! While the greens are withering away, the potato tubers are drawing in the last bits of energy and nutrition from them.
Once the greens have mostly died back, stop watering your potatoes (ideally 2 to 3 weeks prior to harvest). By cutting water, it helps the potato skins start to toughen and prepare for long-term storage.
Finally, it’s time to gently harvest potatoes about 2 weeks after the greens have completely died back. See tips on how we like to harvest potaotes from containers below.
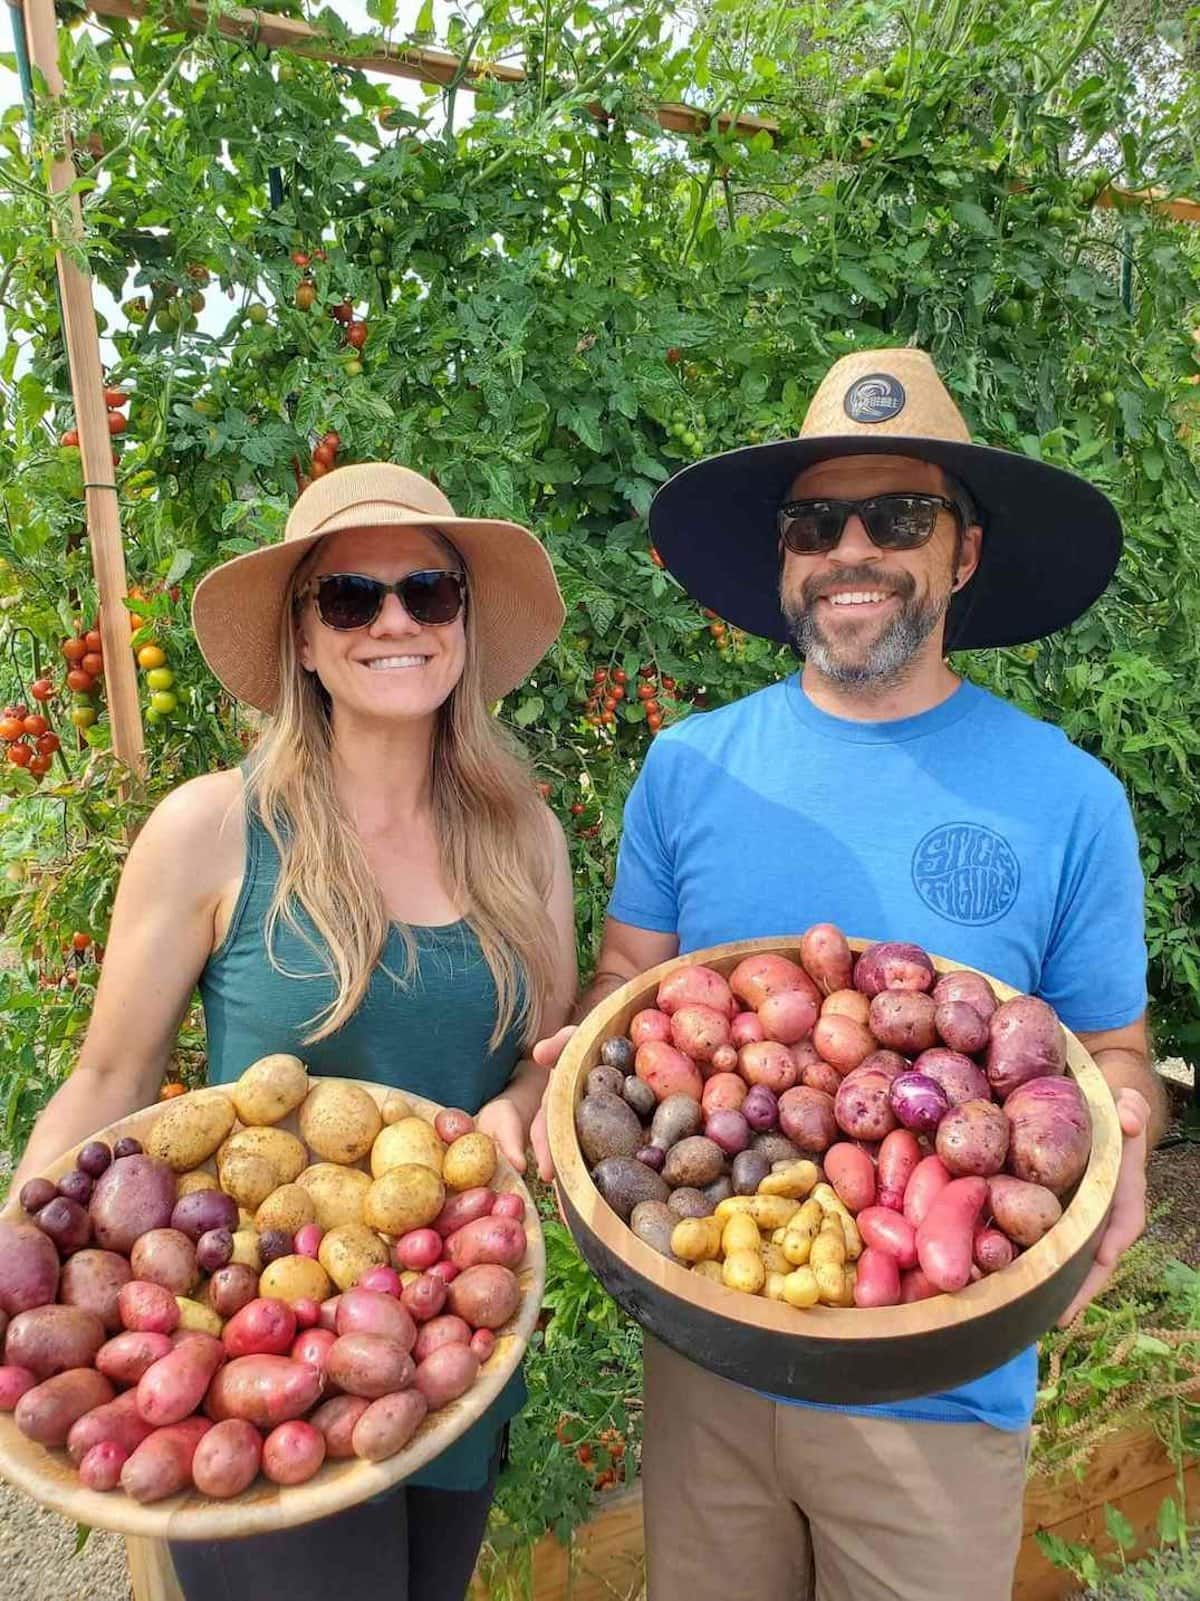
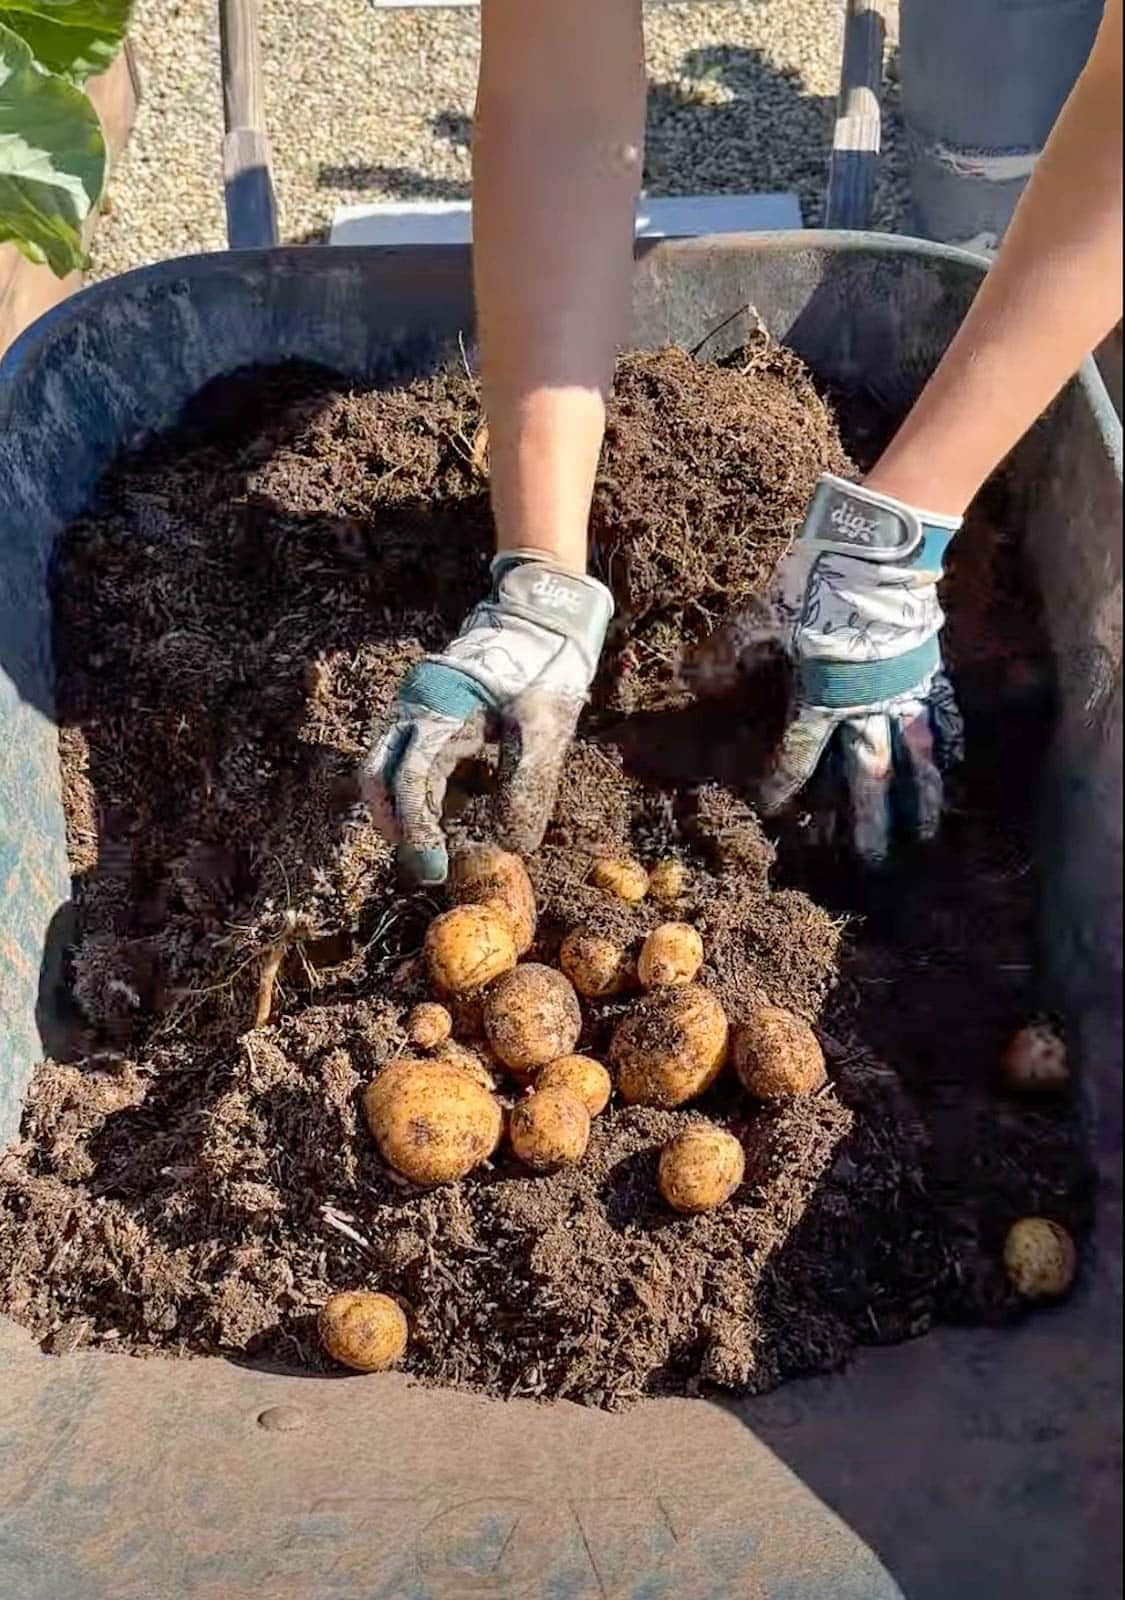
How to Harvest Potatoes from Containers
Growing potatoes in containers makes them exceptionally easy to harvest – and incredibly fun too! All you have to do is gently dump the container out and start hunting around for potatoes. We like to empty our potato grow bags into a wheelbarrow, which makes makes it more comfortable on our backs and also easier to dump the soil back into the bags afterwards. This method also reduces accidentally damaging the potatoes, compared to digging them up with a shovel or pitchfork.
It’s best to avoid washing or wetting potatoes prior to storage, though we have before without issue. Just be sure they’re 100% dry again before storing them.
Storing Potatoes
It’s best to store potatoes in a cool, dark, well-ventilated, dry space – ideally between 45-55°F. A basement or root cellar is ideal, though a cool pantry or spare closet can work too. Store the potatoes in a breathable container such as a paper bag, mesh bag, or cardboard box.
Most sources say to avoid refrigerating potatoes since colder temperatures can convert their starches to sugar, and therefore negatively impact the texture and taste. However, we don’t have the best cool dry storage options in our home, so we’ve often stored homegrown potatoes in the fridge post-harvest… and they taste just fine! That way, they stay firm and good for months.
And now for the best part: enjoy the best potatoes you have ever tasted! If you have never had the pleasure of tasting homegrown potatoes, I am super excited for you!
Here is a video about all how to plant and grow potatoes:
So, are you ready to go grow some spuds?
What is your favorite way to prepare potatoes? I am a sucker for pan-fried, or mashed with garden chives on top. One of our favorite potato recipes is this Roasted Two-Bite Garlic & Herb Smashed Potatoes, perfect for the smaller-than-average spuds. Or, try our drool-worthy, creamy vegan Potato Leek Soup recipe. We love to freeze portions as a way to preserve homegrown potatoes too!
I hope you enjoyed this post, and found it helpful! Please feel free to ask questions in the comments below.
You may also enjoy:
- How to Plant and Grow Cucumbers: Tips for Success and Big Harvests
- How to Grow Turmeric in Containers, in Any Zone!
- Garden Companion Planting Chart, Plans, and Benefits
- How to Make DIY Seed Starting Mix: The Best Recipe

Deanna Talerico
Deanna Talerico (aka DeannaCat) is a garden educator and writer with over 15 years experience in organic gardening. She is a retired Senior Environmental Health Specialist, and holds a M.A. in Environmental Studies and B.S. in Sustainability and Natural Resources.


111 Comments
MLW
Your website is wonderful. I read it often and learn/confirm many things.
Regarding growing potatoes: one thing that puzzles me is that it seems like
you could have published this how-to a lot earlier to allow for chitting, planting–
especially the early varieties. What can you say about that?
Aaron (Mr. DeannaCat)
Hi MLW, we are so glad you enjoy our website! This article was originally published in 2019 (so the information about chitting has been on ours site), we just updated the article enough to where it was republished to the current date. We could have republished the article a month or two ago but we are busy with a number of things most of the time so we don’t always post or share articles at the exact right time. Hope you understand and again, we are glad you enjoy our site.
dan
Hey you two,
Believe it or not, I harvested my first batch of Norland Red’s.
From a 5 gal. bucket, I got about 6 small – medium size ones.
I reused the soil and added straw for some Japanese Sweet Potato slips;
again, using a 5 gal. bucket.
My question is, since the slips are about 10-12 in. tall, should I add soil to
just under the leaves or keep it low, like with the Norland Red’s?
Have a great weekend and send my regards to Badger.
Aaron (Mr. DeannaCat)
Hi Dan, congratulations on your potato harvest! I would plant those sweet potato slips about 4 inches deep, leaving at least a few leaves above the soil surface while removing the leaves that would be buried in the soil. I think sweet potatoes like to sprawl a lot more than regular potatoes so they may be somewhat restricted in the 5 gallon bucket as you may just want 1 slip per bucket. Badger says “thank you”, he is healing up quite well and is enjoying his time during the day outdoors once again. Good luck and have fun growing!
Terri Marikis
Hi Deanna and Aaron,
How do you water your potato bags? I have the rest of my garden on timed soaker or drip lines, will this work for potatoes?
Thank you
Terri
Aaron (Mr. DeannaCat)
Hi Terri, we do have the potato bags on drip irrigation as well. We typically make a drip ring out of 1/4 inch drip line that fits inside of each bag, we cover how we make the drip rings in our How to Set Up Drip Irrigation for Pots, Wine Barrels, Containers article. Hope that helps and have fun growing!
Rob
Greetings,
Just getting started with potatoes. I appreicate your laying out all the steps.
A question though, can you reuse the soil at the end of the year? We purchased the brand you talked about and were wondering if that is a one time purchase or will we need to replace it every year with fresh.
Thank you for a great site and all the information you supply.
Rob
Aaron (Mr. DeannaCat)
Hi Rob, we usually save the soil in the grow bags or you can dump it all into a large tote to save for the following season. Then, at the beginning of the next season, we refill the bags with the soil and some fresh compost and amendments before planting our new potato seed. Hope that helps and have fun growing!
dan
Aaron/ DeannaCat,
I apologize, if I’m belaboring growing potatoes.
In regards to Sweet Potatoes, could I use the same Growbag Technique (gradually adding soil) as you’ve described?
Also, is the soil mix the same as regular Potatoes?
I appreciate your patience, thanks alot.
Aaron (Mr. DeannaCat)
Hi Dan, and no problem at all! Yes you can grow sweet potatoes using the same methods, however, I would look for a sweet potato variety that is recommended for growing in containers as they can spread rather wide and they will root wherever the leafy greens touch the soil. Be sure to also regularly check your containers to ensure your potatoes are getting enough water and the soil isn’t drying out in between waterings. Fertilizing them a couple times throughout the season is a good idea as well, especially so since they can take quite awhile to fully mature. Hope that helps and have fun growing!
dan
Aaron/ DeannaCat,
I’ve purchased the Norland Red asyou suggested, so I have about three weeks for soil prep.
I watched an Epic Gardening video, where it was suggested to add sand to the soil mix.
I’m not sure if sand is in lieu of straw; just curious.
I may be over-thinking this, but I just wanted to avoid conflicting info.
Thanks.
Aaron (Mr. DeannaCat)
Hi Dan, yes you can add sand (around 20% of your soil mix) if you have it available to you along with potting soil and compost. Potatoes like loamy, well draining soil, straw is good to use on top as mulch and once your greens start to appear, add a bit more straw. If you are going to grow the potatoes in containers, straw can get a bit messy and hared to keep inside the containers, don’t overthink it too much though, just get a nice soil mix together that looks good and start growing. Hope that helps and good luck!
dan
Aaron/ DeannaCat,
I’m planning on buying seed potatoes from Peaceful Valley.
I prefer white or red thin-skinned potatoes.
I live south of you in Zone 10A and have sporatic direct sunlight (houses);
because of that I’m concerned about the soil going aerobic.
My basic question is what variety for my Zone and micro-climate would you suggest?
Thanks and take good care.
Aaron (Mr. DeannaCat)
Hi Dan, we have grown potatoes from Peaceful Valley a number of times and have had success with Purple Majesty, Norland Red, German Butterball, and Huckleberry Gold which should all be great options for you. Just be aware of their differing maturation times as their days to harvest will all vary, just in case you are surprised when one of the plants starts to die back and turn yellow or brown before the others. Hope that helps and have fun growing!
dan
Thanks Aaron; I’ll be rereading this article again (and again).
As an aside, a couple of comments in a San Diego Seed Company video were from your area, so I referred them to you and Deannacat.
Later.
Aaron (Mr. DeannaCat)
Hi Dan, thank you so much and have fun growing!
Fairmarian
Do we need to do anything special to the soil after growing potatoes to prepare it for growing other crops?
Aaron (Mr. DeannaCat)
Hi Fairmarian, did you use more acidic soil or fertilizer for you potato crops? As long as you didn’t go overboard and make the soil too acidic, you should be fine just adding some fresh compost and amendments before mulching the top of the soil. Our article on How to Amend and Fertilize Garden Bed Soil Between Seasons should help if you want a more in depth look on how we prepare our garden for the next season. Hope that helps and have fun growing!
Fairmarian
Thank you so much for your reply! We really appreciate all the wonderful and useful knowledge you share with us all…
Aaron (Mr. DeannaCat)
Thanks so much for tuning in and we appreciate your support!
Dan
Aaron,
I forgot to ask earlier, would you suggest the Acid Planting Mix for Blackberries?
I have the Prime Ark freedom variety in mind.
Thanks again.
Aaron (Mr. DeannaCat)
Hi Dan, using Acid Planting mix with good compost is probably a good idea for your blackberries. We didn’t use Acid mix for our berry beds but we have added small amounts of Epsoma soil acidifier and will likely add top dress a small amount in spring and fall going forward to build up the acidity in the soil. Hope that helps and have fun growing!