

How to Make a Cannabis Tincture: Easy Cold Alcohol Extraction

Come learn how to make your own homemade cannabis tincture using a simple cold alcohol (ethanol) extraction method with our step-by-step guide. I’ve included plenty of photos to make the process as clear and easy to follow as possible. There is also a printable summary at the end – though I don’t think you’ll want to miss the extra tips in the body of the post.
Tinctures are a convenient, discreet, and easy way to enjoy your plant medicine. It’s kinder to your lungs than smoking or vaporizing, and offers more controlled and consistent dosing compared to smoking or homemade edibles. (I love that I can take just a few drops if needed.) You can use this homemade cannabis tincture recipe with any of your favorite cannabis strains, with CBD hemp only, or like we do – with homegrown herb!
What is a cannabis tincture?
A cannabis tincture is a concentrated alcohol-based cannabis extract, often referred to as “Green Dragon” among the cannabis community. High percentage alcohol is used as a solvent to extract the medicinal compounds (cannabinoids and terpenes) from the plant flower or “buds”. Though tinctures are essentially cannabis-infused alcohol, you do not get drunk since only a tiny amount is consumed.
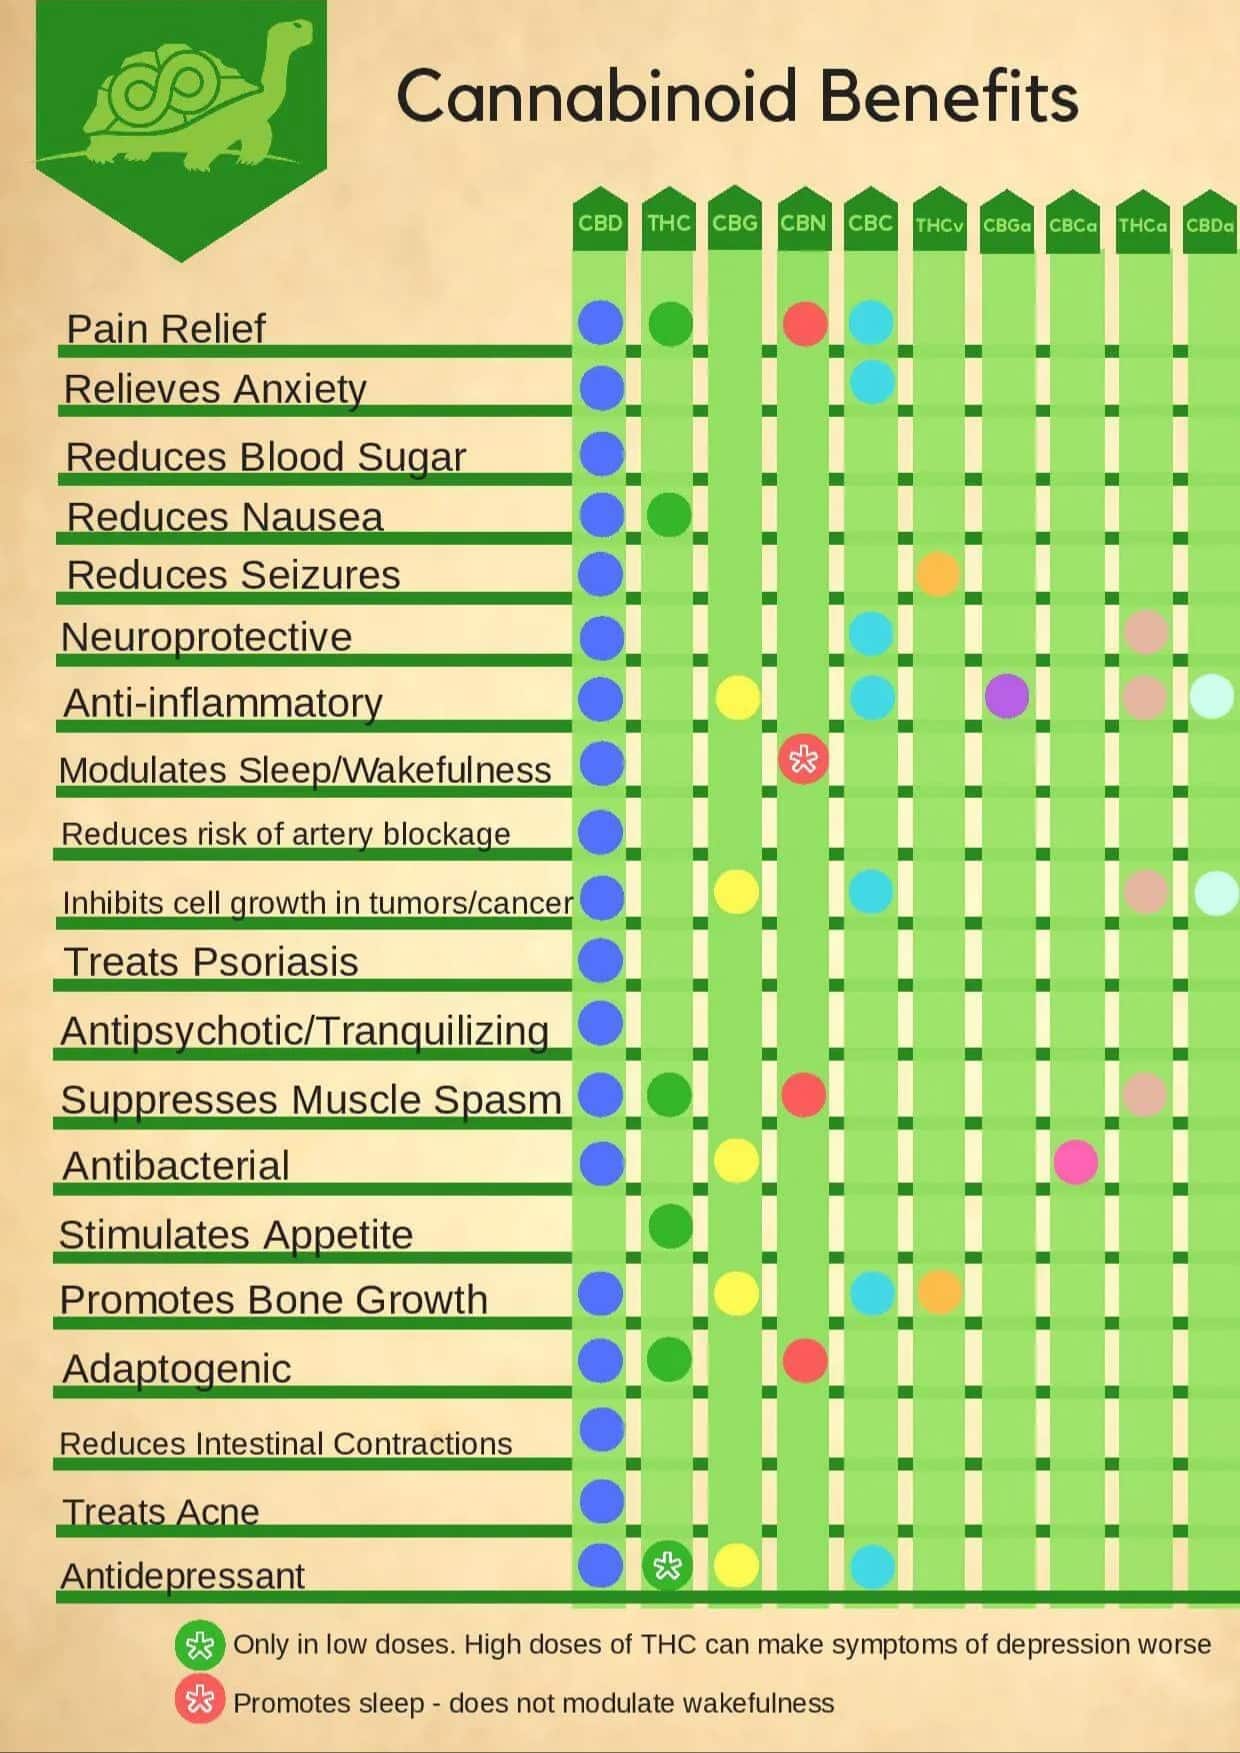
Cannabis tinctures are highly therapeutic. Studies show that cannabis can be used to soothe a wide variety of physical and mental ailments, including sleep disorders, stress, anxiety, ADD/ADHD, muscle tension, joint pain, migraine headaches, inflammation, seizures, cancer, chronic pain and more. Cannabis tinctures can contain THC only (such as THC isolate), a blend of THC and CBD, or CBD alone.
When it comes to CBD, I always use my favorite certified organic full-spectrum CBD oil from NuVita. It’s federally-legal and is the most effective, potent and pure CBD oil I’ve ever tried. It does wonders for my anxiety, TMJ, and sleep issues! (Use code “deannacat” or this link to save 10% off) But if we want something with THC, we make our own tinctures using homegrown cannabis. It’s fun, rewarding, and a great way to save money!

Would you like to save this?
Disclosure: Homestead and Chill is reader-supported. When you purchase through links on our site, we may earn an affiliate commission.
What type of alcohol to make homemade cannabis tincture?
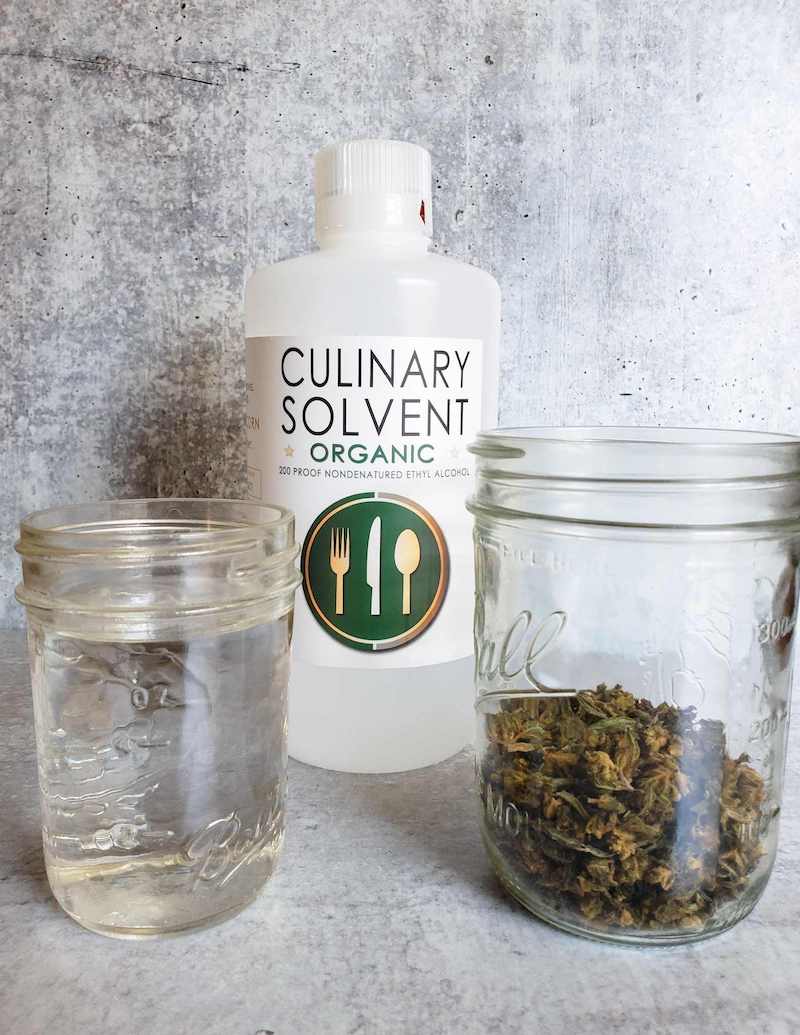
It is best to use either 190 to 200-proof food grade ethanol (aka ethyl alcohol) or 190-proof Everclear alcohol for this cannabis tincture recipe. Both are strong natural solvents that will effectively strip and separate the desired cannabinoids from the plant material. We use this USDA organic ethanol. It is pure food-grade grain alcohol, and doesn’t contain any additives or water!
Lower-proof alcohol (e.g. 80 proof vodka) is a weaker solvent and also has a higher water content than ethanol, which can interfere with the extraction and tincture-making process. You technically can make homemade cannabis tincture with vodka or other lower proof liquor, but it requires additional steps that we aren’t going to cover in this article.
Do not use rubbing alcohol.

What type of cannabis should I use?
It’s important to use decarbed cannabis in this homemade cannabis tincture recipe. If you’re not familiar with decarboxylation, it’s essentially the process of heating cannabis to “activate” it (explained more below). When exposed to heat, raw forms of THCA, CBDA, and other cannabinoids are converted to their active forms of THC and CBD – making it psychoactive as well as more therapeutic. (It’s the same reaction that occurs when you heat cannabis via smoking or vaporizing, and why eating raw bud doesn’t get you high).
Aside from that, use whatever cannabis you prefer or have on hand! Choose a strain (or combination of a couple) with traits you personally desire from your homemade cannabis tincture. We use what we grow: well-rounded sativa/indica hybrids that also offer a good amount of CBD. Learn how to grow your own organic cannabis at home here, and shop for seeds here.
For the most therapeutic tincture, I recommend using strains with a well-balanced THC to CBD ratio. If you’re looking for daytime relief with less mental effects, choose a CBD-dominant strain. Yes, you can totally use this cannabis tincture recipe with CBD hemp alone!
Why freeze alcohol and cannabis for extraction?
This homemade cannabis tincture recipe uses a cold ethanol extraction method, also referred to as quick wash ethanol extraction or “QWET”. Freezing the cannabis makes the trichomes detach from the plant material more efficiently. When mixed with cold ethanol, the desirable cannabinoids and terpenes readily extract and combine with the alcohol – resulting in a stronger, better tincture.
Furthermore, keeping the mixture at a very low temperature helps reduce the amount of undesirable compounds in your tincture, such as lipids and chlorophyll. It’s a chemistry thing, but basically the freezing temperature influences the polarity of the lipids and chlorophyll so they’re more likely to stay bound to the plant material (and therefore get filtered out) rather than combining with the ethanol.
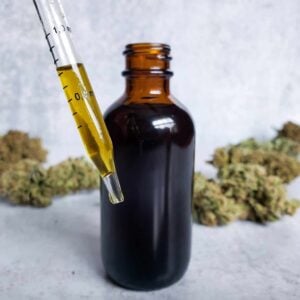
When done right, the resulting filtered tincture wash will be clear and golden in color rather than cloudy or green.
Supplies Needed to Make a Homemade Cannabis Tincture
- 8 grams of decarbed cannabis
- 6 ounces of 190 to 200-proof food grade ethyl alcohol (ethanol) or 190 proof Everclear
- Freezer-safe glass containers, such as wide-mouth pint mason jars or half-pint jars with lids.
- Small unbleached coffee filters, like these ones
- Cheesecloth
- Digital Scale
- Dropper bottles to store your finished tincture. We like these 2-ounce amber bottles; the droppers have mL markers on them for accurate dosing.
Yields: 2 ounces of homemade cannabis tincture
Please note that this is a two-day process, though ingredients are just sitting in the freezer for 97% of that time.
INSTRUCTIONS
Step 1: Decarb your cannabis
To decarb cannabis, start by tearing up the buds into fairly small pieces. Then spread it out evenly on a baking sheet. For THC-dominant strains, heat the cannabis in the oven at 250°F for 25 to 30 minutes. For high-CBD strains, bake it for 40 to 50 minutes at the same temperature. (It takes slightly longer for CBDA to convert to CBD than THCA to THC does.) If you’re using a well-balanced THC:CBD strain, meet in the middle at 30 to 35 minutes. See this article for a more in-depth look at decarbing cannabis.
Don’t want to stink up the house? Consider using an Ardent Nova device for an easy, nearly odor-free decarboxylation experience. We just got one recently and love it!
Note that your cannabis will decrease in weight slightly during the decarb process (as it gets more dry). So, start with a few extra grams so you’ll end up with the 8 grams needed for this cannabis tincture recipe. Or, bake plenty so you have enough leftover to make homemade cannabis oil or topical salve!

Step 2: Freeze Cannabis and Alcohol (separately)
Use a scale to weigh out 8 grams of decarbed cannabis. Add the cannabis to a freezer-safe glass container with a lid. We like to use a wide-mouth pint glass jar. (Even though it seems more than large enough, the extra room in the jar makes it easier to shake compared to a half-pint jar.) Next add 6 ounces of ethanol to a separate freezer-safe container. Do not mix the alcohol and cannabis yet. Put both containers in the freezer for at least 24 hours.
Step 3: Combine Cannabis and Alcohol (First Wash)
After the initial 24 hours (or longer) is up, remove the cannabis and alcohol from the freezer. Pour ONLY HALF of the cold alcohol (3 ounces) into the container of frozen cannabis. Add a lid and shake vigorously for 5 minutes. Wrap the jar in a kitchen towel if it’s too cold to comfortably hold.
This process extracts the cannabinoids and terpenes from the plant material, and is considered the “first wash”. We’ll do two rounds total.
Now return the cannabis-alcohol mixture as well as the separate remaining 3 ounces of plain alcohol to the freezer for an additional 2 hours.

Step 4: Shake and Strain
Once the two hours are up, it’s time for another shake – and then we strain! Remove the jar of mixed cannabis and alcohol from the freezer, and shake it again for an additional 5 minutes. (We don’t need the jar of plain alcohol at this time.)
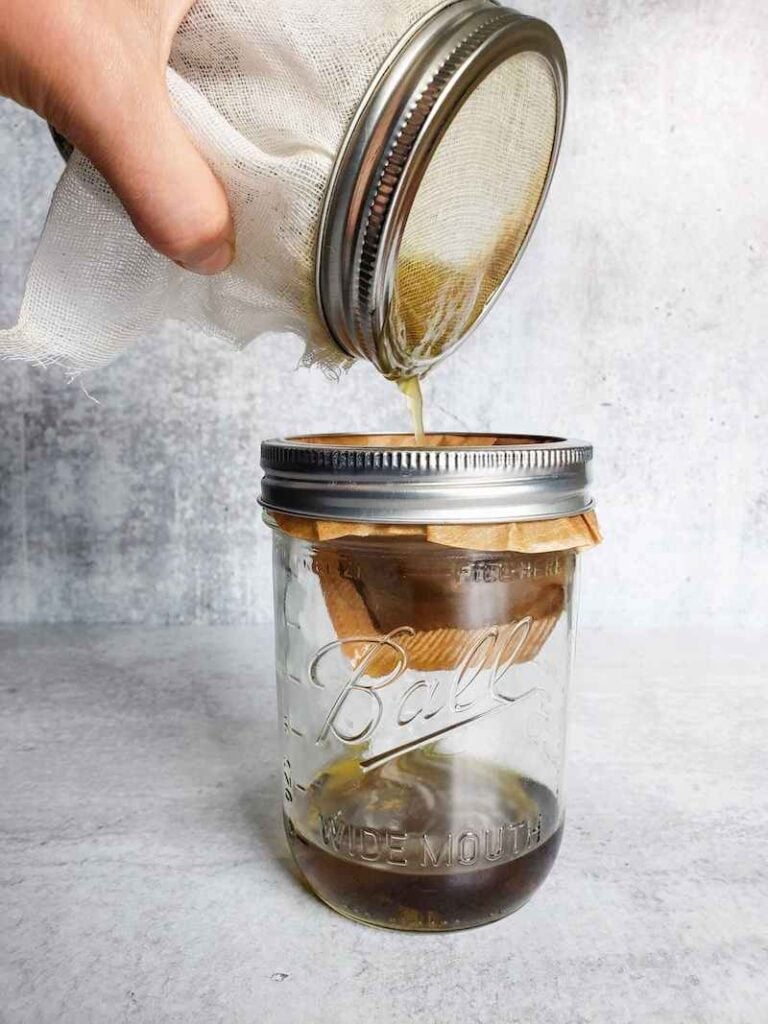
Next we’re going to strain the tincture through two mediums: cheesecloth first to filter the larger plant material, and then a finer coffee filter to further remove unwanted lipids and other residue.
First set up the coffee filter straining station. We find it easiest to set a small coffee filter in the top of a separate clean pint glass jar, fold it over the rim of the jar, and then screw on a lid ring to hold it in place. The cannabis tincture takes a while to seep through the filter, so holding it by hand isn’t fun.
Next, put cheesecloth over the jar that contains the cannabis-alcohol mixture (we use the ring trick again) and slowly pour it through the cheesecloth and into the coffee filter jar. See the photos below.
Now return the jar of remaining cannabis to the freezer while the first wash liquid is straining through the coffee filter (about 10 minutes).

Step 5: Second Wash & Strain
Now it’s time for the second and final wash. This step helps extract any final remaining cannabinoids from the plant material into your homemade cannabis tincture.
Grab the jar of cannabis that was in the freezer while the first wash strained (for about 10 minutes) and then repeat the washing/straining process from steps 3 and 4. Add the remaining 3 ounces of cold plain alcohol to the cannabis jar, add a lid, shake vigorously for 5 minutes, and strain through the cheesecloth and coffee filter once again – pouring it into the same filter and jar as the first wash.

Step 6: Reduce
After all the liquid has strained through the coffee filter into the jar, it’s time to reduce it by about half the volume. Excess alcohol will easily evaporate off, and the result is a more concentrated and effective homemade cannabis texture.
Do this by simply allowing the jar to sit out at room temperature with the lid off for several hours. We place the jar in front of a fan to help expedite the process. Note the volume of liquid in the container when you start (use a rubber band around the jar, or a glass marking pen). Keep an eye on it! Once it reduces by half, add a lid to stop further evaporation – or go ahead and bottle your final homemade cannabis tincture.

Step 7: Bottle and Store
Once it’s reduced by half, transfer the strained cannabis extract to a final storage bottle – such as these amber glass dropper bottles. Amber bottles are ideal since they reduce light exposure, which degrades cannabinoids. Store the bottle in the refrigerator for the best long-lasting quality. Congratulations, you just made a homemade cannabis tincture! Keep reading for usage and dosing information.

How to Use or Take a Cannabis Tincture
You can consume your cannabis tincture either under your tongue (sublingually) or mixed with a beverage (oral ingestion). Sublingual consumption will result in more immediate effects, while oral ingestion will have a slower onset but longer-lasting results. See the graphic below.
However, proceed with some caution! 200 proof ethanol is very strong, and I find it causes a burning sensation when applied straight under my tongue. To avoid that, I put a very small amount of water in my mouth first, squirt in the tincture, hold the diluted mixture in my mouth for a few minutes, and then swallow. Therefore my intake is mostly sublingual, but with a little oral ingestion too.

Strength and Dosing for Homemade Cannabis Tincture
When first trying your tincture, I suggest to start low and go slow. Without lab testing, it’s difficult to say exactly how potent a homemade cannabis tincture is. There are simply too many factors: the initial cannabinoid concentration and strain you used, how long and hot you decarbed it, the efficacy of your ethanol extraction process, and how much it was reduced at the end.
Start with a few drops, and then gradually increase the amount to find your “sweet spot” and desired results. (But wait a couple hours to see how you feel before taking more.) With this recipe, a quarter dropper is a fairly conservative starting point. I personally like to take .25 mL or a quarter dropper (though I’ve taken more just fine) while Aaron prefers about .5 mL or half a dropper. That’s just enough to take the edge off, relax our muscles, and help us sleep better without being too stony.

That was fairly simple, right?
Well folks, I hope this tutorial was easy to follow – and will enable you to successfully make your own cannabis tinctures at home now. Let us know if you have any questions in the comments below. If you found this information useful, please consider leaving a rating/review and pinning or sharing this post. We greatly appreciate you tuning in today. Now go have fun making your own medicinal Green Dragon!
Don’t miss these related posts:
- How to Grow Organic Cannabis at Home: Seeds, Soil, Containers, and Care
- Homemade Cannabis Oil Recipe
- Homemade Cannabis Salve Recipe
- How to Feed Cannabis, Organically: Top-Dressings, Teas & More
- Organic Cannabis Pest Control: How to Keep the Bugs Off Your Nugs
- How to Harvest, Dry, Trim, Cure and Store Cannabis
Homemade Cannabis Tincture Recipe
Equipment
- 2 freezer-safe glass containers, such as wide-mouth pint mason jars or half-pint jars
- 1 small unbleached coffee filter
- cheesecloth
- digital scale
- Baking sheet
- freezer
- bottle for final storage, such as 2-ounce amber dropper bottles
Ingredients
- 8 grams decarbed cannabis
- 6 ounces 200-proof food grade eylth alcohol (ethanol) or 190-proof Everclear alcohol
Instructions
- Decarb your raw cannabis. Tear it up into fairly small pieces and spread on a baking sheet. For THC-dominant strains, heat the cannabis in the oven at 250°F for 25 to 30 minutes. For high-CBD strains, bake for 40 to 50 minutes and 30 to 35 minutes for a well-balanced THC:CBD strain. (I suggest starting with a few more than 8 grams since it will get lighter as it dries.)
- Add 8 grams of decarbed cannabis to a freezer-safe glass container with a lid, and 6 ounces of ethanol to a separate freezer-safe container. Put both containers in the freezer for at least 24 hours.
- First Wash: After the initial 24 hours (or longer), remove the cannabis and alcohol from the freezer. Pour only HALF of the cold alcohol (3 ounces) into the container of frozen cannabis. Add a lid and shake vigorously for 5 minutes. Now return the cannabis-alcohol mixture as well as the separate remaining 3 ounces of plain alcohol to the freezer for an additional 2 hours.
- After two hours, remove the jar of mixed cannabis and alcohol from the freezer and shake it again for an additional 5 minutes. Then strain the mixture twice: first through a cheesecloth and then through a coffee filter into a separate clean container (as shown in this article). Return the jar of remaining cannabis to the freezer while the liquid is straining through the coffee filter (about 10 minutes).
- Second Wash: Grab the jar of cannabis that was in the freezer while the first wash strained (for about 10 minutes) and then repeat the washing/straining process from steps 3 and 4. Add the remaining 3 ounces of cold plain alcohol to the cannabis jar, add a lid, shake vigorously for 5 minutes, and strain through the cheesecloth and coffee filter once again – pouring it into the same filter and jar as the first wash.
- Reduce the liquid by half via evaporation. Simply set the jar out at room temperature with the lid off for several hours, or place in front of a fan to expedite the process. Note the volume of liquid in the container when you start. Once it reduces by half, add a lid to stop further evaporation – and/or transfer your finished tincture into it's final storage bottle.
- Store your homemade cannabis tincture in an opaque glass bottle in the refrigerator. We recommend 2-ounce amber dropper bottles.
- Consume the tincture either under your tongue (sublingually) or mixed with a beverage (oral ingestion). Sublingual consumption will result in more immediate effects, while oral ingestion will have a slower onset but longer-lasting effects. **Please see notes of caution and additional information on usage/dosing below.
Notes
- **Ethanol alcohol is very strong and may cause a burning sensation when applied straight under the tongue. To avoid that, I put a very small amount of water in my mouth first, squirt in the tincture, hold the diluted mixture in my mouth for a few minutes, and then swallow. Therefore my intake is mostly sublingual, but with a little oral ingestion too.
- Re: Dosage, start low and go slow. Start with a few drops, and then gradually increase the amount to find your “sweet spot” and desired results. (But wait a couple hours to see how you feel before taking more.) With this recipe, a quarter dropper is a fairly conservative starting point.


485 Comments
duhnay
My reduction is cloudy. What could I have done wrong?
Aaron (Mr. DeannaCat)
Hi Duhnay, it is likely plant lipids and waxes that made it through the filtering process. What type of alcohol did you use during the extraction and did you further reduce the tincture down to 2 ounces? Either way, the cloudiness of the tincture shouldn’t have an effect on the tincture itself or its effectiveness. Hope that helps and enjoy.
duhnay
I used Everclear. It evaporated down to half. It smells great only thing was that it’s cloudy and not as dark as your pictures. Would it make a difference if I strained it again?
Aaron (Mr. DeannaCat)
Hi Duhnay, was the Everclear and cannabis kept in the freezer for 24 hours before you started the process as this will usually cuts down on the amount of plant lipids and waxes that can make it through the filtering process. Also, if your decarbed cannabis was especially fine, some of that may have gotten through the filtering stage as almost a “dust” type particulate, either way, I wouldn’t worry too much about the cloudiness as the tincture should be just as effective. You could filter the tincture again with a coffee filter but it will cut down on your volume of tincture due to a certain amount will absorb into the filter and since you already reduced the overall amount, you won’t have as much finished tincture. Hope that helps and good luck!
Duhnay
Yes they were actually in the freezer longer because I got super busy. I think the decarbed cannabis was extra fine that is why it’s cloudy and what makes the most sense to me. Thank you so much. Can’t wait to give it a try
Aaron (Mr. DeannaCat)
That’s great to hear, enjoy your tincture!
DDG
Is there any benefit or negative to grinding the herb after decarbed and before adding the ethynol?
Aaron (Mr. DeannaCat)
Hi DDG, I don’t think you need to break down the flower anymore after the decarb, once the freezing ethanol hits the frozen flower and you shake it around, it breaks down all by itself. Hope that helps and good luck!
Sarah
Can you tell me if something can be done with the leftover plant material? Added to cookies or something? Or has it lost all its properties after washing?
Aaron (Mr. DeannaCat)
Hi Sarah, most of the cannabinoids have been stripped from the material but you can still use it in tea, topicals, or edibles such as cookies in your case. I can’t speak to how potent the edibles will be or not with the leftover material but feel free to put it to good use. One thing you will want to do is to spread the material out on a flat tray of some sort to let all of the alcohol evaporate from the plant material until it is fully dried. Hope that helps and good luck!
Shane
Hi
I may be stupid, but when putting the jars in the freezer initially, do you put a lid on both jars or only the weed jar?
Thanks!
Aaron (Mr. DeannaCat)
Hi Shane, yes, put the lids on the jars while they are in the freezer. Good luck!
Arno
Does reducing the liquid on a windowsill degrade the cannabinoids as well or is a few hours while reducing okay before transferring to the Amber dropper bottles? Thanks for the the post and reply. Cheers!
Aaron (Mr. DeannaCat)
Hi Arno, yes light will likely degrade some of the cannabinoids in your tincture or even cannabis flower for that matter as it is best stored in a cool/dry/dark location and we store the finished tincture in our refrigerator for extended shelf life. The best method for passive evaporation that we have found is to place the jar of tincture in front of a fan and allow the air to blow over the top of the liquid, you should be able to see the tincture moving due to the airflow, hope that helps and enjoy your tincture.
Ian
I just wanted to thank you for such an easy to read and follow process
Me and my wife have started to take RSO oil as a health aid. I suffer from inflammation and stress.
The problem is the oil is so costly where we live and we cannot garuntee it’s purity
Would this tincture oil help like the RSO oil does?
Thank you
Ian
Aaron (Mr. DeannaCat)
Hi Ian, we are glad to hear you found the article helpful! The final tincture as is, won’t be similar to RSO as it won’t be nearly as potent, however, you can make your own FECO (Full-Spectrum Extract Cannabis Oil which is similar to RSO) by letting the tincture fully evaporate until you are only left with the sticky, thick, oil. You can either let the tincture evaporate in front of a fan or slowly heat it with an electric appliance such as a crockpot, rice cooker, hot plate etc. until the alcohol fully evaporates. Hope that helps and reach out if you have any other questions.
Angelica Goral
Is this supposed to have an everclear taste? I had to use the boil method to reduce down. And it taste like pure everclear still? I also did the recipe by 3. So maybe I lost something in translation tripling the recipe?
Aaron (Mr. DeannaCat)
Hi Angelica, if you tripled the recipe you should have used 18 ounces of Everclear and 24 grams of cannabis, you would then reduce the tincture down to 9 ounces or less for your final product. I usually reduce the regular recipe down to 2 ounces so it all fits inside a 2 ounce dropper bottle, although the final product still has the alcohol burn to it, when I take some of the tincture, I have some water in my mouth when I administer a dose and it helps water it down greatly, you could also squirt the dose in a small glass of water or juice. I don’t typically let it absorb through my mouth sublingually either, I prefer to swallow the dose, it has a slightly slower onset, 45-60 minutes compared to 30 minutes or less if you let it absorb sublingually.
To get rid of the burn entirely, you would have to reduce the product down to FECO (Full Extract Cannabis Oil) and then lightly heat that portion into a certain amount of oil (MCT, olive oil, ect.) until it fully combines, from there you would just dose with the oil. Hope that helps and reach out if you have any other questions.
Karleen
My 200 proof ethanol has been reducing at room temperature, uncovered, with a fan for over 24 hours. It’s not evaporating. What might I be doing wrong?
Aaron (Mr. DeannaCat)
Hi Karleen, if you have a lot of humidity in your house, it may keep the ethanol from readily evaporating. We can typically reduce our tincture to 2 ounces or less in 3-5 hours in front of a fan. If you have an electric stove, crockpot, or hot plate, you can place the jar of tincture in a water bath and boil the water which will in turn reduce your tincture with heat. If your jar isn’t stable enough in the pot of water (water only needs to reach 1/3 to 1/2 of the jar height), you can place a washcloth on the bottom of the pot for the jar to sit on while it heats. Only do this if you have an electric heating element as you do not want to have flames or fire around high proof alcohol. Hope that helps and good luck!
Jjamerson
Can I evaporate most of the alcohol out by heating after second wash?
Aaron (Mr. DeannaCat)
Hi Jjamerson, yes you can use heat to help the evaporation process but only due so with electric heat (either electric stove, electric crockpot, or cook plate) as you DO NOT want to have flames anywhere near your high alcohol tincture due to obvious fire risk. Hope that helps and good luck!
Brian
Hello! I’ve asked a question before but just curious where I might’ve went wrong.
I followed the recipe to a T, save leaving the flower and alcohol in the freezer for longer than 24 hours since I was waiting on my dropper bottles to arrive.
I used 200 proof food grade ethanol that I got from a lab company.
It just wasn’t near as potent as I expected. I feel as though I must’ve did something wrong, because everyone I hear talking about tinctures say that they’re supposed to be more efficient than smoking and a better way to stretch your bud usage.
I let it evaporate to about just over 2 oz, which only took a couple hours in front of a fan thanks to the 200 proof.
However I had to use 5 full mL’s/dropper fulls each dose to be equivalent to taking 3-4 hits of bud from a bowl over 3-4 hours. Which made it run out in 13 days as opposed to the same amount of bud smoked lasts around 28-30 days.
Is it possible my oven temp is off? Is it more likely im over- or under-decarboxylating? Is it possible to overcook in the decarb step? Do you have any other suggestions for troubleshooting? Thanks!!
Aaron (Mr. DeannaCat)
Hi Brian, that is really surprising that you had to take 5 full ml’s of tincture, I would be off my rocker if I even took 1 full ml. Since it seems like you followed the process correctly, I would guess that your cannabis wasn’t decarbed enough so the THCA didn’t convert to THC, if you consume cannabis that hasn’t been converted (decarbed through heat), you won’t feel any of the usual effects. When you decarb, your cannabis should be light to medium brown afterwards and very dry. To know for sure the temperature of your oven, you would need to have a proper thermometer that can withstand heat to verify if it is heating correctly. I wouldn’t think you would have over decarbed your cannabis but that could be a possibility if your oven is too hot, but I can’t say for sure if you aren’t sure if your oven is operating correctly. We like to use the Ardent Nova for our decarbing needs but it is a bit of an investment up front and would be best for people who consume most of their cannabis through ingestion.
You can possibly still save your tincture that you made by letting it reduce in front of a fan all the way until it is FECO (Full Extract Cannabis Oil) which is a sticky, thick, and oily substance, all of the alcohol would be evaporated at this point. You could then place your glass container with FECO in the oven at the appropriate decarb temp and decarb the FECO for 30 minutes or so, it should start to bubble and the bubbles will cease when the decarb process is complete. Take it out of the oven to cool and add 2 ounces or less of ethanol back into the FECO to complete the tincture. If you have an electric cook plate or crock pot, you could put the glass container in a water bath and heat it in a similar manner until the FECO no longer bubbles which should decarb the oil for you. Hope that helps and reach out if you have any other questions. Good luck!
Vanessa Pierce
Can I ask what the point of reducing it down is for? I want as much tincture as I can get.
Thank you
Aaron (Mr. DeannaCat)
Hi Vanessa, reducing the tincture increases the potency of the tincture itself while also getting rid of some of the excess alcohol. If you don’t reduce it, you would have to take twice the amount to feel the same effects so you would end up going through the tincture just as fast, even though you started with more volume. I like to reduce it down to 2 ounces or just under, that way it fits nicely inside a 2 ounce dropper bottle. Hope that helps and good luck!
Marcus Blobbus
Hi Aaron,
I beleive Ive successfully made the tincture. I’d like to use this to make edible jellies/gummies. Do you have a receipe I could try please ? Im mainly concerned about the volume of tincture to use against the other ingredients.
Thanks
Mark
Aaron (Mr. DeannaCat)
Hi Mark, unfortunately we do not have a gummy recipe as of yet but it is something we have been meaning to do. If you find a gummy recipe and you know how many gummies it supposedly makes, you can do the math on how much tincture to add as a dose is likely around .5 ml (depending on tolerance and how strong you want the gummies) if you made the tincture as outlined. That would mean that a 2 ounce bottle of tincture contains 60 ml, or 120 servings (doses) of tincture. You can use a varying amount of tincture depending on how strong you want the gummies, maybe try the tincture on its own a few times so you can see what dose works best for you. Hope that helps and let us know how your gummies turn out!