

Preserving Apples: How to Make Homemade Apple Cider Vinegar

Homemade apple cider vinegar is one of my favorite things to make and preserve. That’s because we use apple cider vinegar, also known as ACV, pretty much every single day! It’s also incredibly healthy for you. We love to use it for salad dressing, homemade fire cider, or take small shots straight! Since we have an apple tree that provides us with more apples than we can consume fresh, this is a fantastic zero-waste solution to preserve our apple harvests.
The best news of all is that apple cider vinegar is quite simple to make at home. We usually use whole apples since we often have abundance, but you can also make ACV using apple scraps too. One very common method is to save up used apple skins and cores over time, storing them in the freezer, before starting a batch of ACV.
Read along to learn how to turn apples or scraps into fermented, probiotic-rich, delicious homemade apple cider vinegar. This post will provide easy step-by-step instructions, tips to make the best-tasting apple cider vinegar, and ideas for ways to use ACV too.

Would you like to save this?
Disclosure: Homestead and Chill is reader-supported. When you purchase through links on our site, we may earn an affiliate commission.
Benefits of Making Your Own Apple Cider Vinegar
It’s Cost Effective
When we buy apple cider vinegar, we choose the high quality stuff: raw, organic, unfiltered, “with the mother”… such as Braggs, our go-to brand. While I wouldn’t call ACV expensive, it isn’t necessarily as cheap as more basic vinegars, like white or red wine vinegar. Plus, if you use it as regularly as we do, it can add up! Making your own apple cider vinegar at home has huge cost-savings benefits, especially if you’re using scraps, homegrown, or otherwise low-cost apples. Even if you buy them just for this project, a few apples can create a lot of vinegar!
It Reduces Waste
We always suggest discarding excess produce in a compost system, as opposed to throwing them in the trash. On this little homestead, we have several types of compost bins that help take care of the majority of our kitchen and garden waste. Personally, our favorite composting method is vermicomposting, also known as worm composting. So, while you could compost your excess apple scraps, why not turn them into apple cider vinegar instead? Up-cycling for the win!
It is Healthy & Versatile
Apple cider vinegar has many wonderful uses and surprising health benefits! As with all fermented foods, it’s loaded with probiotics. This means ACV aids in digestion and helps to balance gut health. Did you know there is a direct correlation between a healthy gut and every other organ in the body? To read more about the health benefits of fermented foods, check out this article that I wrote on that subject.
Homemade ACV can be used for a lot more than drinking or eating! See other uses for apple cider vinegar at the end of this post.
How does apple cider vinegar help diabetes and blood sugar?
One of the key active components of apple cider vinegar is acetic acid. Acetic acid is excellent at slowing gastric emptying and reducing blood sugar spikes, thus stabilizing blood glucose levels. Being Type 1 Diabetic, I find that if I take a shot of ACV before a meal, I have improved blood sugar levels following that meal! Studies have shown to have similar effects for those with Type 2 Diabetes, when either taken with a meal or before bedtime.

SUPPLIES NEEDED
- Organic apples, or apple scraps – For this recipe, you can use whole apples or apple scraps. A great time to make apple cider vinegar is after creating another apple dish, like baking apple pie, when you have a lot of cores and skins at once! If you cannot collect fresh scraps at one time, store them in the freezer as you continue to add to your supply. Organic produce is always the best choice, especially when it comes to fermenting! See notes on apple varieties below.
The amount of apples needed is totally flexible. As you’ll see in the recipe section below, you can scale the portions up or down as needed. - Filtered Water or other un-chlorinated water is best for making living, fermented things like homemade apple cider vinegar. Do your best with what you have! We simply run ours through a basic carbon filter (in the fridge).
- Organic cane sugar
- A large glass vessel, your choice of size. We make large batches in this two-gallon glass crock, but many people use far smaller containers – like quart or half-gallon mason jars!
- Bottles to store your finished apple cider vinegar in. You won’t need these for a few months, so you have time to collect some. We simply repurpose old Braggs ACV bottles!
Wait… Did you just say you won’t need bottles for a few months? Yes. Fair warning: this process takes several months from start to finish. The minimum time from starting to using the finished product is about 2 months, though some people let their ACV ferment for 4 months or longer.
What are the best apple varieties to make apple cider vinegar?
The best-tasting apple cider vinegar will result from using a variety of different apple types, if possible. Using a combination of sweet and tart apples creates a well-balanced finished flavor. A good goal is to use about two-thirds sweet apple varieties like Gala or Fuji (our Anna apple falls into that category) and one-third tart, such as Granny Smith. Pink Lady would fall somewhere in between. Truth be told, we don’t always mix in tart varieties with our Anna’s since some are picked slightly underripe and tart. It still turns out pretty damn good, just not quite as tangy.

HOMEMADE APPLE CIDER VINEGAR RECIPE
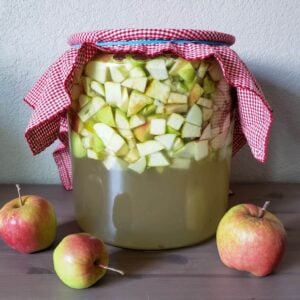
When you’re making apple cider vinegar, the goal is to fill your chosen container about halfway full of chopped apples or apple scraps. Then, the rest of the container is filled with a combination of water and dissolved sugar.
Sugar to water ratio: 1 tablespoon of sugar per one cup of water, or scaled up to 1 cup of sugar per one gallon of water.
Yes, the use of sugar is essential in this process. There are several types of beneficial bacteria naturally present on fruit, including our friends lactobacillus and acetobacter. The addition of sugar provides food for those bacteria to rapidly grow and thrive. They will change the environment in the crock through a series of chemical reactions, first changing the sugar to alcohol, and then further transforming that alcohol into acetic acid over time. Therefore, the final apple cider vinegar is very, very low in sugar, and the alcohol content is virtually non-existent!
INSTRUCTIONS
Step 1) Gather & Prepare Apples
If you are using collected apple scraps, this part is extra easy! There is no prep needed. If your apple scraps were frozen, let them thaw out before starting. A cold ferment is not a happy ferment! I do suggest adding at least some fresh scraps with your frozen ones, if possible. This will ensure your brew is inoculated with live bacteria. When making apple cider vinegar with whole apples, the prep is pretty dang easy too. Simply wash the fruit well with water (no soap!) and chop them up into smallish chunks. You can leave the skins, cores, seeds, and even stems in there!
Add the apples to your glass container of choice, filling it about halfway full with apples. We use this 2-gallon container, but many people make much smaller batches! Ensure the container is nice and clean, but doesn’t have any soap residue present – which can cause off-flavors. We clean all of our fermentation supplies with plain white vinegar and hot water.

2) Add Water & Sugar
Next, it is time to get wet and feed the bacteria! Pour room-temperature to lukewarm filtered water over the apples until the container is completely full. Keep track of how much water you add as you go! To do this, I suggest adding water with a measuring cup, or a jar that you can note the volume of. We need to know the water volume to determine how much sugar to add.
Unfortunately, it isn’t as simple as half of your container. For example, when we fill a 2-gallon crock “half full” of apples, that doesn’t mean it is taking up a true half of the volume – because of the air space between the cut fruit. We can generally still fit 1.5 gallons of water inside.
Now, scaling up or down as needed, add 1 tablespoon of sugar per one cup of water used, or 1 cup of sugar per one gallon of water. Stir thoroughly until all of the sugar appears to have dissolved into the water. Here is where the “lukewarm” water helps out!
To inoculate and kick start our batch, we usually add a few glugs of finished apple cider vinegar. This step isn’t necessary, but may help prevent the formation of mold – especially if you are attempting to do this during a cold time of year.

3) Let Sit to Ferment – and Stir!
Once the apples, water, and sugar are all combined, cover your container with a breathable material, such as a lint-free tea towel, old pillow case, or coffee filter. I do not suggest using cheesecloth or any looser-knit material – it may allow fruit flies in!
Set this container in a location that is around 70 to 75°F, if possible. This is the ideal temperature range for fermentation. The container should also be kept in a dark location. Because we need to see and access it daily for the first two weeks (described below), we keep ours out on the kitchen counter, but wrap the crock in a dark towel or pillowcase to block the light.
For the first two weeks, your fermenting apples should be stirred every day. The purpose is to ensure the sugar doesn’t settle on the bottom, and also rotate which pieces are floating on top. If the same apples are left to float, exposed to the air, there is a chance of mold developing on them. Stirring prevents mold. If you miss a day here or there, it isn’t the end of the world! However, I suggest making a concerted effort stirring daily during the first week especially.
During this time, you’ll notice the apples will turn more brown, and the liquid becomes cloudy. Small bubbles should also appear, and it will start to smell a bit like hard apple cider. A layer of yellowish-white sediment may also collect on the bottom. This is all normal and good! Any obvious, fuzzy, green or white raised mold on the surface is not. In all the years making ACV, we have never had ours mold!


RELATED: Looking for more ways to preserve apples? Try making dehydrated apple chips, or our delicious apple butter recipe for canning or the freezer!
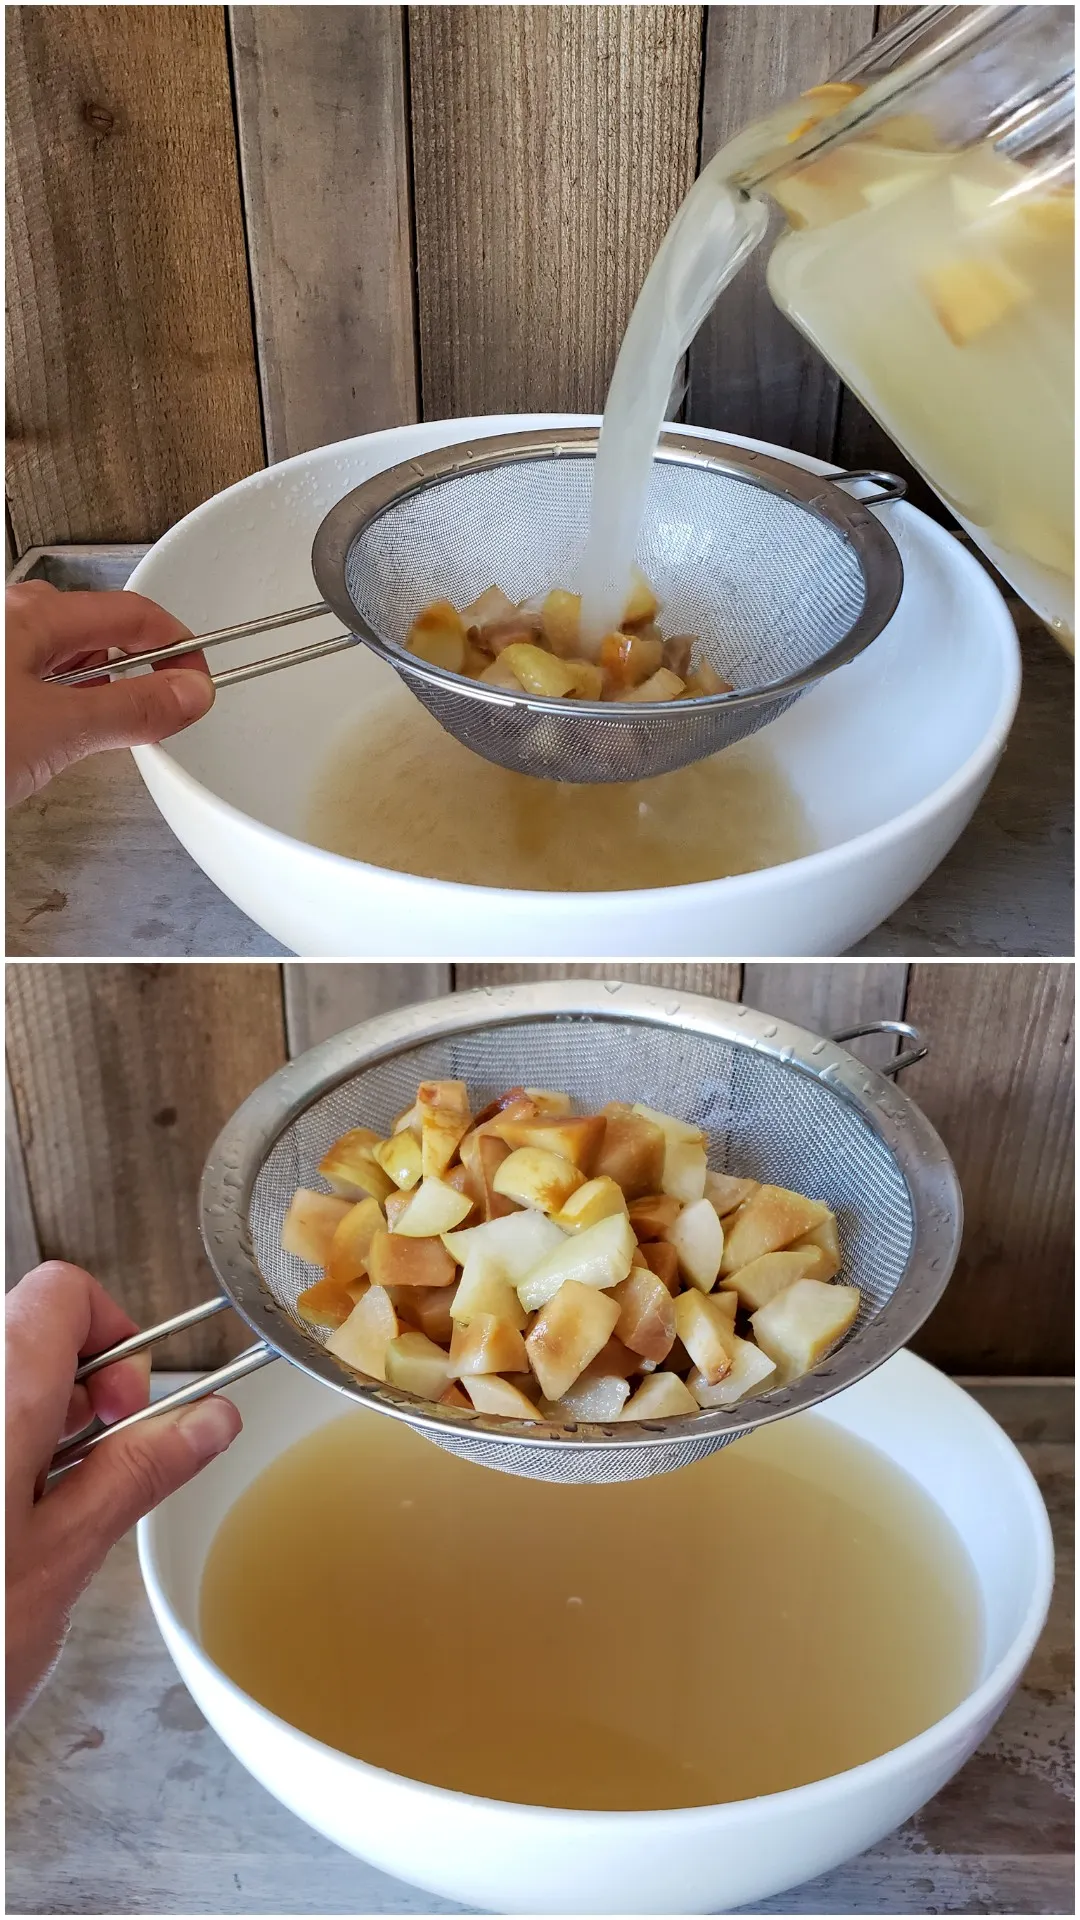
Step 4) Strain Apples
After two weeks of daily stirring, it is time to strain the apples to separate them from the liquid. To accomplish this, we set a fine-mesh strainer on top of a large bowl and slowly pour the contents of the crock through it. You can also use cheesecloth, or whatever else works! The collected fruit can now be composted. Return the captured liquid to a clean glass container of the appropriate size, and cover in the same manner it was before.
Step 5) Continue to Ferment
This is where the waiting game begins… Store your covered crock in a temperate, dark location for at least one month, or longer! The bacteria will keep working to convert more and more of the sugar or alcohol to acetic acid, creating vinegar. The rate at which your partially fermented apple cider turns into full-blown vinegar will vary, depending on the storage conditions and apples used. Our apple cider vinegar usually sits for about 2 to 3 more months before we bottle it.
After a month has passed, you can give your vinegar a taste-test. If it tastes plenty vinegary for your liking, move on to the next step. If not, allow it to ferment longer. When it doubt, you can check the pH of your apple cider with these simple pH test strips! Finished apple cider vinegar should have a pH in the range of 2-3.
Note: During this time, sometimes the vinegar develops a layer of SCOBY on the top – sort of like kombucha does! It is a thin, smooth, off-white membrane made up of accumulated beneficial bacteria and yeast. It is normal and harmless. We discard it once we are ready to bottle the vinegar. Our chickens love to eat SCOBY, but make sure to chop it up well for them!

Step 6) Bottle & Enjoy
Once it reaches that perfect fermentation level, transfer the apple cider vinegar into bottles with tight-fitting lids for storage. We re-use old ACV bottles, or store it in our swing-top kombucha bottles. As an acidic concoction, homemade apple cider vinegar does not have to be refrigerated for safety-sake! It is best to store it in a relatively cool, dark place.
If we have the space, we typically refrigerate at least some of our bottles at this point. Why? Well, once they’re refrigerated, the bacteria activity will slow way down and prevent the vinegar from fermenting beyond the point we enjoy it. Plus, most people like to enjoy their ACV cold anyways! I know we do.
Even stored at room temperature, homemade apple cider vinegar will stay good for up to five years! However, the quality and flavor will likely be best within the first two years.

Ways to Use Apple Cider Vinegar
Apple cider vinegar can be used in wide variety of meals, recipes, taken straight on it’s own, or used in other natural health, home, and body care applications.
- As a salad dressing – drizzled over salad with olive oil, or used in other salad dressing recipes.
- Make shrubs, aka drinking vinegar! Use our fruit shrub recipe to combine AVC, honey, and your choice of fresh fruit to make a delicious gut-healthy sweet and sour syrup to add to sparkling water, cocktails, mocktails, salad dressing and more.
- Use apple cider vinegar in other recipes that call for vinegar, such as our favorite easy refrigerator dill pickles. We also like to add a small drizzle to egg salad, potato salad, and similar dishes.
- Take a small shot (1 to 2 Tbsp) before a meal to reduce blood sugar spikes (aka postprandial blood glucose levels).
- Learn how to make homemade fire cider with apple cider vinegar here. Made with garlic, onion, turmeric, ginger, honey, and spices, fire cider a fantastic tangy tonic that can support your immune system and naturally reduce the intensity and duration of cold and flu symptoms.
- ACV can be diluted and used as a hair rinse, which removes built up minerals in your hair (such as from hard water) while also conditioning, balancing, pH, and healing hairs outer cuticle.
- Many herbalists and naturalists use ACV as a natural facial toner, or as an ingredient in other natural beauty and healing remedies!
- Acidic vinegar makes a great natural surface cleaner and disinfectant, such as in the sink, garbage disposal, stinky cutting boards, or even used to soften laundry. Learn more about using vinegar as a cleaner here.
And that’s how to make apple cider vinegar!
I hope you found this tutorial helpful, and interesting! Next time we have an abundance of apples, I think we are going to take a stab at making our own hard cider. I will report back! Do you brew your own apple cider vinegar, or hard cider? What are your other favorite ways to preserve apples?
If you are interested in other healthy fermented goodies, you may enjoy these articles:
- How (& Why) to Make Fire Cider for Immune Health – We use our ACV as the base for this recipe!
- Easy Fermented Garlic Honey Recipe + Benefits and Uses
- How to Make Kombucha 101: Brewing Basics for Best Booch Ever
- Fermented Dilly Radishes Recipe
- Homemade Elderberry Syrup Recipe – Not fermented… but oh so good for you!
Homemade Apple Cider Vinegar
Ingredients
- Diced apple chunks, or apple scraps (skins, cores). Enough to fill half of your chosen fermenting vessel (e.g. quart jar, half-gallon jar, 1 gallon crock)
- 1 tbsp sugar, per 1 cup filtered water OR
- 1 cup sugar, per 1 gallon of filtered water
Instructions
- Wash and chop the apples into chunks, or gather collected apple scraps (which can be saved in the freezer over time) and add them to your jar or other large fermenting vessel until it filled about halfway full.
- Pour lukewarm filtered water over the apples into the container until it is almost full, but measure/note the total amount of water added.
- Stir in sugar in ratios of 1 tablespoon of sugar per cup of water added, or for larger batches, 1 cup of sugar per gallon of water added.
- Optional: Add a splash of finished organic apple cider vinegar (e.g. store-bought) to inoculate the culture and encourage fermenting.
- Stir combined ingredients until thoroughly mixed, and cover with breathable material.
- Store in a dark location around 70 to 75 degrees F for two weeks to ferment, and stir everyday to prevent mold from forming on top. If needed, add another layer of material like a dark towel on top of the container to block light.
- After two weeks, strain and reserve the liquid into a similar sized container and cover again. Compost the spent fruit.
- Move the covered container of liquid to a location that is out of the way to continue long term fermentation. Maintain dark. A cooler "room temperature" at this stage is okay, but do not refrigerate yet.
- After one month, sample the vinegar to see if it is finished fermenting and tart to your liking. If needed, allow it to continue to ferment for a total of two to three months.
- Once it is fermented to your desired flavor, transfer the apple cider vinegar into bottles with lids (or swing top bottles). Store at room temperature or in the refrigerator, and enjoy!
- Properly fermented apple cider vinegar should "stay good" for over a year – as long as it does not have visible mold, or a strong and unusual flavor or appearance.


637 Comments
Nate
Works great! This is my second attempt (last year’s got taken over with bugs). I’m at the four month mark now and it smells vinegar-y, no scoby. But is only has a 3/4ish PH. Is that a problem? Should I just wait longer until it’s lowered to a 2? Any advice? Thank you!
Aaron (Mr. DeannaCat)
Hi Nate, I would just let it ferment longer until you get the pH down a tad lower (closer to 2-3), if it won’t go any lower after a month or two, you can probably just bottle it up and use it. Hope that helps and good luck!
Nate
Stuck it out and ph got to 3 this month. Any suggestions to get there faster next try? We always have a wealth of extra apples every fall from the orchard. Maybe add more than a splash of vinegar in the batch to get it going with speed?
Aaron (Mr. DeannaCat)
Hi Nate, glad to hear the pH of your vinegar became more acidic with time. If you want a faster process to make ACV with your apples from your orchard, you could turn your apples into apple juice, put the juice into a crock with a tight knit cloth and let ferment for 7-10 days (some people even add yeast to jump start the fermentation). After that point, add a splash of finished ACV and move the crock with the same tight knit cloth lid to a cupboard to continue to ferment for a month or so. You can check the flavor and see if it needs more time to ferment or not. Hope that helps and good luck!
Jenniffer
Hi! I have a few questions, please. Should the liquid be stirred periodically once the apples are strained? If so, how often should I stir? Asking because after a couple of stirs over the span of a week, a white film developed on the crock where the cider splashed up. Is that part of the mother? It’s flat, white/hazy/smooth. And the liquid has the same haze across the top, almost like an oily sheen. Any advice would be appreciated!
Aaron (Mr. DeannaCat)
Hi Jennifer, no we don’t stir the mixture during the second ferment stage and it does sound like your ACV is forming a “mother” on top of the mixture which is completely fine. Just allow it to slowly ferment and taste test it after at least a month but you can let it ferment longer to reach your desired flavor. Hope that helps and good luck!
Jenniffer
Thank you!
Jordann
I have already completed my first batch following this recipe, and it turned out great! I decided for my second batch I would save up my scraps in the freezer, as you suggested. Now that I have enough, I left them out to thaw they’re all oxidized and mushy, which doesn’t seem like it would be a very good start to the process. How would you recommend thawing scraps? Do I need to start over?
Aaron (Mr. DeannaCat)
Hi Jordann, that is normal with frozen apple, you could have started the process with them still frozen without defrosting them first and it may have been less noticeable at the start. Add some fresh apple and a splash of fresh ACV to the mixture as well to be sure there is enough natural yeast and bacteria to get the fermentation process started. Hope that helps and good luck!
Kalesta
I made 3gal of this vinegar last year using this this recipe and just opened my last bottle. I started 4 more gallons and on 2 bottles there’s a white film forming. The apples in those jars sunk around week 3 and I strained them. Should I be concerned about the white film? Kahm yeast or mother formation? I don’t remember this happening last year…
Aaron (Mr. DeannaCat)
Hi Kalesta, so glad to hear you have had success making ACV last year! I would assume the white film is the mother forming over the top, the mother will typically be smooth similar to a kombucha SCOBY whereas kahm yeast will often have white patches here and there. Either way, both are considered harmless, hope that helps and good luck!
Jenny B
Before Thanksgiving, I followed a different recipe and filled my jar with apple scraps instead of halfway as your recipe suggests. Added the filtered water and sugar. Followed the remaining directions, strained the apple scraps. Lots of mother in jar. Jar has a metal canning lid and ring on it and has been in the pantry. It smells like acetone. Now what do I do?
Aaron (Mr. DeannaCat)
Hi Jenny, your ACV is still fermenting so it has a strong acetone aroma. The vinegar still needs access to oxygen so you shouldn’t be using a metal canning lid, you should use the same tight knit cloth you used for the first fermentation step.
Sue Bischof
I just found this recipe after trying it a different way. I filled a large crock half full with apple peels and cores and covered with distilled water. No sugar. I then covered with a cotton dish cloth and put it in my pantry, stirring often, especially at the beginning. It fermented for about 4 months. I’m straining and bottling now. It’s a beautiful brownish color and tastes wonderful. To be safe, I’m covering my jars with cloth so they don’t explode. I guess there was enough natural sugar in the apple scraps? Do you think it will continue to ferment?
Thanks for the info!
Aaron (Mr. DeannaCat)
Hi Sue, once the apple scraps have gone through their main fermentation phase and you strain the apples, the vinegar will continue to ferment at a much slower rate and you shouldn’t be worried about the jars exploding as the mixture won’t produce much gas at this point. Hope that helps and enjoy!
Marc A Cawthon
Very well written DeaanaCat! I forsee this being added to our galley supplies. Thank you very much and GOD Bless you and yours!
Lise Caprani
Thank you so much for an easy and really usefull recipe. Mine is strained and now standing to get accidy, but it has bin standing for four month, and still not very vinergary in its taste. Is this normal or can I do something else? It has the scoby layer.
Aaron (Mr. DeannaCat)
Hi Lise, you can just let it continue to ferment, the liquid should reduce in volume which will make it taste more vinegary in time as the flavors get more concentrated. It likely won’t taste as vinegary as Bragg’s apple cider but ACV has a number of different uses outside of using it in food (vinaigrette, marinades, etc.) such as in cleaning, make a facial toner, use it in hair rinse, as well as many other ways to use it. Hope that helps and good luck!
Rachel
I have had the pink scone form also. Do you keep this to help ferment the next batch like a regular scone or discard?
Aaron (Mr. DeannaCat)
Hi Rachel, you can use the SCOBY for your next batch but it isn’t necessary like if you were making a batch of kombucha. The apples and sugar will have enough beneficial bacteria to create another mother in your new batch, let alone if you add a small splash of already made ACV, yet adding a small amount won’t be harmful either.
Tamara
Hi!
I’m on the last stage- about to bottle the ACV. I noticed a mustard coloured sludge at the bottom (not much but some). Should I stir that up and include it or leave it?
Thx!
Aaron (Mr. DeannaCat)
Hi Tamara, congratulations on making your own ACV! The sludge is just sediment from the apples so it’s really up to what you feel like doing. Stir it up and include it, strain it out, or just pour out your vinegar and try and keep whatever sediment is left behind. We don’t typically strain it out and it seems the vinegar continues to clarify even after it is bottled. Hope that helps and good luck!
shrea kuile
Thanks for publishing a useful blog on Preserving Apples and How to Make Homemade Apple Cider Vinegar. This is a learning topic on how to make Apple Cider Vinegar at home. You covered every side i.e. ingredients, recipes, instructions, nutrition, health benefits, etc. I learned a lot from this article. I take Apple Cider Vinegar mixed with honey. I have three stents. Should I take ACV regularly or at intervals? I like organic products.
Aaron (Mr. DeannaCat)
Hi Shrea, so glad you enjoyed the article! I would use caution in taking ACV by mouth too often as if you consume too much ACV, it can have some adverse reactions as well. I would just try and add it into your diet more often such as in salad dressing or in other foods as well. Hope that helps and good luck!
Kara L Baas
I strained my ACV and it’s part way through the month of just letting it sit and im a little concerned. It’s very light, but I suppose that depends on the type of apples we use. My bigger concern is that there appears to be a pink film on the top of all the jars. Is this mold and I have to discard the batch? Or is this normal or something I can skim off?
Thanks!
Aaron (Mr. DeannaCat)
Hi Kara, is your ACV in the same jars you used during the initial ferment stage? It’s not uncommon for the vinegar mother to form a layer on top similar to a SCOBY, they can be somewhat pink in color depending on the apples used. Mold will typically be raised and fuzzy, I would just determine whether it’s the vinegar mother forming in the jars or if it’s mold. Hope that helps and good luck!