
How to Build a Compost Bin (Wood 3-Bay Compost Bin Design)
Come learn how to build a compost bin with our step-by-step guide to make a wood 3-bay compost bin design, full of helpful tips and photos.
Equipment
- 1 Power Drill
- 1 Saw (electric)
- 1 Measuring Tape
- 1 Level
- 1 Aviation snips to cut hardware cloth
Ingredients
Lumber
- 11 pieces 8-foot 2x6 boards (or three 12-foot boards + six 8-foot boards)
- 4 pieces 8-foot 4x4s
- 3 pieces 8-foot 2x4s
- 5 pieces 8-foot 1x12 boards (or nine 4-foot long 1x12s)
Hardware
- 2 ½ to 3-inch outdoor wood screws or decking screws
- 1-inch or 1-1/4" wide head cabinet screws
- 12 Fence rail brackets
Other
- 30 feet 4-foot tall 1/2" hardware cloth
- Optional: 4 flat corner braces (one for each wall) for added stability
- Optional: 4-foot steel tube gates, one for the front of each bay
Instructions
Step 1: Select and Prep Site
- Choose a location that is fairly level, preferably near the garden (if you have one).
- Sun or shade is fine. Sun = speeds up decomposition but will dry out more. Shade = will stay more moist but break down slower.
- Leave the bottom of the compost pile open to the native soil below. Remove any debris and level the ground some if needed.
Step 2: Measure and Cut Wood
- Corners: Cut the four 8-foot 4x4s in half, to create eight 4-foot long corner pieces.

- Walls: Cut six 8-foot 2x6" boards at 51.5 inches, which will create six 51.5" boards fo for the exterior walls, and leave size 44.5" boards for the interior walls (since 51..5+44/5 = 96 inches or eight feet).
- Back: Leave three 8-foot 2x6s for the back, and cut two 2x6 boards at 48" to get the additional three 4-foot boards you'll need to finish the 12-foot long back. OR, simply use three solid 12-foot long 2x6 boards.
- Front wall slats: Cut three 8-foot 2x4s in half to create the "tracks" for the face boards, but WAIT to measure and cut the 1x12" removable face boards until after the compost bin is fully assembled.
Step 3: Assemble Exterior Walls
- Lay two four-foot 4x4s parallel on a flat work surface, then place three 51.5" 2x6s on top in the opposite direction: one across the top, one at the bottom, and one halfway in the middle.

- Keeping everything square and the ends of the 2x6 boards flush with the side of the 4x4s, add two long decking screws to each of each 2x6 to secure in place.

- Repeat for the second exterior wall.
Step 4: Add Back to Exterior Walls
- Stand the end walls up in place where the compost bin will go, with the 2x6s on the outside and 4x4s facing inward.

- Connect the two exterior walls using either three horizontal 12-foot 2x6s, or a combination of three 8-foot boards plus three 4-foot boards, connected with a 4x4 in the center.
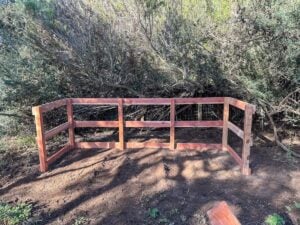
- Keep the back boards flush with the 4x4 corners. Try to keep everything square and level as you go.
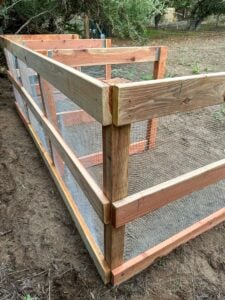
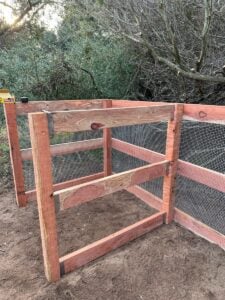
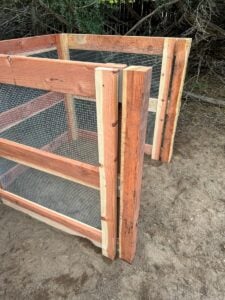
Step 5: Build and Add Interior Walls
- Add two interior walls, spaced approximately 4 feet apart in the center of the bin.

- You can assemble them separately (like we did the exterior walls) then connect them to the backside of the frame, OR built then in-place onto the back walls
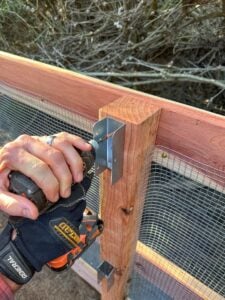
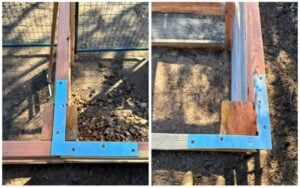
- Using fence rail brackets, connect three 44.5" 2x6s sandwiched between two 4x4s (end to end) - one at the top of the 4x4, one at the bottom, and one spaced halfway in between.
- Screw the brackets onto the 4x4 first - centered, straight and level on the 4x4. Then slide the 2x6s into the brackets and add screws to secure them.
- Optional: skip ahead to Step 6 and add hardware cloth to the back and exterior walls first then continue with adding interior walls - as long as the hardware cloth won't impede the points of connection.
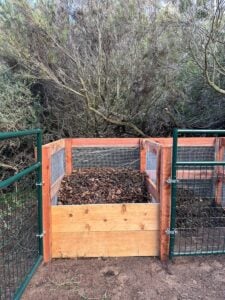
Step 6: Add Hardware Cloth
- After building the compost bin frame, add mesh wire (hardware cloth) along the inside of the walls and back.
- Rather than wrapping an entire bay in hardware cloth at once, we found it was easiest to measure, cut, and attach the hardware cloth to each wall one-by-one.
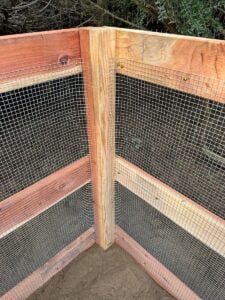
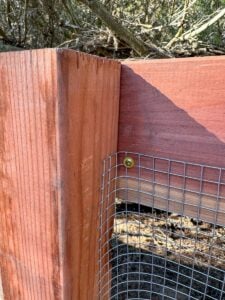
- It's fine to overlap the hardware cloth onto the 4x4s along the back wall and corners, but keep it flush with the 4x4 on the front side so extra hardware cloth won’t block the slot where the removable front boards will go. See photos.
- Secure the hardware cloth to the wood using 1” cabinet screws, pinching a corner section of the wire mesh under the wide head of the screw. Add screws in several places
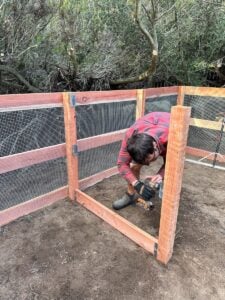
Step 7: Removable Face Boards
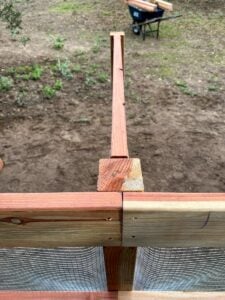
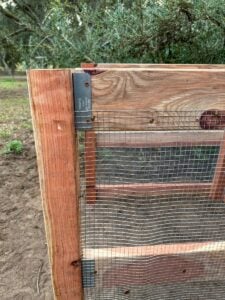
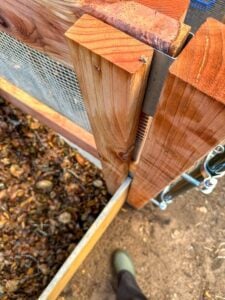
- First create the slots or “tracks” for the removable front boards to slide into. Do so by adding a vertical 4-foot 2x4 to the front inner walls of each bay (six total, 2 per bay).
- Use screws to secure each 2x4 vertically about 1 inch to 1.25 inches back from 4x4 at the front of each wall - enough space to easily slide the 1" face boards (real measurement 3/4") up and down in the track.
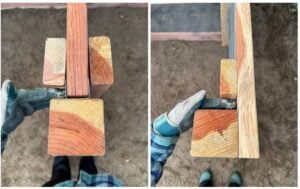
- Wait to cut the removable face boards until the compost bin and tracks are completely assembled! Measure and note the length of the front slot for each bay. We found that the width of our bays varied slightly, requiring us to cut custom boards of different lengths to fit each bay (3 per bay).

- When measuring and cutting the face boards, give yourself a little bit of wiggle room. Cut them long enough so they’ll stay tucked into the desired track, but not so long that they’ll be tight and difficult to get in and out.
- I chose to stain the pine front boards (outward facing side only) to help the light wood blend in better with the overall design.
- Add face boards as needed as the compost piles grow taller

Step 8: Optional Finishing Touches
- To give the walls added stability (for the donkeys), we added an 8” flat corner brace to the top of each wall - or four total.
- We also installed lightweight 4-foot Behlen Country steel tube gates on the front of each bay - and installing the J-bolts straight out of the front of the 4x4.

- We also kept both J-bolts facing UP intentionally, so we could easily lift and take the gates completely off and on when needed.

- For added vermin and pest protection (if needed), you could also build and attach a hinged lid on top of each bay, such as with wood and hardware cloth.
Tried this recipe?Let us know how it was!