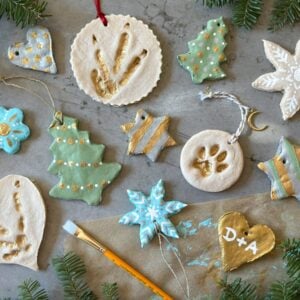
Easy Salt Dough Ornaments Recipe
An easy salt dough ornaments recipe made with only three simple ingredients, plus tips to help them last a lifetime! Create special keepsakes like handprints, footprints and paw prints – or use cookie cutters to create festive shapes to paint.
Equipment
- large mixing bowl, or stand mixer with dough attachment
- Rolling pin
- parchment paper and/or silicone baking mat
- Baking sheet
- tooth pick, wooden skewer or drinking straw (to make holes to hang them)
- twine or ribbon for hanging
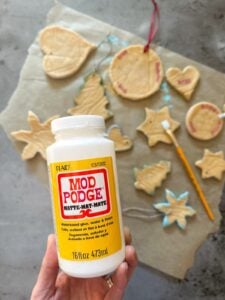
- recommended: Mod Podge or clear acrylic spray sealant to protect them long-term. The finish of your chosen sealer will affect the final sheen of your salt dough ornaments (e.g. matte, glossy or sparkly)
- assorted cookie cutters and/or cookie stamps of choice (optional)
- acrylic paints, small paint brushes, and/or acrylic paint markers (optional)
- glitter, beads, bells, or other small decorations (optional)
Ingredients
- 2 cups all-purpose flour (or 1-to-1 all purpose gluten free flour)
- 3/4 cup salt (basic iodized table salt works best)
- 3/4-1 cup warm water (start with 3/4, up to 1 cup if needed)
Instructions
- Preheat the oven to 215°F.
Prepare Salt Dough
- In a large mixing bowl (or in stand mixer with a dough attachment), combine and thoroughly mix the flour and salt first.
- Then slowly pour in the warm water, mixing as you go. Start with 3/4 cup water, mix well, and only add more if the dough seems too dry and flaky (isn't holding together well). *See notes about adjusting the texture below.
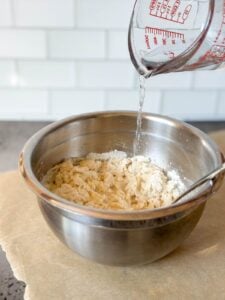
- Continue to mix and knead the dough for several minutes until it’s soft and smooth. If you’re not using a stand mixer, knead the dough with your hands on a clean work surface.
Roll and Stamp
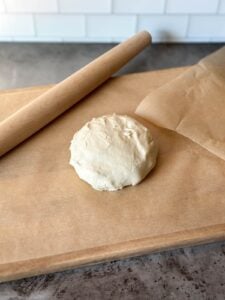
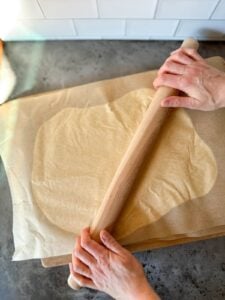
- Place the dough ball between two sheets of parchment paper, or on a silicone baking sheet with a piece of parchment paper on top. (If you doubled the recipe, split the dough ball into two first.)
- Gently roll out the dough until it’s about 1/8 to 1/4 inch thick (err on the thicker side hand for footprints). Gently peel off the top piece of parchment paper.
- Next, use cookie cutters to cut out fun shapes or cookie stamps to create pretty 3D designs.
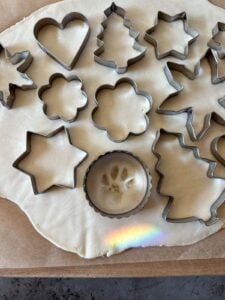
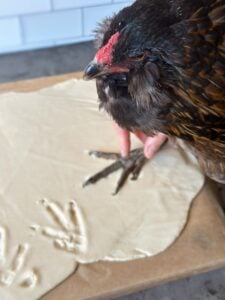
- To do hand or footprints, I suggest gently pressing the hand/foot/paw into an open area on the dough first, and then use a cookie cutter or knife to cut out around it afterwards.
- Gently peel away the excess salt dough from around the sides of your ornaments, leaving them in place on the parchment paper. (You can roll out the extra dough again to make more ornaments if you wish.)
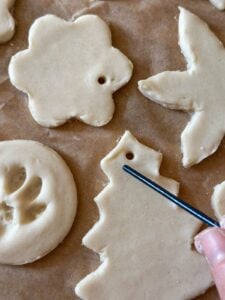
- Use a toothpick, wooden skewer, or end of a small paintbrush to create a small hole in the top of the ornament for hanging.
Bake
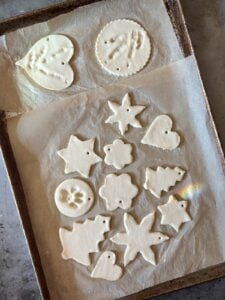
- Carefully transfer the parchment paper with the ornaments onto a baking sheet.
- Bake at 200-225°F for 2 to 3 hours or longer, until they’re totally firm and the bottom/center is no longer soft and wet. Baking salt dough ornaments “low and slow” is key to prevent browning, curling or bubbling! They may take more or less time depending on the size.
- Flip and rotate the ornaments every hour to promote even drying.
- Wait until they’re fully cooled and dry before painting or sealing.
Paint (optional)
- Once they’re cool, have fun painting or decorating your salt dough ornaments! Use acrylic paint, paint pens, glitter, or other additions to add your own personal flair.

Seal
- Since they're naturally porous, it's best to seal salt dough ornaments to protect against mold, moisture, crumbling and make them last!
- Wait until the ornaments are fully dry (including paint) to seal them.
- Apply one to two coats of clear sealer (e.g. mod podge or acyclic spray sealer) to each side of the ornaments, allowing them to dry between sides and coats.
- If using a spray sealer, be sure to work in a very well-ventilated area or outside.
Hang and Enjoy!
- Add twine or ribbon to hang your salt dough ornaments on your tree!
- I love to add little bells, wood beads, tiny crystals or charms to the twine for some extra special flair.

Notes
*The ideal texture for salt dough ornaments is smooth, holds together in a nice ball, and is easy to work with – similar to play dough or sugar cookie dough. It shouldn’t stick to your hands (or only minimally). If it’s too dry and flaky, mix in more water to adjust the consistency, adding just 1 to 2 Tbsp at a time. Or if the salt dough is too wet and sticky, knead in 1 to 2 Tbsp additional flour at a time.
Tried this recipe?Let us know how it was!