

How to Set Up a Chick Brooder: Temperature Chart and Supplies

Are you raising baby chicks for the first time, or simply looking for some fresh brooder ideas and tips? This article will explore everything you need to know to set up a chick brooder, including the supplies needed, heater options, a week-by-week temperature chart by week, easy DIY chick brooder box ideas, size requirements, and more.
With these tips, your chicks will be happy, healthy and safe in your care!
What is a Chick Brooder?
A chick brooder, also known as a brooder box, offers baby chicks a safe warm space to live during their first most vulnerable weeks of life. A brooder is essential for chicks to survive without a mother hen, who would normally tuck the chicks under her body for warmth. The brooder contains their food, water, and a source of heat. It also keeps them safe from predators, including wildlife or pets.
Would you like to save this?
Disclosure: Homestead and Chill is reader-supported. When you purchase through links on our site, we may earn an affiliate commission.
To learn more about raising baby chicks, including food, water, and important health needs, please see: Raising Baby Chicks 101: The Best Beginner’s Guide.
Where to Set Up a Brooder
You can set up a chick brooder inside your house in a spare room, laundry room or bathroom – which will make it easy to maintain the right temperature and watch over the chicks. However, keep in mind that chicks create a lot of dander and dust, so it’s best to keep the brooder away from the kitchen, bedrooms, or main living quarters. We always run an air purifier in our brooder room to help keep the dust down.
You can also set up a brooder in a garage or other protected outdoor location (such as a shed or chicken coop) as long as it’s warm enough and shielded from the elements or temperature swings. If you set up a brooder inside a chicken coop, it’s important that the adult chickens do not have access to the chicks.
PRO TIP: Plan and set up the brooder in advance, so everything is ready and waiting (and warm) as soon as your chicks arrive – so they can get settled in right away.

RELATED: If you haven’t yet decided, learn about where to buy baby chicks, including unique pros and cons of each option. Also be sure to have a few cute or funny chicken names picked out!
Brooder Supplies
The following supplies are needed to set up a chick brooder:
- A brooder box, made from a sturdy structure or container. See DIY brooder box ideas below, along with size guidelines for how much brooder space to provide per chick.
- A lid or cover for the brooder, to keep the baby chicks IN and unwanted visitors (like cats or dogs) out. Chicks will be able to jump out of the brooder or on top of the walls within a couple weeks! The brooder cover must be breathable and secure. Wire fencing like hardware cloth or chicken wire is a great option.
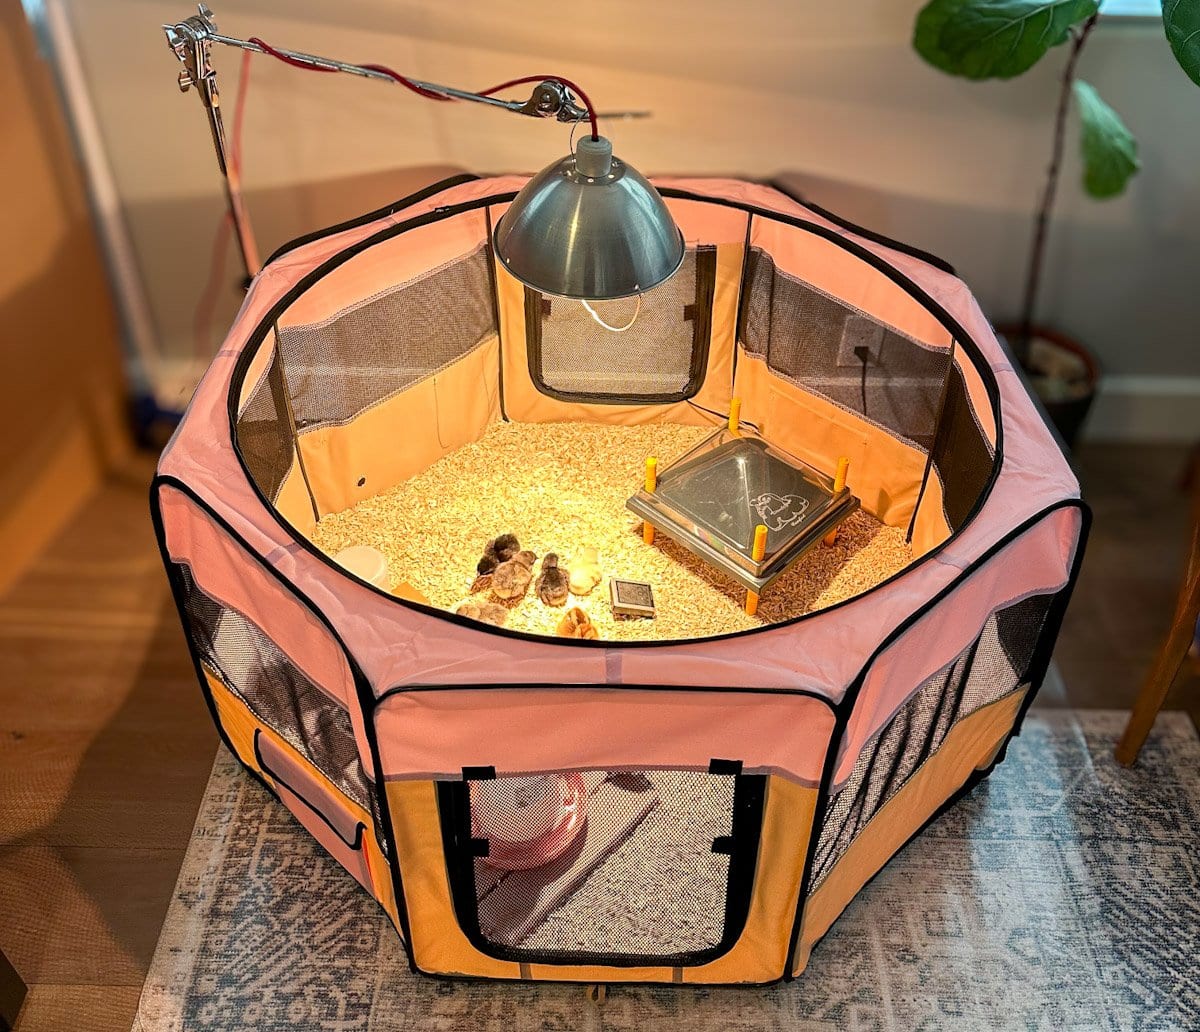
- A heat source, such as a traditional red heat lamp (outfitted in a lamp fixture with a bulb guard), or a radiant heat plate. The pros and cons of both brooder heater options are explored more below.
- Bedding: A chick brooder needs absorbent non-slip bedding on the floor. Popular brooder bedding options include pine or aspen shavings, hemp bedding, coarse sand, or chopped straw. Never use cedar products (which is toxic to chickens) or cat litter (which they’ll likely eat and could lead to intestinal blockage). Newspaper also isn’t recommended as it’s slippery and can cause a condition called splay leg. Weigh the pros and cons of various brooder bedding options here.
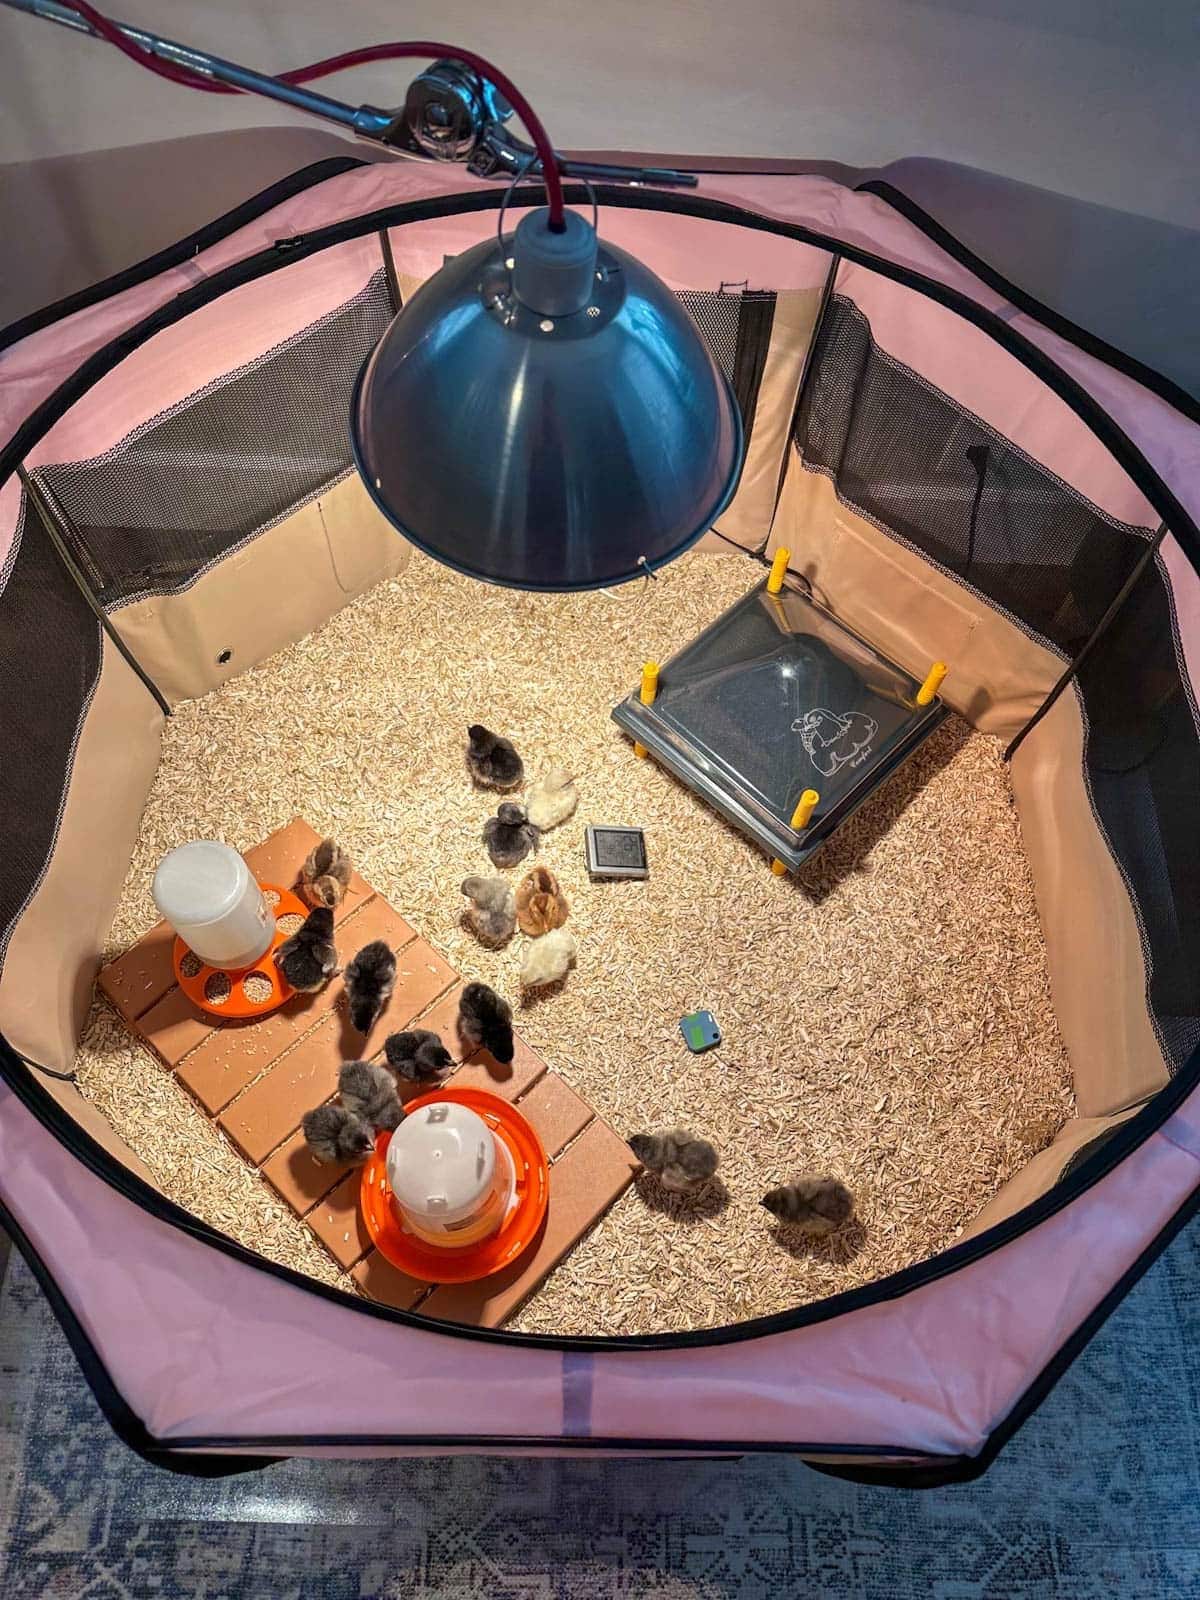
- Food and water containers, like this simple set. Use small containers designed for chicks, which are most safe and take up the least room in their brooder. See our Raising Baby Chicks guide for more information about chick starter feed, adding electrolytes to water, and more.
- A thermometer, placed at chick (floor) level in the brooder. In addition to a regular thermometer, I also love to use this smart thermometer sensor so I can monitor the brooder temperature from my phone!
- A short sturdy roost, such as the example shown below. This gives the chicks something to play on, as well as practice sleeping on a roost. Flat wide roosts are easier and more comfortable for chickens to perch on compared to round dowels.
- Optional: other entertainment, like a small mirror. Yes, chicks enjoy looking at themselves! Some folks also put a small container of sand or dirt as a chick dust bath (doubling as a source of grit) but baby chicks don’t need grit when they’re indoors and eating their specialized chick feed only.

DIY Chick Brooder Box Ideas
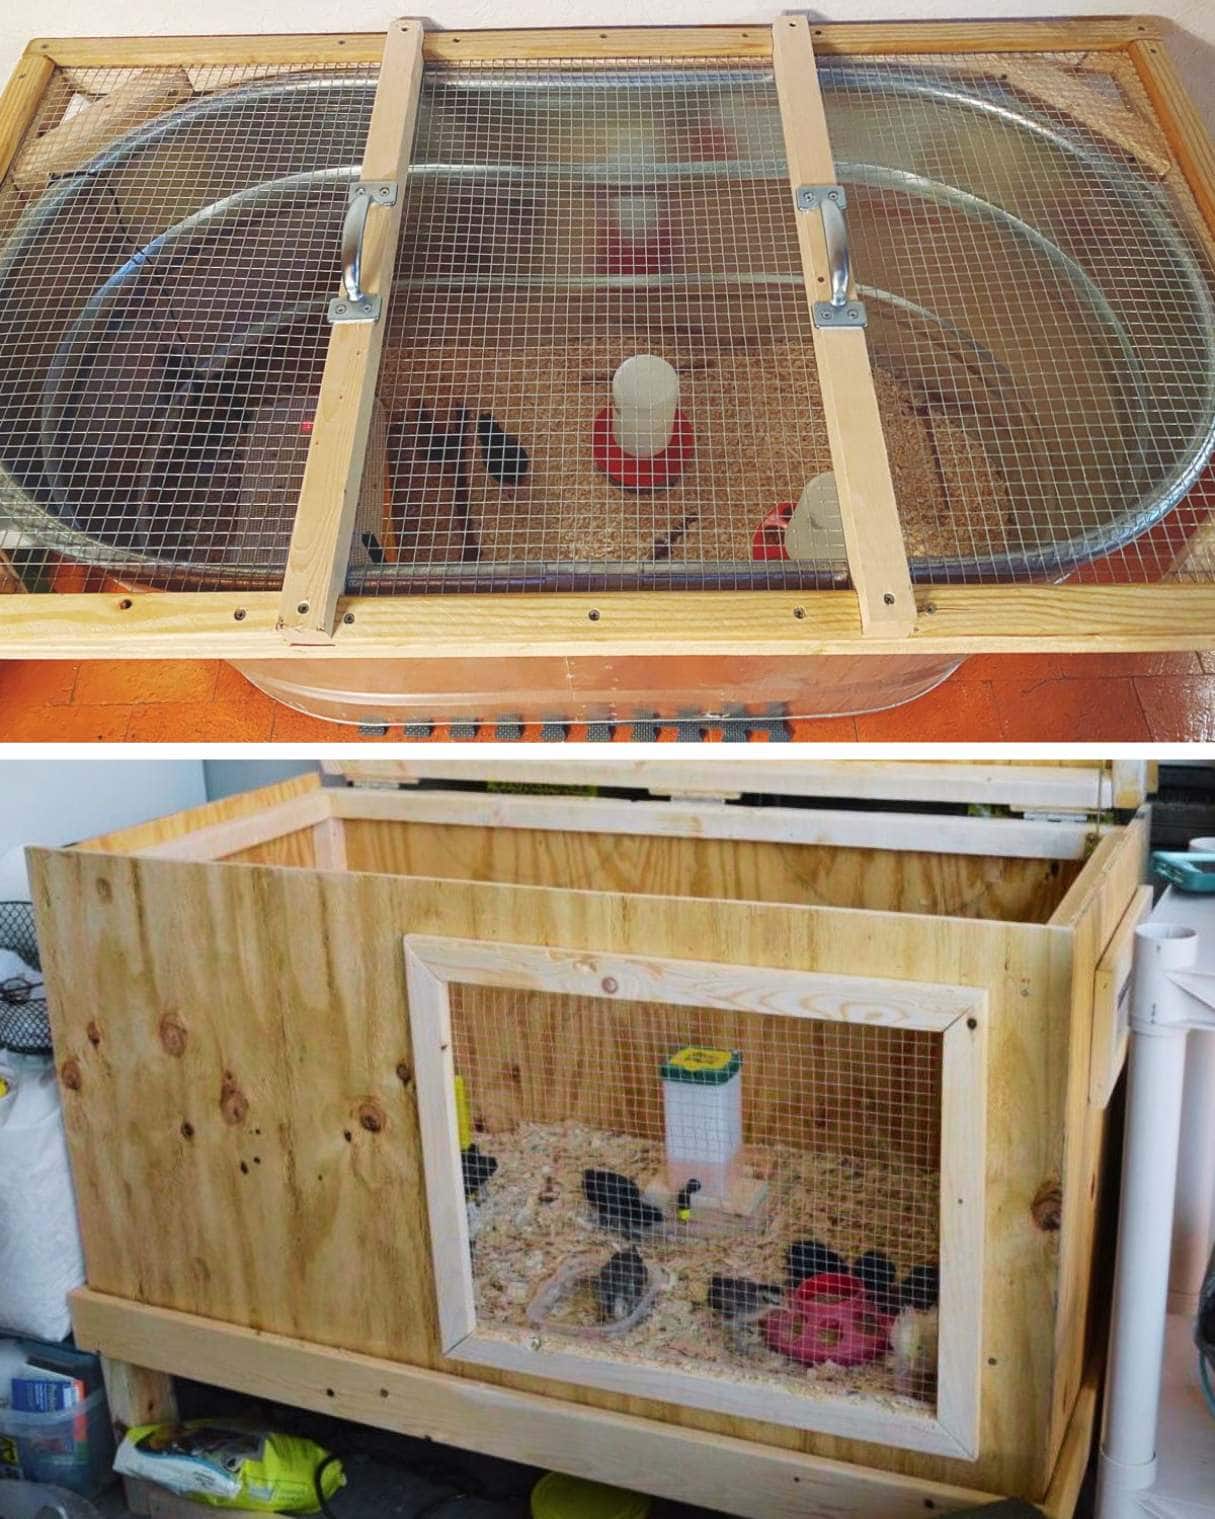
You can make a DIY brooder out of a variety of materials such as a large plastic storage tote, metal tub or stock tank, thick cardboard, or a homemade plywood box. I’ve even seen folks use portable cribs (like a Pack N Play), old aquarium tanks, or wire dog crates lined with cardboard.
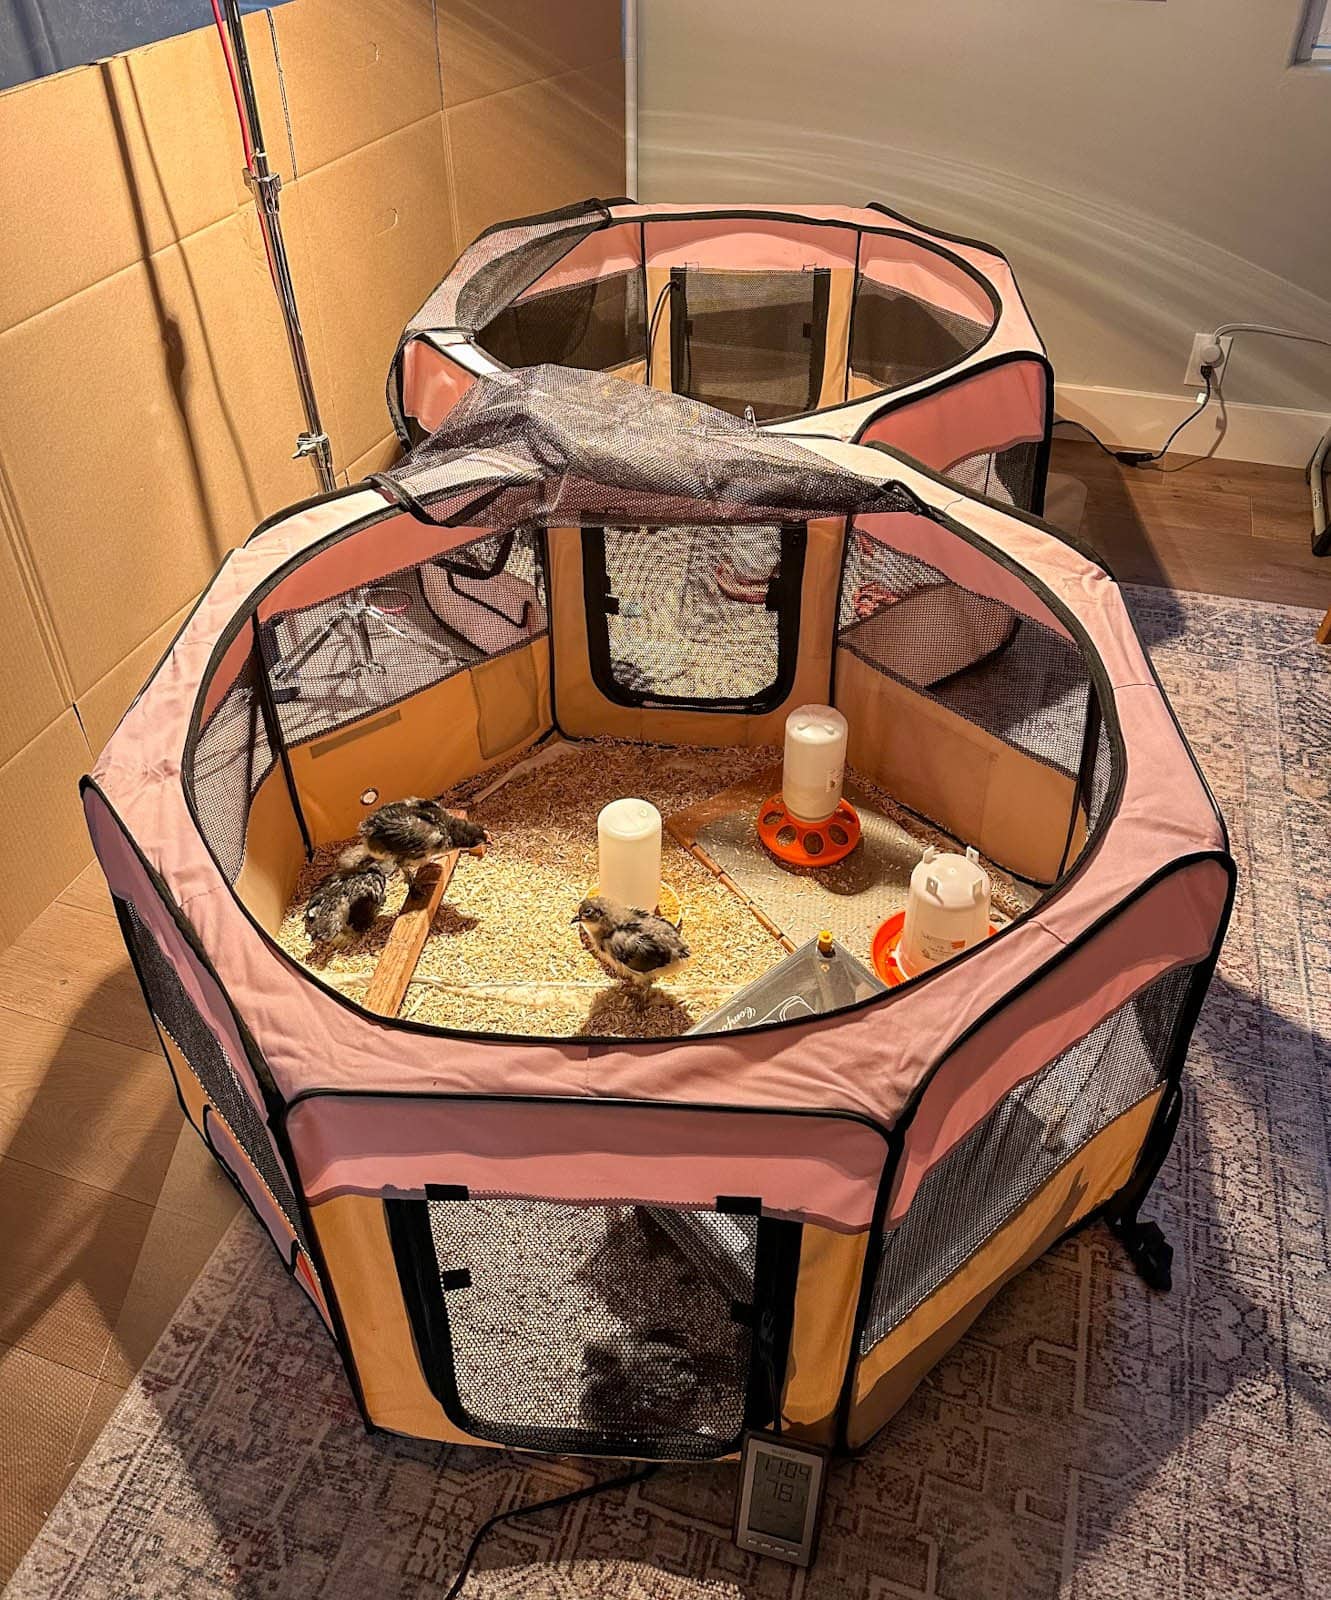
In the past, we’d start in a storage tote and then upgrade to a large DIY plywood box as the chicks got larger. In recent years, we started to use this pop-up dog playpen as a brooder and absolutely love it.
Any sturdy structure with a lid that meets the size requirements (explained below) will work.
See this post for 11 Easy DIY Chick Brooder Box Ideas including more photos, inspo, and details.
Size Requirements
When chicks are one to four weeks old, provide a minimum of ½ square foot of brooder space per chick. As they get larger (4 weeks and older) it’s best to upgrade to 1 or 2 square feet per chick. We typically start our chicks out in a smaller brooder (which is easier to keep warm and maintain) and then move them to a larger one at week 3 or 4.

Heater Options
The two most common chick brooder heater options include a classic heat lamp or a radiant heat plate. There are a number of pros and cons to both, explored below.
Heat Lamps
Heat lamps are inexpensive and effective, but must be used with extreme caution since they can be a fire hazard. It is crucial to hang them in a very secure manner so they can’t tip over or touch anything around them.
It’s also important to be able to easily adjust the height of the light to increase or decrease the temperature in the brooder as needed – monitored with a thermometer on the floor of the brooder.
It’s best to use a RED heat lamp bulb for your brooder. Chicks need to sleep and rest often; clear or white heat lamps are too obnoxiously bright to have on 24/7. We use a sturdy drum cymbal stand to hang our light.

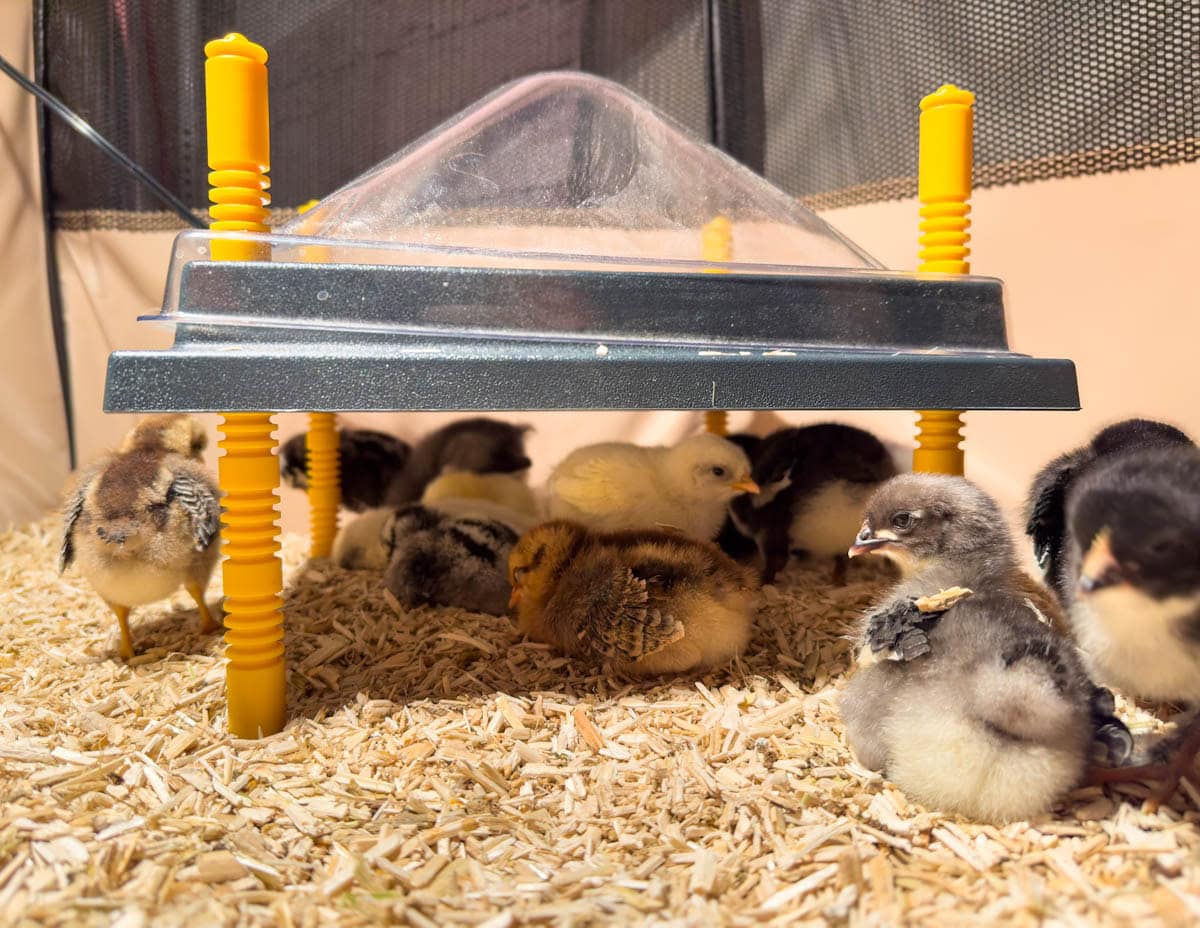
Radiant Heat Plates
Modern radiant heat plates are generally regarded as the safest brooder heater option, with virtually no risk of fire. They closely mimic the natural heat of a mother hen, where chicks can choose to duck under the heater when they’re feeling cold or go out to play once they’re warm enough.
If you use a radiant heat plate, you must also keep a light on nearby all times so chicks can find their food and water. They cannot see in the dark! A dim lamp is fine for overnight.
While radiant heat plates cost more than heat lamps upfront, they are more efficient and require less energy to use. However, since the heat is concentrated around the plate (rather than warming the entire brooder) these may not be the best option if your brooder is located in a very cold location, like an uninsulated shed or garage in winter.
PRO TIP: Choose a brooder heat plate that has a domed lid on top, which prevents the chicks from roosting (and pooping) on top. Also be sure to routinely check that it’s on and working! I’ve heard a couple horror stories where someone didn’t realize theirs was broken until it was too late…
Chick Brooder Temperature Chart By Week
The temperature in a chick brooder starts out very warm (90-95°F degrees the first week) and then slowly decreases week-by-week as chicks become older and their feathers fill in. Check the thermometer inside the brooder (at chick/floor level) regularly and adjust the heat lamp height and temperature as needed. The chick’s behavior will also tell you if they’re too hot or too cold, discussed more below.
- Week 1: 90-95°F (32-35°C)
- Week 2: 85-90°F (30-32°C)
- Week 3: 80-85°F (27-30°C). Start short trips outside on warm sunny days.
- Week 4: 75-80°F (24-37°C). Gradually increase short trips outside.
- Week 5: 70-75°F (21-24°C). We may start turning off the brooder heater during the day at this time, depending on the temperature inside.
- Week 6: 65-70°F (18-21°C) Since our brooder is in the house, we often completely remove the brooder heater at this point.
- Week 7: 60-65°F (15-18°C) In our temperate climate, we usually move the chicks outside by week 7. Learn more about deciding exactly when to move chicks outside below.
- Week 8: 50-60°F (10-15°C) – Time to move outside!

Chick Behavior and Temperature
A comfortable chick will be a nice balance of active and sleepy. They should be able to get closer or further away from the light (or heat plate) freely. Maintain their food and water near the edge of their comfort zone, so they don’t need to be too heated or chilled to eat and drink.
When they’re too cold, chicks may run around and chirp very loudly, or huddle together directly under the light.
When chicks are too hot, they will try to move as far away from the heat lamp as possible, staying around the perimeter of the brooder or sleeping away from the light. They also act more lethargic and sprawl out (though baby chicks take a lot of naps regardless). When very overheated, chicks may also pant.

How long do chicks stay in a brooder?
Chicks usually stay in a brooder for 6 to 8 weeks, depending on the time of year and temperature outside. Most chicks are fully-feathered by 6 to 7 weeks old, and may be moved outdoors to a protected coop if the overnight lows are not below 50-55 degrees at this time (considering a draft-free coop with bedding will be several degrees warmer inside, and the chicks will also huddle together for warmth).
If overnight outdoor temperatures are around 45-50°F, wait until the chicks are 7 or 8 weeks old to move them outside. When overnight temperatures dip below 40-45°F, offer additional heat in the coop for a few more weeks.
Related: Learn more about how to keep chickens warm in winter or cold weather. Also visit our Beginner’s Guide on Raising Baby Chicks for more information about moving chicks outside, including tips for introducing new chickens to a flock.

Brooder Cleaning
It’s important to keep your chick brooder clean, especially to keep the chick’s food and water free of litter and poop. The number of chicks in the brooder will dictate just how often it needs to be cleaned. We pick out droppings daily, and then completely change the bedding once every week or two. Keeping the brooder clean will also help keep unpleasant odors to a minimum. Clean water containers at least daily.

And that’s how to set up a chick brooder!
I hope this guide gave you plenty of useful information, tips, and easy DIY chick brooder ideas. Now, I’m sure you’re eager to get your chicks home and watch them grow! Learn 5-tell tale signs and more tips about when do chickens start laying eggs here. Finally, please enjoy browsing the related articles below, and let us know if you have any questions in the comments!
You may also like:
- The Top 18 Chicken Breeds for Your Backyard Flock
- Backyard Chickens 101: What to Expect When You’re Expecting
- How to Make a Chicken Dust Bath: Easy DIY Ideas
- Top 10 Chicken Coop Supplies That Will Make Your Life Easier
- 10 Ways to Keep Chickens Cool During Hot Summer Weather or Heat Waves
- How to Ferment Chicken Feed for Better Hen Health & Eggs


4 Comments
Katie
I’ve been reading a lot of articles on the pros vs. cons of having a brooder set up inside the chicken coop. Do you have any thoughts on that? I like the idea of the chicks growing up with the older hens so it is an easier transition/introduction when they fully live together. BUT I’m afraid of some of the negatives like if the weather gets too cold and making sure they stay warm enough.
Aaron (Mr. DeannaCat)
Hi Katie, we don’t necessarily have too much to offer outside of what you have already read but in raising three different batches of chicks over the last number of years, we have always done so inside of our house for the first 7-8 weeks or so (weather and temperatures dependent). Keeping the brooder inside of the coop would be a good idea if you have the space and are able to keep the chicks warm enough and protected from the adult birds. If cold weather is an issue, I would try and start your chicks during your warmest months but ensure that it doesn’t get too hot inside the coop either. For our most recent batch of chicks, a few of them needed a little more attention while they were in their first few weeks and it was nice to be able to easily access them inside of our house compared to having to go out into the coop to attend to them. Not having to deal with the dust from the brooder and shavings inside of your house would be another reason to keep the brooder in the coop, but as you stated, there are pros and cons to either situation. Good luck!
Gina
I have no intention of raising chicks anytime soon, but I enjoyed reading this superbly thorough article. Every post you write is so detailed… Exceptional!
Aaron (Mr. DeannaCat)
Thank you so much Gina! We hope you learned something new, even if it’s not something you necessarily needed to know, haha.