

How to Plant and Grow Garlic: The Ultimate Guide

Do you dream of delicious homegrown garlic, straight from your garden to the kitchen? Come learn how to successfully grow garlic at home! This post will cover everything you need to know to grow the best crop possible: when and how to plant garlic cloves, where to get seeds, tips for soil prep, our “secret soak”, disease control, and more.
The best news is: garlic is easy to grow in any climate. It even does well in pots, perfect for container gardens. The key is choosing the right type of garlic for your location, so we’ll talk about the difference between softneck and hardneck garlic varieties too. I hope this guide will help make all of your homegrown garlic dreams come true!
RELATED: If you’ve already planted your garlic and need tips on harvesting, curing, and storage, see How and When to Harvest Garlic for more detailed information. Also see how to preserve garlic here.

Would you like to save this?
Disclosure: Homestead and Chill is reader-supported. When you purchase through links on our site, we may earn an affiliate commission.
When to Plant Garlic
Garlic is cool-season crop which takes about 8 months to grow from seed (cloves) to harvest. Garlic is usually planted in the fall, sometime between late September to late November depending on your climate. Mid-October is a safe bet for most locations. See our planting calendars below for more information. They’re available for every growing zone!
After planting, the cloves should begin to sprout in the fall, and also start to establish their root systems. They’ll go dormant over the winter (in freezing climates), resume growth in the spring, and be ready to harvest early to midsummer.
If you miss the window for fall planting, you can also plant garlic cloves in late winter to early spring, as soon as your soil thaws enough to work. However, fall planted garlic will produce bigger, superior bulbs. Here on the Central Coast of California, we often wait to plant our garlic in late January to help avoid garlic rust, a persistent fungal disease in our area.

Where to Buy Garlic Seed
Garlic doesn’t grow from typical tiny garden seeds. Instead, garlic is grown by planting individual garlic cloves, just like the ones you peel and cook for dinner! Each single garlic clove that is planted will grow into a new large head or bulb of garlic with 5 to 12 paper-wrapped cloves.
Even though you won’t plant garlic until fall, it’s a good idea to plan ahead and buy garlic seed (cloves) in advance. Most online retailers do pre-orders for garlic during the summer, and will ship it out in late summer to early fall.
Some reputable places to buy garlic seed include Peaceful Valley, High Mowing Seeds, Botanical Interests or Adaptive Seeds to name a few. In addition to ordering online, garlic seed is sometimes available for sale at our local Farm Supply or Ace Hardware nursery thought the varieties are limited.
In a pinch, you can plant organic garlic cloves from the grocery store, but then you can’t choose varieties suited for your zone (stores usually sell softneck). If you do go this route, I emphasize: get organic! Non-organic produce is often irradiated or treated with sprouting inhibitors that can hinder success. Check your farmer’s market too. The garlic they sell locally should grow well in your region.

Choosing Garlic Varieties to Plant
There are dozens of varieties of garlic to choose from. Inchelium Red, Music, German White, Creole, Spanish Roja, and California Early White are a few popular options. Some are more spicy or mild, better for storage, larger or smaller bulbs, or earlier-maturing. However, out of all of the many types, garlic will fall into one of two categories: hardneck or softneck (explained below). It’s essential to choose the right type for your climate!

Softneck vs Hardneck Garlic
Here are a number of key differences between hardneck and softneck garlic varieties:
- Climate: Hardneck varieties tend to thrive in regions with more harsh freezing winters. They require a greater period of vernalization, or prolonged exposure to cold temperatures. On the other hand, softneck varieties tend to do best in regions with significantly milder winters, like here on the Central Coast of California. Softneck garlic can grow and survive with some freezing temperatures though! Especially if provided a good deep layer of mulch for added protection.
- Number of cloves: Softneck garlic varieties usually produce a larger bulb, with more individually-wrapped cloves inside. In contrast, hardneck garlic typically has fewer individual cloves, but each clove can be larger, with thinner skin that is easier to peel.
- Storage Potential: Because softneck garlic cloves are so tightly wrapped, they have a longer shelf life: up to 9 months when cured and stored properly. On the more tender side, hardneck garlic has a shorter storage life, usually lasting only 3 to 4 months post-harvest and curing. Therefore, you’ll want to use it, re-plant some as seed, or preserve it within that time frame.
- Scapes: Close to harvest time, hardneck garlic will grow an edible flowering stem called a garlic scape. Garlic scapes are like delicious garlic-flavored, long tender green beans – an awesome addition to pesto or any meal! Softneck garlic does not produce scapes.
For even more information, please see this guide: The Difference Between Softneck and Hardneck Garlic. It also explores the top 12 garlic varieties!

Preparing Garlic Seed to Plant
Once you have your garlic seed, carefully break apart the whole bulbs into individual cloves. Leave the papery cover on each clove though! Removing the paper can make the cloves rot more readily in the soil. It is recommended to break up the bulbs at least a day or two before planting to give them time to dry out.
If you have more seed than you can plant, select the largest cloves of garlic to plant! Big cloves are said to produce the largest bulbs.
Vernalization
Garlic requires a period of vernalization, or exposure to cold temperatures below 40 to 45°F for several weeks. This chilling period helps to stimulate strong root development, sprouting, and growth. Hardneck garlic varieties are especially dependent on vernalization, often requiring up to two months of cold exposure, though three to five weeks is usually adequate for most varieties.
In most places, vernalization happens naturally while the garlic is in the garden soil over the cold winter months. However, if you live somewhere with temperate winter weather, you can “fake” vernalization by putting your garlic seed cloves in the refrigerator for several weeks (I recommend at least a month) prior to planting to help ensure success.

Soaking Garlic Cloves Before Planting (optional)
Prior to planting garlic, we typically soak our garlic cloves in a mixture of seaweed extract and baking soda. This optional step helps provide the garlic seed with additional nutrients and anti-fungal ingredients, helping to jump-start sprouting and fight disease! With this, our garlic always sprouts within just a matter of days.
To create a garlic clove soak, combine 1 Tbsp of baking soda and 2 Tbsp of liquid seaweed per gallon of water. Given the modest amount of garlic we plant (about two pounds of cloves) we only make a quarter of the recipe, using 3/4 teaspoon of baking soda and a ½ tablespoon of seaweed extract per quart jar of water. In a pinch, you can also use kelp meal instead of liquid seaweed extract – just double the amount.
Mix well, distribute into your soaking vessels of choice, and add the garlic cloves. Soak the garlic seed in this solution for several hours or even overnight, but no more than 18 hours. We keep each variety separate in it’s own marked container to keep track.
One final optional step is to give the garlic cloves a quick dunk in rubbing alcohol (just for a minute or two) prior to planting to help further kill any bacteria or fungal spores that may be present. This is particularly useful if you’re re-planting garlic harvested from your own garden, where the likelihood of disease may be higher than fresh seed garlic.

Where to Plant Garlic
Garlic grows best in a location with full sun, or at least 6 hours of direct sunlight per day. If you’re not using raised garden beds, choose a spot in the ground that doesn’t easily collect and pool water, which can lead to rotting.
Avoid planting garlic in the same place year after year, or in the same location that other alliums like onions were recently grown. Good crop rotation practices are important to help prevent disease, pests, and nutrient deficiencies!
Garlic makes a great companion plant to grow near tomatoes, lettuce, carrots and members of the cabbage family, but isn’t as compatible to plant near peas or beans.
Soil Preparation
Garlic thrives in rich, loose, well-draining soil. If your soil is compact and dense, loosen it to about a foot deep and consider adding some potting soil, horticultural sand, and/or pumice to fluff it up.
Before planting, work in several inches of organic compost to your chosen planting location, along with a top dressing of slow-release organic fertilizer. Go fairly light on the fertilizer at the planting stage however, and plan to add more in the spring.

Planting Depth and Spacing
Plant each garlic clove 2 inches deep, about 4 to 6 inches apart. I usually pre-poke all the planting holes in the designated bed, and then pop in each clove one by one. Place the garlic clove in the hole with the flat root end down and the pointy end facing up.
For larger varieties like Elephant garlic (which is actually a member of the leek family), provide more spacing between the cloves – up to 12 inches apart, and 4 to 6 inches deep. Garlic seed companies should also include planting instructions with spacing guidelines for you to follow.

Mulching Garlic
In cold northern climates, it’s important to apply several inches (4 to 6 inches) of loose deep mulch on top of the soil to protect garlic over winter. Straw, shredded leaves, grass clippings, and fluffy well-aged compost are all good mulch options. Apply the mulch before the first hard freeze. There is no need to remove the mulch in spring however – it will help to suppress spring weeds too!
Since we live in an area with mild but rainy winters (frost and hard freezes are rare here), we skip the deep mulch so the bulbs won’t stay soggy and accidentally rot. Instead, we apply just a modest layer (an inch or two) of compost mulch on top. Rather than going dormant, our garlic continues to slowly grow through winter.

Water
Garlic enjoys routine deep water, but not too much. Allow the top inch or two of soil to dry out between watering. If it’s raining, snowing, or otherwise damp in the winter, do not apply additional water. It’s important to not overwater so the bulbs won’t rot, especially when the garlic isn’t actively growing over winter! Once spring comes and temperatures rise, maintain the soil evenly moist but not soggy.
Fertilizer
Garlic is a fairly heavy feeder. Once things start to warm up in the spring, add a fresh layer of compost between the rows and/or a side-dressing of balanced slow-release organic fertilizer. This will give them some much-needed energy as they begin to fatten up! We also try to water our garden with either dilute seaweed extract or homemade compost tea a couple times throughout the summer growing season to support overall soil health.

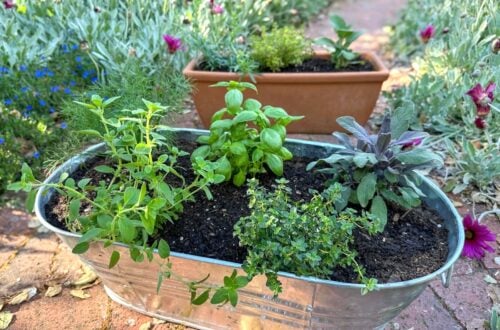
Growing Garlic in Pots
Garlic grows quite well in pots! In addition to raised garden beds, we’ve planted garlic in various containers over the years including in Earth Box planters, 15-gallon grow bags and half wine barrel planters.
To grow garlic in a pot, follow the same tips provided in this guide: use moderately rich but well-draining soil (such as quality potting soil), fertilize once at the time of planting and again in spring, provide full sun, routine water, and deep mulch during winter.
Ensure the container has excellent drainage since garlic will rot if the soil becomes water-logged. A simple moisture meter can help you determine how wet (or dry) the soil in your pot is before watering again.
That depends on how much garlic you want to plant! Keeping in mind that garlic cloves should be spaced 4 to 6 inches apart, I recommend using a wide container with ample surface area (as opposed to a deep narrow pot) to maximize the number of garlic cloves you can plant. Garlic has fairly shallow roots (but needs to be planted 2 inches deep), so choose a pot that is at least 8 to 10 inches deep.


Garlic Diseases and Pests
Thankfully, most common garden pests prefer to stay away from garlic. In fact, garlic is often used as a companion plant to naturally deter pests instead! Aphids did attack our garlic crop one year, but that was only because the plants were already stressed (we forgot to turn on the automatic irrigation – oops!) and struggling plants are always more attractive to pests.
On the other hand garlic is prone to several diseases, including Basal Rot, White Rot, Downy Mildew, Botrytis Rot, Penicillium Decay and more. Cornell University explains that “most of the major garlic diseases are soil-born, so proper site assessment and yearly rotations are crucial in maintaining a healthy garden of garlic.” The only disease we’ve personally encountered is garlic rust.
Garlic rust is a fungal disease that only affects the allium family (garlic, onions, leeks, and shallots) and causes orange rusty-looking spots on the leaves. It is common in humid, damp conditions like we often have in the winter, and is virtually impossible to treat organically once it appears. Minor cases are mostly a cosmetic nuisance, but severe infections can lead to decreased bulb size and lessened life in storage.
Despite our best crop rotation efforts, we usually end up with some rust. If it’s really bad, we sometimes have to harvest our garlic early (resulting in green garlic) to prevent the spread of rust spores. Here in California, we’ve also learned that we can successfully prevent (or at least greatly reduce) garlic rust by planting our garlic in late January instead of fall!


Harvest, Curing and Storage
Garlic is typically harvested in early to midsummer. Close to harvest time, the garlic leaves start to turn yellow or brown, shrivel, and dry up, and you can also feel developed bulbs below the soil. It’s important to stop watering garlic for a couple weeks prior to harvest, which helps it start to dry out for curing. After harvest, garlic should be cured for several weeks (with the green tops and roots still in tact) to prepare it for long-term dry storage.
Please visit our detailed guide on How to Harvest, Cure and Store Garlic for more information. It also includes some of our favorite ways to preserve garlic, such as making homemade garlic powder or fermented garlic honey.

And that’s how to plant and grow garlic.
So, what do you think? Are you going to grow hardneck garlic, softneck, or maybe a little of both? I hope you found this article to be interesting and informative! Please feel free to ask questions in the comments below. May you be blessed with delicious homegrown garlic.
Don’t miss these related articles:
- When to Harvest Garlic, Plus Curing and Storage Tips
- The Difference Between Hardneck and Softneck Garlic + Top 12 Varieties
- Easy Fermented Garlic Honey Recipe + Benefits and Uses
- Roasted Two-Bite Garlic & Herb Smashed Potatoes
- Preserving Garlic: How to Make Homemade Garlic Powder


66 Comments
Val
Thanks so much for a great article,just wondering what else I can make with the scapes besides pesto
Aaron (Mr. DeannaCat)
Hi Val, you can sauté them in butter to eat right away, roast them on the grill, use in risotto and soups, cook them with eggs and pickling them are a few more things to do with your scapes.
Lirio Mulder
Thank you so much for the thorough lesson. I believe this is the best article I’ve read so far in the topic of garlic. It is so complete. Really appreciate your time and expertise.
Laura
Great article! Can I use fish fertilizer instead of seaweed extract? I’m not really sure what the difference is.
Aaron (Mr. DeannaCat)
Hi Laura, seaweed extract is concentrated seaweed or kelp and fish fertilizer is concentrated cooked fish. They are very different and accomplish different things. I would not soak the garlic cloves in the fish fertilizer pre planting but once your garlic is growing, feel free to water them using the fish fertilizer on occasion. Good luck!
Mary
Hi Deanna – I live in Los Osos 10a… What varieties of hardneck garlic are you growing? It’s hard to choose! I am going to order inchelium red, california early white and some shallots. Do you have other suggestions?
Aaron (Mr. DeannaCat)
Hey Mary, it looks like you’re on the right track and made some great selections!
Melinda
Is there any way to save a few of your homegrown bulbs for replanting next season? This summer will be my first time harvesting our own garlic. So excited!
Rachel
Once planted, approximately how long should it take to see garlic sprouts coming up? I’ve planted a fall garlic crop (first time) about 2 1/2 weeks ago and I have yet to see any signs of garlic.
DeannaCat
Several weeks, to months! Patience, young grasshopper.
Emily Journagan
When I am ordering garlic and it says “3-4 bulbs per pound” and you mention separating the bulbs into cloves before planting, does this mean that 1 lb of garlic for planting will start about 10 plants or just the 3-4?
DeannaCat
Each bulb should have anywhere from 8 to 12 cloves on average at minimum, so that is enough for around 40-50 future heads of garlic!
Anna Cagle
Cant wait to grow garlic for my first time! Reading this article has me feeling 0repared! Thanks!
June
I can’t wait to plant some garlic this year! Thank you, DeannaCat for your non-intimidating tutorials! I have a lot of friends who are self proclaimed “plant killers” and have found so much success with your tutorials and recipes!
DeannaCat
I LOVE that! Sure, some people are more naturally a “green thumb” – but anyone can learn to tend to plants! They just need a little guidance… and more importantly, the courage to try, learn from experience, and keep going! 🙂
Nicole Novak
Perfect timing for this article! I just finished curing my garlic and was wondering if I could get an early start and replant some of my crop here in Northern CA. Traditionally I have planted in October/November. Hurray!! Also, as I was reading your fab article, I heard a rustling sound coming from my 🦋 butterfly 🦋 enclosure. First time ever, I had TWO Swallowtails emerge!! A beautiful pair that I hope will breed and produce more cats for me to raise.
Emily
Do you find that you have time to rotate another crop into that spot after harvesting garlic in the summer? I’m thinking about trying it this year, but not sure if I want to give up precious garden real estate 😉
DeannaCat
Do you mean another round of garlic… Or another veggie crop in general? Yes we always replant things when anything comes out of our beds – but we do garden year round here. If you mean, do you have time for a full round of tomatoes or peppers? Maybe not, starting that late. But you could totally grow fall crops behind them, like carrots, greens, beets, or the quickest of them all – radishes!